Amy Johnson CBE. – Herne Bay – Trail 44.

Not only is Herne Bay in Kent famous for the location of the World Air Speed Record and its strong links to Barnes Wallis and the RAF’s 617 Sqn, but it is also linked to a famous female aviator, one who set many world records before her mysterious disappearance over the North Sea.

In Trail 44, we continue with the famous people theme, and see how this corner of Kent saw yet another link to aviation, this time very under tragic circumstances.

Amy Johnson Statue

The life-size Bronze Statue of Amy Johnson in Herne Bay, Kent.

Amy Johnson is one of those names known the world over for her achievements in aviation, being the first woman to fly solo halfway around the world from England to Australia in 1930. This amongst numerous other flying achievements made her one of the most influential women of the 1900s.

She was born in 1903, at 154 St. George’s Road in Kingston upon Hull, in the East Riding of Yorkshire. The eldest daughter of John William Johnson and Amy Hodge, she was the oldest of four sisters. Her education took her through Boulevard Municipal Secondary School and on to the University in Sheffield, where she studied economics at degree level, before moving to London to start a new life after a failed relationship.

One Sunday afternoon while she was away from her office work, Amy travelled to Stag Lane Aerodrome in North London, where she was immediately captivated and enthralled by the aircraft she saw. Amy was determined she was going to fly, and even though flying was the preserve of the rich and famous, she persevered using money supplied by her father. She gained a number of certificates including a ground mechanics qualification and an aviator’s certificate before going on to gain her pilots “A” Licence, on 6th July 1929.

Ignoring the ridicule she was targeted with by the media, Amy began to fly, taking solo flights to her home town and across the United Kingdom.

Amy’s biggest challenge came when she decided to fly solo to Australia. Plotting the most direct route from England, she would cross some of the world’s most inhospitable landscapes, meaning she would have to be airborne for many hours at a time, with no accurate weather reports or radio contact with the ground. Fuel would be supplied en-route, and it was therefore imperative that she made each stop on time in order to achieve her goal. Before long, the ridicule stopped and the media began to take serious notice of what she was doing. They began to praise her, call her “Wonderful” and compare her to Charles Lindbergh.

On May 24th 1930, she finally touched down in her second-hand de Havilland DH.60 Gipsy Moth, an aircraft she had called ‘Jason‘. She landed in Australia, in a time that was sadly outside of the previous record set by the Australian aviator Bert Hinkler in 1928. Nevertheless Amy was still an aviation heroine, and was welcomed and revered across the world.

Now Amy really had the bug, and flying would become a series of challenges, each as daring as the last. A year later in 1931, she would fly with her mechanic and friend, Jack Humphreys, to Tokyo. Together they would set a new record from Moscow to Japan. Amy then fell in love with another pioneering aviator, Jim Mollison, in 1932, a relationship that bonded two like-minded people with a common interest, and they began many journeys flying together. But Amy, still determined to achieve great things, also continued with her solo efforts.

She set another record flying from London to Cape Town in 1933, and then flew across the Atlantic with her husband, being given a tumultuous reception in America. Amy and Jim then took part in the MacRobertson Air Race, a gruelling air race that took competitors from Great Britain across the world to Australia. Sadly, part way across, engine trouble forced the couple to retire from the race, much to their frustration. In 1936, just  six years after achieving her pilots licence, Amy undertook her last record-breaking flight when she flew from England to South Africa setting yet another new world record.

In the years before the Second World War, Amy turned away from record-breaking flights and began her own business ventures. She carried out modelling projects using her good looks and personality to model clothes by Elsa Schiaparelli, the Italian fashion designer, another prominent and influential woman of the inter-war years. But flying was never far from her heart and with the outbreak of war, both the draw to serve her country and to fly, were too much, and she joined the Air Transport Auxiliary service In 1940.

Ferrying aircraft around the country, Amy dutifully carried out this work until January 5th 1941. On this day she was asked to take an Airspeed Oxford from Blackpool to RAF Kidlington, in Oxfordshire.

Sadly, Amy and her passenger never made their destination. For some reason Amy was flying way off course, over the east coast of England rather than down the west coast or across central England, bot more direct routes. Over the North Sea, a few miles off-shore of Herne Bay, an aircraft was heard, and a parachute was seen falling from the snowy sky. A ship, HMS Haslemere raced toward the downed crew but even after frantic searches, neither of them could be found. The commander of HMS Haslemere, Lt. Cmdr. Walter Fletcher, himself dived into the icy waters to search for survivors, but he couldn’t locate anyone, and sadly perished as a result of the extremely cold water. For his bravery and determination he was posthumously awarded the Albert Medal, an award given for extreme acts of gallantry, and the highest honour until the introduction of the George Cross in 1940.

Shortly after, personal items belonging to Amy along with parts of her aircraft were washed up on the nearby shores, strengthening the argument that it was indeed Amy’s aircraft that had come down.  However, why she was flying where she was, and how she died, both remained a mystery, as does the whereabouts of her Airspeed Oxford aircraft.

Conspiracy theories were not slow in forthcoming. Ranging from secret missions to a victim of friendly fire, secret agents and covert operations were all banded about. Sailors on board HMS Haslemere believe she was sucked into the spinning propellers of the ship, a claim that is certainly plausible but not as yet substantiated. The exact cause why she was so far off course and what caused her aircraft to crash has never been satisfactorily identified and continues to remain a mystery to this day.

A vast number of plaques, buildings and statues have been dedicated in Amy’s honour, Schools and public buildings have been named after her, even aircraft have been called ‘Amy Johnson’ after the intrepid flyer. Her portrait has been displayed on tail fins and her home town of Hull have dedicated a number of structures and buildings to her, and the corridors of educational establishments resonate to the sound of her name.

In Herne Bay, a life-size bronze stature was erected and unveiled jointly by HRH Prince Michael of Kent and Tracey Curtis-Taylor (a modern-day aviator herself embroiled in media attention) on 17th September 2016 to mark the 75th anniversary of Amy’s untimely death. A bronze statue, it was designed by Stephen Melton, and sponsored by a number of local and national businesses.

Nearby to the statue is a wooden bi-plane bench, also as a commemorative feature not only to Amy Johnson but all those who served in the Air Transport Auxiliary Service during the war.

There has been much written about Amy Johnson’s life, her achievements and the records she set. She was indeed a remarkable woman, one whose determination proved that dreams can come true, and one whose dramatic life was tragically taken away from her at such a young age. She achieved many, many great things and is a superb role model to all, especially to women and aviators alike.

The Amy Johnson Arts Trust has a wealth of information about Amy and her links to aviation. Their website is worth visiting.

RAF Macmerry – The darker side of war.

After visiting both RAF Drem and RAF East Fortune in Trail 42, we travel a few miles south, back to the A1 road where we visit another disused and almost lost RAF airfield. Initially used as a Landing Ground during the First World War, it struggled to become a fully fledged airfield but it did operate a small number of squadrons under RAF control. One of these squadrons had a rather sinister role to play and had Britain been invaded, then its name would no doubt be well-known and common place in history books today.

In Trail 51, we continue on in the south-eastern region of Scotland, not far from the historic city of Edinburgh, where we visit the former airfield RAF Macmerry.

RAF Macmerry (Tranent / Penston).

The former airfield at the small village of Macmerry is today split by the main A1 road, with the flying side of the airfield to the north and the technical and accommodation areas to the south. Sadly the active side has been completely removed and is now agricultural land, but on the technical and accommodation side there are fortunately still a small number of buildings remaining, albeit in private use today.

RAF Macmerry is located some 14 miles east of Edinburgh, its origins extend back to the First World War when it was known as Penston. Used by No. 77 Squadron who were initially based at Edinburgh, it was a Home Defence Landing Ground housing a squadron detachment until the entire unit moved over in April / May 1918, when the Royal Flying Corps became established as the Royal Air Force. No. 77 Sqn were well-known in the area, having detachments based at nearby Turnhouse and also at New Haggerston and Whiteburn. The squadron had been based at Edinburgh since October 1916 after moving there from Thetford in Norfolk, shortly after their inception. During their time at Penston, No. 77 Sqn operated a number of Royal Aircraft Factory types: the BE.2c, BE.2d and BE.2e, the BE.12 and BE.12b along with the D.H. 6 and RE. 8.

RAF Macmerry

One of many buildings that remain on the farm today.

Even though No. 77 Sqn moved into Penston full-time, they did retain a detachment at Whiteburn, an arrangement that continued until 13th June 1919, when the squadron (now Royal Air Force) was finally disbanded. No. 77 Squadron would go on to be reformed in 1937, just prior to the outbreak of the Second World War, but they would not return to their roots, and would never again appear at the airfield at Macmerry. After 77 Sqn’s departure from Penston, the RAF had no need for the site, and so the airfield was closed and the site sold off.

The 1920s and 30s then saw a short reprieve for Macmerry as aviation became fashionable. The Edinburgh Flying Club established itself here, and the Scottish Motor Traction (SMT) organisation put forward plans for a new major airport here at Macmerry. Established in 1905, the SMT was an established bus company who also provided an air taxi service flying a De Havilland Fox Moth between 18th July and 31st October 1932. Although these ambitious development plans never came to fruition, Macmerry (referred to as Edinburgh) was used for a short period between 1936 and 1939 for commercial air travel by North Eastern Airways.

North Eastern Airways (Copyright Bjorn Larsson)*1

After war broke out the RAF were looking to expand their airfields around the UK, and the border regions of Scotland were soon under the spotlight. The Air Ministry identified Macmerry and decided in July 1940, to rename Macmerry as Tranent after the nearby town. However, and even after the official requisition later on, this name change never appeared on any but a handful of official documents and the name Macmerry stuck.

It was around this time too that the Cunliffe-Owen company, a civilian aircraft manufacturing company, began operations at the airfield repairing Lockheed Hudson aircraft. Cunliffe-Owen was set up by the millionaire Sir Hugo Cunliffe-Owen on August 9th 1937 under the name of BOA Ltd, changing it later in 1938, to Cunliffe-Owen Aircraft. Utilising the First World War hangar at Eastleigh in the former county of Wessex, they would be famous for their investigations into the ‘Flying Wing’ project. Cunliffe-Owen also formed a contract with Lockheed Aircraft and began assembling Hudsons along with a large number of other American aircraft imported into the UK for RAF service.*2

On September 2nd 1940, No. 263 Squadron moved into RAF Drem, located about 6 miles north-east of here, and used Macmerry as a satellite airfield, even though the RAF had not officially taken over the site. Regardless of this, the Westland Whirlwinds they were flying, did occasionally use the airfield along with another satellite at Prestwick way off to the west.

In January 1941, Macmerry was officially requisitioned and would come under the control of 13 Group Fighter Command, with the first aircraft arriving very soon after. The Hurricane Mk.Is of 607 (County of Durham) Sqn would stop off here between January 16th and March 2nd 1941, before joining the main squadron also based at RAF Drem. No. 607 Sqn were veterans of the Battle of Britain, and would go on to be the first Squadron to operate the ‘Hurri’ bomber, a Hawker Hurricane fitted with bombs.

As they departed Macmerry, a second unit arrived, No. 614 (County of Glamorgan) Squadron, who were a pre-war squadron and would operate Lysander Mk.II and Mk.IIIs before replacing these with Blenheim IVs in July 1941. After a short spell away at Thruxton, No. 614 Sqn returned to Macmerry for a few days before departing for the final time at the end of August 1942. Flying with the squadron code ‘LJ’, it was these Lysanders that had a rather sinister role to play, and one that was perhaps unique along this coastline of Scotland.

Westland Lysander Mark III, ‘LJ-P’ of No. 614 Squadron RAF Macmerry, on a photographic-reconnaissance flight (IWM H 9183)

First impressions of Macmerry were not positive for crews, a small hangar and a flying control building were about all that greeted the men. There were no accommodation facilities and airmen were billeted in the homes of local families. Runways at this time were grass (1 x 1,500 yards and 2 x 1,200 yards), whilst the perimeter track was tarmac, a feature that would not change for the duration of the war.

By the summer months accommodation on the airfield was finally available (sufficient for around 1000 personnel of mixed rank and gender) and the whole of No. 614 Squadron moved into Macmerry. Work continued on the remainder of the airfield infrastructure, including six hardstands each holding two-twin engined aircraft in a ‘Blenheim’ style aircraft pen. Otherwise know as type ‘B’ (designed to drawing 7151/41) they had cranked sides and staggered entrances. Each of these had a shelter built into the revetment sufficient to hold 25 men. Eight Blister hangars and a T2 were also added at some point, along with a range of technical buildings.

Working under the control of the Royal Air Force Army Co-operation Command, No. 614 Sqn’s Lysanders were to monitor and patrol Scotland’s east coast, and in the event of an invasion, they were to contaminate the beaches with Gas (possibly Mustard Gas even though this was banned in the 1925 Geneva Protocol) using the vast stocks they had at Macmerry airfield. A lethal substance, it was never thankfully used and was disposed of later on. Much of the information about this has only recently come to light, but according to Operational Record Books*3 gas attacks were something that were rehearsed on many occasions.

Whilst No. 614 Sqn were based here at Macmerry, they performed regular operations with Army units, detachments from Macmerry flying to the Fleet Air Arm airfield at Arbroath where they would carry out photo reconnaissance, simulated dive bombing and these aforementioned gas laying operations. These operations (e.g. ‘FORFAR’, ‘HOPE’ and ‘JOHN’) were carried out in conjunction with various army divisions, with RAF support staff and  equipment (including Bowsers) being taken by road to the detachment airfield. In many cases, the crews and ground staff from Macmerry would be housed in tents supplied by the various army brigades and they would be fed by the Royal Navy, something that the more senior officials within the RAF wanted to stop.

During these exercises, Lysanders would drop messages to ‘message stations’, these message stations would be viable targets for the ‘enemy’ aircraft (bomber sorties being performed by other Lysanders, Spitfires or Miles Masters) and therefore the diligence of those inside was of the utmost importance. Following a review of the first of these operations, this key point was noted in the ORB, in which it was pointed out that  “…only intelligent men should be employed, and the same men, if possible, should do the duty on all occasions.

During August 1941 a detachment of Tomahawk IIA aircraft were to join No. 614 Sqn here at Macmerry. These aircraft were operating with No. 241 Sqn, who were primarily based at RAF Wattisham, but had detachments already at Snailwell, Henlow and Docking and now at Macmerry.

In March 1942 these Tomahawks were replaced by the North American P-51 Mustang Mk.I, an aircraft designed in response to the need for a long-range fighter with outstanding capabilities. Designed by a German born designer, Edgar Schmued, it would become one of, if not the, Second World War’s most successful fighters, especially after it had the Rolls Royce Merlin replace the weaker Allinson. As well as an increase in top speed of around 50 mph, it out performed the Allinson in all other categories including rate of climb and performance at altitude. By May 1942, No. 241 Sqn and their new Mustangs would all depart Macmerry for pastures new at Ayr. However, and not before too long, 241 Sqn would return to this part of the country, spending a short time at RAF Winfield in the border regions working in cooperation with 4th Medium Regiment, Royal Artillery.

It was during May that No. 225 Sqn moved to Thruxton  whilst also having a detachment based here at Macmerry, and once again the Mustang Mk.I would be back in the skies over this small Scottish village. The entire squadron would move onto the airfield at the end of August and would stay until the end of October when they would depart for North Africa taking their Mustangs with them.

By late summer 1942, the accommodation, hangars and major facilities were all now complete and open, the site was now ‘modern’ and homely, engineer’s workshops, allowed for maintenance of the aircraft, and aircraft pens offered protection to both the airmen and aircraft in the case of Luftwaffe attack.

RAF Macmerry

One of the ‘B’ type aircraft pens surviving at Macmerry today. The brick structure to the right is the entrance to the built-in shelter.

By August 1942, No. 614 squadron were to pull out moving to RAF Odiham where they replaced their aircraft with Blenheim Vs. Their place at Macmerry being taken by No.13 Sqn flying Blenheim IVs. Their stay would, like many of their predecessors, be a short one, another ex Lysander user, they only stayed here for about 10 days before they too moved off to Odiham and onto North Africa.

The November would then see the last operational flying until arrive at Macmerry, and they would be the longest-serving unit to stay here. At the end of November, on the 21st, No. 63 squadron would arrive bringing  with them further Mustang Mk.Is. The main block of the squadron would operate from Macmerry whilst detachments would be placed across the length and breadth of the country at Lossiemouth, Odiham, Dalcross and Acklington. Many of the sorties flown by No. 63 sqn were photographic reconnaissance missions, using F.24 (8″) cameras installed on the port side of the fuselage directly behind the cockpit. Because of the open landscape and close proximity to the coast of the airfield, many sorties flown from here were hampered by high winds and the impending Scottish cold, something that brought discomfort to the may crews who were stationed here at some point.

A  No. 63 Squadron Mustang Mk.1 dropping a message bag (off to the right) during an Army co-operation exercise (IWM)

Originally reformed in the summer of 1942, No. 63 Sqn moved here from Catterick, and stayed until July 1943 when they departed to Turnhouse, leaving only a detachment here at Macmerry. In November, the entire squadron then moved off to Thruxton leaving the airfield at Macmerry behind for good.

Other than a handful of Lysander target tugs and glider trainers, flying wise Macmerry would then fall quiet, the sound of aircraft engines being replaced by the thud of marching boots. During the winter of 1943, Operation ‘Fortitude North‘ was put into place, an operation to fool the Germans into thinking the impending invasion would occur across the North Sea. Macmerry would see a huge influx of army personnel, from No. 2736, No. 2830 and No. 2949 Regiment Squadrons, who would take to the mountains sending out false signals that would be picked up by German intelligence. These groups stayed here for a number of months until moved south for the real  invasion across the English Channel. So successful was the operation that German forces failed to pull vital units away from the Norwegian coastal areas for fear of an impending Allied attack.

RAF Macmerry

Much of what is left is rundown but in use for storing farm machinery.

In the months after the D-day landings, the RAF began to shrink as the need for fighters and heavy bomber began to lessen. The closing stages of the war were near and the fight was well and truly over German soil. The Fleet Air Arm (FAA) however were still expanding, preparing for what was going to be the invasion of Japan. To this end they needed more airfields to train pilots and crews to meet this demand. The Air Ministry considered giving the FAA Macmerry airfield to use, primarily as a repair yard, but, and whilst the offer was accepted, it was never actually put into practice. The FAA also considered stationing No. 770 Sqn FAA here, a Fleet Requirements Unit, whose role was to provide target tugs, simulated attacks on vessels and other gunnery roles. This too however, never actually came to fruition, and whilst the FAA had renamed the airfield H.M.S. Nighthawk II in preparation (Drem being re-designated H.M.S. Nighthawk) they handed Macmerry back to the RAF on March 15th 1946 without ever actually placing a man through its gates. With the war over for the second time, the RAF had no further use for Macmerry, and it was closed down very soon after.

With the airfield abandoned, the Edinburgh Flying Club seized the opportunity to get back into Macmerry, and on August 31st 1946, they reopened the airfield and began to operate from its runways again. They continued to operate here until 1953 when flying finally ceased and Macmerry closed its gates for the last and final time.

After this the site was sold off, the main A1 was eventually built and then later extended into a dual carriageway. As a result of the new road the airfield was split, and the active side developed as farm land. There are suggestions that additional hardstands were provided on the perimeter track on this side, but any sign of these seem to have gone along with the flying side of the airfield. In addition to this, the hangars on the northern side have also been removed and replaced by a rather large grain store.

The accommodation and technical sites were then turned into a small industrial park, the land adjacent to this, being returned to farm land. It is on this land that many of the accommodation buildings have been retained being put to use by the farm to house farm machinery and produce. The WAAF site buildings were demolished but the squash courts and gym both remain today.

RAF Macmerry

The squash court at Macmerry.

The road from the A1 circumnavigates the entire site and it is from this road that the best views can be obtained. From the main A1, the first stop is at the two revetments, which remain sandwiched in between this side road and the main A1. Hidden from view of the A1, they are discernible from the side road and are in remarkably good condition for their age. In a small triangular section of ground, there are several structures here, including the aircraft pens and crew blocks.

The industrial site visible just off to the left of this road is what was the main technical area of the airfield. The modern warehouses and industrial units having replaced the technical buildings that were once thriving RAF workshops.

Continue on and take a left turn. This takes you past the former accommodation sites and the location of the majority of surviving buildings today; long halls with their chimneys which were once the centre of life at Macmerry. Following this road to the left then takes you past the Gym and Squash Courts, passed the accommodation area and back to the A1 and away from the airfield.

The former airfield RAF Macmerry went through a number of changes during its life, and although it has a history dating back to the First World War, it is one of those airfields that never really seemed to establish itself as a front line airfield. The number of squadrons who passed through here also brought a range of aircraft types, giving Macmerry a varied and interesting mix of models. That said, Macmerry had a dark side to it, and had the invasion of Britain come through Scotland’s borders, then Macmerry would no doubt be a name at the forefront of Britain’s history books today.

Sources and further reading.

*1 Timetable courtesy of Bjorn Larsson via Airline Timetable Images Website.

*2 Phipp, M., ‘Wessex Aviation History‘, Amberley Publishing 2009, e-book accessed 24/4/18.

*3 AIR 27/2122 National Archives.

AIR 27/587/1 National Archives.

The East Lothian at War website gallery has a number of photos taken at RAF Macmerry during the war and is worth a visit.

The Development of Britain’s Airfields (Part 8).

In this, the last of the series looking at the development of Britain’s airfields, we look at the Watch Office, perhaps the most atmospheric of buildings associated with Britain’ wartime airfields. The hub of an airfield control, it was where aircraft were counted out and back, where the battle was monitored and the cries of those who fought in the air war were heard.

Though only a recent addition to airfield architecture, it developed quickly and became one of the technologically advanced offices in the world.

Watch Offices.

The Watch office, Watch Tower or in American terms Control Tower, was the centre piece of any airfield, the place in which all operations were controlled. Even today, the control tower is the one feature that stands high above the rest of the airfield with commanding views across the entire site.

Many of these watch offices remain today, some as fabulous museums, some as private dwellings, but many are sadly derelict or even worse – gone altogether. This that do survive create a haunting and evocative feeling when seen from inside.

Thorpe Abbotts Museum

The beautifully restored Thorpe Abbots Watch Office (design 15683/41).

Unlike hangar development, the watch office appeared quite late in the development of the airfield, only really coming into being as war seemed inevitable. Before this, a rudimentary office was often all that was used, usually attached to the side of the main hangar, and was used to ‘book’ aircraft in and out. But by the mid war period the watch office had become a major structure on the airfield, a standard design (depending upon the airfield use) with two or more floors and often a ‘glass house’ for observation purposes.

For obvious reasons the watch office was built away from other buildings with clear sight over the entire airfield, an important aspect if controllers were to keep watch on the many aircraft that were moving about the airfield space. A vital asset to the airfield it was often targeted by marauding bombers, and in the case of attack, the controllers within would relocate to an emergency battle headquarters, hidden at ground level on a remote part of the airfield, but still with views across the site.

The basic watch office was often adapted rather than demolished and rebuilt, this can and does, cause great confusion as to its design origin. Further more, on some sites, the original was abandoned but not demolished, and a new office built elsewhere on a nearby site, thus giving rise to two offices on the one airfield eg. Matlask and Martlesham Heath

The Watch Office as we know it was first seen on military airfields in 1926 and resembled a small bungalow with bay windows. Those constructed on bomber bases would be slightly smaller than those on fighter bases, a fighter base office having a pilots office attached. The idea behind this was to keep pilots as close to the airfield  control centre so they could quickly be scrambled and report back to the airfield controller on their return. These early design were found on airfields such as Bircham Newton in Norfolk, Hendon and Tangmere and were all built to the same  basic 1926 drawing design only modified to take the extra pilots room.

The standard shape of the World War 2 Watch Office stems back to the mid 1930s, with the introduction of a two-storey building that was square in design. Like similar buildings of its time, it was brick, a building material that was replaced with concrete, in 1936.

RAF West Malling Control Tower under refurbishment

West Malling a 5845/39 design which is now a coffee shop.

By the end of the expansion period, and with the introduction of hard runways, it was realised that the non-dispersed sites gave poor visibility for early watch offices, views across the airfields were not clear and so a quick remedy was called for. The answer lay in two choices, (a) demolish the current buildings  and rebuild it in a better location, or (b) add an extension. In many cases the former was the better idea and this progressed quite quickly, however, where the latter was chosen, remedial work required alteration of the building whilst it remained in use.

A further complication to these designs was the introduction of meteorological sections, which all new buildings erected at the beginning of the war now had. This gave a mix of design styles, enough though there was only a small selection of design drawings from which to work.

These late expansion period and early war designs introduced the idea of ‘viewing platforms’ or parapets, surrounded by safety railings along the front of the building. These deign also had very large glass fronted walls, bright and airy they allowed a lot of light to enter the building but gave cause for concern later on, when it was realised that a bomb blast would cause severed injury to the occupants in an attack. It was also found that during night operations, large windows were more difficult to black out and so smaller windows offered both better protection and greater ease of black out.

As building materials became scare, particularly wood and brick, concrete became the norm. This change also led to drawing changes even though the basic design inside and out, was the same.

In order to appreciate the changes to watch office designs, one needs to consider the different roles that airfields played during the war. Bomber Command airfields would have a differ office to a fighter Command airfield, which in turn, had a different office to a satellite or night-fighter station.

Thorpe Abbotts Museum

Watch Offices give commanding views across the airfield. (Thorpe Abbots).

The regional control stations where these first offices were being built were certainly getting the better choice at this time, standard fighter and bomber airfields having to use inferior designs that very soon became outdated and inadequate for the needs of the airfield.

During the massive building programme of 1941/42, there was some effort made to standardise all airfield Watch Offices, this resulted in the 1941 design drawing no. 12779/41. This was to be the basic airfield watch office design, with its parapet, six large windows to the front and outside access steps. As older airfields were brought up to Class A Specification, many had these new Watch Offices built to replace the older original ones. Some simply had adaptation of the original. Here the use of the airfield had a bearing on the watch office modification / design, and whilst the basic 12779/41 model was employed, slight variations did exist where the airfield was not a bomber airfield.

Therefore various adaptations of this did follow, examples of which include the slightly smaller 13023/41 (RAF Cottam), those with modified smaller windows 15371/41 (Kimbolton) and 343/43 (Martlesham Heath),  and the smaller Night-Fighter design 15684/41 (Winfield). Being a Night-Fighter station Winfield, had the same basic design but construction methods were totally different. This new design 15684/41, would become standard at all night fighter bases.

All these alternative designs appear outwardly very similar to the original, but differ mainly in window design only, although the physical size of some is different.

RAF Winfield

The Night-Fighter station Watch Office at Winfield (15684/41) is a similar design but smaller, having only four windows in the front.

This design, 343/43, eventually became the most common design for watch offices and appeared on all operational stations and Operation Training Unit airfields after 1943, using a set of six half-size windows across the front.

Tower (2)

The smaller windows of Parham (Framlingham) were half the original design size (12779/41 modified to 343/43).

A further addition was the glass observation room located on the roof of the Watch Office. These were generally only applied to Group control offices, and gave an excellent all round unrestricted view of the entire airfield. Examples that exist today, such as Framlingham above, are replicas but have been built to very high standards.

Former RAF Martlesham Heath

Martlesham Heath is a similar design to Framlingham (modified to 343/43) – Note the runway heading board on the roof.

At the end of the war some airfields such as Sculthorpe and West Raynham had their Watch Offices modified as they changed roles to Very Heavy Bomber Stations. This new design 294/45, improved on former buildings as a complete new design based on a steel frame with precast concrete floors. It had an extra floor added and then the octagonal ‘glass house’ or Visual Control Room with slanted glass to reduce glare.

Control Tower

Sculthorpe’s modified tower gives 360 degree views over the airfield. A three-story block it utilises the former World War 2 Watch Office.

The Watch Office has been the hub of airfield command and control since the mid 1930s, it has developed from the humble shed to a multi-functional technologically advanced building dominating the skyline of the airfield today. Sadly though, many are now gone, and of those that are left only a few remain in good condition or open to the public.

Summary

The war-time airfield incorporated numerous building designs and shapes, certainly far too many to cover here, the wide variety of technical buildings, synthetic trainers, parachute stores, headquarters and general stores, all changing as the war progressed.  The design and materials used in these structures was as varied as the designs themselves. But as the RAF grew so too did the airfields they used. The runways, the hangars, the technical buildings and accommodation sites have all grown alongside. Sadly many of these buildings have now vanished, but the process and speed at which they developed has been unprecedented. From humble grass strips with wooden shacks to enormous conurbations with numerous buildings, they have become iconic symbols representing decades of both aviation history and human sacrifice.

The entire page can be viewed separately:

Part 1 – The Road to War.
Part 2 – The Expansion Period and airfield development.
Part 3 – Choosing a site.
Part 4 – Building the airfield.
Part 5 – Airfield Architecture.
Part 6 – Runways and Hardstands.
Part 7 – Hangars and aircraft sheds.

or as a whole document.


RAF Thorpe Abbotts – home to the ‘Bloody 100th’.

There are few Bomb Groups who got through the war unscathed. Some earned notable awards, many earned notable nicknames. There are none more though than that of the 100th Bomb Group of the United States Air Force, a groups of men who fought in many of Europe’s most fearsome air battles, suffering many great loses but also achieving great successes.

In this review of Trail 12 we look again at the airfield at Thorpe Abbots, and the history behind the derelict buildings and the concrete remains, we see how the 100th BG earned themselves that most unsavoury name ‘The Bloody 100th‘.

Thorpe Abbotts (Station 139).

Opened quite late in the war, (April 1943), Thorpe Abbots would only be active for a short period of time. But during these months, it would be home to one major air group, the 100th BG of the US Eighth Air Force, who would gain the unsavoury name ‘The Bloody 100th’. Their legacy would become well-known, it would be a legacy connected with death and destruction, and would be one that would live on for many years, even after the cessation of conflict in Europe.

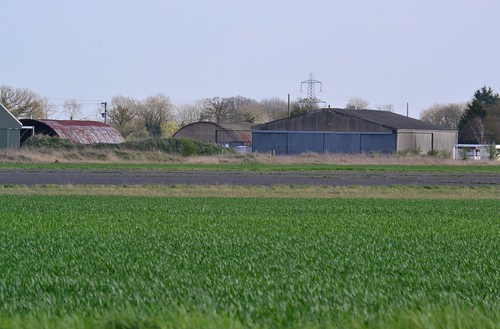
The first units of the 100th BG would arrive in June 1943, and would operate continuously here until the cessation of conflict in 1945. The site would never see any further action after this, being returned to the RAF who retained ownership until its final closure in 1956. Now totally agricultural, it boasts a superb museum as a memorial to those who gave so tragically flying with ‘The Bloody 100th’.

Thorpe Abbotts Village sign

Thorpe Abbotts Village sign

The 100th’s name developed as a result of losses sustained by the group, which in actual fact were not significantly worse than any other Bomb Group of the US Air Force at that time. However, throughout their 306 operational missions over occupied Europe, 177 aircraft along with 700 lives were sadly lost in what were some of the most difficult and terrifying air battles of the Second World War.

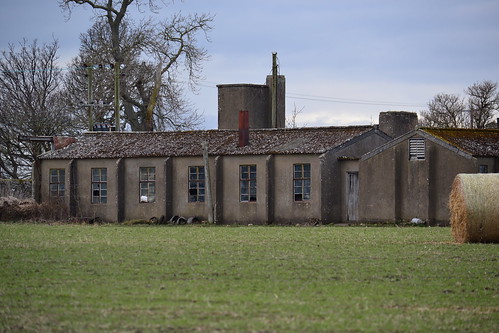
Designated Station 139, Thorpe Abbots was built to Class A specification, with three concrete and woodchip runways in the form of an inverted ‘A’, with the cross of the A being the main runway running east to west. Being a bomber base it had 36 pan style hardstands and 16 spectacle hardstands around the perimeter. Maintenance was carried out in two T2 hangars (a type A to drawing 8254/40, and a standard T2). The technical area, accommodation areas and even the bomb store were very unusually all nestled close together in the south-western corner of the site, giving the whole airfield a  compact feel.

With two communal sites, six airmen sites, two WAAF sites, a sick quarters and sewage works, it was a large accommodation area capable of holding 3,000 men and women of mixed ranks. All the accommodation areas used a range of standard huts, Nissen, Romney, Seco, Thorn and Orlit, all of which appeared on site.

Being a large base, it was, like many of its counterparts, a little town in its own right, with a barber’s shop, a cobblers, grocery store, a gymnasium and squash courts. It also had an on site plumbers, a cement store and a carpenter’s shop.

Although the journey of the 100th started with the activation on June 1st 1942, little occurred until later that year, when the collection of 230 enlisted men and 26 Officers arrived at Walla Walla, Washington, under the guidance of the Group Adjutant Cpt. Karl Standish. He began to organise the cadre into something worthwhile, and as more men arrived the ranks began to swell and the 100th began to take shape. The four squadrons: 349th (led by Cpt. William Veal), 350th (Cpt. Gale Clevan), 351st (Cpt. John Kidd) and 418th (Cpt. Robert Flesher), formed bonds and very quickly, and very soon after, the air echelons would begin to arrive, bringing with them brand new ‘straight out of the factory’ B-17Fs.

Thorpe Abbotts Museum

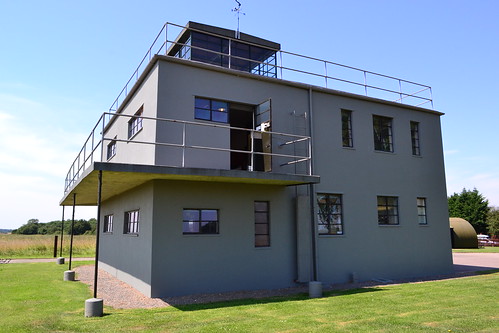
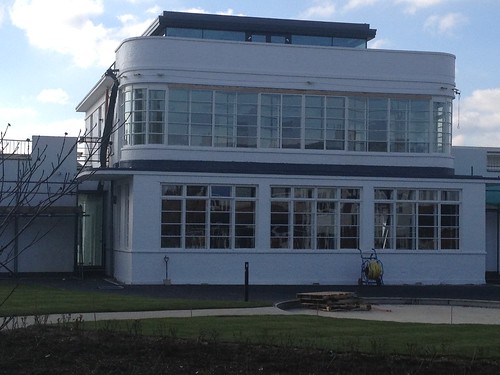
Thorpe Abbotts Control Tower now a museum to the 100th BG.

Their next move came at the end of November with a move that took them to Wendover Field, Utah, followed by, Sioux City and then Kearney Air Base in Nebraska, their final major US base before leaving for the UK in May 1943.

After the ground and air echelons split for their transition, the air echelons flew to bases in Newfoundland, where they departed across the northern route to Prestwick at the end of May. The ground echelons then  carried out ground training before departing on the “Queen Elizabeth” on the 27th May, many men being confined below decks because of the overcrowding on the upper decks.

The Queen Elizabeth finally made Greenock, and the men began unloading, the transition from the US to the UK being a shock to many as they clambered aboard the small ‘box cars’ size trains. That night they arrived at Poddington, their first base, and following a poor night’s sleep they received their initial introduction into the British way of life.

The 100th’s arrival at Thorpe Abbotts was not a pleasant one, the base was unfinished, accommodation was lacking and overcrowded, and food supplies were poor to say the least; this was not going to be an easy ride by any means.

Finally, in June, the air echelons began to arrive, the ground and air crews began to work on their machines, rehearsing, tweaking instruments and flying around the local area, until just after midnight on June 25th 1943, the order came through; they were to fly their first mission early that next morning.

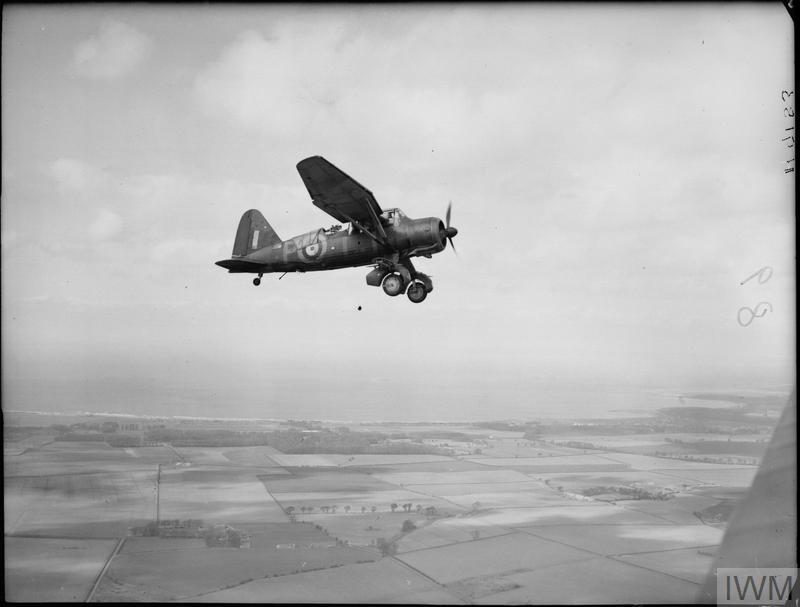
The 100th were the third B-17 group to join the Mighty Eighth, as part of the new and reorganised 4th Bombardment Wing, they would join with the 379th BG (Kimbolton) and the 384th BG (Grafton Underwood), both also B-17 groups.

On that morning the aircraft would depart Thorpe Abbotts at 06:00 hrs, and whilst flying out over the North Sea, the formation would be joined by another B-17, with no top turret and the letters ‘VGY’ painted on it. No-one knew what it was, or where it had come from, and suspicions quickly arose about its authenticity. The ‘alien’ ship remained with the formation up until the target at which point it departed and “all hell broke loose”. The formation consisting of these new recruits was ragged and the experienced Luftwaffe pilots took full advantage of this. Focusing on the low squadron first, they fired a barrage of explosive shells into the fuselage’s of the B-17s. That afternoon three aircraft and thirty airmen failed to return home to Thorpe Abbotts, the war had hit home, and hit home hard.

Robert H. Wolff’s crew. L to R Back Row: Ira Bardman, Alfred Clark, William ‘Casey’ Casebolt, James Brady, Arthur ‘Eagle’ Eggleston, Willis ‘Browny’ Brown . Front Row: Charles ‘Stu’ Stuart, Fredric ‘Buzz’ White, (aiming at the enemy) Bob Wolff, Lawrence ‘Mac’ McDonell. The photo was taken after Regensburg for publicity purposes. (@IWM FRE 905)

Over the next month, there were many aborted and scrubbed missions, this continued raising and dashing of hopes set the men on edge but what few missions they did fly, they manged to get through relatively unscathed.

The end of July 1943 saw the official hand over of Thorpe Abbotts from the RAF to the USAAF, with Sqn. Ldrs. Lawson and Bloomfield representing the RAF and Col. Harding the USAAF.

On August 17th 1943, on the anniversary of the Eighth’s operations from England, the men of the 100th sat in the briefing room awaiting the revealing of the target for the day. The anticipation however, was soon replaced with trepidation as the route map revealed a line that would take them deep into the heart of southern Germany, to the Messerschmitt plant at Regensburg. This would be no ordinary mission though, they were to not return to Thorpe Abbotts that day, but instead, they were to complete the first shuttle mission by the Eighth Air Force of the war, flying on to land in North Africa.

After an initial postponement because of mist, the green light was finally given and the aircrews started their engines. One by one they departed Thorpe Abbots toward the  skies above Germany. The 100th were in the unenviable position of ‘tail end Charlie’ being the low squadron at the rear of the formation. Added to this the 100th BG found themselves unprotected due to miscalculations in timing, and as unprotected ‘tail-end Charlies’, they were easy prey for the fearsome and hunting Luftwaffe. For two whole hours the defenders attacked from every possible angle, venting their determination on the lowly B-17s. The sky was littered with downed aircraft and falling wreckage. The B-17s were subjected to harrowing attempts to bring them down, air-to-air bombing from Ju-88s, and rockets fired from BF-109s just added to the mayhem of exploding cannon shells and bullets.

During this engagement B-17 #42-30311, piloted by Lt. Tom Hummel was attacked by Rudolf Germeroth in Bf 109G-6 of J 3/1. The aircraft was seen to explode and fall from the sky. The two waist gunners Ken O’Connor and Dick Bowler were killed whilst the remainder of the crew escaped the wreck and were taken prisoner.

Bombing over the target was accurate and reports sent back to England hailed the mission as a total success, The Messerschmitt factory being totally destroyed, and along with it unbeknown to intelligence, secret jigs for the manufacture of Me 262 jets. But the price had been high, of the twenty-one aircraft sent from the Thorpe Abbotts group,  nine had been lost and ninety men were either dead, captured or missing. Of all the groups who had taken part, the 100th had suffered the most, the lead group protected by P-47s coming off much more lightly.

The Regensburg mission would be a turning point for the 100th, their luck would run out and very soon they would earn themselves the unsavoury nickname ‘The Bloody 100th‘, a name that would stick with them for the duration of the war and beyond.

For their action in this mission, the 100th (and the entire division) would earn themselves a Distinguished Unit Citation (D.U.C.) an award now becoming a regular feature amongst the brave crews of the Eighth Air Force.

In the Citation, the Secretary of War, G.C. Marshall said:

“The 3d Bombardment Division (H) is cited for outstanding performance of duty on action against the enemy on 17th August 1943. This unprecedented attack against one of Germany’s most important aircraft factories was the first shuttle mission performed in the theatre of operations and entailed the longest flight over strongly defended enemy territory yet accomplished to this date. For 4.5 hours the formation was subjected to persistent, savage assaults by large forces of enemy fighters…

…The high degree of success achieved is directly attributable to the extraordinary heroism, skill and devotion to duty displayed by the members of this unit.”

During the September, the USAAF was reorganised again, the 4th Bombardment Wing now becoming the 3rd Bomb Division, 13th Combat Wing, a move that heralded little more than a change in aircraft markings. September would also be a notable month for other reasons. The mission on the 6th to Stuttgart would be a disaster for the USAAF, a deep penetration mission that saw over 400 aircraft combine in the skies over Germany. It was during this mission that B-17 #42-30088 ‘Squawkin’ Hawk II‘ would suffer from head on attacks by Luftwaffe aircraft who pounded the B-17 with 20 mm cannon shells. In the attacks the co-pilot (F/O. Harry Edeburn) was fatally wounded, the bombardier and navigator Lt. Peter Delso and Lt. Russ Engel were both severely wounded and the pilot, Lt. Summer Reeder was sprayed with metal as the nose of the B-17 shattered. With poor control and no oxygen, Reeder dropped the aircraft some 14,000 ft at an unbelievable rate of around 300 mph, before playing cat and mouse with the Luftwaffe fighters who were determined to finish off the damaged aircraft. By singing and telling jokes, the severely injured Reeder assisted by the badly wounded navigator, manged to reach England and without brakes or hydraulics, managed to put the aircraft down on a fighter airfield in England.

Squawkin Hawk II‘ would go on to become the first 100th BG aircraft to complete 50 missions covering a staggering 47,720 combat miles. She returned to the US in May 1944 where she was eventually sold for scrap.

After completing 50 missions, “Squawkin’ Hawk II” was covered with autographs before being sent back to the US for retirement and eventual scrapping.(@IWM FRE 4124)

During this disastrous mission many aircraft would run out of fuel, five made for Switzerland including ‘Raunchy‘ from the 100th BG in which Joe Moloney, the ball turret gunner, would be killed whilst trying to ditch. He would take the dubious honour of being the first US airman killed in neutral Switzerland.

It was also at this month, that the 100th would suffer another major blow and to rub salt into the wounds, they would not even get credit for it.

After a cancelled mission on September 24th 1943, the men of the 100th were raised from their beds for a practice mission over the North Sea, a ‘mission’ that would test their ability as Pathfinders. With bombs still in the aircraft from the morning’s preparations, skeleton crews and semi prepared aircraft took off from several bases across East Anglia.

They were to form up with P-47s over the Wash and then fly out over the sea and practice bombing. When a collection of aircraft appeared on the horizon it was assumed by the bomber crews that it was the friendlies arriving at last. The reality of it was sickening. Diving out of the sun Luftwaffe fighters from JG 3/II attacked the formation, rallying 20mm cannon shells in to the B-17’s wings and bodies. One aircraft, #42-30259 “Damifino II” piloted by Lt. J. Gossage crashed into the sea. Five crewmen were plucked from the water by Motor Torpedo Boats (MTB) hunting German ‘E’ boats, five men remained missing presumed dead.

Yet more difficult times lay ahead. The October raid to Munster saw only one of fourteen aircraft return home – 120 crewmen were missing in action that day. As aircraft were hit from head on, the formation split. Aircraft dodged falling debris and exploding B-17s as rockets were launched at near point-blank range in a forty-five minute frenzy of slaughter.

This disastrous mission would see the tally of lost airmen rise to 200 in just one week, the loss could not be hidden and Munster would simply add another black chapter to the already darkening book of the 100th’s war. Even the one year celebrations at the end of October failed to cover the feeling of loss shrouding the base, a feeling as thick as the autumn fogs preventing flying from taking place.

Thorpe Abbotts Emergency operations block

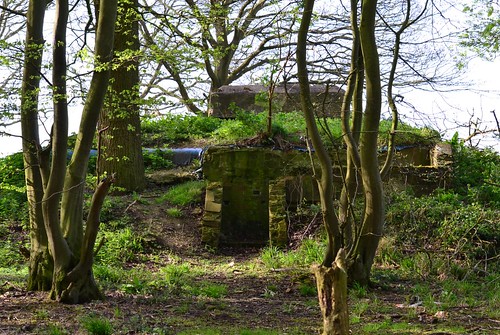
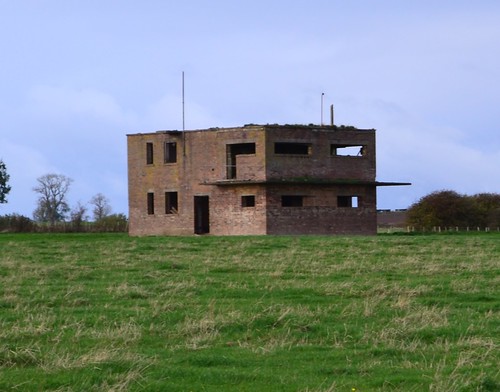
Ghostly reminders hidden amongst the trees. Thorpe Abbott’s Battle Headquarters.

The cold winter of 1943/44 saw more fog, rain and cold, the dismal weather allowing only a few missions to go ahead. But as spring warmed the ground, the softening of the German defences in preparation for Operation “Overlord” could begin. ‘Big Week’ of February 20th – 25th, saw the 100th in action again – Brunswick on the 21st. March saw another milestone etched in the annuals of history as the 100th took the war directly to the heart of Germany and Berlin. Over three days the 100th would target the German capital, the first on the 4th, followed by the 6th and then the 8th. The 4th would see the 100th achieve the first blood, shooting down their first German aircraft over Berlin.

Each attack brought new challenges. In the first mission the weather forced many aircraft to abandon the flight and return home, the 100th, persevering lost one aircraft that day. On the 6th, the loss was much higher, fifteen aircraft went down and then another single aircraft on the 8th; 170 men were missing from those missions.

For their action, the 100th would receive their second DUC, albeit a year later. In the General orders 3rd March 1945, No.14 it said:

“The 100th Bombardment Group (H) is cited for outstanding performance of duty in action against the enemy in connection with the initial series of successful attacks against Berlin, Germany, 4, 6, and 8 March 1944…”

For the remainder of the summer the 100th would attack oil fields. bridges, and gun positions. They would provide support at St. Lo and Brest in August. Marshalling yards would also come under the focus of the 100th, the Ardennes and the assault across the Rhine.

On 16th September 1944, a letter was sent by Major General Earl Partridge (U.S. Army) to the Commanding Officer of the 100thBG extending his gratitude to all the personnel at the station on their 200th mission. He concluded:

“Please extend to all Officers and Men on your station my appreciation for the outstanding work which they have done. Their achievements reflect the highest credit upon themselves and the Army Air Forces as a whole.”*1

As part of the celebrations a B-17 was sent to London to collect a “huge supply of Whisky and Vodka”, no doubt a considerable amount was consumed that night.

Eventually the war would come to a close and the 100th perform their last mission on April 20th 1945. They would lick their wounds and prepare for a well-earned return to the US.

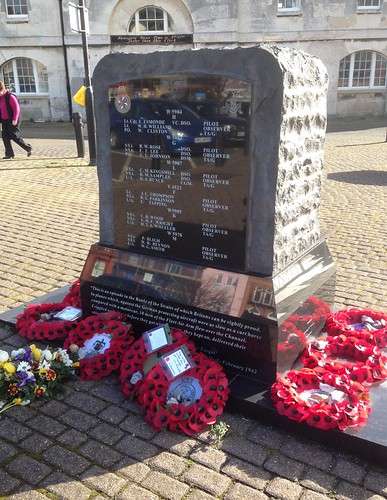
By the end of its war-time operations the 100th BG had flown nearly 9,000 sorties, in over 300 missions, dropping over 19,000 tons of bombs. They would be credited with the destruction of 261 enemy aircraft, with another 240 damaged or probable. They earned two DUCs and the French Croix de Guerre with palm. Far from being the worst in the 8th Air Force, the 100th’s reputation for accuracy, and overall low operational loses made it one of the most outstanding Bomb Groups of the Air Force.

Finally leaving in December 1945, the 100th would eventually return to serve over the skies of the UK once more as the 100th Refuelling Wing based at nearby RAF Mildenhall.

After the 100th departed, Thorpe Abbots was returned to RAF ownership, no further military flying  took place and the site remained inactive. Eventually in 1956 the airfield was closed and the site then sold off to private ownership. Many of the runways and perimeter tracks were removed for hardcore, and the buildings fell into disrepair.

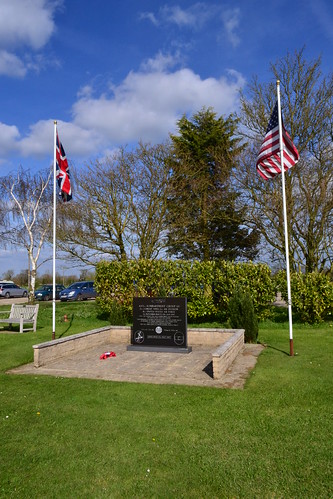
Today, the site houses a museum utilising the old original control tower and a small number of other buildings. Tucked neatly away amongst the beautiful countryside of Norfolk, this museum is more than worthy of a visit.

Thorpe Abbotts Museum

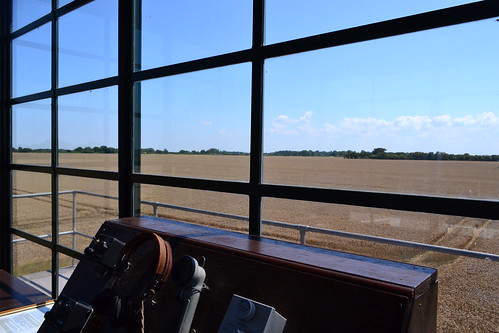
The Tower has Commanding Views.

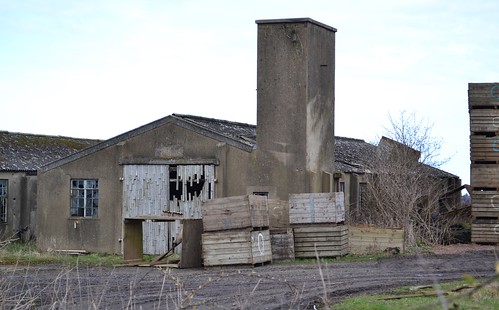
Visible remains of the airfield are restricted to mainly perimeter track, but remnants can be found with a little effort. In the woods to the east of the tower, buried in amongst the undergrowth, are the remains of buildings including the Battle Headquarters  which would have commanded excellent views across the field in the case of attack.

The perimeter track has been partially utilised and turned into road, from which larger sections can be seen. A number of admin blocks, stores and a range of accommodation buildings are now engulfed by trees and vegetation but still survive and are all very much on private land.

Thorpe Abbotts Museum

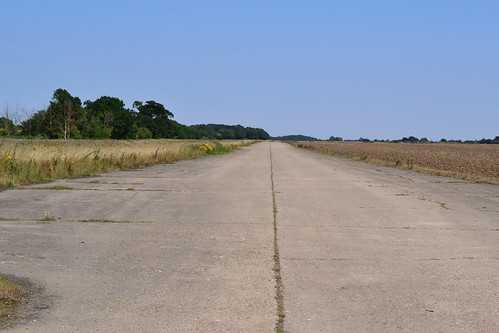
Remnants of the perimeter track at Thorpe Abbotts.

Whilst many buildings remain hidden away, the dedication of a few volunteers keep the memories and lives of those who gave so much alive, and enable the history of Thorpe Abbots airfield to continue on for future generations.

Sources and further reading. 

*1 100th BG Quartermaster Log via their website August 2019.

Freeman, Roger A. “The Mighty Eighth” (1986) Arms and Armour

Arnold, Henry. H., “Contrails, My War Record: A history of World War Two as recorded at U.S. Army Air Force Station #139, Thorpe Abbots, near Diss, county of Norfolk, England” (1947) World War Regimental Histories Book 194.

Further details of the 100th BG and information about the museum can be found on the museum website.

The Development of Britain’s Airfields (Part 3).

In Part 3 of this series, we turn from the political scene of Part 2 and look at how airfields were identified, The process and methodology of airfield selection.

Choosing a site.

Choosing an airfield site during these prewar periods was especially difficult as there were many ‘unknown’ factors to predict, a factor in itself that helped determine the needs of each of the various schemes mentioned previously. However, there were a number of airfields already in situ, some used by the military and some used by civilian aviation. As remnants of the First World War, many military sites were inadequate or inappropriate for the growing future needs of the RAF, but with some work, they could be developed into workable sites as the basic infrastructure was already there in place.

As well as these RAF sites, there were also civilian airfields, which the Government considered as potential military airfields. Because civil aviation had grown amongst the wealthier members of society, although not exclusively, this meant that in the pre-war period, there were some 90 airfields*4 owned either by local councils or under private ownership. Many of these were requisitioned by the authorities, but because many were small or located very close to built-up areas, (in 1928 the Air Ministry ‘encouraged’ towns of 20,000+ inhabitants to have a municipal airport), they were not suitable for modern fighter or bomber aircraft. As a result, many of these became training or maintenance sites, some linked to aircraft production facilities, but none were ‘operational’ for fighting units.

A further group of airfields in use at this time, were those of the AA (Automobile Association – better known as a motoring organisation). The AA Landing Grounds were often ex First World War sites located near to hotels and other places of interest to the motorist. Fuel was usually supplied at, or near to, each site, and each one was ‘tested’ by an aircraft on behalf of the AA before it was granted AA status. As these sites were registered, their locations were readily available to the Germans and so they were closed and rendered unsuitable for aircraft. However, land in close proximity was occasionally used, and so a new site would be created in a similar location.

With all these sites available, one would imagine choosing a site and developing it, would be relatively straight forward, but this is far from the truth. Many of these sites were inadequate, and the process of repairing/upgrading or rectifying it was simply not going to be sufficient. Therefore, many new sites were going to be required and the process by which a site was identified, acquired and then subsequently developed was not at all straightforward. In each case the Air Ministry Directorate (AMDGW) and Air Ministries Aerodromes Board would work in very close conjunction with numerous other Government departments and interested public bodies. These would include local Electricity Boards, Drainage Boards, the Geological Survey Department and the local War Agricultural Committee, who were concerned about flooding caused by run-off from the sudden building of large expanses of concrete.

In the first instance, using an ordnance survey map, areas that were below 50 feet above sea level or above 650 feet were generally ignored, the former being prone to flooding whilst the latter suffering high levels of low cloud or hill fog. Next a circle with a radius of 1,100 yards was marked off, this had to be flat with minimal rise in the ground layer. It also had to be free from obstructions and ideally at least three miles away from any other flying location. Next officers from the Air Ministries Aerodromes Board would walk the site, field by field, recording maximum landing distances, and noting any unidentified obstacles, trees, hedges, ditches or more permanent structures that would need removal.

By September 1939, board officials had identified, examined and recorded around 4,000 possible sites in the U.K. Many would be simply filed away never to see aviation of any kind, whilst others would become famous for years to come.

Once a suitable site had been identified and examined, the local geology had to be established where possible. In the pre-war years, no consideration was given to hard runways, they didn’t exist in any real form and were not seen as needed as any aircraft of that time could happily take off from a grass strip. However, in order to prevent aircraft wheels from bogging down, or flooding closing an airfield, well-drained soils were absolutely paramount.

Once the site had been accepted, the land was requisitioned, forcibly purchased using new powers created under the Emergency Powers (Defence) Act 1939. This gave virtually immediate access and ownership of the land – with little notice to the land owner – to the Government. These powers also saw their way to reducing the ‘NIMBY*5 effect, protests against developments being side-lined through political clout.

The next stage in the process was to put the job out to tender. The difficulty here was that secrecy was of the utmost importance, and so little of the detail was released other than an approximate location. As the war progressed, the number of construction companies involved became fewer, and those that were involved more established, prime contractors being Wimpey, Laing, Taylor-Woodrow and McAlpine – all of whom went on to be major construction companies post war. That said, no major airfield would generally be completed by one single contractor, as the whole process required a wide range of skills based operations. As one completed their task, another would come in, sometimes dual operations would be carried out simultaneously. For example taxiways and access roads may have been built by Tarmac, whereas the runway may have been built by McAlpine. Accommodation areas often used ‘Nissen’, or in many USAAF cases, ‘Quonset’ huts, many of these and other ‘standard’ buildings were erected by buildings contractors whereas other more substantial buildings may have been built by John Laing and Co.

By the outbreak of war, 100 sites had been purchased, as the number was relatively small, the board were able to be ‘particular’ in their choice, something that was quickly disregarded as the war progressed.

Airfields are highly labour intensive projects requiring an enormous workforce and extensive heavy machinery, little of which were available in the early 1940s. Irish labour provided the backbone of the initial workforce, whilst heavy plant came in from the United States. At its peak there were some 60,000 men employed on airfield construction, all of whom were unable to spend their time rebuilding the devastated towns and cities of the UK.

As the war progressed, the Royal Air Force Airfield Construction Service began taking a greater role in airfield construction, diversifying away from their original role as repairers of damaged airfields sites. There would be an initial 20 squadrons created to carry out these tasks, with a further 6 being formed later in the war. With squadron numbers ranging from 5001 to 5026, they would be initially involved in the updating of older sites and the creation of ALGs, eventually taking on a much greater responsibility of airfield construction. These squadrons, were of course given great assistance by the well established Royal Engineers.

In 1942, the United States joined the European theatre sending their own Engineer Aviation Battalions to the U.K. Their task was to support these British squadrons by building their own airfields ready for the huge influx of men and machines that was about to arrive. The first site completed by the Americans and opened in 1943, was Great Saling (later renamed Andrews Field) by the 819th engineer Aviation Battalion. Not being experienced in U.K. soils, it was a steep learning curve fraught with a number of initial problems.

Former RAF Andrewsfield

RAF Andrews Field memorial to the 819th Engineer Aviation Battalion.

In 1939 there were only 60 military airfields in the UK, by 1940 this had increased to 280, almost tripling to over 720 by 1945. Between 1939 and 1945 444 airfields*2,4 new airfields were built by these organisations – an amazing feat by any standard. Using almost a third of Britain’s total construction labour force, they were often open and manned within a matter of months rather than years. Building Britain’s wartime airfields was not cheap. Many, like Debach the last USAAF airfield to be constructed, cost almost £1,000,000 to construct.  A small amount compared to the £645, 000,000 it cost to build all 250 US airfields in the UK*5a

This whole process however was not fool-proof. In a number of situations sites were identified and requisitioned, but not developed. In several cases they were partly built, and in others like RAF Cottam, they were completely built but then never occupied. Some airfields were identified for USAAF use, only to be declined and then handed over to their RAF counterparts. Some US bases were never actually started but remained named and therefore official sites even though they remained as farmers fields!

The lead up to war led to a massive change in the British landscape. Keeping airfields secret led to many being built in remote areas and away from major towns. Little did the inhabitants of these quiet little villages know, but their population was about to increase, in some cases by thousands.

In the next section we look at how the airfield was built, the process of construction and the difficulties faced during this phase.

Sources and further reading. 

*2 Smith, D.J., “Britain’s Military Airfields 1939-1945“, Patrick Stephens Limited, 1989

*4 Francis, P., et al, “Nine Thousand Miles of Concrete, Historic England in Conjunction with the Airfield Research Group (ARG). pdf document Published 15/1/16 via website accessed 2/1/18

*5 NIMBY – Acronym used to describe the objections of local planning projects. (Not In My Back Yard).

*5a Wilson. K., “Blood and Fears – How America’s Bomber Boys and Girls in England Won Their War.”, Weiden & Nicolson. (2016)

The Development of Britain’s Airfields (Part 2).

In this series of posts we look at the development of Britain’s airfields and how they developed over the years. We move on from Part 1, and the “Road to War”, to look at the Political response to Germany’s build up and the development of the airfield. We focus on the expansion period 1934-1939, and the political moves that helped shape the airfields that are found in Britain today.

The expansion period and airfield development.

In this, the expansion period 1934-39, airfield development would become a prime factor in the RAF’s own development.  The driving force behind this was the need to increase the numbers of front line aircraft, both fighters and bombers, if Britain was to be able to match Germany’s growing armed forces and her desires over Europe. To this end, a number of schemes were created, each one building upon the previous through  adaptation of technological development, design improvement and political pressure. A continuation of updating meant that the face of the British airfield would change considerably from 1934 to the end of the war in 1945. This development would then go on post war as the world entered the jet age and nuclear deterrent.

Whilst many of Britain’s original airfields dated back to the First World War, the vast majority had vanished, (of the original 301 only 45 remained and of these 17 were civil*2) the rest being sold cheaply in the reorganisation of the post war RAF. Of those that did remain, many were poorly kept, the permanent huts that had been built were in poor condition and flying surfaces totally inadequate for the heavier aircraft that were envisaged.  Many of these airfields were located around London (including Biggin Hill and North Weald) and were built on a clay subsoil, a soil that holds water and led to numerous accidents as aircraft landed badly. The RAF began to apply pressure on the Government, but with no real direction, there was little hope of achieving anything more than lip service.

RAF Museum Hendon

Early biplanes formed the backbone of the interwar years.

The Government finally realising that change was needed, formed a new department, whose role of executing these new plans it fell to. The Air Ministry Directorate General of Works (AMDGW) under the control of Ernest Holloway, oversaw the process with the new Air Ministries Aerodromes (later Airfield) Board, being responsible for identifying the new airfield. The Lands Branch of the Air Ministry would purchase the land, and then the construction, development and maintenance would be carried out under contract, by civilian organisations, to the Air Ministry.

This process took airfield design through a series of successive alphabetically listed schemes commencing with ‘A’ (not to be confused with Class ‘A’ airfields that emerged much later in 1942) progressing through to ‘M’. Due to the rapid changes in these designs though, not all were implemented, many being absorbed into subsequent models before they could be administered. The future development and expansion of the RAF would be built-in to these schemes, restricted initially by the monetary cost of such a plan. But the overall  aim would be to build the RAF up to full strength within eight years (1942).

The key to these designs was continuity and replication. By creating a series of standard design drawings for everything from latrines to heating systems, hangars and runways, airfields could be ‘mass produced’ with ease, saving both time and money, which was paramount if the RAF was to be ready for the forthcoming war.

In essence, these schemes increased targets for aircraft numbers, including training facilities and airfield design:*2,3,4

Scheme A – (adopted in July 1934) is the scheme that set the bench mark by which all future schemes would develop, and called for a front line total of 1,544 aircraft within the next five years. Of these, 1,252 would be allocated specifically for home defence. This scheme was responsible for bringing military aviation back to the north of England, Norfolk and Suffolk, of which Marham (the first), Feltwell and Stradishall were among the first completed. These airfields were designed as “non-dispersed” (or compact) airfields, where all domestic sites were located close to the main airfield site, and not spread about the surrounding area as was common practice in war-time airfield designs. At this stage, the dangers of an air attack were not being wholeheartedly considered, and such an attack could have proven devastating if bombs had been accurately dropped. It was thought that by having personnel close by, airfields would run both economically and efficiently, and of course they could more easily be protected from ground forces.

Scheme ‘A’ would also introduce the idea of standard building designs, in which all new airfields (and older original airfields) would now be built to.

Scheme B – was never submitted to Government

Scheme C – adopted May 1935 following Hitler’s boast to Anthony Eden that the German Air Force had surpassed the RAF’s in number, a claim that has since been discounted. This would develop bomber bases within flying distance of Germany (notably Lincolnshire and Yorkshire), and proposed creating a further 70 bomber and 35 fighter squadrons accommodating 1,500 front line aircraft within two years.

Scheme D – was never submitted to Government

Scheme E – was never submitted to Government

Scheme F – replaced Scheme ‘C’ and was approved in March 1936. Scheme ‘F’ expanded the defence force, further increasing front line numbers to 1,736 with a foreseeable number of 2,500 by 1939. This scheme saw the creation of additional factories in close proximity to the already adopted car manufacturing plants in the industrial midlands. A move that was intended to assist with the supply of new aircraft and aircraft components. Such was the industrial output at this time that Aircraft Storage Units (ASU) had to be specially set up utilising land on already established Flying Training Schools. These ASU stations would be specifically created to assemble or disassemble aircraft for transport to fighter bases, either within or outside of Britain. Scheme ‘F’ would also create further new front line airfields, examples including: Debden, Upwood, Scampton and Dishforth, with further updating being implemented at previously built airfields.

Scheme G – was never submitted to Government

Scheme Hreached proposal at the end of 1936 and would have increased front line strength at the expense of the reserves, and so was rejected. It was at this point that the ADGB and associated bodies were split into the four aforementioned commands each headed by a Commander-in-Chief (CIC)

Scheme I – was not used

Scheme Jonly reached proposal, but would have provided the RAF with 2,400 front line aircraft. It was considered too expensive and rejected in lieu of Scheme ‘K’.

Scheme Kreached proposal in March 1938, but was considered too small following the German’s annexation of Austria. A further review was requested which accelerated the expansion, and was proposed a month later as Scheme ‘L’.

Scheme L – passed by the Government on 27th April 1938, it called upon industry to produce the maximum output possible over the next two years. Superseded by ‘M’ after the Munich crisis, new airfields included: Binbrook, Leeming, Middle Wallop, and Horsham St. Faith. This scheme required 2,373 front line aircraft in 152 squadrons, and focused on fighter Command; in particular, increasing the number of fighter pilot training units. Scheme ‘L’ also called for increased accommodation facilities to allow for this increase in trainee pilots, and it called for new RAF Hospitals, the first of which was at Ely in Cambridgeshire.

Scheme M – approved on 7th November 1938 and called for 2,550 front line aircraft by March 1942. Airfield examples included: Swanton Morley in Norfolk, Coningsby in Lincolnshire and West Malling in Kent. This scheme introduced the ‘J’ and ‘K’ hangars, implemented as part of austerity measures, one of the few permanent buildings now on site.

By the outbreak of war the RAF had a force that equalled less than half that of the Luftwaffe, Fighter Command possessing only 1,500 aircraft (less than was required under Scheme ‘F’), of which many were already outdated or inadequate. Bomber Command had 920 aircraft, but nothing was bigger than a twin-engined aircraft with limited capabilities.

RAF Museum Hendon

The RAF’s front line bombers were twin-engined with limited capability.

The four Commands created out of the ADGB were also undergoing dramatic change, with aircraft being distributed more appropriately and groups being formed to streamline operations. Whilst still far below the levels at which the Luftwaffe were operating, the RAF had over the last few years seen a major reconstruction process, both in terms of aircraft and airfield development, along with major changes in the Air Force’s structure.

As aircraft were designed to perform different duties, airfields within their commands would also differ in their operation and construction. Hangars or watch offices for example, would be designed but modified depending upon the nature of the airfield they were servicing. Standard buildings would be altered to suit the different needs of the different duties, and airfield design would take a change in direction, the non-dispersed site being discarded for the safer, but less efficient, dispersed site.

As the years progressed, further changes to airfield development would occur as new, larger and heavier aircraft were developed. The four engined heavies: Stirling, Halifax and Lancaster, determining new designs and new requirements. The entrance of the USAAF in the European theatre also played a part in airfield design and development, and by 1942, a new standard would be devised by which all future airfields would be built.

The Class ‘A’ airfield became the standard airfield design for bomber airfields, with many fighter airfields, training and temporary airfields remaining either as grass or using a form of steel matting. Twelve different types of matting were developed during the war, the most common being – Sommerfeld Track, Pierced Steel Planking (PSP – also called Marston Mat), or Square Mesh Track (SMT). The Class A was determined primarily by its runway layout and measures, formed around three intersecting runways at 60o to each other, the main was 2,000 yards long with two subsidiaries of 1,400 yards, each 50 yards wide. An extension of 75 yards was provided alongside the runaway to allow for emergency landings. In addition, another grass strip clear of all obstacles was also provided, these measured 400 and 200 yards respectively.

The Class A would set the standard from now on, the British airfield was now a major geographical conurbation. They were now like small towns, with cinemas, gymnasiums and other recreational facilities, they had dispersed accommodation areas, technical sites, large aircraft maintenance sheds and hard runways that only a few years earlier were unheard of.

Each of these schemes brought new requirements for airfield designs; their layouts and buildings were changing almost as fast as aircraft development. The airfield had finally evolved.

In the next part we look at the way in which a site was chosen, the number of agencies involved and the criteria for airfield location.

Sources and further reading. 

*2 Smith, D.J., “Britain’s Military Airfields 1939-1945“, Patrick Stephens Limited, 1989

*3 “Norfolk Heritage Explorer pdf document published by Norfolk County Council – via  website accessed 2/1/18,

*4 Francis, P., et al, “Nine Thousand Miles of Concrete, Historic England in Conjunction with the Airfield Research Group (ARG). pdf document Published 15/1/16 via website accessed 2/1/18

The Development of Britain’s Airfields (Part 1).

The development of Britain’s airfields has been both rapid and complex. The design, layout and specific requirements of airfields changing as the need for areas suitable for larger and more powerful aircraft arose. From the early days of flight through the expansion period of 1934 – 1939, and on into the cold war, Britain’s airfields have become iconic symbols not only of Britain’s defence, but also the rapid development of air travel.

The range of airfields is as wide as their developmental history: fighter; Bomber; Coastal Command; Emergency Landing Grounds (ELG); Relief Landing Ground (RLG); Satellite Landing Grounds (SLG); Advanced Landing Grounds (ALG) and Cub Strips, not to mention the fake ‘Q’ sites along with the various training, glider and ATC sites.

It is a very detailed and complex subject, and one in which there have been many valuable and in-depth texts written. It is a subject that is far too detailed to cover in its entirety here, but by focusing on the main features of airfield development, we can at least shed some light on the huge undertaking that reshaped the British landscape, and whose effect has been long-lasting, becoming the widespread topic of interest it is today.

In the following series of eight posts, we look at the development of these airfields, the main structures that are associated with them and how Britain’s airfields grew from basic fields to major conurbations as a result of the direct threat of war.

We start with the build up to war and the growth of the Royal Air Force from 1918.

Britain’s Road to War.

The Royal Air Force was formed on April 1st 1918 through an act of Parliament that saw its predecessor, the Royal Flying Corp, mutate into what has become not only one of the premier fighting forces of the world, but also the oldest Air Force in the World. However, in the post-war era following the First World War, political opinion was very much against the continuation of the RAF, feeling that it was exhausting an already depleted national economy and contravening a stern non-rearmament policy. In addition, an apathetic and vehemently pacifist post war public was also hard to convince that a third force, which was seen as ‘weaker’ than its two older sisters, was really necessary.

Two men, Winston Churchill (then Minister for War) and Air Marshal Trenchard (as Chief of the Air Staff), crusaded on behalf of the RAF, seeing it as the valuable asset it had become. In the Trenchard memorandum of December 1919, Trenchard outlined the biggest re-organisation of the Royal Air Force in history, a change that included everything from insignia and uniforms, to buildings and training. It was a change that would establish the RAF as an air force capable of mobilisation and expansion at a moments notice.

To achieve these goals, Trenchard would set up a rigorous training plan, with stations specifically designed to deal with the various aspects that would be needed; an Air Force Cadet College at Cranwell, a flying training school for Air Force Staff in Andover, a further scheme for short-service commissions and a technical college at Halton (set to close in 2022) in Buckinghamshire.

RAF Cranwell

RAF Cranwell in Lincolnshire remains the Officer Training College today.

This re-organisation would be a re-organisation for survival, and would involve the disbandment and demobilising of vast numbers of men and women; the subsequent rundown of the RAF being both rapid and immediate. By March 1920, in excess of 23,000 officers, 21,000 cadets and 227,000 other ranks and been demobilised and returned to ‘civvy street’. The new RAF was small, formed with just 3,280 officers and 25,000 other ranks. Assets too were stripped, airfields were sold off and hardware disposed of, but the Air Force was going to survive as an independent fighting force that would become a major peacekeeping force within the next few decades.

In the 1920s, and even though limited by the 10 Year Rule on defence expenditure, Trenchard envisaged a build up of the Air Force, incorporating both fighters and bombers, to a level that would be both powerful and dominant. He set a target of some 52 Home Defence Squadrons, but his continued battles with the Army, Royal Navy and politicians alike, meant that this figure would take many years to achieve and Britain would be poorly protected in the case of attack.

In a statement by the Secretary of State for Air, Sir Samual Hoare, at a meeting of the Imperial Conference on October 19th, 1923, Sir Samual highlighted the inadequate numbers that were present for Home Defence, he said:

“When the Navy and Army requirements were met and the squadrons provided for the Air Command in Iraq, and provision made for training in Great Britain, the machines left for home defence in Great Britain were altogether insignificant. I may give as an instance of this insignificance the fact that a few months ago at the height of the Turkish crisis, when we had sent two Royal Air Force squadrons to Constantinople, we were left with only twenty-four first-line machines actually available for home defence against air attack.”

Whilst slow, the 1920s and early 1930s did see the RAF expand, achieving 65 squadrons by January 1st 1935, mostly manned by fully trained reserves. This did however, do little to bolster the front line numbers of available fighters, and as demands for spending cuts in the world’s depression started to bite, this build up began to slow even further.

It was during these early 1930s that movements in Germany, in particular with Hitler and the rise of the Nazi Party, gave rise to an uneasy feeling across Europe; a feeling that would lead to new policies being implemented, policies that would refuel the impetus of Britain re-arming its major forces in the latter half of the 1930s.

With events like the Schneider Trophy and displays at Hendon capturing the imagination of the public, the Government saw these as a way to develop new faster and more agile aircraft, and as a pedestal on which to put both Britain and the RAF. These air displays continued until 1937, when a war with Germany became evermore likely, and the previously formed rearming policies began to take shape.

German boasting of its redevelopment was barely enough to hide the fact that it was rearming as early as 1932, and the speed at which this was happening would far outstrip the RAF’s meagre numbers in the years following the Nazi’s rise to power in 1933. In these early years, Britain’s bomber strength was as low as five night, and six-day bomber squadrons, each one operating limited, slow and cumbersome biplanes. Aircraft that were no match for even the reduced force that Germany was to front during the controversial Spanish Civil War.

Germany’s rearming was occurring at an alarming rate, and after Goring’s inauguration as head of the Reich Commission for Aviation, a formal request for the purchase of British aircraft, by Goring, was refused, but ironically not the supply of two military supercharged aero-engines that were to be built under license in Germany! Britain was not alone in this action though, the USA also sold Germany contravening merchandise during the 1930s, 19 aircraft and 569 aero-engines crossed the Atlantic, with most of these being supplied during 1934.*1 Perhaps even more astonishingly, the World War 1 German Ace Ernst Udet visited the US in the 1930s, where he developed not only ground attack and dive bombing techniques, but purchased two Curtiss Hawk II biplanes, which were taken back to Germany for evaluation for future dive bomber designs. This action eventually led to the Germans developing the Junkers Ju-87, famously known as the ‘Stuka‘, an aircraft that wreaked fear and havoc across the European continent.

Although the depression of the 1930s held German production back, the number of air-frame plants rose from 2,813 in January 1933 to almost 38,000 in 1935. This rearming was becoming so rapid, that in 1933, six new aircraft manufacturers joined the seven already established – all diversifying from other engineering areas to begin aircraft manufacture. By 1935, the total number of air-frame and aero-engine plants had risen to an astonishing 53,865, an increase of nearly 50,000 in just two years.

This massive increase was highlighted in a letter from Winston Churchill to Stanley Baldwin (three times British Prime Minister) on March 17th 1935*8, in which Churchill pointed out that:

“I believe that the Germans are already as strong as we are and possibly stronger, and that if we carry out our new programme as prescribed Germany will be 50 per cent stronger than we by the end of 1935 or the beginning of 1936.”

This increase eventually led to a number of changes in Britain. One such change was the demand for a twin-engined aircraft capable of delivering a 1,000lb bomb up to 720 miles away. Whilst not record-breaking, specification B.9/32 led to both the Wellington and the Hudson being developed, each a major step forward from the biplanes in RAF service at that time.

A further major change that the German action brought about, occurred during the mid – late years of the 1930s (1934-1939) where Britain saw, what is now commonly referred to as, “the Expansion Period”, a period in which the RAF began to increase its numbers also. It was during this period (between May and July 1936) that the idea of Trenchard’s small elite force would become four; the Air Defence of Great Britain (ADGB) along with No.1 Air Defence Group and other administration and command groups, would be disbanded and reformed as four new commands: Fighter Command (HQ at Stanmore), Bomber Command (HQ at Uxbridge), Coastal Command (HQ at Lee-on-Solent) and Training Command (HQ at Ternhill). In addition, new aircraft were going to be required, particularly fighters and heavy bombers, and to support these new aircraft, a massive support network:  new training facilities; aircraft and aero-engine factories; storage facilities; armaments factories; flying schools, and of course a range of new airfields would be needed. Running in conjunction with this would be research and development. The RAF’s budget, which included research and procurement, rose from £17.5m in 1934-5 to £74.5m by 1938-39, a massive injection of cash to help develop these new ideas.

This demand would begin the process by which Britain would develop its airfields and air force, kick starting the huge economic and technological change that would see Britain move from the simple bi-plane to jet technology, and airfields that covered not just a few, but several thousands of acres of land across the British landscape.

Britain had entered the arms race with Germany, and it would be a race to the death.

In the second part we examine the political response focusing on the expansion period 1934-1939, and how Britain’s airfields changed as a direct result.

Notes, sources and further reading.

CAB\24\164 Note from the Meeting  of the Imperial Conference on October 19th, 1923. (National Archives)

*1 Dancey, P.G., and Vajda, A-V, “German Aircraft Industry and Production, 1933-45“. 1998, Airlife Publishing Ltd

*8 Churchill, W.S., “The Second World War Volume I – The Gathering Storm“, Cassell, 1948

Disaster at RAF Tibenham.

In this post, we revisit Tibenham in Norfolk, the home of the 445th Bomb Group, Eighth Air Force. Whilst here, the 445th would suffer the worst casualty rate of any Bomb Group in a single mission, a mission that virtually wiped out the entire Group. Yet they would no give up, determined they would go onto have one of the most successful bombs on target statistics of all the Eighth’s Bomb Groups, a record they can be proud of.

RAF Tibenham (Station 124)

Station 124 was one of those purpose-built airfields designed specifically for the USAAF in the mid-part of the war. Known to the locals as Tivetshall, it occupies a site previously used by the Royal Flying Corps in World War 1 (although there appears to be no record of units based here).

In preparation for the Air Force’s arrival, a Class A airfield was built, with three standard concrete and tarmac runways, the primary of 2,000 yds and two secondary each 1,400 yds long and all the standard 50 yds wide. In addition, there were thirty-five ‘frying pans’ hardstands and a further seventeen ‘spectacle’ hardstands, all dotted around the perimeter track. Aircraft maintenance was completed in two T2 hangars, one in the technical area and one other to the south side of the airfield. The bomb store was located to the north-west of the airfield, with the technical and administrative areas to the east. Beyond this, dispersed further to the north-east were the accommodation areas: two communal sites, a WAAF site, sick quarters and seven male accommodation sites. Accommodation was initially designed for 3,000 personnel, using mainly Nissen huts with some Orlit hutting on site. Most other buildings were ‘temporary’ and built of brick.

RAF Tibenham Perimeter track

Part of the perimeter track – RAF Tibenham

Built over 1941-1942 by W. and C. French Ltd, it was opened in 1942, and was the temporary residence for the ground echelons of two squadrons of the 320th BG in November that year. The plan was to send the air echelons via the northern route, but due to heavy losses of the 47th and 319th BGs, they were diverted to North Africa via the southern route. The Ground echelons would then join them departing both Tibenham and nearby Hethel on November 21st 1942.

Tibenham then remained unoccupied by operational forces until November 4th 1943, when the 700th, 701st, 702nd and 703rd Bomb Squadrons of the 445th Bomb Group, Eighth Air Force arrived.

The 445th’s journey brought them from Gowen Field in Idaho, through Wendover Air Force Base in Utah, to Sioux City where they completed their training. In October the ground echelons sailed on the Queen Mary arriving in Scotland in early November. The air echelons flew the southern route, covering Florida, Puerto Rico, Brazil and West Africa before arriving shortly afterwards.

Flying B-24 Liberators, they would perform their first mission on December 13th 1943 – a month after their arrival. Their first target was the U-boat pens at Kiel. Along with other units of the 2nd Bomb Division fifteen aircraft would take off and undertake what was to be a relatively uneventful sortie, all the 445th aircraft returning with only two aircraft damaged and no casualties.

Their third mission, also in December, was less successful. A massive force of 546 bombers left England to attack Breman, arriving over the target between 11:42 and 12:14, the force was badly hit by ME-410s of the Luftwaffe. The 445th had fifteen of their aircraft damaged, with two crewmen wounded and eleven classed as ‘missing’. The realities of war were beginning to bite home.

1944 would be a more decisive year for Tibenham and the 445th. During the February ‘Big Week’ campaign against the German aircraft industry, Tibenham would suffer from accidental bombing by a returning Liberator. After being recalled, a  B-24 accidentally released a bomb whilst flying over Tibenham airfield, the resultant explosion killing two servicemen and a civilian in a nearby house.

The 445th would also suffer this year, but for their determination and action over Gotha they would be awarded a Distinguished Unit Citation (DUC), an award that reflected their bravery.

RAF Tibenham

Today’s huts and hangars

The eight groups of the 2nd Bomb Division (BD) were targeting the Me-110 factories on February 24th 1944, dropping 372 tons of high explosive bombs. During the  mission 239 aircraft would leave England in three large wing formations, the 445th in the 2nd Combat Wing (CW) were to fly in the lead, along with the 389th BG and the 453rd BG. Behind them were the 14th Combat Wing with the 20th Combat Wing bringing up the rear.

The lead group were hit hard as much as 80 minutes before the target. Flying ahead of schedule, they had failed to rendezvous with their escort and so were at a huge disadvantage. Flying at altitude, the lead aircraft of the 389th suffered oxygen problems, which caused the bomb aimer to suffer from anoxia, the condition led to him release the bombs early, over Eisenach and not the primary target. As the bombs fell toward the ground, others in the wing began to follow suit, all releasing their bombs far too early, and well away from the target area. The 445th realising there was a problem, ignored the false signal and continued on to the target alone. Being out of formation and without escort, the B-24s were ‘sitting ducks’, and unsurprisingly were given special attention by the Luftwaffe.

From then on, and for an hour after the bomb run, Luftwaffe fighters attacked the B-24s, and one by one, the heavy bombers fell from the sky as fighters picked them off. After two and a half hours of relentless attacks, thirteen of the original twenty-five aircraft had been lost and nine others were badly damaged. The mission had cost 50% of the groups aircraft, but it was a tragedy that was not to be their last, nor their worst.

The main formation who had released early, had also suffered badly, being subjected to aerial bombing, cable bombing and rockets, an attack which led to a mission tally of thirty-three aircraft being lost and 314 airmen being classed as ‘missing in action’.

March 1944 would also be a noteworthy month. It was the end of a career as Commanding Officer for Capt. James Stewart, Commander of the 703rd BS. Posted here before he was declared unfit for flying duty, he arrived as ‘Operations Officer’, before being given the Command of the 703rd. He would go onto fly ten missions with the 703rd before departing Tibenham for Old Buckenham and the 453rd BG as Group Operations Manager.

Because the 445th had flown many missions over the winter months, March would become noteworthy for another reason. Four months after their first operation, Lt. Sam Miller and the crew of B-24 #42-110037 of the 700th BS had completed twenty-five missions whilst here at Tibenham, they were the first crew of the group to do so. At last some good news had brought relief to the horrors of the previous months and in particular the disaster of ‘Big Week’.

Ground personnel of the 445th Bomb Group gather around a B-24 Liberator (I5-B+, serial number 42-110037) after its return to base on D-Day. Printed caption on reverse: '51451- Ground crew swarming around a bomber returning from a D-Day mission for information on the invasion.' Handwritten caption on reverse: 'Lt Sam Miller's B-24 returning to Tibenham, Norfolk after he and crew completed a 25 mission tour of operations. First crew in the 445th bomb Group to do so.'

The return of B-24 #42-110037 after its crew had completed 25 Missions (USAF).

In the lead up to the Normandy invasion in June, the 445th attacked airfields in the Paris area along with V-weapons sites in Northern France, and on D-Day itself, they returned and attacked the shore installations, pounding them before the land forces arrived. The 445th then went on to help with the breakout at St. Lo striking enemy defensive positions. The Tibenham group were now so successful that they led the ratings for the most accurate bombing of all the Liberator groups in Europe, these successes though, were to be short-lived, for on September 27th 1944, the 445th would suffer its own ‘day of infamy’.

On that day the group was allocated the Henschel facility in Kassel, and they were to lead 315 B-24s to the target. Navigating by GEE the 445th took a wrong turn and left the protection of the formation. The turn went unnoticed by the remainder of the group and so, all of a sudden, the 445th were now out on a limb and lacking the protection of the formation once again.

The group then all dropped their bombs, but unbeknown to them they were not over Kassel but were in fact over Gottingen some 20 miles away. After implementing the withdrawal plan, the 445th put themselves even further away from the main force, they were now alone. All of a sudden the 445th met II/JG.4, and what followed would all but wipe out the group.

Fw-190s approached the group from behind, three abreast diving down as they fired. Then followed two Me-109 Gruppen of JG.4 who picked off the damaged aircraft. With individuals falling away, the formation was spread and broken up, some 150 enemy aircraft had attacked and devastated the group.

In around five minutes, the Luftwaffe fighters had picked off and dispatched twenty-five B-24s and damaged most of those that remained flying. Only the intervention of US fighters stopped the total and complete annihilation of the group. The scene was devastating, the sky was full of smoke and debris, parachutes from both sides floated through the carnage. Three more B-24s crashed on the way, luckily in allied territory, two others managed to reach Manston’s emergency runway and one more crashed at Old Buckenham. The four remaining aircraft managed to limp back to Tibenham, but only one was able to fly again the next day.

In a written account*1, Pilot Capt. William R Dewey Jr describes the scene in his B-24 (one of those that made Manston)

“The tail turret had caught fire, from direct hits by 20 mm cannon in the first wave of FW-190s, both waist gunners were wounded and bloody along with the tail gunner. There was a huge hole in the right waist ahead of the window, the left waist window was shattered. Control cables to the tail were partially damaged, and the twin vertical rudders appeared frayed and disintegrating. Looking out the copilot’s window we could see a 3′ diameter hole in the upper surface of the wing behind the #3 engine, where 100 octane gasoline was splashing out.”

Dewey goes on to explain how the co-pilot William L. Boykin Jr, carried oxygen bottles back to the wounded crew, gave them first aid and comforted them. Dewey then decided to drop below oxygen requirement level and risk ditching. Switching channels to the emergency channel, he manged to contact air-sea rescue using the code word “Colgate“. After obtaining a radar fix, they gave him a heading for Manston.

After an hour Dewey spotted Manston and began the task of landing not knowing what condition the flaps, undercarriage or tyres were in. Thankfully all were in good order and he described it as:

“the best I ever made in a B-24 – like we were on feathers. A day we will never forget!”*1

Statistics for the day were horrendous, the efficiency of the German controllers had been spectacular, no previous efforts had yielded such incredible results; 236 men were missing, 1 was dead and 13 were injured in the resultant crashes. This loss, left only ten aircraft in the entire group, and would go down as the worst operational day of the war for any single group of ‘The Mighty Eighth’.

The 445th would regroup and return though. In December and January they supported the troops in the Battle of the Bulge by bombing German communication lines, helping the Paratroops holding up in the forests of the Ardennes.

On February 24th 1945, Ford built Liberator B-24H-1-FO #42-7619 “Bunnie” a veteran of 103 missions, took off from Tibenham’s main east-west runway. Within seconds something went wrong and the bomber crashed a few hundred yards west of the airfield. In the crash four of the crew were killed, the remaining five managed to survive.

Photo of

“Chuck” Walker & his crew being congratulated by Lt. Col. Fleming, (deputy commander) on completion of their 35th mission and “Bunnie’s” 100th.(IWM)

and then on 24th March 1945, they dropped food, ammunition and medical supplies to the troops who had made the Rhine crossing at Wesel. They returned later that day to bomb the landing grounds at Stormede.

The 445th went on to carry out a total of 282 operations building a reputation for high accuracy bombing in the face of danger. Further awards were received from the French for their support of the Resistance, in dropping food supplies, gaining them the Croix de Guerre, a highly regarded award.

The 445th flew their last mission on 25th April 1945, the last mission by the Eighth Air Force in Europe, attacking airfields and rail targets in south-east Germany and Czechoslovakia without loss. The 445th finally returned to the US at the end of hostilities leaving behind huge numbers of crews for whom home would never be back on their own soil.

After their departure in May / June, Tibenham remained ‘operational’ although no operational flying took place. The RAF then began to sell off parts of the airfield to the local farmers. A short-lived expansion of the airfield’s runway in 1955 led nowhere, as no aircraft were assigned to the airbase, and in 1959, Tibenham was finally closed as a military base. During this time, the Norfolk Gliding Club took over part of the site, paying a rent to the Ministry of Defence, remaining here even after 1964/65 when the airfield site was finally sold.

Since then the Club has fought long and hard to keep flying at Tibenham. Battles over land and attempts to curb flying have so far failed. Gradually bit-by-bit the infrastructure has been removed, sold off for hardcore and agriculture use.

Flying at Tibenham

Small piston engined aircraft keep the spirit alive

A small collection of memorabilia and photographs of the four squadrons based at Tibenham are maintained by the club, and a memorial stands as a lasting legacy to those who never returned.

Currently, large parts of two of the runways remain; the perimeter track can also be seen, being split by the main road round the airfield. Also a small number of huts are still being used and the site is in remarkable condition as a result.

Other evidence is hard to find, the majority of the accommodation, stores and works all being located to the east amongst the trees and on private land. I am reliably informed that primitive airfield defences can be found amongst the trees at the end of the runway. These amount to a ladder that would enable any defence troops to climb up and remain hidden should any German paratroopers fall.

The heavily laden bombers have long since been replaced by the grace and beauty of gliders, the control tower and other major buildings are now history, but as the summer sun and cool breeze wafts across the open skies above Norfolk, it is easy to picture these lumbering bombers, fuelled and crewed waiting for their turn to depart. With the roar of labouring engines now long gone, peace has returned once more to this quiet corner of Norfolk.

RAF Tibenham memorial

Memorial dedicated to the 445th BG.

Tibenham was initially visited in April 2014 when these photos were taken. It appears as part of Trail 13 along with Old Buckenham and East Wretham. This page is an update with additional information on the 445th’s history.

Sources and further reading.

The Norfolk Gliding Club website gives details of their activities, opening times and flying operations.

*1 A typescript memoir written by Capt. William R. Dewey ‘Disaster at Kassel’: 27th Sep 1944. Second Air Division Digital Archive . Ref: MC 371/250, USF 5/1 accessed 25/3/18.

All Saints Church in Tibenham also has a small memorial and kneelers dedicated to those who flew from Tibenham.

Operation ‘Fuller’ – “The Channel Dash”.

On 12th February 1942, 18 young men took off on a daring mission from RAF Manston, in outdated and out gunned biplanes, to attack the German fleet sailing through the English Channel.

Leaving Brest harbour, a force of mighty ships including the Scharnhorst, Gneisenau and Prinz Eugen, attempted a break out, supported by sixty-six surface vessels and 250 aircraft, they were to head north through the Channel out into the North Sea and homeward to Germany where they could receive valuable repairs.

For many weeks the British had been monitoring the vessels awaiting some movement out to sea. Then,  German transmitting stations based at both Calais and Cherbourg, began a cat and mouse game transmitting false readings to interfere with British radar sets on the south coast. In mid February, the Luftwaffe organised themselves over northern France and the radars went wild with false readings and interference. Temporarily blinded by these measures, the British were unable to ‘see’ the mighty armada slip out into the Channel waters. Their escape had been a success.

The British, fearing such an attempt, had prepared six Fairy Swordfish of 825 Naval Air Squadron at nearby RAF Manston in readiness for the breakout. Ageing biplanes, they were no match for the Luftwaffe’s fast and more dominant fighters, nor the defensive guns of the mighty German fleet they were hoping to attack.

In front of their Swordfish, Lieut Cdr E Esmonde, RN, (2nd Left) on board HMS Ark Royal, October 1941. This photo was taken after the attack on the Bismark, and includes the various aircrew who received decorations as a result of that daring attack. (Left to right: Lieut P D Gick, RN, awarded DSC; Lieut Cdr E Esmonde, RN, awarded DSO; Sub Lieut V K Norfolk, RN, awarded DSC; A/PO Air L D Sayer. awarded DSM; A/ Ldg Air A L Johnson, awarded DSM). (© IWM A 5828)

In the cold winter of 1942, the Swordfish were kept ready, engines warmed and torpedoes armed, when suddenly and unexpectedly, at 12:25 on the 12th February, the fleet was sighted. They could no longer wait, and instead of attacking as planned at night, they would have to attack during the day, and so the order was given. The crews started their engines and set off on their daring and suicidal mission.

Shortly after take off, the escort arrived, merely ten Spitfires from No. 72 Squadron RAF, led by Squadron Leader Brian Kingcombe, and not the five Spitfire squadrons promised. The six Swordfish, led by  Lt. Cdr. Eugene Esmonde, dived to 50 feet and began their attack. Hoping to fly below the level of the anti-aircraft guns each of the six Swordfish flew gallantly toward their targets. Eventually hit and badly damaged, they pressed home their attacks, but they were out-gunned, and out performed, and just twenty minutes after the attack began, all six had fallen victim to the German guns. No torpedoes had struck home.

Of the eighteen men who took off that day, only five were to survive.

Leading the attack, Lt. Cdr. Esmonde was warded the V.C. Posthumously, he had previously been awarded the Distinguished Service Order for his part in the attack on the Battleship Bismark; an award that also went to: S/Lt. B Rose, S/Lt. E Lee, S/Lt. C Kingsmill, and S/Lt. R Samples. Flying with them, L/A. D. Bunce was awarded the Conspicuous Gallantry Medal and twelve of the airmen were mentioned in dispatches.

In their honour and to commemorate the brave attempt to hit the German fleet that day, a memorial was erected in Ramsgate Harbour, the names of the eighteen men are listed where their story is inscribed for eternity.

Operation 'Fuller'

The memorial stands in Ramsgate Harbour.

Operation 'Fuller'

The names of the 18 airmen and the Swordfish they flew.

January 1st 1945 – Loss of Mosquito PZ340

On the afternoon of January 1st 1945, Mosquito FB.VI #PZ340, ‘HB-Z’ took off from RAF West Raynham, according to the Operational Record Book it was assigned to a “high level bomber support” sortie over Heligoland, unusual as these Mosquitoes were not pressurised models. The pilot, F/O Ian George Walker (s/n: 156104) and navigator/wireless operator F/O. Joseph Ridley Watkins (s/n: 152875), had only just been brought together, F/O Watkins, from Wanstead in Essex, normally being based with 141 Squadron, but on attachment to 239 Squadron, when the flight took place.

On return, from the mission, the aircraft crashed near to Narford Hall, an Eighteenth Century stately home located a short distance to the north-east of RAF Marham in Norfolk. Whilst not confirmed, it is thought the crash was caused by an instrument failure, a crash that resulted in both airmen being killed.

Following the accident, F/O. Walker was returned to his home town and was buried in St. Michael’s Cemetery in Dumfries. F/O Watkins however, was buried locally, in nearby St. Andrew’s Church, Little Massingham not far from RAF Great Massingham. Both airmen were only 21 years of age.

The Mosquito, a Hatfield manufactured aircraft, was produced under contract 555/C.23(a), and was an aircraft designed for ‘intruder’ strike missions, it was the most commonly used variant of all Mosquitoes.  239 Squadron was in the process of replacing these examples with the MK. XXX before its disbandment on July 1st 1945.

Little Massingham St. Andrew's Church

F/O Watkins died on January 1st 1945 after the Mosquito he was in crashed near to RAF Marham, Norfolk. He rests in St. Andrew’s Church yard, Little Massingham.