Trail 66 – RAF Chelveston – Part 9 – The End of an Era

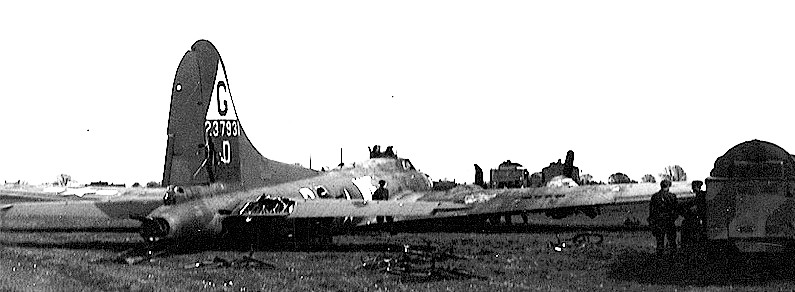
Part 8 saw Chelveston at the crossroads of history. From the heroism of B-17 crews braving ferocious Luftwaffe attacks to the tense vigilance of Strategic Air Command jets in the early Cold War, the station had witnessed courage, innovation, and loss. Yet as international tensions shifted and technology advanced, even its longest runways and fortified hangars could not guarantee a future.

By the late 1950s, Chelveston faced an uncertain fate. What would become of a place that had once been alive with the roar of engines and the courage of men? Its final chapter was about to be written – but the outcome was far from certain.

During the late 1950s and early 60s, the world’s political landscape was shifting constantly and rapidly. France’s president, Charles de Gaulle, saw his country as a strong, independent nuclear power, wanting full control over its own defence. That vision did not accommodate large numbers of foreign – particularly American – forces on French soil. As a result, 1959 saw the start of a reduction in military numbers with strict limits being placed on the number of American forces allowed in France. Any personnel or equipment beyond this ceiling were required to leave immediately. This decision triggered a massive redeployment of forces, with many units being reassigned to Germany or Belgium, and others returning to the United Kingdom where they were accommodated at the so-called ‘Red Richard bases, of which Chelveston was one.*20

Over the next several years, France saw a steady reduction in American personnel and units, a process that would culminate in 1966 with President Charles de Gaulle’s announcement of France’s withdrawal from NATO’s integrated military command. The decision required the removal of all foreign forces from French soil by April 1967, bringing an end to more than a decade of a large-scale American presence.

To accommodate the early relocations from the continent, a number of Britain’s newly modernised airfields were selected – Chelveston among them. Alongside RAF Alconbury and RAF Bruntingthorpe, each station received elements of the 10th Tactical Reconnaissance Wing (TRW), the 42nd Tactical Reconnaissance Squadron, of the 10th TRW, arriving at Chelveston in August 1959. Operating the twin-engined Douglas RB-66C Destroyer – electronic reconnaissance aircraft, eighteen of these machines, together with their crews and ground personnel, quickly took up residence. Shortly after their arrival, the aircraft were modified with updated electronic counter-measures equipment, reflecting the increasingly technical nature of Cold War aerial reconnaissance.

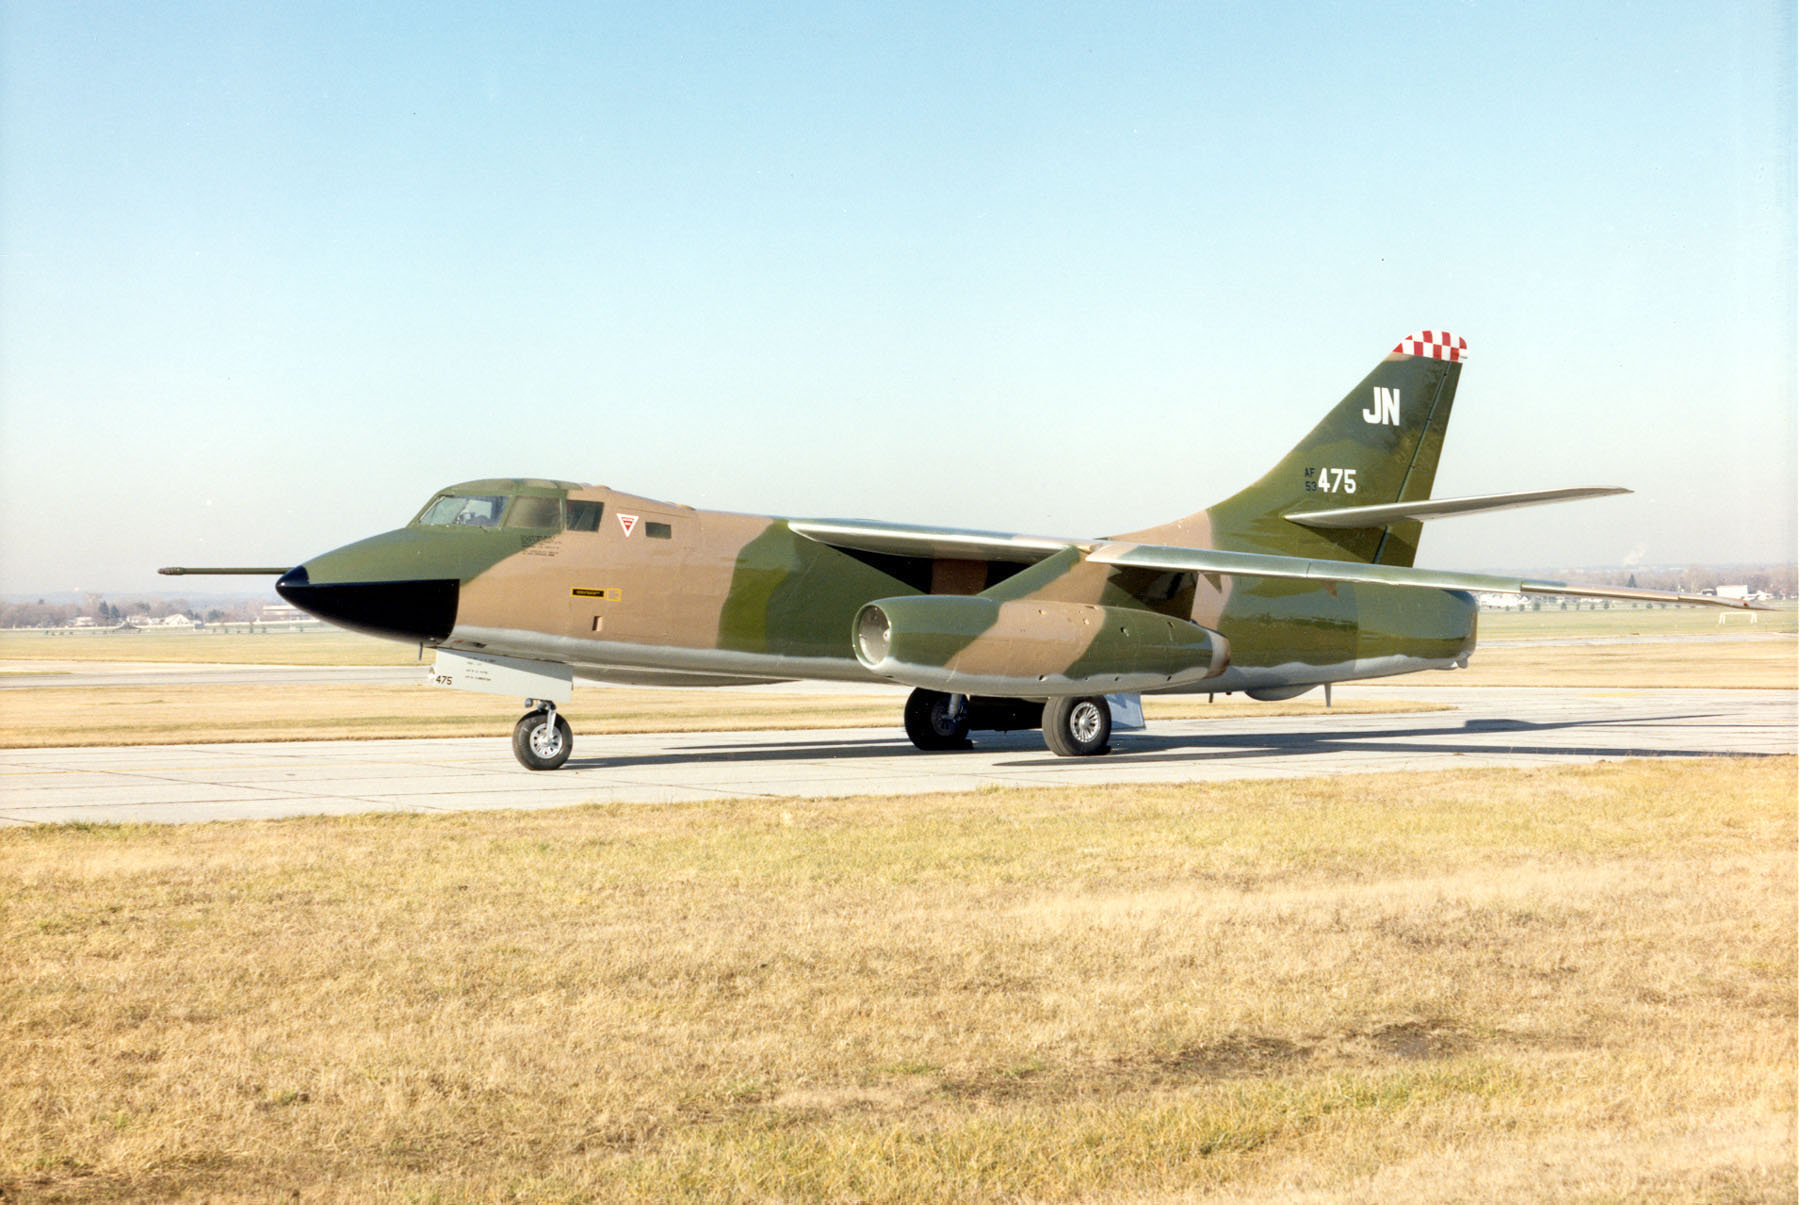
Douglas RB-66B Destroyer (U.S. Air Force photo)

The squadron remained at Chelveston for almost three years. Then, in the summer of 1962, both the 42nd Tactical Reconnaissance Squadron and the 19th Tactical Reconnaissance Squadron departed their respective Midlands stations for deployment to Toul-Rosières Air Base in eastern France. The move placed the wing’s reconnaissance assets closer to the Central European front line at a time when aerial reconnaissance was increasing. For Chelveston, however, it marked the effective end of its active flying role. With the Americans steadily reducing their UK footprint and Bruntingthorpe facing closure, the departure of the RB-66s signalled the beginning of the station’s final chapter.

Project Clearwater and the End of the Reflex Era

So, once again, Chelveston was left devoid of all main front line squadrons. Facing a reduction in demand for Cold War bases –  combined with both long expensive runways and a shift towards a more logistical, support and storage use – Chelveston’s runway was closed to all but infrequent, small aircraft – examples that could operate on shorter runways.

Before long, the airfield being used less and less, Chelveston closed to flying altogether, and it quickly reverted back to a reserve airfield status.

This shift in wider policy soon became formalised. On 26th July 1963, the United States Department of Defence announced ‘Project Clearwater’, the final phase in the reduction of American forces stationed on British soil.*21 Although Chelveston had already fallen largely silent, the base remained nominally under United States control while residual activities continued. That position ended on 19th June 1964, when Chelveston – together with RAF Fairford, RAF Greenham Common and RAF Sculthorpe was formally closed and handed back to the Royal Air Force.

By 1st April 1965, Project Clearwater had effectively brought an end to Strategic Air Command’s Reflex bomber deployments in Britain, terminating large-scale rotational operations and leading to the inactivation of the 7th Air Division*22 Chelveston, retained by the RAF on a care-and-maintenance basis for a further period, would briefly assume a less glamorous role as a storage location for American equipment being withdrawn from the continent. The age of regular transatlantic bomber and reconnaissance operations from Northamptonshire had quietly drawn to a close.

From Runways to Renewables: The Final Transformation of Chelveston

With no flying units now operating from Chelveston, the runways and associated tracks began to deteriorate and break up. With the increasing demand for housing and the nearby new town of Milton Keynes expanding, hardcore was needed and Chelveston had a good supply just waiting to be quarried. The runways and perimeter tracks were all removed thus ending any chance of a reprieve for flying in the future. But it wasn’t to be the end of its military association just yet.

In 1977, Chelveston became home to a key part of the Royal Air Force’s Strike Command Integrated Communications System (STCICS). The site, equipped with a large array of antennas, formed an essential link in the RAF’s network, transmitting voice, data, and weather information to aircraft, and connecting military stations across the UK and beyond. For decades, it played a vital role in maintaining operational communications for Strike Command.

As technology and operational requirements evolved however, the Ministry of Defence upgraded the system, leading to the creation of the Defence High Frequency Communications Service (DHFCS). This new network integrated both air and naval communications into a single nationwide system, capable of maintaining secure links over long distances, and routing messages through a central control centre. By December 2003, with the network increasingly managed by civilian contractors,  Chelveston was vacated once more, thus marking the end of its role in the UK’s high-frequency military communications infrastructure.*23 *24

With their departure, the site became surplus to military requirements, and it was sold off in 2005, as a going concern. New businesses seeing it as a development opportunity, bought it up turning it into a diverse renewable energy park that is known today as Chelveston Renewable Energy Ltd.

A number of wind turbines have since been erected, all linked by  the remaining remnants of the perimeter track.  A solar farm has also been added, and the site has evolved into a major energy supplier utilising renewable energy sources.

Today, the former Chelveston airfield  continues in this state, and little evidence exists of its previous life; the runways, perimeter tracks and buildings all having been removed. Dotted about, within the confines of the private area, a small number of  temporary buildings are known to remain (as surveyed by Northamptonshire Archaeology in conjunction with West Northamptonshire Council) including one of the nuclear bomb stores, – the ‘igloo’. Because, of its excellent condition and rarity value, the structure has been put forward for long-term protection through the Scheduling process of West Northampton Council.  The store is considered to be ‘well-preserved and a relatively unaltered example of a distinctive 1950s USAF munitions storage area’ which ‘comprises characteristic storage bunkers or “Igloos” inspection buildings, and perimeter fencing.’ *25

Although largely privately owned, there is a footpath across the site running perpendicular to the post war runway. In addition, the Cold War accommodation blocks are still present adjacent to the site, and a small section is used by the Northamptonshire Fire and Rescue Service as a training centre, training fire-fighters.

On the ground little remains to be seen, and access to that is restricted. The concrete foundations used by the post war communications centre are visible, but otherwise, Chelveston, and its history, are merely records longing to be opened and read.

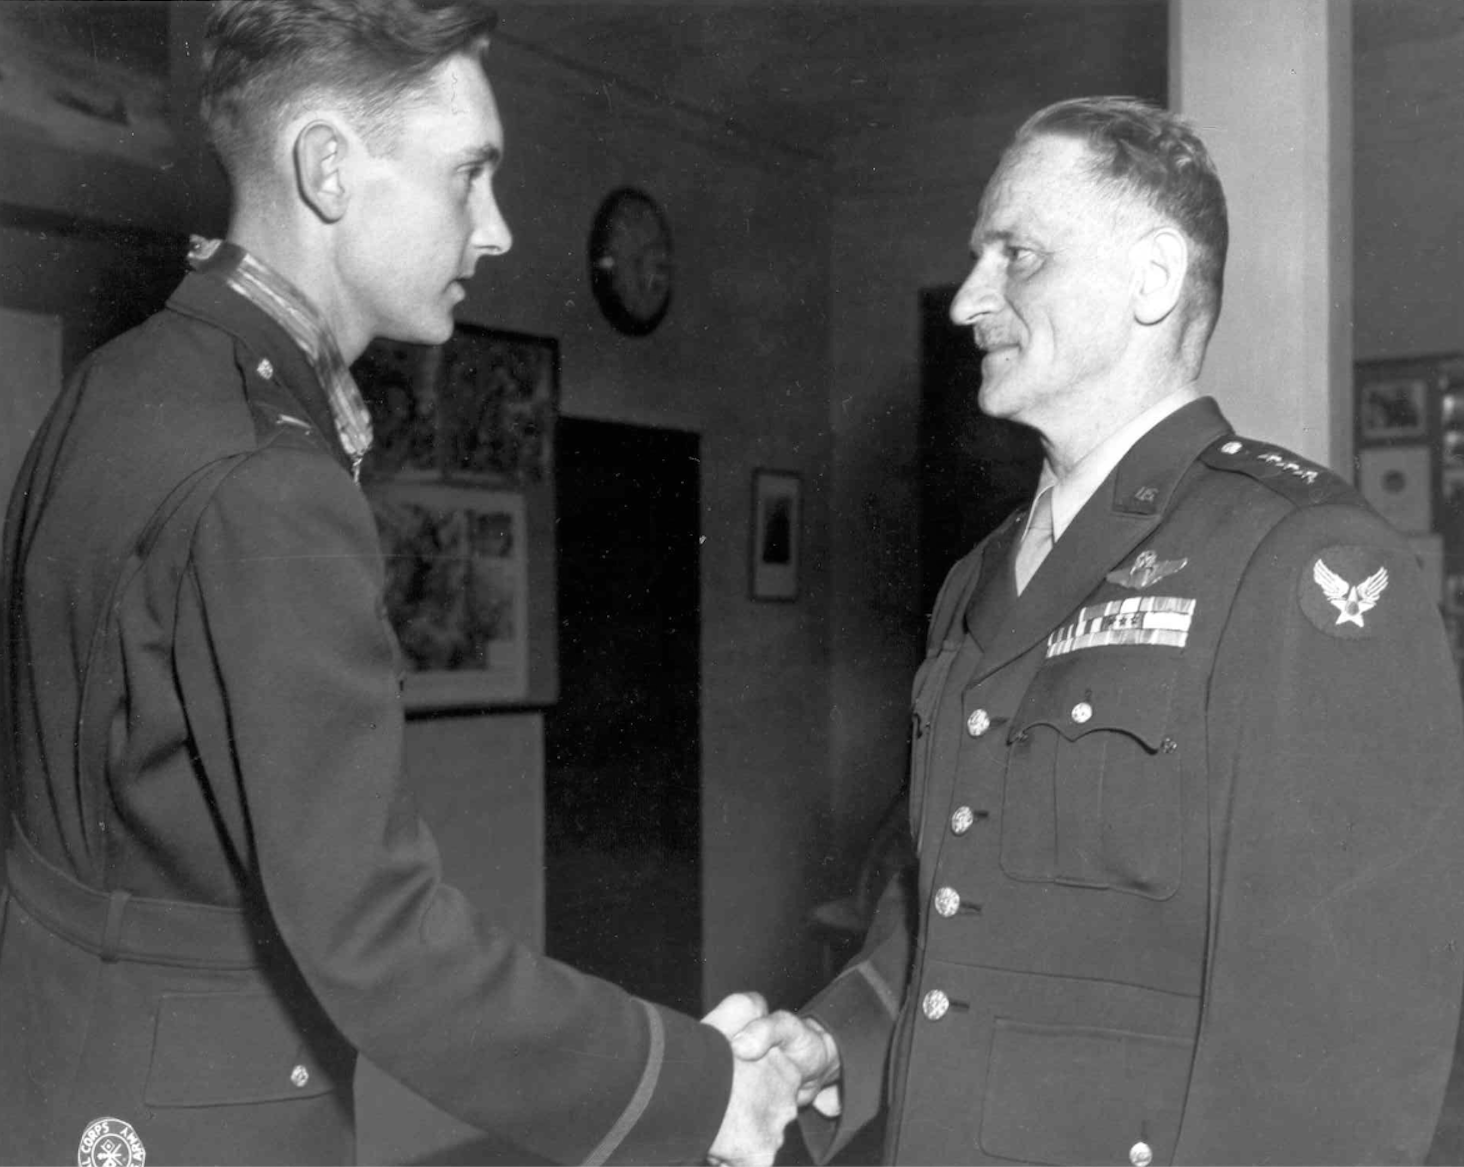
During its short wartime life, Chelveston witnessed many acts of great heroism. It bore heavy losses, saw significant developments in aerial warfare, and its crews endured sustained enemy attacks. Those who served here are now honoured by a memorial in the nearby village, a quiet reminder of the station’s wartime sacrifice. Yet the story of Chelveston did not end in 1945; for many years after the war, the airfield continued to play a major role in Europe’s front-line operations, a legacy that is not suitably acknowledged.

Now a thriving energy park its future has been sealed, The military have departed and private enterprise has taken over what little remains of its once glorious but reserved history.

The whole story of Chelveston can be read in Trail 66. Northants and Bedfordshire (Part 2)

Sources and Further Reading (RAF Chelveston)

*1 Chelveston renewable Energy Park website. Accessed 24 June 2025

*2 Chelveston Parish / Local history website. Accessed 24 June 2025

*3 Commonwealth War Graves Commission website. Accessed 5 July 2025

*4 The Airborne Assault Paradata website. Accessed 16 July 2025

*5 Air Force Historical research Agency Website. Accessed 18 August 2025

*6, *7 Vlahos, M. C., and Kehler, B., Leading the Way to Victory: A History of the 60th Troop Carrier Group 1940–1945. Woodbridge, CT: Knox Press, 2023.

*8 Wilhelm, D., ‘The flight of the bomber Phyllis’, Liberty, 5 December 1942, Imperial War Museums, document 50898.

*9 Missing Air Crew Report (MACR) 15501.

*10 Hamilton, J., The Writing 69th. Green Harbour Publications, 1999.

*11 Coffey, T. M., Decision Over Schweinfurt. Magnum Books, 1978.

*12 Freeman, R. A., Mighty Eighth War Diary. Jane’s Publishing Co., 1981.

*13 Bowman, M., The Bedford Triangle. Pen & Sword, 1989.

*14 Coffey, T. M., Decision Over Schweinfurt. Magnum Books, 1978.

*15 Congressional Medal of Honour website.  Accessed 5 August 2025

*16 Boyd, R. J., ‘Project Casey Jones 1945’, Penn State Hazleton Campus Library.

*17 United States Air Forces in Europe – Air Forces Africa – Third Air Force, website. Accessed 3 October 2025.

*18 West Northamptonshire Council, website. Accessed 27 September 2025.

*19 Rushden Research Group, website. Accessed 11 September 2025.

*20 West Northamptonshire Council, website. Accessed 27 September 2025.

*21 RAF Mildenhall, website. Accessed 17 September 2025.

*22 RAF Mildenhall, website. Accessed 17 September 2025.

*23 Everything Explained Today, website. Accessed 15 February 2026.

*24 Everything Explained Today, website. Accessed 15 February 2026.

*25 West Northamptonshire Council, Northamptonshire Historic Environment Record, website. Accessed 15 February 2026.

Additional references

National Museum of the United States Air Force Website accessed 2 March 2026

The Airborne Assault Paradata website. This provides a wealth of information about the AFEE and airborne operations. It is well worth a read.

Air mobility Command US Air Force, Website Accessed 12 October 2025

Chelveston-cum-Caldecott Parish Council website accessed 20 September 2025

Airfields of Britain Conservation Trust Website.

Rushden “Hearts & Soles” website accessed 20 September 2025

Trail 66 – RAF Chelveston – Part 7 – 2 Medals of Honour

In Part 6, the 305th Bomb Group faced some of the most intense and costly operations of the war, including record-setting large formations and the brutal Schweinfurt raids, which inflicted heavy losses on the group. Crews endured extreme physical and mental strain, yet displayed remarkable heroism, earning multiple medals and citations while innovating new tactics and night operations. By late 1943 and early 1944, the group began to benefit from improved technology, navigation systems, and experience, setting the stage for record-breaking missions that would push both men and machines to their limits.

The formation was to cross to the continent where it would  split, each branch finding their predetermined targets, bomb and then reform for the long journey home. Although the weather was poor, fighter escorts did get airborne and they managed to stave off many of the attacks aimed at the bomber stream. For one 305th aircraft though, it would be a major struggle and an heroic one.

In B-17 42-38109 – ‘Cabin in the Sky’ – was pilot 1st Lt. William Robert Lawley Jr, flying only his tenth mission since joining the 364th BS, less than a year previously.

First Lieutenant William R. Lawley, Jr., is congratulated by Lieutenant General Carl Spaatz on the award of the Medal of Honour, 8th August 1944. (IWM UPL 55737)

The aircraft, a B-17G-30-DL (WF-P) was departing the target area with its bomb load intact due to a frozen mechanism, when it suffered a full frontal attack by enemy fighters. Suddenly, a canon shell ripped into the cockpit  killing the co-pilot, Paul Murphy, and striking Lawley in the face severely wounding him.

The attack by around twenty enemy fighters, also wounded every other crewman, in addition to setting an engine on fire. The attack caused the B-17 to enter a dive which could well have been uncontrollable had Lawley not fought back the pain and forced the co-pilot’s hands off the controls with one hand, whilst fighting the aircraft with the other. With a hole in the blood soaked windscreen, cold air forced its way in, adding to the cockpit’s terrible conditions and to the extreme pain Lawley was already feeling.

In fear of an explosion, resulting in total destruction of the aircraft and its crew, Lawley gave the order to bale out, but no one did. Some were simply too injured to do so, and those that were able to, did not want to leave their buddies behind to what must have seemed to be an inevitable fate.

Even whilst enduring further attacks, the engine fire was somehow extinguished, only to be replaced by another in a different engine. Then, a glimmer of hope came over the intercom, the bombardier had managed to free the bombs, thus lightening the load. This allowed the badly injured Lawley to perform incredible evasive action.

But by now, Lawley was exhausted, and was suffering from huge blood loss. Acutely aware of the situation, Mason, the bombardier, took over until Lawley was able to regain his strength and take back the B-17’s controls. With two engines out, a new threat appeared – lack of fuel. Another engine suddenly stopped running, leaving just one to keep the heavy bomber aloft. Somehow, the aircraft managed to not only reach England, but pass over its coastline. Feeling somewhat relieved, but acutely aware of the ever present danger, the crew scoured the horizon for a safe place to land. Redhill suddenly came into view, and just in time, as the B-17 was now losing height, and fire was spreading across the wings.

In great pain, Lawley managed to bring the aircraft down to Earth, performing an amazingly controlled crash landing. Nine of the ten onboard survived to return to duty, Paul Murphy being the only casualty. For his determination to get home, Lawley was awarded the Medal of Honour, the US’s highest award for bravery.

This dramatic event was mirrored by a B-17 of the 351st, then based at  RAF Polebrook. Sadly though, this one ended in the loss of the three crewmen left on board, after the aircraft crashed in a field. For his action, Sgt. Archibald Mathies also received the Medal of Honour.

B-17 42-38109 ‘Cabin in the Sky‘, after crash landing at RAF Redhill. (IWM UPL 55733)

This would not be a solitary awarding of the prestigious Medal of Honour, for it would be repeated just two months later, highlighting the bravery shown by many crewmen during those dark days of World War II.

On April 11th 1944, the Germans yet again made a ferocious attack from the front, a tactic they had devised early on in the American’s war in Europe.

In this instance, 1st Lt. Edward S. Michael was piloting B-17G  ‘Bertie Lee’ 42-37931, as part of the 364th BS on operations to bomb various  targets in Germany, including the Focke-Wulf plant at Sorau. Other targets for the 341 B-17s of the 1st BD, included Cottbus, Dobberphel, Stettin and Trechel.

The aircraft, a Douglas-Long Beach B-17G-20-DL Fortress (WF*D), was flying in formation toward Stettin when it became the focus of a determined enemy attack. To the crew, German fighters appeared to single them out, pressing home repeated assaults, despite escorting fighters and heavy defensive fire from the bomber.

The ferocious attack shattered the cockpit, both pilot and co-pilot (2nd Lt. Franklin Westberg) were wounded, instruments failed, oil covered the windscreen and the aircraft fell into a 3,000 foot spin from which survival seemed over. With skill and strength however, 1st Lt. Michael managed to pull the aircraft out of the dive, only to discover that the bomb bay, still full of incendiaries, was on fire – the result of yet another attack. With damage to the release equipment, the crew were unable to jettison  the bombs – the situation was getting worse.
The only way they could survive now was to bale out, and so Michael gave the order. On doing so, he was greeted by the horrendous sight of the top turret gunner, Jewel Philips, holding his eye in his hand and blood gushing from a severe head wound.

Giving initial aid to the gunner, Michael, himself injured, helped him to the door and out of the aircraft, He was one of seven who made it away.

With the co-pilot and injured bombardier, Lt. Leiber,  still on board, Michael decided he was going to try a crash landing.  Working hard to save the ship for as long as they could, the bombardier managed to finally free the burning incendiaries, and by performing dramatic evasive manoeuvres, Michael managed to  shake off pursuing enemy aircraft; eventually reaching the relative safety of cloud cover.

Now being targeted by flak, he decided to get the aircraft down as low as he could, and flying at almost treetop level, he headed towards England. The aircraft continued to respond well considering the extensive damage it had received, and so they flew on for as long and as far as they could. Miraculously, they reached the English coast, but Michael was exhausted from both his continued efforts and a severe thigh wound, The bombardier took over, circling the aircraft in a holding pattern until Michael had the strength to bring the stricken aircraft down. With no hydraulics, the ball turret jammed down, the undercarriage locked up and the bomb bay doors locked open, it was not going to be an easy ride and the odds of survival were stacked heavily against them.

As if the gods were on their side though, Michael retook control and brought ‘Bertie Lee’ down, its metalwork crunching and groaning as it careered along the grass at RAF Waltham near to Grimsby in Lincolnshire.

For his incredible actions and determination to get home, 1st Lt. Michael received the unit’s second, highest level award, the Medal of Honour.

Extensively damaged, ‘Bertie Lee’ after crash landing at RAF Waltham (IWM UPL 40113).

1st. Lt. Michael’s citation*15 read:

For conspicuous gallantry and intrepidity above and beyond the call of duty while serving as pilot of a B-17 aircraft on a heavy-bombardment mission to Germany, 11 April 1944.

The group in which 1st Lt. Michael was flying was attacked by a swarm of fighters. His plane was singled out and the fighters pressed their attacks home recklessly, completely disregarding the Allied fighter escort and their own intensive flak. His plane was riddled from nose to tail with exploding cannon shells and knocked out of formation, with a large number of fighters following it down, blasting it with cannon fire as it descended.

A cannon shell exploded in the cockpit, wounded the co-pilot, wrecked the instruments, and blew out the side window. First Lt. Michael was seriously and painfully wounded in the right thigh. Hydraulic fluid filmed over the windshield making visibility impossible, and smoke filled the cockpit. The controls failed to respond and 3,000 feet were lost before he succeeded in levelling off.

The radio operator informed him that the whole bomb bay was in flames as a result of the explosion of three cannon shells, which had ignited the incendiaries. With a full load of incendiaries in the bomb bay and a considerable gas load in the tanks, the danger of fire enveloping the plane and the tanks exploding seemed imminent. When the emergency release lever failed to function, 1st Lt. Michael at once gave the order to bail out and seven of the crew left the plane.

Seeing the bombardier firing the navigator’s gun at the enemy planes, 1st Lt. Michael ordered him to bail out as the plane was liable to explode any minute. When the bombardier looked for his parachute he found that it had been riddled with 20-mm fragments and was useless. First Lt. Michael, seeing the ruined parachute, realized that if the plane was abandoned the bombardier would perish and decided that the only chance would be a crash landing.

Completely disregarding his own painful and profusely bleeding wounds, but thinking only of the safety of the remaining crewmembers, he gallantly evaded the enemy using violent evasive action despite the battered condition of his plane. After the plane had been under sustained enemy attack for fully 45 minutes, 1st Lt. Michael finally lost the persistent fighters in a cloud bank.

Upon emerging, an accurate barrage of flak caused him to come down to treetop level where flak towers poured a continuous rain of fire on the plane. He continued into France, realizing that at any moment a crash landing might have to be attempted, but trying to get as far as possible to increase the escape possibilities if a safe landing could be achieved.

First Lt. Michael flew the plane until he became exhausted from loss of blood, which had formed on the floor in pools, and he lost consciousness. The co-pilot succeeded in reaching England and sighted an RAF field near the coast. First Lt. Michael finally regained consciousness and insisted upon taking over the controls to land the plane.

The undercarriage was useless; the bomb bay doors were jammed open; the hydraulic system and altimeter were shot out. In addition, there was no airspeed indicator, the ball turret was jammed with the guns pointing downward, and the flaps would not respond. Despite these apparently insurmountable obstacles, he landed the plane without mishap.

Heroic actions like this, were widely mirrored across the beaches, seas and skies of Normandy that June, when vast numbers of ground, naval and air force personnel combined to carryout the greatest invasion ever known. With operations beginning in the early hours of June 6th 1944, Chelveston’s aircraft would again be involved, dropping leaflets to the French people warning them of the impending allied invasion. It would be a day that would go down in history.

Many of those involved in D-day looked forward to the day they would return home, but returning home was never a guarantee of safety. In December whilst on a mission to bomb the railway marshalling yards at Kassel in Germany, B-17 43-38973 received extensive damage with one engine put out of action. As the aircraft made its way home, it began to lose height and to make matters worse, England was shrouded in fog cutting visibility to near zero.

In an attempt to find a landmark, the pilot took the aircraft lower and lower, a risk that ended in tragedy when it struck a Gee mast at Borough Hill in Northamptonshire. All nine on board were killed in the collision.

337 Missions to Victory: The 305th’s Final Campaigns

The winter of 1944–45 descended with a familiar severity. Snow and ice gripped the airfields, while dense fog rolled across much of Europe, grounding aircraft and testing the endurance of even the most seasoned crews. Yet amid the bitter cold came decisive movement on the ground. Following the Allied breakthrough in the Ardennes, advancing forces pressed steadily into Germany itself. The war’s end was now clearly in sight, but its closing chapter would be anything but quiet. The months that followed brought an intense tempo of operations, as bomber formations crossed the Rhine with increasing confidence. With the Luftwaffe offering only sporadic and weakening resistance, B-17s and B-24s were able to penetrate deep into German territory with far less opposition than in previous years. Mission counts climbed rapidly. Many groups reached the formidable milestone of one hundred operations, and several of the original contingents went well beyond it, their longevity a testament to both endurance and experience.

Gradually, as allied forces made their way across Europe,  the heavy bombers of the allied forces pounded German cities. By March, the 305th had completed its 300th operation, having endured a long and demanding campaign since being amongst one of the first groups to deploy to the UK. In celebration, they were once again given the lead position in an attack on Böhlen-Rötha, Leipzig. Thirty-six aircraft set off that day to find near perfect weather over the target and so bombing was considered highly accurate despite heavy and accurate flak. Of the thirty-six, aircraft despatched, two B-17s were lost from the 305th, one of which carried the command crew – led by Lt. Col. Howell G. Crank in 44-8141. The aircraft was hit by flak and one of its engines knocked out. It then turned over and dived into the ground killing ten of those on board with one taken as a prisoner of war.

A month later on April 25th, 1945, shortly before the war’s end, the 305th would make their final bombing flight bringing Chelveston’s war in Europe to an end. The 305th had achieved an eye-watering 337 combat missions (480 including other types), dropping over 22,000 tons of bombs and over 70 tons of propaganda leaflets. During their time in Britain they had lost in the region of 154 aircraft, received two Distinguished Unit Citations and two airmen had both been awarded a Medal of Honour. In just three short months, on July 25th, they would leave England, heading for a new base at  St. Trond, Belgium (Army Airfield A-92). Their final departure leaving no operational front line units at Chelveston and little prospect of any arriving in the future.

After the defeat of Japan and the formal declaration of world peace in September 1945, the group was posted to Germany where the four squadrons were dispersed to various airfields, prior to their deactivation in the following December. The reason for the move was – and included the 306th from Thurleigh – to photograph two million square miles of land, ranging from Iceland in the north, through Europe to the Soviet frontier in the east, and on to north and west Africa in the south. By splitting the groups, it meant that flying time was reduced and coverage increased.*16

Following that, the 305th Bombardment Group returned to the United States. Crews were demobilised and dispersed, and the aircraft that had endured the rigours of combat over Europe were largely scrapped. The group would then briefly re-emerge in 1947 and again in 1951, each time for only a short period. After another short reprieve in 1994, it was reborn as the 305th Air Mobility Wing, a title under which it continues to operate today. The wartime service of the 305th at RAF Chelveston remains a key part of this lineage; the group’s achievements with the Eighth Air Force between 1942 and 1945 established the reputation of what became known as the “Can-Do Wing.” Chelveston is still recorded in U.S. Air Force historical archives as one of the stations from which the unit first earned its combat distinction, and with it, the legacy of the 305th  continues on.

As peace settled over Europe, Britain faced a daunting challenge: what to do with nearly 700 surplus wartime airfields, many hastily built and suddenly redundant. While some were dismantled or repurposed for civilian use, others – including Chelveston – were quietly retained, waiting for a world that was rapidly becoming uncertain once more. By the early 1950s, the rise of the Cold War, nuclear weapons, and jet bombers would transform these dormant relics into strategic strongholds, setting the stage for a dramatic new chapter in both British and American air power.

The whole story of Chelveston can be read in Trail 66. Northants and Bedfordshire (Part 2)

Trail 66 – RAF Chelveston – Part 4 – The ‘Can-Do’ Group

We saw in Part 3 how the USAAF’s 301st Bombardment Group transformed Chelveston into an operational heavy-bomber station, launching their first combat missions over Europe. Early operations brought the group face-to-face with enemy fighters, resulting in casualties and dramatic incidents, including a heavily damaged B-17 returning to RAF Gatwick and another ditching in the Channel. By late November, the 301st had departed for North Africa, leaving Chelveston ready to welcome its next unit, the 305th Bombardment Group.

These early battles gave great hope for the men of the 8th Air Force, with low losses they were perhaps, lured into a false sense of security and feelings of an easy battle ahead. But all that was to be washed away, when over the coming months, the 8th would become battle hardened and severely scarred.

Forging the ‘Can-Do’ Group: Col. Curtis LeMay and the 305th Bombardment Group

The 305th, who arrived here in early December 1942, were led by the tough and innovative Col. Curtis LeMay whose drive and leadership led to the rookie 305th, being known as the ‘Can do’ Group.

LeMay was a very quiet man, but commanded respect from those beneath him. He was slightly forgiving, but he would not tolerate being lied to. LeMay, never having been in battle himself, forged his career in the United States where he learnt every detail of the B-17, the bomber he was about to take to war. LeMay looked to the likes of Col. Armstrong for guidance, asking him question after question about his experiences and tactics, absorbing his advise like a sponge. Many of Armstrong’s answers he took strictly at face value, however, only to realise later, that perhaps Armstrong was not the man LeMay thought he was.

Through his leadership style, LeMay earned the title of ‘Iron Ass’, a grudging respect from those who followed him. The 305th, led by LeMay, would be a forward thinking group, one who would go on to develop pioneering methods of aerial bombing and battle formation flying.

The heavy armament of the B-17 gave the highest level of protection when in a tight formation, each gun covering a wide arc thus protecting all the others in the group. By forming a ‘box’, this level of protection was at its highest, a style developed by the 305th. With bombing accuracy becoming a major issue for the USAAF, the idea of a lead crew, was another idea stemming from the experiences of the 305th and LeMay. By having a single lead upon whom the whole formation would bomb, accuracy was improved and concentrations of bombs in the target area increased. Both these methods became standard operating procedures throughout the 8th Air Force during the Second World War.

The 305th like the 301st before them, and now their sister squadron the 306th at Thurleigh, were amongst the first few units to arrive in the UK, and as newbies with no battle experience, they faced an incredibly long and steep learning curve.

The 305th arrived in the UK forming initially at RAF Grafton Underwood around September 12th, 1942, bringing together both the ground and air echelons as they prepared to commence operations over Europe. The mud and cold that greeted them would quickly become their bed-partner, remaining with them for the duration of their wartime lives.

The conditions at Grafton were appalling and the airfield was totally unfit for a bomber unit. It would take an enormous amount of upgrading and huge renovations to improve it. This would mean the newly arrived 305th would have to move out, a move that signalled the beginning of their time at Chelveston. Over the Period 6th to 11th December, they transferred across, a temporary measure that quickly became permanent lasting the duration of the war.

Their journey to Chelveston began back at Salt Lake City where they were activated on March 1st 1942. They spent a large part of their training at Muroc Lake Air base (now Edwards Air Force base) before the ground echelon sailed on Queen Mary in early September, arriving at Greenock on 12th. The air echelon meanwhile didn’t leave until October, advanced flight training taking place at Syracuse, New York, in the weeks prior to their departure. Flying the usual northern route they brought their B-17Fs via Presque Isle, Gander and Prestwick, before routing to Grafton underwood.

Following Roosevelt’s controversial slimming down of the Eighth, the 305th, together with the 91st, 303rd and 306th, formed the only B-17 groups remaining in the command, while the 44th and 93rd were its sole B-24 units. Collectively, they constituted the backbone of an Eighth Air Force, stripped to little more than this handful of operational groups – a striking force reduced to a shadow of its intended strength. But then, even that would be cut back, with elements of the B-24s being sent to North Africa as well, and not returning to the UK until the following summer after which time, the B-17s had ‘flown the US’s flag’ over occupied Europe.

Fearing that heavy losses would catastrophically reduce the remaining groups to a handful of aircraft and crews, Spatz and Eaker mounted relatively ‘safe’ operations, those featuring little penetration into the European stronghold. However, the chances of loses, even at those short distances, continued to remain high.

Tactics and Innovation: The 305th’s Early Combat Lessons

The 305th’s first mission would happen a month after their arrival at Grafton on 17th November 1942 against the U-boat pens at St. Nazaire.  It was during these early missions that the Luftwaffe pilots worked out that a full frontal attack on a B-17 would target it’s weakest point – a blind spot in the gunners forward arc. Here, the fighters had both a better chance of survival and the ability to cripple an aircraft by killing both its pilot and co-pilot in a well aimed attack.

To combat this weakness. two innovative Thurleigh ground crew  devised a method by which the nose guns could be moved and supported thus filling the gap in the arc. After developing and trialling the new fixture, the system quickly became standard fittings on later B-17s across the air force.

For the 305th, the otherwise fierce attack of 17th November proved a rare exception: they returned without a single casualty – one of only a handful of units to do so – despite nearly a quarter of the dispatched aircraft sustaining damage from concentrated machine-gun and cannon fire.

These early battles highlighted a stark reality: losses and damage were disproportionately high when set against the relatively small numbers of aircraft taking part. LeMay, latched onto this, and quickly became the driving force behind efforts to improve both survival and bombing effectiveness.

After being told by Armstrong never to fly straight and level for more than a few seconds on the bomb run, LeMay did exactly the opposite, leading his group for some 4 minutes toward the target. Whilst this tactic was indeed a gamble, the 305th’s bombing record was soon to be far in excess of other groups especially those who followed the Armstrong doctrine.

LeMay, encouraged by these successes, also began experimenting with new combat formations, seeking a balance between maximising defensive firepower and reducing the risk of bombers damaging one another in the chaos of fighter attacks. His solution was the development of the staggered ‘box’ formation, arranged both vertically and horizontally. To preserve bombing accuracy and avoid aircraft jostling for position, all bombers would release their loads simultaneously on the lead aircraft’s command. These methods proved to be so effective that they were also quickly adopted as standard practice throughout the entire Eighth Air Force.

In the next part of Chelveston’s history, we see the 305th pushed to the limits of courage and endurance, facing punishing winter raids over the U-boat pens and the heart of Germany. Crews battled flak, fighters, freezing conditions, and the strain of inexperienced personnel, while stories of survival, heroism, and narrow escapes emerged from each mission. Just as morale teetered under the weight of losses, the airfield itself was officially handed over to full American control – yet even this milestone could not prepare them for the next series of deadly operations that would test the 305th like never before.

The whole story of Chelveston can be read in Trail 66. Northants and Bedfordshire (Part 2)

Trail 66 – RAF Chelveston – Part 3 – Early Operations

In Part 2 we saw how RAF Chelveston opened in August 1941 under RAF Bomber Command’s 2 Group while construction and runway extensions continued to bring the station up to heavy-bomber standards. Early activity centred on training and experimental work, including operations by the Central Gunnery School and airborne trials carried out by the Airborne Forces Experimental Establishment. The arrival of the American 60th Transport Group in mid-1942 introduced the first USAAF presence at the airfield, and although their stay was brief before departing for North Africa, senior Allied visits soon followed, hinting that Chelveston’s role was about to change significantly.

Chelveston Goes to War: Early Operations of the 301st

A change in management led to Major Kincaid (USAAF) assuming responsibility for the control of RAF Chelveston just before the station’s first formal operational unit, the USAAF’s 301st Bombardment Group (BG), was preparing to arrive. His oversight ensured that the transition from a training and transit airfield to an active bomber station proceeded smoothly.

With Chelveston now upgraded to accommodate heavy bombers, the newly arrived B‑17F Flying Fortresses of the 301st BG became the first operational aircraft to fly from the airfield. In taking up residence, the group inherited the original ‘J’-type hangar, a distinctive but unusual feature on USAAF bases, as few American stations were equipped with them.

The 301st’s journey to the UK began at Geiger Field in  Washington, before flying the northern route via Greenland and Iceland to Prestwick, arriving here with twenty aircraft, 115 officers, one warrant officer and 1,395 enlisted men.

On arriving at Chelveston in mid-August 1942, the group was far from operational readiness, a situation compounded by the lack of accommodation for all four squadrons. As a temporary measure, the 352nd Bomb Squadron moved to the satellite station at RAF Poddington. It was not until 2nd September, when the RAF anti-aircraft regiment transferred from Chelveston to RAF Ludham in Norfolk, that the squadron could return, reuniting the group once more.

With all four squadrons, the 32nd, 352nd, 353rd, and 419th, all now together at Chelveston, operations could begin, and it wouldn’t be long before they did.

As with most early operations, the first few were to coastal targets in France and the low countries, considered easier targets or ‘milk runs’, they were initially designed to acclimatise crews to combat conditions.

The Group’s initiation to the European theatre occurred on 2nd  September 1942. An operation that took them to the locomotive engine sheds at Rouen. During the operation, twelve aircraft jointly from the 352nd and 419th set off to drop their payload on the target. Two aircraft returned early, one from each squadron, leaving the remainder to drop their 40 x 1,000lb bombs on the locomotive sheds. With no losses, it was a relatively successful start to their wartime journey.

The 301st would be in action again on the 6th, with thirteen aircraft despatched but only eleven being effective. On this occasion, the Eighth AF suffered their first heavy bomber losses with two aircraft (one each from the 92nd and 97th Bomb Groups) going down; the 301st on the other hand would see all their aircraft return. With two more ‘uneventful’ operations on the 7th and the 26th, September drew to a close with little to report.

The first casualties for the group occurred on October 2nd, with a twenty-five ship operation to the Meaulte aircraft factory. Whilst all aircraft returned, one was forced to crash land at RAF Gatwick after three of the aircrew on board were wounded by enemy fighter attacks.

The 301st BG found itself squarely in the sights of the Luftwaffe that day, and at the rear of the formation B-17 41‑24397 ‘Phyllis’ bore the worst of the punishment. As the tail-end Charlie, she was repeatedly singled out by attacking Fw-190s. One pass after another tearing into the aircraft, smashing the top turret and badly wounding the gunner inside. Moments later the outboard starboard engine began to run wildly out of control, while further damage left the inboard engine completely dead.

With control cables severed, ‘Phyllis’ pitched violently, rearing into a steep climb that the crew struggled to contain. As if the situation were not already desperate, part of the oxygen system failed, further increasing the danger faced by those on board. Damage to the wing and control surfaces meant that simply holding level flight demanded the full attention and cooperation of the entire crew, and even then it could not be sustained for long.

At last, British soil came into view. Spotting the first airfield they could, the pilot headed for RAF Gatwick. Given the aircraft’s battered condition and the risks involved, they elected to make a wheels-up landing – often the safest option under such circumstances. ‘Phyllis’ came down and skidded across the airfield, clipping a hangar before finally safely coming to a rest.

B-17 ‘Phyllis’ of the 301st BG after crash-landing at RAF Gatwick. (IWM UPL 36745).

Only afterwards did the full extent of her ordeal become clear. The aircraft was found to have absorbed around 300 small-calibre hits, at least sixteen cannon shell penetrations, and evidence of concentrated fire around the tail. Three members of the crew had been wounded, and it was little short of remarkable that the bomber had remained airborne for as long as it did. That survival owed much to the skill and determination of the pilots, the teamwork of the crew, and the inherent strength of the B-17’s construction.*8

A subsequent mission on the 9th October to the Compagnie de Fives steel works at Lille, France, saw further casualties for the 301st, and for the first time, an Eighth Air Force bomber ditching in the sea.

The B-17, 41-24362, piloted by 1st. Lt. Donald M. Swenson, was badly damaged by fighters knocking out or damaging, three of the four engines, causing the aircraft to lose altitude rapidly. Swenson, with the intercom out of action, gave the controls to the co-pilot and went back to instruct each member of the crew to prepare for ditching. With rough seas, it was not going to be easy, and even though the crew were prepared, some were caught off guard by the 15 – 20 foot swell and were thrown about the aircraft causing minor injuries as they did so.

After the aircraft came to rest on the water, most of the crew escaped through the gun port, while the pilot and co-pilot forced their way out through the cockpit windows. To their dismay, only one of the life rafts proved serviceable, the other having been damaged by gunfire in the attacks. Three of the airmen were able to climb aboard the intact raft, while the remainder could do no more than cling to its sides. Having discarded their sheepskin flying jackets – which quickly became waterlogged and dangerously heavy – they remained in the sea roughly a mile off North Foreland (Margate).

Luckily on the way down,  the radio operator had sent out a may-day giving their position to the RAF’s Rescue Service who were quickly on the scene. Once there, they managed to successfully retract each crewmember from the water.

But, the story behind the aircraft goes a little deeper than being the first successful ditching by a USAAF aircraft. The B-17 was initially earmarked for RAF service, as a MK II FA667,  through the lend-lease agreement, but was diverted to the USAAF at the last minute. Then, on only its third operation with the 301st, and just before the aircraft departed on its flight, one of the ground crew, M. Sgt. Glenn Doerr, persuaded the pilot to allow him to fly with them without official permission – a decision he would no doubt regret. However, his part in the rescue of the crew must have played a large part in redeeming his misdemeanour, no doubt, thereby, reducing the severity of his punishment on his return to Chelveston.

On November 8th, the 301st would perform their final mission as part of the 8th Air Force, as on the 23rd, a mere three months after their arrival in the UK, they were ordered to relocate to the 12th Air Force in Algeria.

Like the 60th TCG, the 301st (and 97th at Polebrook), were all ordered out under the direction of Roosevelt, who, influenced by Churchill, sent units to bolster the war in North Africa. Churchill – fearing that an inadequate invasion force sent to Northern France would be decimated – persuaded Roosevelt to postpone the invasion and concentrate on bolstering the Africa campaign instead.

Eisenhower, the commander picked by Roosevelt to lead Operation Torch, was bitterly opposed to the plan, and when Henry H. Arnold (General of the Army; Commanding General, U.S. Army Air Forces) was informed, he too was furious. The move would strip back the fledgling Eighth Air Force, almost killing it before it even got off the ground.

Despite their misgivings though, the various groups departed the UK and headed for North Africa, the 301st leaving Chelveston far behind.

During their brief tenure at the airfield, the 301st completed just eight operational missions, losing just a single aircraft in actual combat. Between the 8th and 23rd of the month they were formally designated ‘non-operational’ while preparations for their relocation were put in hand.

Their departure was marked by a visit from King George VI, who toured the station in the company of Col. R. Walker, Commanding Officer of the 301st, and Squadron Leader Robert Clayton.

King George VI with Colonel Robert Walker and Squadron Leader Robert Clayton during a visit to the 301st Bomb Group at Chelveston. (IWM FRE 9802).

The 301st’s departure from Chelveston on 26th November, would then leave the airfield all but empty and ready for a new group, and it would be another B-17 group, the 305th, that would fill that space.

The whole story of Chelveston can be read in Trail 66. Northants and Bedfordshire (Part 2)

Trail 66 – RAF Chelveston – Part 1 – Important Beginnings.

In Trail 66, we return to the Bedfordshire and Northamptonshire borderlands to visit the site of another former bomber airfield that has been almost entirely erased from the landscape. Although its wartime service was relatively brief, it was defined by intense operational pressures, loss, and remarkable acts of heroism.

Despite continuing in use well into the Cold War and beyond, the airfield failed to leave the regional mark it deserved. Over time, its purpose changed and its structures were gradually removed, the land being adapted to modern energy use, leaving little visible evidence of its former importance. This transformation stands in contrast to the role the station once played and the legacy it holds today.

Home to a small number of RAF units, it was predominately an American base during the Second World War, and remained with them into the depths of the Cold War. Although flying activity ceased in 1962 with the departure of the modern United States Air Force, a military presence remained there until the Ministry Of Defence (MOD) sold the site as recently as 2005.

Whilst some aspects of the original airfield do remain, the vast majority has been decommissioned and removed, including the runways, works buildings and training facilities, leaving little more than ghostly evidence behind.

In this part of our trip to Northants and Bedfordshire, we visit the former RAF Chelveston.

RAF Chelveston (Station 105).

RAF Chelveston (Station 105) lies across the two counties of  Bedfordshire and Northamptonshire, and although the border crosses roughly through the centre, the majority of the site lies in Northampton. Like many wartime airfields it went through a series of name changes depending upon who owned  it at the time. Today it is known as Chelveston Renewable Energy Park, reflecting its modern use as the ‘centre of technological innovation’ capable of producing enough electricity, to power 60,000 properties.*1

During the planning stages in 1940 the aerodrome site was briefly referred to as Shelton, after the nearby village to the east. Before the station officially opened in 1941, however, the name was changed and it entered service as RAF Chelveston, the official British designation. Later in the war the airfield passed into American control and was designated Station 105 by the United States Army Air Force. Over the years though, it was also referred to as RAF Station Chelveston, and simply Chelveston Aerodrome, reflecting both its early planning name and the variety of roles it fulfilled throughout its operational history.

The land upon which the airfield sits, lies approximately four miles to the east of Rushden and about twenty-seven miles south-west of Peterborough. It shares a region – designated by a Peterborough, Northampton and Bedford triangle – with a number of other former bomber airfields including Kimbolton, Thurleigh and Molesworth.

The land for Chelveston (a name derived from a Norman family) was acquired by the Air Ministry in 1940, with construction beginning shortly afterwards. The airfield was initially intended for the RAF and the reformed 8 Group, with Taylor-Woodrow Ltd serving as the main contractor. At first, it had grass runways and minimal storage, consisting of a single ‘J’-type brick-and-metal hangar measuring 300 ft by 151 ft. Later, two ‘T2’-type metal hangars were added, each 240 ft long, 115 ft wide, and 29 ft high. The original design fell under development scheme ‘M’ of the Government’s expansion programme, which essentially replaced the earlier ‘C’-type hangars with the newer ‘J’-type. Since construction began during the war rather than before it, accommodation sites were dispersed away from the main airfield site – unlike pre-war designs, where living quarters were typically located on-site.

At Chelveston, these accommodation sites were positioned to the south-west of the airfield, unusually close to the main runway’s flightpath – in-fact within just a few hundred feet of its threshold. In all there were twelve accommodation sites, supplemented by two sewerage sites, giving a total of fourteen in all. These accommodation areas included: two communal sites, officers’ quarters, enlisted men’s quarters, sick quarters, and a large WAAF area with its own sewerage facilities.

The all important technical area, lay directly across the dividing public road from here; a little further north than the accommodation area and on the western side of the main airfield. It included a wide range of buildings including: MT (motor transport) sheds, operations blocks, briefing rooms, link trainers, stores, flight offices, works offices and the like.

Typical of the range of buildings found on any wartime airfield, they were a mix of both temporary and permanent construction. The manufacturers involved were also typical of those pertaining to wartime airfields: Laing, Romney, SECO, Ministry of Works and Nissen, who used a variety of construction materials including timber, iron, plasterboard, brick and concrete to create these various standard design structures.

On the main airfield itself, No. 1 runway ran north-east to south-west, whilst No. 2 dissected it in a north-west to south-east direction. The third runway, No.3, ran just off north to south. The classic ‘A’ frame was created by the crossing of all three in the centre of the airfield with the runways extending extensively beyond this point. As in all cases, the three runways were linked by a circular perimeter track, around which eventually, some fifty-five hardstands were built; both a mix of ‘spectacle’ and ‘frying-pan’ types.

As with all airfields of its kind, a bomb store would be incorporated well away from the accommodation and technical areas, and in Chelveston’s case this was just off to the north-east. Here, a number of hardened shelters were interlinked by small tracks along which the bombs were transported to the various aircraft dispersals.

Bombs being man-handled at Chelveston. (IWM FRE10440).

Overseeing movements in and out of the airfield was the watch office, which stood proud with clear views across the airfield. Located to the western side of the site, the office was built to drawing 518/40 – the largest and most common wartime design. This particular build evolved from the 1939 drawing, number 5845/39, and incorporated the meteorological office within its layout. By combining both functions into a single structure, it enabled the rapid exchange of vital weather information.

Chelveston’s construction began in 1940 on land straddling the Bedfordshire-Northamptonshire border. A basic airfield to start with, it soon began to develop and grow, all part of Britain’s rapid wartime airfield expansion programme. Over the next few months it would grow and develop into a standard three-runway bomber airfield complete with dispersals, technical buildings, bomb stores and extensive accommodation sites. Though the landscape has since been transformed into the modern Chelveston Renewable Energy Park, the wartime layout still hints at the scale and ambition of the original station.

The story of how this quiet stretch of countryside evolved from construction site to operational wartime airfield begins in Part 2, as RAF Chelveston opens its runways and the station starts its journey toward becoming an important Allied base.

The whole story of Chelveston can be read in Trail 66. Northants and Bedfordshire (Part 2)

RAF Sutton Bridge Part 6 – The End of an Era.

Part 5 of this trail, we saw how Sutton Bridge grew into a bustling hub of Allied air training, hosting a mix of British, European, Commonwealth, and American pilots. How the airfield remained under constant threat from Luftwaffe raids, while crowded skies and inexperienced trainees made accidents a grim reality. In 1942, the focus shifted from front-line pilot training to advanced gunnery instruction with the arrival of the Central Gunnery School. Fighter and bomber crews honed their skills in Spitfires, Wellingtons, and Hampdens, while innovative experiments, including rocket-firing Hurricanes, highlighted Sutton Bridge’s role at the cutting edge of aerial warfare. Despite progress, the dangers were ever-present, with both trainees and experienced instructors paying the ultimate price.

In the final part, we witness the slow decline and eventual but inevitable closure of the airfield. How a once vibrant but small airfield became simply a part of history.

Arrival of WAAFs and Local Folklore

During May 1942, Sutton Bridge found itself with in excess of 180 WAAFs arriving, mainly to operate training turrets and to work in the photographic room developing cine reels. The WAAFs were billeted not on the airfield but in small Nissen huts located in various parts of the village. It was one of these WAAFs that added fuel to the story of a pilot flying under the bridge, by claiming she saw it happen, again whilst she was there. No other evidence is available and so, like the first account, it will unfortunately remain just an uncorroborated story passed from generation to generation.

Enemy Attacks and a Safe Haven.

The war was never far away, and once again was brought all that little bit closer on 24th July 1942, when a Dornier 217 dropped its payload on the airfield in the early hours of the morning whilst most were asleep. Several buildings were damaged including hangars, the cinema and the armoury which exploded when all the ammunition inside was hit. Several personnel were also injured mainly from flying debris, and several aircraft were also damaged. The attack certainly brought an early morning wake up call and the war very much closer to home.

Being so close to the Wash, Sutton Bridge was often a safe haven for damaged aircraft either returning from Germany or suffering mechanical difficulties whilst forming up over the Wash. One such incident involved B-17F #41-24460 “RD-A” of the 423BS, 306BG at Thurleigh. The aircraft had been part of ninety B-17s and B-24s sent to Lorient on October 21st 1942. Due to poor visibility, the operation was scrubbed and bombers were ordered to dispose of their bombs in the Wash – a common practice for damaged aircraft or scrubbed missions. During the process, the life-raft latch broke loose allowing the raft to escape and wrap itself around the elevator.

B-17 #41-24460 ‘RD-A’ of the 306th BG that made an emergency landing at RAF Sutton Bridge. (IWM FRE 4418)

After landing on the short space of Sutton Bridge, the problem was soon sorted allowing the B-17 to take off and return for further repairs at its base at Thurleigh. Crowds gathered to see the spectacle as the aircraft thundered along the grassed runway before rising into the air.

Earlier Emergency Landings

It was not the first bomber though, to use Sutton Bridge as safe haven. Prior to this, a Halifax (W1102) from 35 Sqn, also made an emergency landing after it suffered damage on the night of October 14th 1942. The bomber, taking part in operations over Kiel, was hit by flak rendering its starboard outer engine unserviceable and the fuel tank leaking. Despite its difficulties, the crew managed to reach Sutton Bridge with little fuel left to get them home to Gravely. The crew would experience something similar a matter of days later when they had to land another damaged Halifax, this time at RAF Martlesham Heath.

USAAF Arrivals and High-Profile Visits

Sutton Bridge had supported many US airmen in the lead up to their war, training pilots of the Eagle Squadrons. Following the Japanese attack on Pearl Harbour and America’s entry into the war, USAAF pilots began to arrive here for gunnery training bringing their own unique aircraft with them. Some of these included P-38 ‘Lightnings’, an aircraft unknown to the British airmen at Sutton Bridge. Other US visitors included Brigadier-General James Doolittle and an entourage of high ranking officials. Arriving on a Douglas C-47 ‘Skytrain’, they were here to inspect the training methods of the Gunnery School and try out the Spitfires for themselves.

Even with experienced pilots and gunners, mishaps continued to happen. As the summer of 1942 led into the autumn and eventually winter, so the cold, fog and frosts began to return too.

Accidents and Operational Hazards

But the cold weather was not the only problem pilots had to contend with. Even though, those who attended the gunnery school had already received operational experience, it didn’t stop them having accidents. Between August 1st 1942 and New Year 1943, there were no less than fourteen crashes on the airfield all relating to undercarriage issues; either a heavy landing, blown tyres or a pilot’s mishandling of the aircraft.

Winter Challenges, Early 1943

With heavy snows in January 1943, present aircraft had to be stored undercover, being pushed by hand, into the hangars. Waterlogged ground froze, and ice became the norm. What flying could be done could only be done in Magisters, the Spitfires flimsy flaps and undercarriages being too prone to damage in such appalling conditions. By the end of January and beginning of February, servicing also become an issue with around two-thirds of the sixty available aircraft requiring remedial attention.

Spring Accidents, more Losses and more Changes

As the winter changed to spring the weather turned, the ground thawed and flying took place once more. On 10th April, a Wellington of the CGS, Wellington IA N2865 piloted by Flt. Lt. Terence C. Stanbury, collided in mid air whilst undertaking a training exercise with Spitfire IIa (P7677) piloted by Flt. Lt. Ernest H. Griffith of the RAAF. The two aircraft were performing gunnery manoeuvres over Abbots Ripon not far from Alconbury in Huntingdon, when they accidentally collided sending both aircraft to the ground.

Flt. Lt. Griffith managed to bale out suffering minor injuries and was returned to Sutton Bridge where he was treated before returning to flying duties. The Wellington crew were not so fortunate however, and all six were killed. The crew was a truly multinational one consisting of a Scot, a Canadian, and two Australians.  The Pilot, Flt. Lt. Stanbury lies in Sutton Bridge churchyard.*18

Leadership within the CGS changed hands on numerous occasions during its wartime history; one of the more famous associated with it being New Zealander Wg. Cdr. Alan C. Deere, whose achievements overshadowed most who followed him. On appointment to lead the Pilot Gunnery Instructor Training Wing, (a part of the CGS) on October 21st 1943, he would have twenty-two kills to his name, an ideal candidate to lead such a school.

1944 – Departure of the Central Gunnery School

By February 1944, a further reorganisation occurred and it was decided that the Central Gunnery School (CGS) would move on from Sutton Bridge. After two productive years, the school had more than demonstrated its value, but its departure left a sense of uncertainty. With Wing Commander Alan Deere posted to a desk job and the demand for new aircrew beginning to decline, the future of the airfield seemed in doubt. A review, downgrading, or even closure suddenly appeared possible.

For a time, Sutton Bridge became ‘spare’ and was placed in a state of ‘care and maintenance’, administered by RAF Peterborough while its long-term role was considered. Yet its story was far from over. With Peterborough heavily committed, Sutton Bridge was soon called upon to take on new duties. When the runways at RAF Newton (Peterborough’s satellite) required reseeding, its resident 16 (Polish) Service Flying Training School was temporarily relocated to Sutton Bridge. From early 1944 until August, the Polish unit brought a new but temporary life to the airfield before eventually returning to Newton once more.

Although winding down, the summer months continued to bring further activity. Between May and November an American unit, the 1st Gunnery & Towed Target Flight (1 G&TTF), arrived to operate alongside No. 1 Combined Combat Gunnery School, then based at RAF Snettisham. Their task was to provide target-towing services, a role previously carried out at Sutton Bridge by RAF flights equipped with Vultee Vengeance aircraft. Surplus Vengeances were duly handed over to the Americans, who continued the work with their own crews.

Meanwhile, No. 7 (Pilot) Advanced Flying Unit (7 (P)AFU, officially based at Peterborough, made increasing use of Sutton Bridge as an overflow for both day and night flying. Among its pupils were French trainees, who formed a distinct French wing within the unit, flying Miles Masters and Airspeed Oxfords. For a time this group carried the informal title of “French SFTS,” although this was later dropped.

As 1944 progressed, training pressures shifted. After D-Day, the demand for new pilots eased, and courses at Sutton Bridge became more general in nature. In December, 7 (P)AFU was reorganised and re-designated No. 7 Flying Training School (FTS). Training was split between the two sites: single-engine work at Peterborough, twin-engine training at Sutton Bridge. At the helm was Wing Commander David Kinnear, AFC, AFM, whose leadership steered the school through this transitional period.

For Sutton Bridge, this change marked the final stage of its wartime flying role. With nearby Sibson closed for runway maintenance, 7 FTS continued to operate from Sutton Bridge into the post-war years. The school remained there until 1946, making it the last operational flying unit to be based at RAF Sutton Bridge. After its departure, the airfield’s role shifted once again, becoming a relief landing ground and maintenance site, closing this chapter on its remarkable contribution to the war effort.

1946 – The End of an era

After its inevitable closure to flying, the site became a storage facility utilised by 58 Maintenance Unit (MU), whose work included servicing Derwent 8 and 9 jet engines, powering the RAF’s latest front-line aircraft, the Vampire and Meteor. For four more years Sutton Bridge was at the heart of this vital engineering effort, before activity gradually wound down once again as the station moved towards demobilisation.

Now surplus to requirements, it closed for good. This marked the end of the line for Sutton Bridge; as a small grass airfield with basic facilities, it was no longer capable of providing a use to a modern Air Force who had moved from piston engined aircraft to fast jets and the nuclear age. With a reorganisation of the entire air force likely, this small but highly significant site was abandoned, and all remaining military personnel departed locking the gates behind them; thus ending three decades of aviation activity.

Post War Legacy

From the 1920s through its wartime years, Sutton Bridge was a hive of activity and purpose. From the 1920s to the Central Gunnery School, training instructors in fighter and bomber gunnery, to the Fleet Air Arm squadrons working up in Ospreys, Skuas, and Nimrods over the Wash, the airfield was a crucible where skill, courage, and determination were forged. Advanced pilot training by 7 (P)AFU and 7 FTS saw cadets mastering single – and twin-engined aircraft, including Wellingtons, Hampdens, Spitfires, and Mustangs. Visits by senior figures, such as Air Chief Marshal Ludlow-Hewitt, underscored the station’s strategic importance. Hundreds of pilots and aircrew honed their skills at this small but significant airfield, readying themselves to defend Britain’s skies during the darkest days of 1940–41.

Sutton Bridge Today

Today, Sutton Bridge airfield has largely returned to the rhythms of the countryside, its runways removed and its technical and accommodation areas absorbed into the Wingland Enterprise Park – home to a large power station and a vegetable processing facility where only one of the original Bellman hangars still stands – a quiet sentinel to the airfield’s former life.

Sutton Bridge was far more than an RAF outpost. Its runways and the associated gunnery ranges served both the RAF, the Fleet Air Arm and the USAAF, becoming a crucial hub in Britain’s pre-war and wartime training network. Here, generations of instructors and trainees honed their skills, learning the art of aerial combat, navigation, and gunnery in an environment that was both demanding and dangerous.

The graves in St. Matthew’s churchyard are a poignant reminder of the risks inherent in training pilots. For every life lost, many others went on to defend Britain during the Battle of Britain and beyond, their courage and commitment standing as a beacon when the nation’s fate seemed uncertain. Between the opening of Sutton Bridge and the official end of the Battle of Britain, 525 trainees passed through its gates, with 390 qualifying for the Battle of Britain Clasp, a testament to the station’s vital contribution to the war effort.*19

Today, only a handful of tracks and a solitary building, believed to be a former squadron office, mark the site. Amidst polytunnels and vast potato stores, the airfield’s presence is almost invisible.

A memorial, incorporating the bent propellor of Hurricane L2529 of 56 OTU that crashed in March 1941, was  erected in 1993, near to the swing bridge, and stands in quiet tribute, commemorating all nationalities who served at Sutton Bridge, ensuring that the sacrifices and achievements of those who trained and served here are not forgotten.

As for the range at Holbeach, the very reason for RAF Sutton Bridge’s origin, it remains a vital asset to both the Royal Air Force and the USAF, having regular visits from Typhoons, F-15s, Ospreys, Apache Helicopters and more recently F-35s. On retirement of the RAF’s Tornado in 2019, it was overflown by a formation of three from RAF Marham. It remains publicly accessible and provides an exciting reminder of the history of aviation in and around the area of Sutton Bridge.

The full story can be read in Trail 3 – Gone but not Forgotten.

Sources and Further Reading (Sutton Bridge)

*1 Francis, P. “British Airfield Architecture” Patrick Stephens Ltd. 1996

*2 Goodrum,, A., “School of Aces” Amberley Publishing 2019.

*3 Royal Air Force Quarterly Vol 16. No.1. December 1944 (via Google books)

*4 There is no official evidence to support this claim but ‘eye-witnesses’ claim to have seen it carried out (as mentioned in Goodrum, 2019)

*5. Air of Authority / RAFweb – No. 801 Squadron movements, listing Sutton Bridge visits in July 1933, May 1935 and January 1938.

*6. Air of Authority / RAFweb – No. 802 Squadron movements, listing Sutton Bridge visits in August 1934 and May 1935.

*7. Royal Navy Research Archive – RAF Worthy Down station history, noting 803 Squadron’s move to Sutton Bridge on 5 February 1939 and 800 Squadron’s linked ship-to-shore activity in spring 1939.

*8 BAE Systems Website accessed 30.3.25.

*9 National Archives AIR 27/1553/1; AIR 27/1558/1

*10 Verkaik, R., “Defiant“. Robinson. 2020

*11 The National Archives, AIR 33/10, “Report No. 11. Visit to Sutton Bridge on 3 May 1940. Notes by the Inspector General,” dated 14 May 1940, signed Air Chief Marshal Sir Edgar Ludlow-Hewitt.

*12 Hamilton-Paterson, J., “Empire of the Clouds” Faber & Faber 2011

*13 Waterton, William Arthur., “The Quick and the Dead“. Grubb Street. 2012

*14 Goodrum,, A., “School of Aces” Amberley Publishing 2019.

*15 Chorley,  W.R. “Bomber Command Losses of the Second World War – 1942.” 1994, Midland Counties.

*16 Goodrum,, A., “School of Aces” Amberley Publishing 2019.

*17 Commonwealth War Graves Commission website

*18  – Aircrew Remembered website. accessed 30/8/25

*19 Goodrum,, A., “School of Aces” Amberley Publishing 2019.

National Archives: AIR 27/1558/1; AIR 27/1553/1; AIR 27/1514/2; AIR 27/1514/1; AIR 27/589/1; AIR 27/379/41

Goodrum. Alastair, “Through adversity” 2020. Amberley Publishing Limited

Flight Safety Network website 

RAF Sutton Bridge Part 3 – Defiants and Battles

In Part 2, we saw how Sutton Bridge grew from a temporary summer camp into a fully operational RAF station, shaped by innovation, spectacle, and the relentless demands of training aircrew. The lessons learned here – from aerobatic displays and night-firing trials to early experiments with new aircraft – prepared both pilots and the airfield itself for the pressures of wartime service. As Europe edged closer to conflict, Sutton Bridge stood ready, its evolving infrastructure and experienced personnel poised to meet the coming challenges of the Second World War.

In the tense early months of the Second World War, Sutton Bridge briefly served a crucial administrative and training role. On 14th September 1939, the airfield was designated a Recruit Sub-Receiving Centre, and within a week – on 22nd September – it was formally redesignated No. 3 Recruit Training Pool (RTP). The purpose was straightforward: to process and provide initial instruction for newly enlisted airmen as they entered RAF service. However, this function was short-lived – in what was typical of the rapidly evolving war-time organisational changes, No. 3 RTP at Sutton Bridge was disbanded on 29th October 1939, and the training process was relocated elsewhere.

Immediately, orders came through from 12 Group Fighter Command ordering the formation of two new squadrons: 264 Sqn and 266 Sqn, both to be stationed at Sutton Bridge. For a brief moment it appeared that this basic grass airfield would become a front line fighter station, propelling it into the limelight of Fighter Command, operating both single and twin engined aircraft. In charge of the two new squadrons and the airfield as a whole, was the new station commander, one Sqn. Ldr. Philip R. Barwell.

Barwell had previously been stationed at RAF Digby, in Lincolnshire, with 46 Sqn. and had himself trained here at Sutton Bridge no less than a decade earlier. He was famed for heading off the first enemy air attack on a convoy in British waters near to Spurn Head. In the attack he shot down one enemy aircraft and shared in the destruction of another, action which led him to receive the DFC followed by a rapid promotion to Wing Commander.

Barwell would oversee the organising and training of both these new squadrons. 264 Squadron, who adopted  the name “Madras Presidency Squadron” after a financial donation to the squadron from the then President of Madras, and was led by Sqn. Ldr. S. H. Hardy; 266 Squadron, on the other hand, was led by Sqn. Ldr. John W. A. Hunnard. To fulfil the squadron’s obligations, Sutton Bridge would see a huge influx of men, all being posted in from various Training Schools, who over the next few weeks, would train to fly in the two new units.

The influx of men was not matched by the influx of machines for them to fly however. With continued delays in the arrival of the aircraft, crews were temporarily posted to other airfields to train and gain the vital experience they needed. On the ground, lectures filled many days, whilst some airmen were given temporary leave and others used the Link trainer to gain what basic experience they could.

Desperate to get started, pressure was put on those above, and on November 8th, the order was given for pilots of 264 Sqn to collect three Magisters (N3867, N3857 and N3868) from RAF Hullavington. These were  followed three days later, by a further  three for 266 Sqn. *9

Defiants, Battles, and the Harsh Winter of 1939

With little in the way of equipment, or even direction from the Ministry, 264 Sqn would very soon learn that they were to receive the new Defiant, a fighter built by Boulton Paul, and one which caused a major split in the ranks of the High Command. Being the first Defiant unit, it would be dogged by many issues including both political wrangling and production problems.

The Defiant, a much despised aircraft by both Dowding and Parks – due to their dislike of the idea of a free turning turret on a two seat fighter – came up against incredible opposition within the government bodies, but after much pressure from those higher up, Dowding succumbed and reluctantly accepted the squadron for the defence of the UK.

The political infighting and excessive demands put on Boulton Paul, led to delay after delay of its arrival at front line stations. Indeed, only at the end of the year, after 264 Squadron had moved to Martlesham Heath, did they receive any aircraft at all. The Defiants would go on though, to perform far better initially than Dowding could have hoped for, but its success was marred by poor management leading to huge losses and a reputation that soon saw it labelled unfairly as an utter failure.

The Defiant and its crews performed admirably during the early months of the war, particularly over Dunkirk, where 264 became the first ‘Ace in a day’*10 squadron. The crew, Flt. Lt. Nicholas Cooke and Cpl. Albert Lippett of 264 Sqn, shot down five enemy aircraft whilst patrolling over Dunkirk achieving the much sought after status that many young pilots would crave.

Sadly, the successes didn’t continue though, the Germans soon realising the aircraft’s poor performance, and the limitations of the turreted four Browning machine guns,  it quickly became prey to the hungry Luftwaffe airmen especially during the Battle of Britain where it often flew without a much needed escort.

The Defiant was designed as a bomber destroyer, not a fighter, the idea being to attack and destroy bombers by flying along side or underneath, then rotating its turret and guns accordingly. However, on many occasions they flew alone and ended up taking on the Me 109s which were far superior in what became almost suicidal missions.

The crews that flew the Defiants, spoke very highly of the aircraft, and although many would lose their lives, they would defend the aircraft saying it was not used as it was intended and subsequently, as a fish out of water, it didn’t perform as well as they knew it could. Dogged by political infighting, the Defiant never achieved full status, instead being forced into a role it was never designed to perform, and so, naturally, it met with devastating results.

264’s departure from Sutton Bridge on December 7th, coincided with the arrival of the main party of 254 Sqn from Stradishall, who were in the process of receiving Blenheim IFs. Like the Defiants though, the Blenheim Squadron was having considerable problems, not with the supply of aircraft but with serviceability, many requiring oxygen systems, radios, guns or even complete overhauls due to their expired flying hours.

Mishaps and poor weather then began to play their part causing further issues with flying. A serious accident in which one aircraft (K7132), piloted by Sgt. T.K. Rees, suffered extreme air frame stresses in a vertical dive, led to considerable damage. Rees however, using all his skill and know how,  managed to land the aircraft at the airfield where it was found many of the flying controls were badly damaged.

Meanwhile 266 Squadron, the second front line unit formed at Sutton Bridge, fared slightly better, receiving their first three Fairey Battles (L5348, L5350 and L5374) in early December 1939. They were soon followed by three more which led to the whole of the month being used for formation flying and training in the new aircraft for all crews. As a training unit, the inevitable accident would soon happen. On December 9th, one of these aircraft was forced into a wheels up landing, in which luckily, the two crewmen, Flt. Lt. Coward and Plt. Off. James L. Wilkie, were unhurt but the Battle had been badly damaged during the belly landing on the airfield.

With further aircraft arriving during that December, Sutton Bridge became increasingly busier, and with fifteen aircraft by the end of  the month, 266 became a well established squadron. The weather of course, played its part, cancelling flying activities on a regular basis, and so this, combined with continuous minor accidents, led to an increasing shortage of spares.

As a result, 266 would also soon be dogged by serviceability issues, having to take their Battles to RAF Upwood for servicing, causing severe issues for those crews trying to increase their hours in the air. Combine that with the poor weather, snow by now having fallen, and temperatures dropping to below freezing, the winter months did not look promising for anyone stationed here at Sutton Bridge.

From Battles to Spitfires: The Transformation of 266 Squadron

The initial idea of 266 Sqn being an all two-seater squadron soon changed though. On the 10th January1940, news of their immediate change to Spitfire MK.Is came through, and keen to get into the air in one, pilots took every chance they could to get airborne – even flying in poor weather. But the weather can be a formidable enemy, and before long, all aircraft were grounded, as heavy and thick snow lay on the frozen ground for almost a month. Sutton Bridge was essentially closed in.

entrance to bombs store 2

Entrance to bomb store 2.

The gradual change in status from a ‘two-seat’ squadron to a ‘single seat’ one, would also mean a change in personnel, as a single seat fighter unit, the Battle’s gunners were now surplus to requirements and so were posted out to other units where gunners were in much needed demand.

Eventually, as it usually does, the weather broke and the early spring temperatures began to slowly rise. The melting snow and frozen ground led to waterlogged runways as a thaw set in. Being low lying, water took a long time to drain away, and the runways quickly became bogs. The hopes of getting airborne were dashed as quickly as they were raised. With little flying happening, and new aircraft arriving (by early February the squadron had received nineteen Spitfires) pilots were soon queuing up to get a flight.

One notable incident during this time, led to the demise of Spitfire N3120 piloted by Flt. Lt. Ian Gleed. When testing the aircraft at 18,000 ft, for some reason, it disintegrated throwing Gleed from the cockpit. After the aircraft wreckage crashed into the Fen soil, the various parts were collected and taken to the Woolwich Arsenal, presumably for analysis, eventually ending up at the Kent Battle of Britain Museum on the former RAF Hawkinge airfield. Gleed was relatively unhurt after his accident, and was eventually passed fit for flying going on to continue his career in the RAF before being killed in 1943 in North Africa.

An Airfield Without a Squadron: Sutton Bridge in Transition

Another change for the squadron would come in February 1940, when they received the order to prepare to move and join 264 Sqn, at RAF Martlesham Heath taking their Spitfires with them. 254 Sqn, for whom serviceability had also continued to be an issue, also received their departure orders leaving for Bircham Newton in mid January joining Coastal Command, meaning that all three initial units under Fighter Command had now left Sutton Bridge for pastures new.

However, what the RAF really needed, were new aircrew and the training stations to create those pilots, gunners and Navigators. To cope with the massed intake of new recruits that would hopefully come, a series of Recruiting Centres were set up all over the country. Sutton Bridge suddenly, and once again, changed its status becoming a training centre for new recruits in RAF discipline, preparing them for the rigours of day-to-day life in the Royal Air Force. But this initiative was also short lived as Sutton Bridge was soon to become a Flying Training airfield once more, training these new pilots in the art of flight techniques and gunnery.

The station flight, which had been continuously based at the airfield, had been the primary reason for Sutton Bridge. It remained active throughout all these recent changes, towing drogues for air-to-air gunnery practise, but with the poor weather they had had little to do. With no flying, the ill-prepared aircraft that had landed at their feet were soon worked on and missing components quickly fitted. With the departure of the three main resident squadrons, it meant that new visitors could be no more than ‘entertained’ until flying could once again start to take place.

With the airfield now devoid of any major unit other than small training units like the Henley Target Towing flight, it was an ideal opportunity to open a new training unit specifically for fighter pilots, and so 6 Operational Training Unit (OTU) was born.

In the opening months of the Second World War, Sutton Bridge swung between roles with remarkable speed. From a brief stint as a recruit training centre to hosting newly formed 264 and 266 Squadrons, the airfield grappled with scarce aircraft, harsh winter weather, and early operational mishaps. Defiants, Blenheims, and then Spitfires tested both pilots and crews, while accidents and maintenance challenges were constant. By early 1940, with the squadrons gone, Sutton Bridge pivoted once more, becoming a hub for new recruits and small training flights, laying the groundwork for its next vital role as 6 Operational Training Unit.

The full story can be read in Trail 3 – Gone but not Forgotten.

RAF Sutton Bridge Part 2 – Flying Circuses and Fatal Risks.

Part 1, gave us an insight into the reason for Sutton Bridge’s origin and how it developed into a more recognisable and efficient airfield.

The 1920s and 1930s, then saw Sutton Bridge develop further becoming a hub of daring displays, training activities, and aviation firsts. From thrilling aerobatics over the Fens to early bombing and gunnery trials, pilots and crews developed both skill and courage, often at deadly risk. As biplanes gave way to faster monoplanes and the Fleet Air Arm joined in, the airfield transformed from a seasonal training camp into a fully established RAF station, laying the foundations for its crucial role in the Second World War.

Flying Circuses and Fatal Risks: The 1920s at Sutton Bridge

The 1920s saw a  range of squadrons use the site for short, week long stays, each flying in, completing practise days and then departing back to their home airfield. Many of the early users of the range and Sutton Bridge arrived in Leyland 3-ton trucks, a 1918 model with hard tyres. These advanced party trucks were packed with additional equipment: Bowsers, tail-trolleys, chocks and extra tool kits; all of which had to be unloaded before anyone could find themselves a bed for the night. The main party usually arrived shortly after, using the more comfortable train whilst the pilots took a leisurely flight bringing their aircraft in later on. *3

The number and range of aircraft that attended Sutton Bridge is far too many to list at this time, but records show the presence of some fifteen squadrons in one year alone, bringing a wide range of models and personnel. Such aircraft included: Hawker Woodcocks, Gloster Gamecocks, Bristol F2B Fighters, A.W. Siskins, Hawker Furys and Bristol Bulldogs to name but a few.

Interspersed with these flying activities, aircrew would put on displays for the locals who readily accepted them into their homes, pubs and dance halls. Dramatic flying completing loops and almost zero feet aerobatics amazed the gathered crowds, and the local swing-bridge became a ‘target’ to buzz and even fly underneath!*4 With all this daring activity, there was as a result, accidents both in the air and on the ground. Many of those lost were seasoned pilots from the First World War, and it would become a trend rather than a short lived phase in the airfield’s life.

The routine of bombing, air firing and displays would continue on until the weather began to close in, around about October. With that, the site would then shut with the tents and temporary accommodation taken away until the following spring.

From Experiment to Establishment: Sutton Bridge in the 1930s

The 1930s saw a global recession along with an increasing interest in Hitler’s activities in Germany. The British were beginning to think ahead, and Sutton Bridge quickly became a hive of activity, with wave after wave of dignitaries presenting themselves at the airfield to see the activities occurring at the site. Out on the ranges however, all was not going well. Biplanes of the 1930s launched bombs from carriers fitted beneath the fuselage, close to where the undercarriage was fixed, and on several occasions, the bombs caught the axle detonating in mid air. On more than one occasion, the aircraft was destroyed and the pilot killed by this very issue. Eventually, the Air Ministry called a halt to dive bombing, particularly at steep angles, but it had taken an airman’s death to trigger the move – at least until a better way of fixing the bombs could be found.

During these early years, the Fleet Air Arm (FAA) began to join the RAF in using Sutton Bridge, several Flights came and went enjoying the benefits of the nearby range. For the naval squadrons, Sutton Bridge offered an ideal shore base from where gunnery practice could be carried out over the Wash, away from the constraints of crowded airfields or carrier decks.

Among the earliest visitors was 801 Squadron, which detached to Sutton Bridge on a number of occasions – first recorded in July 1933, and again in May 1935 and January 1938. These short stays were typical of the Fleet Air Arm’s use of practice camps, allowing pilots and air gunners to sharpen their skills before re-joining their carriers. 802 Squadron followed a similar pattern, making use of Sutton Bridge in August 1934 and again in May 1935, its aircraft temporarily filling the skies over Lincolnshire before returning to front-line duties.*5*6

As the decade drew to a close, Fleet Air Arm activity at the airfield increased. In February 1939, 803 Squadron moved from Worthy Down to Sutton Bridge, settling in for a period of flying and training ashore. Not long afterwards, 800 Squadron, newly disembarked from HMS Ark Royal, also linked into this circuit of shore training, taking advantage of Sutton Bridge’s ranges as part of its spring 1939 programme.*7

Outside of the FAA’s activities, things at the airfield began to move forward. In 1933, prior to the winter closing in October, 23 Squadron took part in night firing trials using tracers being fired at drogues illuminated by searchlights on the ground. The first event witnessed by Group Captain Tedder, would eventually open a new chapter in the life of the airfield, allowing aircraft to fly from Sutton Bridge over the range to carry out night firing activities, something that continues on the range today.

Sutton Bridge officially became an airfield on March 1st, 1936, as a result of the reorganisation of the RAF commands. No longer a Summer Armament Training Camp, it received the status it needed – RAF Station Sutton Bridge – although it continued to  remain under the control of the Air Armament School.

Pageantry and Public Spectacle

Sutton Bridge’s elevation to official RAF station status in that year brought little immediate operational change, but one development was significant: the construction of married quarters along Chalk Lane. These quarters still stand today but now as private housing. When built, they would accommodate married couples providing a comfortable alternative to those supplied to single men.

Peri track west Side

Perimeter track west side.

As a way of show-casing the RAF, many air pageants sprouted up around the country during this time, with military stations opening their doors to the general public. Sutton Bridge was no exception, with some 3,000 people attending its first on 23rd May 1936. A grand display of aerobatics and formation flying, was supported by open hangars and pilots keen to provide information and encouragement to those wanting to know more.

During these shows, pilots would fly along the adjacent River Nene, which being banked by high flood banks, could approach unseen by those waiting on the other side. As they neared the swing bridge they would rise up and over the bank in dramatic style surprising the waiting audience. A feat of daring that was repeated regularly up until a year later in the 1937 Empire Day at the airfield. This final event, was a dismal day, with very poor weather and low visibility, little flying took place, and whilst it would have been hoped to have continued on, it would unfortunately be the end for Sutton Bridge, as it was to never take part in public days again. With war now inevitable, preparations began to be made that would supersede any public engagements.

From Biplanes to Monoplanes: Trials at Sutton Bridge

The looming war accelerated change. Outdated biplanes, long  being the backbone of the RAF, began to give way to sleek new monoplanes. Hurricanes, Spitfires and Blenheims were soon seen at Sutton Bridge, foreshadowing the modern era of aerial warfare, though training still relied heavily on older aircraft. The introduction of the Henley, Hawker’s own monoplane bomber designed to a specification for a light day-bomber that was capable of providing close air-support, was tried and tested with 350 initially ordered by the government. However, after a change in policy, this was reduced to 200 and even these being demoted to second line duties.

The promising aircraft, the younger brother of the Hurricane, never reached its potential, cut short before it had time to prove itself; many ended up as engine test beds or more likely, target tugs which caused many to have engine problems due to the low speeds it had to maintain with its high powered Merlin engine.

The second Henley prototype, K7554, fitted with a windmill-driven target winch (@BAE Systems.)*8

It was four of these Henleys that found themselves at Sutton Bridge where they were ‘downgraded’ and used as a Target Towing aircraft under 3 ATS between 1936 and 1939.

The Shadow of War: Sutton Bridge in 1939

1939 saw Europe heading catastrophically toward conflict, and this conflict was the reason for the reduced stay of 64 Sqn in August that year. On the 12th, they were ordered from their base at Church Fenton to Sutton Bridge for an armament training period, but owing to the worsening situation on the continent, this was cut short, and on the 24th, they were recalled. Within a week, like many other squadrons, they were ordered to mobilise.

Just before the outbreak of war, a sudden posting of the Training School from Sutton Bridge signalled what may have been its demise. But, the next day, one of the world’s most famous speeches was given, and Britain entered the war with Germany.

By the end of the 1930s, Sutton Bridge had grown from a temporary summer camp into a fully operational RAF station, shaped by innovation, spectacle, and the relentless demands of training aircrew. The lessons learned here – from aerobatic displays and night-firing trials to early experiments with new aircraft – prepared both pilots and the airfield itself for the pressures of wartime service. As Europe edged closer to conflict, Sutton Bridge stood ready, its evolving infrastructure and experienced personnel poised to meet the coming challenges of the Second World War.

The full story can be read in Trail 3 – Gone but not Forgotten.

RAF Sutton Bridge Part 1 – Its Origins and Early Days.

On the windswept Fens bordering Lincolnshire and Norfolk lies a site that shaped the skies of World War II. Far more than a quiet airfield, it was a crucible for pilots from Britain, the Commonwealth, and beyond, where Hurricanes, Spitfires, and Wellingtons soared – and often fell – as young airmen learned the deadly art of aerial warfare.

From rocket-firing trials to emergency landings, from multinational trainees to seasoned instructors, this airfield was a hub of innovation, skill, and courage. Lives were lost, lessons were learned, and generations of aircrew left ready to defend Britain’s skies. Though the airfield has largely returned to nature, its legacy remains – a testament to bravery, determination, and the high stakes of war in the air.

In Trail 3, we revisit the airfield that was RAF Sutton Bridge.

RAF Sutton Bridge

The origins of Sutton Bridge airfield are rooted some 20 years before the start of the Second World War, and largely owes its creation to the Holbeach firing range located in the shallows of the Wash just a stones throw north of the airfield. The range, which is still in operation today, was first supported by the airfield at Sutton Bridge as early as 1926 – a basic airfield from which to base those units using the range.

From Fens to Flying Fields

The airfield itself sits on the edge of the Fens, a flat, open area often referred to as ‘desolate’ and ‘drab’. In winter, certainly the wide open expanses allow winds to blow freely across its dark silt substrate, much of which lay under water for millions of years previously. But this dark open landscape offers prime agricultural and historical prospects, the Romans, Vikings and the Icini people all having made their mark on its dramatic landscape.

The airfield’s roots go back as far as the end of the First World War, the then newly formed RAF was cut back hard, reduced to a mere twenty-five squadrons for both home defence and to protect the commonwealth’s interests abroad. With little need seen for a home based air force, little thought was put into preparing pilots and gunners for any likely future conflict. To keep pilots busy, aerobatics and formation flying took preference over mock dog fights, aerial warfare tactics and ground attack practise.

But by the 1920s, this was not seen as productive and thoughts began to turn to training crews more responsibly, after all, if a pilot cannot engage and defeat his enemy then what use is he? So, a new firing range was sought to train pilots and gunners in the art of ground attack and air-to-air firing. The area required for such a task would need to be away from the public, but easily accessible and coastal, preferably with shallows waters. In 1925, several areas were seen as possible candidates; Catfoss, Donna Nook and an area known as Holbeach Marsh on the Lincolnshire / Norfolk border. After inspection by the Air Ministry, all three were deemed ideal, and so they took control creating three new ranges for the RAF’s use.

To be able to access the range at Holbeach, a nearby airfield was then needed, and being the closest, the former World War 1 site at Tydd St. Mary was given first consideration. However, strong objections from both local landowners and the council jointly, persuaded the military otherwise, and so an alternative had to be found.

The Birth of Sutton Bridge

The Ministry looked further east, nearer to the Wash, and found a small area close to the village of Sutton Bridge on the Lincoln / Norfolk border, about a mile or so from the sea. It would be perfect, and so an area of some 130 acres was obtained through either purchase or lease, allowing, on 1st September 1926, the birth of the soon to be, RAF Sutton Bridge.

The airfield’s main entrance gate and guard house, leading down towards the Mechanical Transport (MT) Shed, Bessonneau hangars and the airfield ground beyond. Visible in the far left background is the new Hinaidi type aircraft hangar built during the 1930s replacing two of the airfield’s original four Bessonneau type aircraft hangars. (source wiki)

Sitting on prime agricultural land, the airfield was hemmed in by both the River Nene along the western boundary and a former LNER railway line (now the A17 road) along the northern boundary. The borders of the two counties, Lincolnshire and Norfolk, cross the airfield resulting in it being divided between the two. The nature of this design though, would later on, lead  to many problems. The airfield being irregular in shape, meant that landing across it – cross-wind east / west – was very difficult if not impossible as there was insufficient room to do so. This would, in itself, restrict the number of days on which flying by trainees could take place, thus forcing them to make difficult cross-wind landings when they did.

In these early days Sutton Bridge would be rudimentary at best, bell tents being the main form of accommodation; only developing as new and longer training courses were needed. More permanent buildings were gradually erected including an Officers’ Mess, permanent accommodation blocks and maintenance workshops.

The 1920s was not a time for major airfield construction though, very few companies had developed or mastered the necessary skills needed for good airfield development. A local business,  Messers Thomson and Sons of Peterborough, were initially brought in, commencing the construction with small roads and tracks, along with four canvas Bessonneau hangars for storage and maintenance. Rudimentary maybe, but it was beginning to take some shape.

Original Entrance

The original entrance today.

Expansion and Identity: Sutton Bridge in the 1930s

The emergence of the ‘expansion period‘ in the 1930s, saw a period of rapid change and development in the military, where the need for airfields and a strong air force was seen as priority. Airfield development now began to improve and new companies, skilled in their design and construction, emerged onto the scene. One of these, “En-Tout-Cas”, in conjunction with other smaller companies, was enlisted to oversee the continued construction of the site at Sutton Bridge. These new and more experienced companies were employed under contract directly with the Air Ministry, using both civilian workers and their equipment, to build not only Sutton Bridge but Catfoss, Lee-on-Solent and Sealand as well *1

On January 1st 1932, the various training sites including Sutton Bridge were given formal titles – Armament Training Camps (ATC) – with each being given a number to distinguish them. Sutton Bridge became known as No. 3 ATC, handling fighter squadrons. Over the next few years it would go through a series of name changes, the first being on 1st April 1938, when it became 3 Armament Training Station (ATS), and then again, a year later, it would close only to reopen under the name of 4 Air Observers School (AOS).

Being better skilled in airfield design and construction, specific buildings for particular tasks were now being added to the work already done, small blocks for administration, maintenance sheds and such like all began to spring up. Being a pre-war construction, all buildings, including accommodation blocks, were placed directly on the airfield site rather than being dispersed as was the norm later on. Dispersals for aircrew were located at different points around the airfield’s perimeter, alongside the aircraft dispersals, and were brick built to protect crews from the heat and cold of the Fen weather.

The early Bell tents and Marquees were gradually replaced with more permanent brick structures arranged neatly in rows alongside the access road. Even with more permanent structures to bed down in, the comforts of a proper bed failed to materialise, instead metal stretchers with sawdust filled wadding for a mattress became the norm. *2

Wartime Growth and Shifting Commands

The runways of which there were three, were initially grass, but as the war progressed these were upgraded to ‘hard’ surfaces using a mix of steel matting, 080 American Planking and 130 Sommerfeld Track; all variants of metal planks that locked together to form a temporary but hard base. A concrete perimeter track was installed and fourteen hardstands were added using a hardcore base with tarmac coverings. In addition, two Bellman hangars, one Aeroplane Repair Section (ARS) Hangar and twelve 69 ft blister hangars were also erected on site. By the time it was established it had become a formidable site.

Sutton Bridge was passed directly to RAF control fourteen days after initial construction began, followed two weeks later by the arrival of the first RAF personnel from RAF Bircham Newton.

In these pre and early war years, the airfield would go through a series of ‘owners’ with 25 (Armament Training Group) under The Flying Training Command taking over in 1937 followed by 12 Group Fighter Command in September 1939 and finally back to The Flying Training Command once again in April 1942. The rapid change of ownership reflecting the many changes that the airfield would go through and the many units that would use its meagre but highly regarded facilities.

All these changes would mean that personnel numbers would fluctuate throughout the war depending upon who was there and what courses were being run, but in general the airfield accommodation could initially cater for 109 Officers, 110 Senior Non-Commissioned Officers and 110 ordinary rank male personnel; WAAFs were also catered for with 6, 12 and 361 respectfully. The fluctuation in staff would also reflect the numbers and types of aircraft on site. It is known that at one point there were no less than ninety Hurricanes plus other trainers along with Spitfires and Wellingtons on the airfield at one time.

For those travelling here on a posting, a train station was conveniently placed across the road from the airfield, getting to and from it was therefore relatively easy as long as the trains were running.

Photograph of the airfield’s main entrance (left) the Mechanical Transport (MT) Shed and on-site airfield road leading down towards four Bessonneau hangars and the airfield ground beyond. (Source via Wiki)

So far we have seen how Sutton Bridge began, how its origins owe its thanks to the range at Holbeach and how over the immediate post war years it developed as an airfield. In Part 2, we progress  through the 1920s and 1930s towards war, during which time, Sutton Bridge shone in the public eye, with pageants and air displays that enthralled the locals.

The full story can be read in Trail 3 – Gone but not Forgotten.

Trail 65 – RAF Thurleigh Part 2 – The USAAF Arrive.

In Part 1 we saw how RAF Thurleigh emerged from the Bedfordshire countryside and was shaped by early Luftwaffe raids on the construction site. We saw the arrival of new RAF training units flying Wellington bombers, and their subsequent departure to the far East. We saw how tragedy and fatal accidents claimed the lives of new Polish crews training at the station with 18 OTU, and how with Bomber Command moving on, Thurleigh’s role was set to change dramatically.

A New Ally Arrives: The American Transformation of Thurleigh

At the end of 1941, after the surprise attack on Pearl Harbour, America entered the conflict declaring war on both Japan and Germany and their allies. Over the next few months high ranking officials hurriedly put plans in place to send twenty-eight American bomb groups to the United Kingdom, and the European theatre of war. In a meeting between General Eaker and Air Chief Marshal Arthur Harris, discussions took place that would not only facilitate such a move, but also give the Americans suitable airfields on which to house their new heavy bombers.

Aware that most British airfields were too small to accommodate the American’s heavy bomber units, Eaker went on to press Harris for specific details including both their locations and the facilities available at each one. Anticipating this, Harris handed over the identity of eight potential sites, many of them RAF satellite stations, but all suitable for the American’s use. Amongst these were the airfields at Polebrook, Chelveston, Molesworth, Kimbolton, and of course Thurleigh.

Initially designated Station B-4, Thurleigh would then undergo a major modification programme, one that would bring it up to the new Class ‘A’ standard, a specification that would make it suitable for the American heavy bombers, both the B-24 ‘Liberator’ and the B-17 ‘Flying Fortresses’ that Eaker was sending over.

Thurleigh

One of the former arms buildings.

Construction crews quickly began work, both extending and reinforcing the short runways; they added additional hardstands, and expanded both the technical and domestic sites. Upon completion, the airfield would feature three concrete runways: one of 2,000 feet and two of 1,400 feet in length, each being the standard 50 yards wide. Aircraft dispersal was facilitated by a total of 51 loop and frying-pan style hardstands arranged around a full length perimeter track.

In addition, and unusually, four T2 hangars were erected, providing protective aircraft shelter and maintenance facilities. The bomb store was discreetly placed in Galsey Wood, a wooded area to the northwest and away from the main flying and accommodation areas – an essential safety precaution in wartime.

Fifteen accommodation sites, including two communal areas, two WAAF quarters, medical facilities, and barrack blocks, were all established along the road leading away from Thurleigh village to the south-west of the airfield. These sites employed a variety of wartime construction styles – brick, timber, concrete, steel, asbestos, and plasterboard – using standard designs from Laing, Nissen, Seco, Jane, Romney, and others. At full capacity, the base would accommodate over 440 officers and more than 2,500 enlisted personnel, including members of the Women’s Auxiliary Air Force.

After being allocated to the Americans on August 10th 1942, Thurleigh opened with its first residents. On 7th September that year, the first and only front line bomber Group to operate from the airfield, the 306th Bomb Group (BG), arrived with its four squadrons of B-17s: the 367th, 368th, 369th and 423rd Bomb Squadrons (BS). In command would be Col. Charles B. “Chip” Overcracker.

The 306th Bomb Group: Arrival of “The Reich Wreckers” (Autumn 1942)

Known as “The Reich Wreckers” the 306th would have many claims to fame, including being the oldest operational Bomb Group in the 8th Air Force and the only one to remain at the same station (Thurleigh) in England for the longest period of time. In addition, they were the first unit to have personnel achieve their first tour of operations, a major mile stone that gave the whole air force hope that going home was indeed possible.

Thurleigh

A graffiti panel rescued from a 423rd BS barrack now on display at the museum.

The Group, designated the 306th, were constituted on January 28th 1942, and activated in March that same year. Their journey to the UK began at Gowen Field in Idaho, transferring through Wendover Field to their embarkation point at New York onboard HMS Queen Elizabeth. The ground echelon set sale, travelling across the treacherous north Atlantic route to arrive at Greenock in Scotland, on September 5th, 1942.

The air echelon travelled separately, arriving a week later in small groups touching down at Thurleigh between the 8th and 13th September, having flown their own thirty-five aircraft across the northern route. This cold and bleak route took them via Greenland and Iceland, before passing over northern Ireland to arrive at Prestwick in Scotland on the north-west coast. During the journey over, one B-17F, with a crew of nine and one passenger, exploded for no apparent reason, 150 miles from Gander Lake,  Newfoundland. A second aircraft also ditched in the Irish Sea. The crew in this instance were picked up, but the aircraft was lost in the cold waters of the North Atlantic. This was the third B-17 the group had lost since their inauguration.

The 306th would go on to fight in some of the most bitter air battles of the war, including Schweinfurt, Stuttgart, Hannover, Berlin, Ludwigshafen and Leipzig. They would lead the first US bomber penetration of German skies; Big Week in February 1944, and go on to support both the Normandy landings and the St. Lo breakout. They would remain active throughout the war achieving numerous awards including two Medals of Honour, numerous Purple Hearts and two Distinguished Unit Citations (DUC) for action over occupied Europe.

Their arrival at Thurleigh was not however the great dream they may have wished for. On unloading, the 306th were greeted by unfinished buildings and mud – lots of it. Tents immediately formed the basis of personnel  accommodation and the officers’ mess was so small, staff had to operate in three shifts to enable them all to get fed.

Not only was a considerable amount of work needing to be done to get the station ready, but being new to the European theatre, a huge amount of ‘up-skilling’ was also going to be needed. To this end, intelligence staff, operations controllers and flight controllers were all sent to RAF stations to learn the ‘tricks of the trade’ enabling them to operate alongside their British counterparts in what was about to become a very busy airspace.

Baptism by Fire: First Operations and Early Losses

This poor start was then compounded when on October 2nd 1942, during a practice mission over the Wash, one of the waist gunners of B-17 #41-24492 ‘Lady Halitosis‘ of the 367th BS, suffered oxygen failure. In a bid to help the gunner, the pilot put the aircraft into a steep dive losing some 9,000 feet of altitude in a matter of minutes. The dive and subsequent recovery was so severe that the aircraft’s control cables snapped, and part of the starboard wing broke away taking an engine with it. The aircraft then caught fire and the bomb bay doors became detached. One of these doors, struck the rear section of the aircraft with such force that it severed the fuselage at the tail. The rear gunner, trapped inside his position, desperately tried to escape, hammering at the plexiglass and fuselage to break out. With only a 1,000 feet of air left, he just managed to break through the fuselage and free himself from his falling coffin. His parachute luckily opened, and he landed safely some distance away south-east of Spalding in Lincolnshire. His luck, already used exhaustively, somehow managed to continue on for a few moments more, when the remainder of the burning  B-17 came crashing down a mere one hundred yards or so from where he was sat.

Rescue crews from a nearby anti-aircraft gun ran to the scene but they were unable to get close enough to the wreckage due the the ferocity of the fire, and sadly, all six of those left inside, perished. During the whole episode only one other crewman managed to escape – Ball Turret Gunner Private Raymond McAskill – suffering slight injuries as he did so.

The event was so understandably harrowing for gunner S.Sgt. William Kellum, that he was eventually grounded, his mental state rendering him ‘unfit’ to continue on after having only carried out a few missions following his horrific flight debut in England.

With this disaster behind them, the 306th took to the air once more on their maiden operation on October 9th 1942, an operation to bomb the steel works at Lille, France. But again, it was not to be the glorious outcome they all would have wished for.

For the first time, over 100 American bombers, a mix of B-24s and B-17s, led by the soon to be legendary Col. Edward “Ted” Timberlake, flew across the English Channel to France. The huge formation, escorted by over 400 fighters, a mix of Spitfires – now part of the 4th Fighter Group –  and P-38 “Lightnings”, knew how important this mission was going to be.

Waiting for them were the battle hardened Luftwaffe pilots of JG 26 in their FW190s, they were not going to let the bombers through easily and the sky would be full.

With departure planned for 08:32, the lumbering giants gradually rose in to the air and set route for France.

As the bombers reached the target, the Luftwaffe struck, focussing initially on the B-24s of 93rd BG. Attacking from their favoured position, the rear, they struck at the formation ignoring the fighters flying high above. Releasing over the target, bombing was considered poor, some bomb aimers not even finding the target and so dropping their bombs on alternative sites. During the action, the formation had become disjointed, partly due to some turning back with technical problems and partly to some being knocked out by enemy fighters – the defensive wall had been breached.

As for the 306th, a second aircraft was lost, and this time there were no survivors. A third B-17, #41-24486 “Man O’ War” piloted by 2nd. Lt. James M. Stewart, lost three engines and its radio failed. It was about to ditch in the English Channel, when – as if out of a boy’s action story – a Spitfire, flown by Flt. Lt. Andrews of 91 Sqn, appeared alongside and guided the B-17 to RAF Manston in Kent where it made a successful crash landing. None of the crew were injured in the event, saved no doubt by the actions of Flt. Lt. Andrews.

Inexperience played a large part for many of the crews taking part that day. Being new to operational duties, not only had they suffered poor aiming but gunners had made hugely exaggerated claims about the numbers of enemy aircraft shot down – although probably unknowingly to them. In reply to the frenzied attack on the formation, air gunners sprayed bullets all over the sky hitting everything except the enemy. A mix of poor training and a determination to prove their worth, had been a recipe for disaster.

Thurleigh

One of several buildings on the bomb store.

Not only was the bomb aiming poor but so was the navigation. Many navigators, like the gunners, were simply not experienced enough, nor trained well enough for the European geography. With thick cloud being present almost all of the time, many new crews were unable to identify specific geographical features and were simply lost within 10 minutes of leaving their home base.*4

During this initial operation experienced enemy fighters were both fearsome and determined in their attacks. Whilst few bombers were actually shot down, all of those in the lagging 306th received hits from the FW-190s – some severely. The opening few weeks had been a real eye opener for the 306th, an experience resembling a baptism of fire not only for those newbies the “The Reich Wreckers“, but for the Eighth Air Force as a whole.

Weather, Warnings, and Misfires: October’s Frustrating Missions

The British winter weather then intervened. Several operations were cancelled as were training flights which were greatly needed. A cancelled flight to Lorient on October 21st, merely two weeks after their first operation, meant that the entire 306th returned without dropping a single bomb. The declining weather and poor visibility was to blame, but some ninety aircraft did continue on, and of those who did bomb, their bombs simply “bounced off” the submarine pens, having no impact whatsoever. *5

Aircrews were learning that operations over enemy territory were high risk, but even scrubbed missions could have their problems: aircraft still had tanks full of petrol and bomb-bays were still filled with tons of high explosives. For the 306th, troubles on this mission began even before they had left British airspace. When the abort signal came through, it instructed crews to drop their ordnance in the Wash – a large body of shallow coastal water off the north Norfolk coast.  Whilst it became a common practice for scrubbed missions, for one B-17 it was not going to be a simple or straight forward task.

Emergency Landing: A B-17 Touches Down at Sutton Bridge

B-17F, #41-24460 ‘RD-A’, “Little Audrey” of the 423 BS, began the process of releasing its bombs when suddenly the life raft latch broke loose causing the raft to escape and wrap itself around the elevator rendering the aircraft difficult to control.

Captain Mack McKay, 306th BG points to a “kill” marking painted on his B-17 Flying Fortress “Little Audrey” (IWM FRE 4418)

Now being unstable in flight, the B-17 had to find a safe place to land, and near to the Wash was the firing range at Holbeach and its associated airfield at RAF Sutton Bridge. A physically small grass airfield that was used for gunnery training of RAF fighters, it was not designed to take large four-engined heavy bombers. The likely hood of getting down safely was slim, but after using all his skill and judgement, the pilot managed to put the bomber down safely on the grass much to the joy of those inside the bomber. Once remedial work had been carried out on the aircraft, the crew began to prepare for the take off, an event just as risky as the landing and with odds just as bad.

Being an unusual aircraft to see at Sutton Bridge, huge crowds gathered to see the B-17 and to witness what could have been a terrible accident had the take off been misjudged on the small grass strip. Fortunately though, again using all his skill and judgement, the pilot got the aircraft up and the B-17 successfully rose in to the air making its way home to Thurleigh being waved off by the extensive crowd of locals gathered by. *6

Mounting Pressure: Heavy Losses and Royal Visits

The early days of November 1942, saw missions 3, 4 and 5 for the 306th. Visits to Brest, Lille and St. Nazaire, saw a further four aircraft lost with all crews listed as ‘missing in action’. These early loses were beginning to mount, and those in charge were beginning to voice their concerns.

On November 13th, a Royal visit was made in which General Carl Spaatz and King George VI carried out a tour of the many airfields now in the region, including Thurleigh. Whilst the Royal party were here, they were shown around the airfield, seeing the various facilities available. They were also introduced to several crews and ground staff with whom they chatted happily.

Brigadier-General Newton Longfellow and Lieutenant Robert L Riordan of the 306th Bomb Group, show King George VI part of a damaged B-17 Flying Fortress during a royal visit. (IWM FRE 4390)

The B-17’s Fatal Flaw – and its Remedy

But the relief brought by important visitors didn’t prevent problems in the air. By now, the Luftwaffe had got the measure the of the B-17 and pilots, such as Oberstleutant Egon Mayer, quickly found its Achilles heel. Even though bristling with guns, the B-17s suffered from ‘blind spots’, areas where the gun’s arc didn’t cover. This made the bomber vulnerable, and the worst position was through a direct full frontal attack. New tactics were then used by the Luftwaffe, directing fire directly at the front of the aircraft, potentially its most vulnerable position. It became so successful, that some 30% of pilots and co-pilots in the 306th were killed in such attacks.*7  With little protection, early model B-17Es were quickly withdrawn from front line operations and investigations carried out into a possible remedy to the problem.*8

Naturally the B-17 crews realised this vulnerability too, and also set about finding their own remedy. Whilst official routes were being taken to solve the problem, these were taking too long, and a quicker solution was needed. Within the 367th BS an armourer  and a welder (S. Sgts. James C. Green and Ben F. Marcilonis) got together and took matters into their own hands. They designed and built a new bracket that could hold a heavy .50 machine gun fitted into the nose of the aircraft to protect this gap in the forward arc.  Once constructed and fitted, trials began, the ‘guinea pig’ being a B-17F #42-5130 named “Sweet Pea“.

The bracket fitted to Sweet Pea, proved to be so successful that it was adopted not only by the 306th but the 8th Air Service Command as a whole*9 becoming part of a modification feature to future B-17 models.

The aircraft  was unusual for other reasons though. It was ‘christened’ on December 20th 1942, by a small orphan girl called ‘Maureen’ whom the 367th BS had adopted from a London orphanage. They gave her the nickname ‘Sweet Pea‘ and to mark the occasion, she dipped her hand in paint and placed a print on the aircraft as a form of dedication.. Like many aircraft of the ‘Reich Wreckers’, Sweet Pea would fly on several operations, suffering a great deal of damage in the process; eventually failing to return from operations to Lorient on March 6th 1943, with one airman killed in action, one evading and eight being taken prisoners of war.

The news report on the dedication of ‘Sweet Pea‘ by Maureen – a three year-old orphan – at Thurleigh. (IWM UPL 15963)

Thurleigh had transformed from a training airfield into a heavy bomber base ready for its new American role. Upgraded to Class “A” standard it soon became home to the 306th Bomb Group – “The Reich Wreckers.” Their arrival in September 1942 was far from smooth though: unfinished buildings, muddy conditions, and a steep learning curve in the European theatre made for a difficult start. Early missions brought tragedy, from training accidents to heavy combat losses, while poor weather and inexperience compounded their struggles. Yet alongside setbacks came resilience, adaptation, and even innovation, as crews refined tactics and strengthened their aircraft. With these foundations laid, the stage was set for the 306th to face the increasingly bitter air battles of 1943.

The entire history can be read in Trail 65