Sqn. Ldr. Ian Willoughby Bazalgette (RAFVR) VC

RAF Downham Market was one of a small number of airfields that were home to the RAF’s Pathfinder Squadrons. Elite airmen who would lead formations of heavy bombers into some of the most heavily defended areas of the Reich, often against insurmountable odds and always at great risk to themselves. The Pathfinders produced some remarkable flyers and many, many heroes. Of all the crews who flew with 8 Group PFF, only three were rewarded for their valour and gallantry with the highest possible accolade, the Victoria Cross. One of those went Posthumously to Sqn. Ldr. I. W. Bazalgette, whose long and distinguished career led him to achieving 58 missions before his death. Based at RAF Downham Market, Bazalgette, would become legendary, flying his Lancaster bomber in pursuit of victory against a tyranny beyond all evil.

Ian Willoughby Bazalgette.jpg

Sqn Leader Ian Bazalgette (RAFVR) died August 4th 1944, a few days before his 26th Birthday.*1

Squadron Leader Ian Willoughby “Baz” Bazalgette was born on October 19th 1918 in Calgary, Canada and was the youngest of three children. His parents decided to move to England in 1924 when he was six, settling in New Malden, Surrey on the outskirts of London.

During his school life he developed a passion for music, and in particular Classical Music, which he immersed himself in spending hours listening to and writing about.

As a teenager, he would have his first real battle, that of tuberculosis, which meant he would have to undergo four long months of hospital treatment. Bazalgette’s strength and determination would see him pull though this, a strength and determination that would go on to show itself on a number of occasions later on during his RAF career. 

Prior to the outbreak of war, Bazalgette decided to enlist, applying to, and being accepted by, the Royal Artillery; achieving a commission as Second Lieutenant within a year. This new role took him to the outskirts of Edinburgh operating a radar searchlight, protecting both the city, and the Forth Estuary from Luftwaffe bombers. Dissatisfied with the routine of searchlight activities, he decided to give up this role, and whilst on a trip into nearby Edinburgh in March 1941, he applied to the Royal Air Force Volunteer Reserves. His application was accepted and in the following July, he received his first posting to a training unit – 22 Elementary Flying Training School at Cambridge.

Throughout his training Bazalgette showed great tenacity and promise, quickly passing  a number of stringent and difficult flying tests. Flying solo for the first time during August, gave him the opportunity he had been longing for. His flying skills impressed his seniors so much that on the 28th, he passed the C.O.s test taking just 30 minutes to complete the flight. Upon passing, he was graded as an ‘above average’ pilot by his examiners.

Bazalgette was then transferred to Cranwell where he trained on Airspeed Oxfords. At Cranwell he achieved his wings, and after a short break, he was sent to Scampton and 18 Beam Approach School. Bazalgette eventually left Scampton, heading towards his first operational unit, 25 Operational Training Unit, where he would form his first crew.

Informal crewing up was very much encouraged by the RAF, but those that didn’t manage the task were allocated crew members by the relevant staff at the various bases; Bazalgette had no problems in finding his own.

Whilst at the OTU, Bazalgette would have his first experience of heavy bombers flying the Vickers Wellington; a remarkable aircraft that used Barnes Wallis’ geodesic construction in Rex Pierson’s design.  Bazalgette and his crew competed a range of training flights whilst at 25 OTU, including air gunnery and bombing practice, all of which they passed. On September 18th 1942, after accumulating some 223 hours as a pilot, Bazalgette received his first posting to a fully operational Squadron, 115 Squadron at RAF Marham, Norfolk, he was off to war.

The very next day he flew “Second Dickie” assisting an experienced crew tackling the rigours of an operational sortie to Saarbrucken. Two days later he was back out, but this time laying mines on a ‘Gardening’ mission shortly before the squadron moved to nearby RAF Mildenhall in Suffolk. It was here that Bazalgette would fly his first operational mission as a pilot leading his own crew.

After moving to East Wretham, 115 squadron then began the task of replacing their Wellingtons with Stirlings, and Bazalgette was sent to 1567 Operational Conversion Unit (OCU) to convert to the big heavy four-engined aircraft. Between him completing the course and returning to East Wretham though the Stirling had been superseded, proving to be a poor performer in conflict zones. Bazalgette would now get his chance to fly the legendary Lancaster.

On the 3rd April 1943, Bazalgette was awarded the DFC, and the same strength and determination that had got him though tuberculosis would get him through his tour of 30 missions. On completion, as was customary at this point, he and his crew were separated and scattered across a range of new squadrons within the Air Force.

Bazalgette was sent back to Scotland and RAF Lossiemouth where he reluctantly trained new bomber pilots, a position he disliked immensely. He pleaded for postings to an operational unit, a plea that was eventually granted in April 1944, and a posting to RAF Warboys and the Pathfinder Conversion Unit.

From here he transferred with a new crew to 635 Squadron at RAF Downham Market, in Norfolk, a few miles west of Marham the very station he had spent his early days at with 115 Sqn.

As a model crew, he was looked up to by others at Downham Market. He would go on to fly 58 missions in total, two off his score of two tours of duty.

However, his 58th mission would be his last. On August 4th 1944, Lancaster ‘M’ for Mother would not be listed for duty, but an absent crew left an opening that Bazalgette and his crew jumped at. It was a decision that would change their lives forever.

On that day, Bazalgette would fly Lancaster Mk III, F2-‘T’ for Tommy, not their usual aircraft but it was ready, fuelled and bombed up. The aircraft was known for a history of mechanical problems, its usual pilot tending to work the engines much harder than necessary, but it was a choice of stay on the ground or fly the mission: for Bazalgette and the crew of ‘M’ for Mother it was an easy choice.

The mission for the day was as Master Bomber of the Pathfinder squadron to identify and mark a V1 storage site at Trossy St. Maximin, a heavily defended area to the north of Paris. Take off was set for 11:00, over the next fifteen minutes at five-minute intervals, 14 Lancasters of 635 Sqn would leave Downham Market heading for France. The weather was less than 3/10 cloud over the target, excellent for the determined and accurate anti-aircraft gunners below. On the second run in to the target, the Master Bomber and Deputy Master bomber were both hit, one being downed (PA983 F2-A piloted by F/L. R. W. Beveridge) and the second forced to return home, leaving Bazalgette as the lead aircraft.

Flak was incredibly intense and his aircraft repeatedly hit. The starboard wing was struck causing damage to both engines, subsequently putting them both out of action. In the wing the fuel tanks caught fire, fuel poured into the rear of the fuselage and the situation becomes desperate. The bomb aimer was mortally wounded, his arm barely recognisable due to his injuries, but Bazalgette managed to reach the target, drop both his markers and his bombs, whereupon the aircraft began a steep spin toward the ground below. As the situation worsened, he gave the order to bail out, all but three; Bazalgette, F/Lt. I. A. Hibbert and F/Sgt. V. V. R. Leader are left.

Bazalgette continued to fight with the controls and quite remarkably managed to keep the stricken bomber flying long enough to avoid the French village of Senantes. Unable to maintain height, the aircraft finally hit the ground, resting momentarily before exploding in a massive fireball killing all those remaining on board.

Once the ferocious fire subsided, locals were able to reach the wreck and remove the bodies of both Leeder and Hibbert. Bazalgette’s remains were not found until the air frame was removed, some days later.

For his bravery and sacrifice, Ian Bazalgette was awarded the V.C., the highest honour for military personnel. The London Gazette, of 14th August 1945, published the following:

On 4th August 1944 Squadron Leader Bazalgette was “Master bomber” of a Pathfinder Squadron detailed to mark an important target for the main bomber force. When nearing the target his Lancaster was seriously damaged and set on fire by anti-aircraft fire; the bomb aimer was badly wounded. As the deputy “Master bomber” had already been shot down, the success of the attack depended on Squadron Leader Bazalgette who despite appalling conditions in his burning aircraft pressed on gallantly, bombed, and marked the target accurately. That the attack was successful was due to his magnificent effort. The condition of the aircraft had by now become so bad that Squadron Leader Bazalgette ordered his crew to leave the aircraft by parachute. He attempted the almost hopeless task of landing the crippled and blazing aircraft to save the wounded bomb aimer, and one air-gunner, who had been overcome by fumes. With superb skill and taking great care to avoid a French village, be brought the aircraft safely down. Unfortunately it then exploded and this gallant officer and his two comrades perished. His heroic sacrifice marked the climax of a long career of operations against the enemy. He always chose the more dangerous and exacting roles. His courage and devotion to duty were beyond praise.

Ian Bazalgette’s sacrifice marked the end of a career covering an incredible 58 operational missions. His courage, determination and devotion to duty going way beyond those expected of any serving officer. With him that day on ‘T’ for Tommy were: Sgt. G. R. Turner; F/L. G. Goddard; F/L. I. A. Hibbert DFC; F/O. C. R. Godfrey DFC; F/S. V. V. R. Leeder (RAAF) and F/O. D. Cameron DFM. Of the four men who manged to get out of the aircraft: Turner, Goddard, Godfrey and Cameron, all managed to evade capture*2.

In his honour, Bazalgette has a Garden in New Malden, Surrey named after him, a school in Calgary, the ‘Ian Bazalgette Junior High School’, and at the Bomber Command Museum of Canada, an Avro Lancaster, FM159, was painted in the markings of his aircraft; the Lancaster was dedicated in 1990. At the ceremony, Bazalgette’s sister, Mrs. E. Broderick, unveiled a commemorative plaque whilst the aircraft itself was unveiled by two of Bazalgette’s former crew members, Chuck Godfrey DFC and George Turner, both of whom were with him of that fateful night.

Outside the church of St. Mary’s at Bexwell close to the accommodation sites of Downham airfield, stands a small memorial in his name. Laying beside him is the memorial of another V.C. winner Arthur Aaron, who was also based at RAF Downham Market during the Second World War.

Ian Bazalgette was one of those many young men who sacrificed their lives in the hope of saving others. He dedication to duty, determination to win and above all, his value of other’s led to a tragic and sad end, that shall forever be remembered in the hearts and minds of those who lived through those terrible years 1939-45.

RAF Downham Market

The memorial at St. Mary’s Church Bexwell.

RAF Downham Market appears in Trail 7: Northwest Norfolk.

There is a book written listing every operation of 635 Sqn whilst at RAF Downham Market, with crew details, aircraft profiles and mission aerial photographs. It is an amazing record and the result of three years work. The author Christopher Coverdale, is also on the committee aiming to construct the new memorial at RAF Downham Market.

Notes and Further Reading.

Coverdale C. ‘Pathfinders 635 Squadron – definitive history March 1944 – September 1945‘ Published by Pathfinder Publishing, 2009. ISBN: 978-0-9561145-0-1

The Bomber Command Museum of Canada website has a detailed account of the restoration of Lancaster FM159.

*1 Photo IWM – CH 15911 in the public domain.

*2 Chorley, W. R. ‘Bomber Command Losses of the Second World War‘ Vol 5, 1944, 1997

Other records of heroism and crew stories can be found on the Heroic Tales page.

The Borders – RAF Charterhall (Part 3)

We carry on from Part 2 of Trail 41 for the final Part of RAF Charterhall. An airfield that had become known as ‘Slaughterhall’ it was about to see a new breed of aircraft, perhaps even a turn in luck.

RAF Charterhall

The main runway at Charterhall looking south.

The night of May 27th – 28th 1944 was a heavy night for Bomber Command, with large numbers of four engined heavies attacking targets in Germany.  On their return, ten Lancaster bombers were diverted to Charterhall, the first time the four engined bombers would use the airfield, but not the last. On the 8th June, another seven were to arrive, also diverted on their return from the continent. Then in July, a Halifax was diverted here after sustaining heavy flak damage over Helioland. The pilot, P/O W. Stewart of the RCAF and navigator P/O K. Evans (RAF) were both awarded DFCs for their action whilst badly injured, such was the determination to get all the crew and aircraft back safely.

July to October saw an increase in flying and an increase in accidents. July ‘led the way’ with heavy landings, burst tyres, ground collisions and engine failures being common place. The majority of these incidents were Beaufighter MKIIfs, some were visiting or passing aircraft who suffered problems and had to divert. Charterhall saw a mix of Lysanders, Barracuders, Beauforts, Wellingtons and Hurricanes all use Charterhall as a safe haven.

As the threat of attack was now diminishing, a reorganisation of the O.T.Us would see 9 Group disband in September that year. The responsibility of 54 O.T.U (now flying mainly Mosquitoes) and Charterhall would now pass to 12 Group.

Eventually 1944 turned to 1945 and the year that saw for 17 fatal crashes also saw 54 O.T.U. take on more aircraft and more crews.

January 1945 was incredibly harsh in terms of weather and the cold. Training new crews on new radar meant that Wellingtons were brought into Charterhall. Small teams of pupils would take turns to operate the radar to detect Hurricane ‘targets’. These new models increased the air frame numbers at Charterhall to 123 by the end of January.

RAF Charterhall

‘No. 1’ Building on the Technical site.

By now the allies were winding their way into Germany, pressure was increased by Bomber Command and so more heavies were to find Charterhall a refuge when the weather closed in. On the 15th February a large ‘Gardening’ operation led to 12 heavies landing at Charterhall along with four Mosquitoes who had been flying with them over Norway. All these aircraft were able to return to their various bases at Skipton-On-Swale, Leeming and Little Snoring the next day.

Two days later, more aircraft were to find Charterhall (and Winfield) needed. Some 266 aircrews – an incredible influx for one night – were going to need bedding – billiard tables, sofas and chairs suddenly became in very short supply.

The poor weather continued well into the year and snow caused some ‘minor’ accidents at Charterhall. The first confirmed death was not until early March and others were to follow. By May the war had come to an end and operations began to wind down. Winfield was closed and crews returned to Charterhall. Beaufighters were gradually sold, scrapped or moved elsewhere, and by August the last aircraft had left.

March would see the last fatalities at Charterhall, both in Mosquitoes on the 25th and 29th. In the former, the aircraft was in a high-speed vertical crash and the latter the pilot, Flight Lieutenant Cole (s/n125484), overshot the runway and crashed his Mosquito FBVI (HR297) a mile south of the airfield. He was 22.

Apart from a small detachment of crews from 770 Squadron Naval Air Branch carrying out trials, operations began slowing down. After VJ day, the Mosquito numbers were also wound down, only fifty-one aircraft remained by the end of August.

In September the order came through to vacate Charterhall and the packing began. By the end of the month 54 O.T.U. had all but vacated leaving Charterhall quiet once more. The last eighty aircraft consisting of: Mosquito VI,  XVII and NF30s, Martinets, an Oxford, Miles Master II, Ansons, Hurricane IICs and Wellington XVIIIs were flown out for the final time, 54 O.T.U. had played its part and their end lay ahead.

In the three years that Charterhall had been in operation, they had passed over 800 crews for night fighter operations, they had suffered over 330 accidents, 56 of which had resulted in deaths. During this time crews had flown just short of 92, 000 hours flying time day and night, with almost a third being carried out at night. Had it not been for this unit, the heavy bombers of Bomber Command may well have suffered even greater losses, the determined and deadly night fighters of the Luftwaffe may have had a much wider and easier reign over our skies and the losses we quote today would be even higher.

But the withdrawal of 54 O.T.U. was not the demise of Charterhall. For a short period it was set up as No 3 Armament Practice Station, designed to support and train fighter pilots in the art of gunnery. During its period here November 1945 – March 1947 it would see a range of aircraft types grace the runways of Charterhall.

The first units were the Spitfire IXB of 130 squadron from December 1st 1945 – January 24th 1946, followed by 165 Squadron’s Spitfire IXE between 30th December and January 24th 1946. On the day these two squadrons moved out, Charterhall entered a new era as the jet engines of Meteor F3s arrived under the command of 263 Squadron. After staying for one month they left, allowing the Mustang IVs of 303 (Polish) Squadron to utilise the airfield. Each of these squadrons followed a course which included air-to-air target practice, ground attack, bombing and dive bombing techniques.

Following the completion of the course 303 pulled out and the order was given to close No. 3 Armament Practice Station and wind Charterhall down for good. The RAF sent no further flying units here and apart from a detachment of Mosquitoes from 772 Squadron of the Fleet Air Arm, by the following summer, it had closed. The final spin of the airscrew had taken place.

Post war, the airfield was left, the runways and buildings remained intact and the airfield was used by small light aircraft. Gradually though it fell into disrepair, used mainly for agriculture, it had a new lease of life when on Saturday May 31st, 1952, the airfield saw its first motor race using sections of the perimeter track and runways. A two-mile track became the proving ground for a number of the worlds most famous racing drivers including: Sir Stirling Moss, Jackie Stewart O.B.E., Roy Salvadori, Sir John Arthur ‘Jack’ Brabham, AO, OBE, Giuseppe “Nino” Farina and local boy Jim Clark O.B.E. Clark cut his racing teeth at Charterhall, eventually winning 25 Grand Prix races and the Indianapolis 500 in 1965. His grave lies in nearby Chirnside cemetery alongside his mother and father. Charterhall also saw the appearance of Scotland’s first organised sports car team, ‘Ecurie Ecosse’, using Jaguar cars*4. Racing occurred here until 1969, when the current owners took over the site.

The RAF then returned briefly in late 1976 undertaking trials of the Rapier ground-to-air missile system, in which a range of fast jets including Jaguars and Phantoms would participate. These lasted a month which would see the last and final RAF involvement end.

The owners reinvigorated the site providing a venue for rally sport events which started again in 1986. Eventually on March 30th, 2013, the last ever race was run and motor sport stopped for good and so another era finally came to a close.*5

RAF Charterhall

Jim Clark’s grave stone at Chirnside.

Today a section at the western end of the main runway is still available for use by light aircraft (with prior permission) and the main technical area is home to the Co-op Grain store, a facility which has a number of large stores for drying and storage of grain.

Accessing the site is from the B6460 where a memorial stands to the crews who passed through Charterhall and in particular Flight Lieutenant Hillary and Flight Sgt. Fison, who died in such tragic circumstances. A track leads all the way to the airfield site, which was the main entrance to the airfield. A good quantity of buildings still stand here on the technical site along with two of the original hangars. All of these are used for storage or stabling of animals including horses and are rather rundown. The perimeter track and runways are complete but their surfaces are breaking up and in a poor state of repair.

These buildings are a remarkable and poignant reminder of the tragic but significant years that Charterhall prepared and developed crews for the night fighter squadrons of the RAF. Hundreds passed through here, for many it was a difficult twelve weeks, for some it ended abruptly and decisively. Not known for its comforts, it was a pivotal station in the Second World War and indeed also for many years after for the those who went on to become some of the world’s most famous motor racing drivers.

Many airmen came and stayed, sixteen of them who were killed on active service whilst at Charterhall are buried in the nearby cemetery at Fogo, a short distance to the north of the airfield. Many are from around the commonwealth who came here to help and were never to return.

After leaving Charterhall, we head a little further east to Charterhall’s satellite and a site that had strong links with the forces of Poland. Remembered here is an usual mascot, a bear known as ‘Wojtek’. We stop off a few miles away at the satellite that was RAF Winfield.

Sources and further reading

*4 Obituary of Bill Dobson: ‘Ecurie Ecosse’ racing driver in ‘The Scotsman‘ newspaper 21st October 2008.

*5 A news report of the event can be read on ‘The Berwickshire News‘ Newspaper, 28th March 2013.

The Borders – RAF Charterhall (Part 2)

Following on from Part 1 of Trail 41 – The Borders, we return to Charterhall in the beginning of 1943.

During the Battle of Britain many pilots suffered from burns in aircraft fires and crashes. The famous ‘Guinea Pig club’ became synonymous with those men who underwent experimental techniques in reconstructive skin work carried out by of Archibald McIndoe at the Queen Victoria Hospital, East Grinstead in Sussex. Some of these men wrote about their experiences, and one, Flight Lieutenant Richard Hillary, sadly lost his life at Charterhall.

Hillary arrived here in November 1942 – after two long years of surgery and hospitalisation. Writing about his experiences in ‘The Last Enemy‘ he opted for night fighter training and was posted to Charterhall. Still disfigured, he had virtually no experience in night flying and none on twin-engined aircraft.

RAF Charterhall

One of two remaining hangars.

The controls of the Blenheim were awkward and difficult to use at the best of times, Hillary, with his disfigured hands, found the Blenheim I more so and often needed help with the undercarriage. Cockpit lighting was another issue experienced by crews, even in later models instrument panels were difficult to read in the dark and this led to several pilots making errors when reading the various dials and gauges. Hillary found this a further challenge, with damaged eyelids his night sight was ‘impaired’ and on January 8th 1943, his aircraft, Blenheim V BA194, struck the ground killing both him and his Radio Operator Flight Sgt. K.W. Fison. The cause of the crash is unclear, whether Hillary’s condition added to the accident is not known, and it is generally thought to be as a result of icing due to the thick, cold Scottish fog. Whatever the cause, it ended the life of two very brave young men, one of whom had fought long and hard to survive in some of the harshest of times.*2

In April 1943 Beauforts began arriving to replace the ageing and very much outdated Blenheim Is. It was also in this month that responsibility of the O.T.Us passed over to 9 Group, and there were now fourteen operational units countrywide. Monthly ‘processing’ of new crews would be increased to an intake of 40 all undertaking a 12 week course before finally being posted to operational squadrons.

The summer of 1943 saw a rapid increase in accidents. Some of these occurred on the ground as well as whilst flying. On June 14th a tragic accident occurred when a Beaufighter piloted by Sgt. Wilkie, swung on take off colliding with another aircraft being refueled. The Bowser exploded in the accident destroying both aircraft and killing two ground staff: Leading Aircraftman (LAC) Francis P. Matthews and Leading Aircraftman George Lotherington.*3

A further incident, also caused by a Beaufighter swinging on take off, caused the first July fatality, when the aircraft hit both a blister hangar and a taxiing Beaufort. The two collisions wrote off the Beaufighter and severely damaged the Beaufort. The pilot of the Beaufighter,  Flight Sgt. W. Andrew (s/n 415280) aged just 21, was killed in the incident.

July was a milestone for 54 O.T.U in that it was the first time that 3,000 flying hours had been exceeded of which 894 had been carried out at night at a cost of 20 accidents – such was the demand for trained operational crews.

During September, new MK VI Beaufighters began to arrive. These were passed directly to Winfield and ‘C’ squadron after delivery and inspection at Charterhall. Even though they were ‘factory new’, they did not prevent further accidents nor deaths occurring. By the end of 1943, 54 O.T.U had amassed 28,940 hours flying time of which 7,012 were at night. A huge total that had enabled the RAF to pass the equivalent of 12 operational squadron crews but it had also taken a serious loss of life.

In January 1944 the unit strength was up to ninety-six aircraft, flying continued where the inclement weather allowed, and the year would start off with no serious accidents or deaths – a welcome break; but 1944 would eventually prove to be Charterhall’s worst year.

May brought a new focus for the trainees when it was decided to make  54 O.T.U operational in support of the impending invasion. Operating in the night fighter role, they were called out on to intercept German aircraft roaming over the north-east of England and southern Scotland. Unfortunately, whilst intruders were detected, no contacts were made during these operations, primarily due to the intruders flying too low for the GCI to pick them up; but it did give some purpose to the heavy losses that were being incurred.

At this time a new aircraft began appearing in ‘C’ Squadron, a model that gave new hope and determination to the crews – the incredible, D.H. Mosquito. By the war’s end, 54 O.T.U. would have used eight different variants of the Mosquito.

The initial batch of two were located at Winfield, rather disappointing perhaps for those at Charterhall, but they were not to be  devoid of their own special breed of aircraft.

The final part of our visit to RAF Charterhall will follow soon, the end of the war is in sight and so starts a new era for RAF Charterhall…

Sources and further reading

*News report on Hillary in ‘The Scotsman‘ Newspaper, 11th November 2001

*3 Commonwealth War Graves Commission website accessed 29/4/17

The Borders – RAF Charterhall (Part 1)

After leaving the Wolds of Yorkshire, Trail 41 takes us north across the border into Scotland. A land as diverse in its history as it is its beauty.  With fabulous views of the Cheviots to the south and the North Sea coast to the east, it is an area renowned for beautiful scenery and delightful walks. With Holy Island and Lindisfarne Castle standing proud, it also an area with a rich and diverse aviation history,

In this trail we stop off at two airfields where we find some remarkable relics and some terrible stories.

Our first stop is at a site that is little known about even though it played a major part in the night-fighter air war, and was also the proving ground for some of the world’s top motor racing drivers as well. Yet beneath all this glamour and bravado it holds a collection of terrible stories. We stop off at the former RAF Charterhall.

RAF Charterhall.

Located some 15 miles south-west of the coastal town of Berwick, Charterhall airfield had its aviation origins in the First World War. Its original name was RFC Eccles Tofts (although the two were not quite the same physical site), a landing ground for 77 Squadron who were based further north at Edinburgh, and flew the Royal Aircraft Factory BE.2c/d/e, BE.12, RE8, de Havilland DH6 and Avro’s 504k.  Whilst not official detached here, the airfield was available for these aircraft to land upon and be recovered should the need arise. It wasn’t kept open for long and soon disappeared returning to its former agricultural use.

Charterhall is one of those airfields that has a grand sounding name, suggesting regency and nobility, its reality though, was somewhat different. It gained the rather unsavoury, but apt, nick-name ‘Slaughterhall’, due to the high accident rate of the trainee aircrew who passed through here.

RAF Charterhall

Technical buildings at Charterhall.

Many of the aircraft that operated from here were outdated and ‘war weary’, held together by the dedicated mechanics that took great pride in their work. Used for short-term placements of trainees, it would not house any true front line squadrons until the war’s end in 1945.

As a training airfield it would have a large number of airfield buildings, two Tarmacadam (Tarmac) runways the main running east-west of 1,600 yards and the second north-east/south-west of 1,100 yards; both were the standard 50 yards wide. There were some 38 dispersal pans, similar in shape to the ‘frying pan’ style , eight blister hangars and four main hangars of which two still survive. Chaterhall’s accommodation was initially designed for 1,392 airmen and 464 WAAFs – consisting of 126 Officers (both male and female) and 1,730 other ranks (again both male and female).

The main technical area was to the north side of the airfield with accommodation spread amongst the woods around this area. The watch office, long since demolished, was a mix of concrete and timber (thought to be initially a 518/40 design), which originally had timber floors, roof and stairs. However, an acute shortage of wood led to all these designs having only a timber balcony and control room. These modified designs (Charterhall included) were therefore built to a mix of 518/40 and 8936/40 specifications.

Another interesting feature of Charterhall would have been the instructional fuselage building. Here crews would have been trained using an aircraft fuselage (Charterhall had two, one each of Beaufighter and Blenheim) jacked up and linked to a controller’s panel. A number of simulated problems could be created for the crews to experience, anything from radio exercises through small warning lights to engine failure and even ditching. All crewmen had to have a good understanding of their aircraft, working hydraulics, electrical and fuel systems were all taught using this same method. In addition to these training fuselages, Charterhall would operate six Link Trainers, along with several other ‘state of the art’ training facilities.

RAF Charterhall

Many of the remaining buildings are in a poor state of repair.

The entire airfield would occupy around 143 hectares, it was certainly not large, especially considering the numbers of crews and mix of aircraft it would have during its short life.

Construction of Charterhall took place over 1941/42 opening on April 30th as part of 81 Group Fighter Command (and later 9 Group), receiving 54 Operational Training Unit (O.T.U) in May 1942. Formed two years earlier, they flew primarily Blenheim Is and Beaufighter IIs under the Squadron code ‘BF’ (Four different unit codes were used: BF, LX, ST and YX). A number of these aircraft were fitted with Aircraft Interception radar (AI) and some Blenheims were dual control.

To support the operations at Charterhall, a satellite airfield was built at nearby Winfield, a few miles east, both sites being used by 54 O.T.U. simultaneously. Later in the war, in an effort to divert marauding Luftwaffe bombers away from the two airfields, a dummy ‘Q’ site (No. 179) was built at Swinton also to the east of Charterhall.

The increase in O.T.U.s in these early days of the war was as a direct result of the increase in demand for new pilots in Fighter Command. In December 1940, 81 Group had six such units (54-59 O.T.U.) and by June 1941 this had increased to nine (52 – 60). By 1942, a total of twelve were in existence boosted by the addition of 12, 61 and 62 O.T.U. 54 O.T.U. would be one of two specialising in twin-engined night fighter flying. New crews, of which there were about 30 per month, were initially given about ten days to establish themselves and ‘crew up’. As time passed however, this time reduced to the point where some intakes were literally herded in a hangar and told to find a crewman or they would be allocated one! *1

Many of the crews arriving at Charterhall were brought in from around the Commonwealth and after passing their basic flying training instruction, would proceed through a further three stages of training. Some crews were also ex-fighter pilots already battled hardened, who had transferred in from front line units to night-fighters.

Progression through the course would be through initially three, and latterly four, squadrons. ‘A’ Squadron would be the initial conversion unit initiating crews on the rudiments of twin-engined aircraft as many had come from single engined fighter units. ‘B’ Squadron was the intermediate squadron, where the crews moved onto the larger twin-engined aircraft and finally ‘C’, (based at Winfield) was the advanced squadron honing skills such as aircraft interception and attack.  After completing the full training period, crews would receive postings to front line squadrons across the U.K. and beyond.

RAF Charterhall

A latrine on the technical site.

Initially on opening, Charterhall was not completely ready, especially the airfield’s lighting (Drem), and so training flights would only occur during the day. But, with the help of ground crews, this was soon rectified and by the end of the month considerable work had been done, and very soon night flying could begin.

The first daylight flights took place on May 13th 1942, followed by night flying seven days later, and – as crews were to find out very quickly – flying these aircraft would be a risky business.

During 1942 some 5000 aircrew would enter 81 Group’s training units, and they would suffer in the region of 2,000 accidents, of which just under 200 would be fatal. On May 23rd, 54 O.T.U’s first accident would occur when a ‘technical failure’ on a Blenheim Mk I, would cause the controls to jam. The aircrew were thankfully unhurt but the aircraft was severely damaged in the resultant crash. The first fatality would not be long in coming though, occurring just two days later, on May 25th, less than a month after 54 O.T.U’s arrival. On this day, Blenheim IV (Z6090) crashed killing both Pilot Officer J. A. Hill (s/n 115324) and Observer Sgt. A.E. Harrison (s/n 1384501) in an accident which is thought to have been caused by icing. P/O Hill is buried at Haddington (St. Martin’s) burial ground in East Lothain, whilst Sgt Harrison is buried in Middlesbrough (Acklam) Cemetery, Yorkshire.

During June, the first Beaufighters would begin to arrive, followed quickly by their first accident. Whilst on delivery by 2 Aircraft Delivery Flight at Colerne, the aircraft – a Beaufighter MkIIf – had an engine cut out causing it to crash about 10 kilometres north-west of Charterhall. Luckily the crew were able to walk away but the aircraft was written off.

During July bad weather hampered flying activities, but it didn’t prevent the unit from increasing its strength to seventy-seven aircraft.  Primarily Blenheims and Beaufighters, there were also a small number of Lysanders for target towing and four Airspeed Oxfords.

Accidents continued to occur at Charterhall, and it wasn’t until September 1942 that it would be fatality free – a welcome boost to the morale of the instructors at the time. However, the reprieve was short-lived, and October would see further accidents and yet more fatalities. On the 5th, two Blenheim MK Is (L6788 and L8613) collided: Pilot Sgt. J. Masters (missing – presumed drowned) and Navigator Sgt. J. Gracey were both killed. There were seven other accidents that month, a tally that involved two Blenheims and five Beaufighters, with the loss of one life. Causes included: two burst tyres, two overshoots, a loss of control and an undercarriage failure, all of which added to the lengthening list of accidents occurring at Charterhall.

The need for new crews increased the pressure on training stations to increase flying hours. Courses were cut short, spares were lacking and with only rudimentary rescue equipment, further deaths were inevitable. As a result, it wouldn’t be until March 1943 before Charterhall would see a break in these increasing fatalities.

The start of 1943 saw a new Station Commander, but the new change in command would not see the new year start on a good note…


(Part 2 of Trail 41 will continue shortly).

Sources and further reading

*1 An interview with Edward Braine, in ‘reel 4’ he describes his posting to RAF Charterhall for operational training; crewing up; transfer onto Bristol Beaufighters; position of navigator in Bristol Beaufighter; accident during training; method of observing aircraft at night and interpreting radar signals. Sound file reel 4 Recorded and presented by the Imperial War Museum.


A New Memorial to Honour Those Who Never Came Home.

RAF Downham Market in Norfolk, was home to 6 squadrons during the Second World War: 214, 218, 571, 608, 623 and 635 along with a number of other non-flying units. It was also home to a number of aircraft types, Short’s enormous Stirling, the famous Lancaster and of course de Havilland’s ‘Wooden Wonder’ the Mosquito of the RAF’s Pathfinder force.

RAF Downham Market

One of the many huts still left on the airfield.

It was also the airfield that launched the last bombing mission by an RAF aircraft, a Mosquito, on May 2nd 1945, to attack retreating German forces at the Kiel canal.

Considering the strong links it has with the RAF and Bomber Command, it has never been given a fitting memorial, but maybe finally, this is about to change.

A proposal has been put forward to erect a grand memorial on a site next to where one of the former accommodation sites once stood. It will honour not only those who flew from Downham Market and never returned, but those who served and were stationed here as well.

It is hoped that the new memorial will consist of seven polished, black granite slabs with each name of the 700 crewmen who lost their lives, carved into it, in the order in which they were lost. It is hoped to raise £250,000 to cover the cost of the structure which will be grand in scale and stand next to the main A10, a road that was made using the runways for its hardcore.

Currently the only reminder of their sacrifice is a small memorial outside of Bexwell church. It is a small memorial telling the stories of the two heroic crew members, Flight Sergeant Arthur Louis Aaron and Squadron Leader Ian Bazalgette, two pilots who both received the Victoria Cross whilst at Downham Market, for extreme bravery in the face of the enemy.

Today whilst none of the runways or perimeter tracks exist, a number of the original buildings are still present, used by small businesses and light industry. Recently however, a  £170m regeneration plan was announced, one that may signify the end of these buildings and Downham Market airfield for good (see here).

RAF Downham Market and especially the many crew members, who came from all across the Commonwealth, deserve great recognition for the work they did. Perhaps this, is finally a sign that it may now happen.

The full story and pictures can be accessed on the Eastern Daily Press website. There are more details and a link to the donations page on the RAF Downham Market website. 

RAF Downham Market appears on Trail 7 – North West Norfolk. 


RAF Cottam – Built and Abandoned.

Up in the Yorkshire Wolds stands an airfield that could have been considered as one the Air Ministry’s ‘less sensible’ decisions. Open to the elements, this site was built but never fully used by an operational flying unit, in fact, Cottam could be considered one of the RAF’s more expensive bomb dumps, used primarily for munitions storage toward the war’s end. In its construction it would have accommodation, a hangar, and a watch office, along with three concrete runways – all the makings of an RAF bomber base, yet it was often desolate and empty. Even though it wasn’t used operationally, it did have its own problems however, and its own casualties . As we head across the River Humber into the East Riding of Yorkshire, we visit the former RAF airfield, RAF Cottam.

RAF Cottam.

Designed originally as a satellite for RAF Driffield, Cottam airfield lies high up in the hills on Cottam Well Dale, about 5 miles north of Driffield, just a stones throw from the village of Langtoft, and the tiny parish of Cottam. At 475 ft. above sea level, it is one of the higher peaks in the area which makes it popular with dog walkers and ramblers alike.

The airfield site encompasses the site of the ancient village of Cottam, (on maps of the late 1600s it appears as Cotham) of which only the church remains.  A lone building, it stands neglected and derelict, a reminder of a small community that has long since gone.

RAF Cottam (Yorkshire)

The abandoned medieval church marks the boundary of Cottam airfield and a community long gone.

The Air Ministry decided to build an airfield here to be used as a satellite and possible bomber base. The airfield would have a watch office with detached operations block (the separate block designed to drawing 13023/41). As construction was completed before June 1941, it would be classed as a Type ‘A’ building, and would need to be modified to bring it up to the newer Type ‘B’ standard as were being built on later airfield sites. Under the Type ‘B’ scheme, Cottam would have a Watch Office built to design 13726/41, then adapted by the fitting of smaller ‘slit’ windows more in line with bomber and O.T.U. satellite airfields of that time (15683/41). Sadly, the entire building was demolished in 1980, and no there are no signs of its existence left on site today.

A single T1 hangar provided space for aircraft repairs and maintenance, and accommodation, although sparse, would accommodate around 1000 men and 120 women of the Maintenance Command by December 1944.

RAF Cottam (Yorkshire)

The remains of the secondary runway looking west.

Cottam officially opened in September 1939, and as a grassed airfield, would only be used for dispersed aircraft from Driffield’s 4 Group Bomber Command, flying Whitleys of 77 and 102 Sqn. Cottam was also used later on for the Fairy Battles of 4 Group Target Towing Flight (4G T.T.F.) also based at Driffield at that time.

It wouldn’t be long though before Cottam would have its first accident. On July 1st 1940, a dispersed aircraft, Whitley V, (N1391) ‘DY-H’ of 102 Sqn, swung on take off causing minor damage to the aircraft. Luckily there weren’t thought to be any casualties in the incident, but the aircraft was rendered unable to fly, and the damage was sufficiently serious to need it to be taken away for repairs.

A month later, the 15th August 1940, signified a major point in the Battle of Britain, one which saw all of the Luftwaffe’s air fleets deployed for the first time, in a full and coordinated attack on the British mainland. This day saw the heaviest fighting of the Battle with attacks ranging from the south coast to east Yorkshire, and up to Edinburgh. This also meant the start of a number of attacks on British airfields and Driffield would not be left out. In this first attack, a Luftwaffe force of some 50 Junkers Ju 88s attacked the airfield damaging or destroying 12 aircraft on the ground – many of these were Whitleys. This attack was particularly devastating for a number of reasons, one of which was that it caused the first death on active service of a Bomber Command W.A.A.F., (A.C.W.2) Marguerite Hudson, who was killed after delivering stores to the site. This attack caused extensive damage to both the airfield site, infrastructure, and aircraft, and for a short period whilst repairs were undertaken, some aircraft were moved and dispersed here at Cottam. Indeed, on 27th September 1940, 4 Group T.T.F moved over to Cottam where they stayed for a month, not returning until the 24th October, once repairs had been completed and air attacks had all but ceased.

RAF Cottam (Yorkshire)

The secondary runway looking east, this part is full width but built upon.

It is possible that these attacks may have led to the demise of one 77 Sqn Whitley V (N1355) ‘KN-X’ flown by Sgt. James Walter Ward RAFVR (741435), who undershot on landing at Cottam, hitting a fence, causing the undercarriage to later collapse. The five occupants of the aircraft were unhurt, but the aircraft itself was later struck off charge on 22nd September 1940, after assessment at Armstrong Whitworth in Baginton*1. Ward himself was killed with his crew only five days later, when his aircraft, Whitley V, (N1473) was shot down by flak over Noord Brabant, 2km from Vijfhuizen, on September 25th 1940. He died along with P/O C. Montague, himself a veteran of three previous serious crashes.

By the end of August 1940, both 77 and 102 Sqns had departed Driffield and so Cottam, which left it only being used by the Fairy Battles of 4 G T.T.F. During the winter months Cottam was abandoned by these aircraft, presumably due to its inclement weather conditions, but dispersed aircraft did return again in the spring and summer months. In October 1941, 4G T.T.F. reformed at Driffield as 1484 T.T.F., and it is at this point that it is thought their use of Cottam ceased.

RAF Cottam (Yorkshire)

The perimeter track looking east. The main airfield is to your left.

Under the Ministry’s airfield expansion plan, new airfields of the early 40s were built with concrete surfaces. ‘Older’ grass sites, like Cottam, were upgraded having new runways laid down in an effort to reduce water logging and provide a more stable surface for the heavier bomber aircraft coming in. To meet these upgrades Cottam’s three runways – all consisting of concrete and wood chip – were built; the main being just short of 5,300 ft., with the two further runways around 4,000 ft. in length. Pan style aircraft dispersals were also added which gave Cottam a new look and hope for the future. However, and even though huge amounts of money had been spent on the airfield, it was decided it was not to be used further, as either a satellite or a bomber station. Cottam was offered to various other military groups who all turned down the location for various reasons. The army did take up residency for a short while until March 1944, whereupon it was then used to store vehicles for the impending invasion of Normandy.

RAF Cottam (Yorkshire)

Blocks from the former site, and the beautiful views across the Wolds from one of the highest peaks in the area.

It is believed that further forced landings took place at Cottam during this time. Firstly, a damaged B-24 ‘Liberator’ came down after sustaining damage on a raid; and secondly, it is also thought that a Halifax landed here after an S.O.E. mission. Sadly at present, I can find no further official details of these events, and cannot therefore expand on them further.

Toward the end of the year 91 Maintenance Unit (M.U.) were based here*2 using the runways and hardstandings to store ammunition and other stores that were delivered by road from the rail yard at Driffield. A spell of residency for 244 Maintenance Unit carried on the storage work before the airfield was finally abandoned and closed in June 1954.

Returned to agriculture, the airfield is mostly gone, a section of the easy-west runway does still exist, and in part, at full width. Footpaths allow for walks across the site allowing views along the runway in both directions, they also allow walkers to use the remains of the perimeter track and secondary runway – albeit as a track. The frame of an air-raid shelter and the standby set house (designed to drawing 13244/41) are in situ, although by far the runways are the most prominent feature surviving today.

Access is best made from the Cottam Lane junction. The path leads up through the site of the medieval village of Cottam where the church still stands. This takes you south onto the airfield site itself and along the two runways. The walk extends along the perimeter track to the south, where debris from the perimeter track can also be seen.

Built high on the Wolds of Yorkshire, it is hard to understand why such a site was chosen. In winter, it could be bleak, windy and very cold. Landing conditions must have been difficult at best, and treacherous at worst. Its history of accidents tell their own tale.

In 2016, Cottam Airfield was the subject of a wind farm review, and a battle between the locals and the energy firm R.W.E, began. As yet though the site remains free of turbines, a gem for walkers and those wishing to experience the natural beauty of the Yorkshire Wolds. The open air and fabulous views hide a strange history, one that goes back long before the Second World War, but one that has only scars to tell the tale in this oddly historical, but beautiful part of Yorkshire. *3

Source and further reading:

*1 This was reported on a number of sites (Air Safety Network) but no records could be found referring to the accident in the Operational Records Book recorded by 77 Squadron at that time.

*2 See the National Archives website for details.

*3 News report on the proposal.

The Hull and East Riding at War Website has a range of information on the area during the Second World War.

My thanks go to Ronnie and Jo for the great walk, and for being such fabulous hosts. 

RAF Martlesham Heath (part 2) – A long and distinguished history.

In part two of this Trail, we continue looking at the history of RAF Martlesham Heath.

RAF Martlesham Heath (Station 369).

On August 15th 1944, two P-47s flying more than 200 miles off course mistakenly attacked the Ninth Air Force headquarters near to Laval. In the attack, ground gun crews managed to bring down one of the aircraft killing its pilot. The second aircraft managed to avoid the anti-aircraft fire and returned home safely.

For three days in September, the 356th attacked enemy gun emplacements at Arnhem, earning themselves a DUC for their actions. These aircraft had the unenviable task of attacking the gun emplacements defending the allied drop zones. In order to neutralise the guns, the pilots first had to find them, a move that involved presenting themselves as bait. They proved their worth, bombing and strafing with 260lb fragmentation bombs, destroying all but two of the guns.

Former RAF Martlesham Heath

Martlesham Heath’s Watch Office now a museum surrounded by housing.

In November 1944 the P-47s were replaced by the P-51 ‘Mustangs’, the delight of the USAAF Fighter Groups. Early successes were good, even though they were tainted with repeated and wide-spread gun jamming.

The winter of 1944-45 was notoriously bad, one of the worst on record and many flights were cancelled at the last-minute. Maintenance on open airfields was incredibly difficult and accidents increased because of cloud, ice and snow. In mid January, five P-51s were lost, crashing on snow packed runways, being lost in cloud or suffering from taxiing accidents. By now though the war had turned and the blue and red chequered nosed fighters of the USAAF had turned to hunters and were eager for blood.

By now, Luftwaffe jets had now been in service for some time, harassing bombing formations, diving in amongst them, firing and then fleeing. Three P-51s of the 356th had the good fortune to catch an Arado-234 in the Bielefield area. After the pilot bailed out, they flew along side photographing the aircraft before finally shooting it down. It was one of a number that day that were lost to American airmen.

As the war ended the 356th had seen only eighteen months of active service, a short time that had allowed them to amass 276.5 kills in the air. Whilst being the lowest ‘score’ in the US Air Force, it doesn’t detract from the determination nor the skill of the brave pilots who flew with the 356th.

After the war’s end, the Americans departed and in November 1945, Martlesham Heath was returned to RAF ownership.

In 1946, experimental units returned with the forming of the Armament and Instrument Experimental Unit. Over the next few years they would go through several changes of name , but in essence retained their primary role. During this period, they would operate a small number of aircraft including amongst them: Mosquito NF38 (VT654); Meteor F4 (VW308); Lincoln B1 (RE242); Canberra T4 (WE189) and Comet 3B (XP915).

On November 1st 1949, the Bomb Ballistic Unit (formed May 1944 at Woodbridge) and Blind Landing Experimental Units (formed October 1945 also at Woodbridge) were amalgamated, forming one complete unit (the Bomb Ballistic and Blind Landing Experimental Unit) here at Martlesham Heath. They each operated a number of twin and four engined aircraft that would be absorbed into the Armament and Instrument Experimental Unit 15 days later. On November 1st 1955 RAF control of the unit ceased, and it was re-branded Armament and Instrument Experimental Establishment, whereupon it ran until 1st July 1957, when it was disbanded and absorbed into the Royal Aircraft Establishment.

Former RAF Martlesham Heath

A number of the ‘H’ blocks have been given a new lease of life as office blocks. The parade ground, the car park.

With little operationally occurring at Martlesham, its decline was inevitable. Between 15th April 1958, and New Years Eve 1960, 11 Group Communications Flight operated: two Ansons (TX193 & WB453); a Devon (VP974); a Meteor T7 (WL378) and Chipmunk T.10 (WG465). Following their disbandment the only other flying units to use Martlesham were the then Hurricane and four Spitfires of the Battle of Britain Flight (now the legendary Battle of Britain Memorial Flight based at RAF Coningsby) between 1958 and 1961. The 612 Glider School also used the site between September 1952 and May 1963, whereupon they disbanded and the airfield then closed. Remaining intact, the airfield would continue to be used but for light private flying only, until this also finally ceased in 1979.

Following its closure, Martlesham Heath’s 600 acres were handed over to the Bradford Property Trust following the reversion of the lease from the Air Ministry, and because of its location to both the larger town of Ipswich and the major sea port at Felixstowe, it was destined for development. It was declared by the new owners that Martlesham would become a ‘village’, rather than a traditional ‘housing estate’ in which the concept of small groups of housing would be built, often around a cul-de-sac rather than in rows, thus promoting a ‘community spirit’ within each segment of the development. Planning permission was granted in 1973, ten years after the Ministry sold it off, the development was finally completed in 1990.*2

On its completion Martlesham was designated a village, and since then the original 3,500 population has grown, in 2011, the Martlesham Neighbourhood Development Plan stated the population of the Parish at 5,478.

Today Martlesham Heath is a thriving mix of private housing, industrial and retail units, reflecting this ‘Garden Village’ design. Two major employers soon moved in: the British Telecom Research Centre and Suffolk County Police – forming their headquarters on this and the adjacent land.

Beneath all this development though, elements of the ‘Heath’ do still exist, largely due to the good foresight of the developers. The parade ground (now a car park), the barrack ’H’ blocks (like West Malling are office blocks), the watch office, messes, hangars and RAF workshops all transformed into light industrial units which remain in use today.

In 1982, local people set on preserving the heritage of Martlesham Heath created the Martlesham Heath Aviation Society, and were allowed to set up their home in the former watch office. After raising funds, the office was refurbished and turned into a museum displaying many artefacts, stories and photographs of Martlesham’s history. The museum finally opened in 2000 and remains there today encircled by housing on all four sides. The spirit of Martlesham Heath also lives on in the road names. Even the Douglas Bader pub has a tenuous link to this historic place.

Former RAF Martlesham Heath

The memorials to those who served at Martlesham Heath during its long and distinguished career.

Viewing the airfield remains are relatively easy as most are visible and accessible from the public highway. Finding them is another matter. The design of the streets are such that there are many paths and small side streets and ‘getting lost’ is quite easy for the visitor. The main A12 road through Martlesham dissects the airfield site in two. The museum is to the west off Eagles way, surrounded by housing – an odd remnant of a bygone era. What little remains of the runway can be seen further south off Dobbs lane, in an area of heath and scrub – a lingering reminder of this once historic airfield, how long I wonder, before this too is removed.

The hangars and barrack blocks are to the eastern side, mostly among the retail park. The three memorials are located on Barrack Road opposite the BT building and alongside the former parade ground and ‘H’ blocks.

Now listed locally and with Suffolk Coastal District Council, many of the remaining but obscure remnants (airfield markers, hangar foundations, revetments, and the last remains of the runway) all lie dormant amongst the footpaths, cycle tracks and parks of the huge Martlesham Heath conurbation that was once RAF Martlesham Heath.

Notes and further reading

*2 Ward, S.V., The Garden City, past, Present and Future,  1992, Spon Press

RAF Martlesham Heath (Part 1) – a long and distinguished history.

On the outskirts of Ipswich close to the former Cold War bases at Woodbridge and Bentwaters, is what is perhaps a model of the future, of many of our wartime airfields. Built upon with town housing hidden in the ‘Village’ idea, it is a place with major industry and retail parks, where the few remains that exist are hidden amongst the pathways and roads of this large conurbation. However, not all is lost, a museum and modern use of many of its original structures ensure the history of this once busy airfield are not lost forever.  In Trail 40 we head to the southern reaches of East Anglia, to the the outskirts of Ipswich and the former site that was once RAF Martlesham Heath.

RAF Martlesham Heath (Station 369).

Martlesham Heath was opened in 1917, and until it closed in 1963, was the home to a very large number of military units. It was also used by a number of aircraft experimental units, each one investigating the various aspects of aircraft and weapons designs needed in a modern air force. These investigations were carried out initially by the RFC Aeroplane Experimental Station and latterly the Aircraft and Armament Experimental Establishment (A&AEE). Also present at Martlesham were the Armament & Instrument Experimental Unit, the Air Sea Rescue units, and the Battle of Britain Flight (now the Battle of Britain Memorial Flight based at RAF Coningsby). In addition, a Gunnery flight was also based here, as were gliders and numerous squadrons flown by a whole range of Nationalities including: Belgian, Czech, Polish, Australian, Canadian, New Zealand and American airmen. With all these units came a broad and diverse range of aircraft types. Its history is certainly long and very, very distinguished.

The dawn of aviation happened at Martlesham Heath when it officially opened on January 16th, 1917.  During that year, the Aircraft Testing Squadron would arrive here from its base at Upavon to be joined on March 16th 1920 by the Armament Experimental Station from Orfordness. The amalgamation of these two aircraft experimental units would set the foundations for Britain’s future research and development organisation. This marriage, forged the name the Aeroplane Experimental Establishment (Home) until 24th March 1924, when it disbanded to become the better known Aircraft and Armament Experimental Establishment (A&AEE), who carried out their work here, at Martlesham Heath, until the outbreak of war in 1939. 

A number of both civilian and military aircraft were tested here, one of the most notable being the enormous all-metal tri-engined transport, the Beardmore Inflexible. Designed by William Beardmore, it had a wing span of 157 feet – 16 feet longer than Boeing B-29. Other aircraft included the 4.F1 ‘Taper Wing’ Camel, a sole example was produced with simplified wing-struts in an attempt to reduce drag and improve the Camel’s performance.  Amongst others featuring at Martlesham, were the Bristol Blenheim, various Auto Gyros and the Bristol Bombay. The A&AEE would be joined in July 1923 by the reformed 22 Sqn who would undertake armament testing investigations; and then, a year later, by the reformed 15 Sqn who would carry out performance and handling trials. Both these units operated solely as trials units, flying  a notional number of aircraft including a: Boulton Paul Bugle II, Fairy Ferret, Gloster Gamecock, Vickers 161 and Hawker Horsley aircraft.

INTER WAR BRITISH AIRCRAFT

The prototype Bristol Blenheim at Martlesham Heath under evaluation. (IWM)

With the outbreak of war, all sections of the A&AEE, with one exception, was moved for its own protection, to its new base at Boscombe Down. Here its history has become renowned, and many weapons and aircraft developments have taken place since. The exception to the move, was ‘D’ Flight of the A&AEE’s Performance Testing section, who moved to Perth where it became the Royal Air Force Detachment, Perth.

Over the next few years Martlesham Heath would become a major player in the war. Some 60 or so RAF squadrons would pass through here, either permanently based here or as detachments away from their parent bases. The first of these was 64 Sqn RAF flying Hawker Demons. After a short spell abroad, they would return in 1941 with Spitfire IIAs – the first permanently based unit. Other sqn’s that would pass through in these early years included:  29 and 151 Sqn (December 1938); 110 Sqn (June 1939); 25 and 56 Sqn (October 1939);  604 Sqn (September 1939) and 236 Sqn (December 1939).

With the evacuation of the BEF and the subsequent Battle of Britain, Martlesham would become increasingly busy. During 1940 five squadrons would be based here, whilst in 1941, thirteen squadrons would pass through. This would increase to sixteen in 1942; nine in 1943 and only two in 1944; thus the number of units using Martlesham would reflect both the level of the German threat and direction that the war was moving.

Being close to London, Martlesham would play its part in the Battle of Britain. A number of gritty and determined fighter pilots would serve here, including both Group Captain Douglas Bader and Squadron Leader Bob Stanford Tuck.

Squadron Leader Stanford Tuck poses with a group of pilots of 257 Squadron, RAF © IWM (CH 1674)

On September 19th 1940, 71 Sqn was reformed at RAF Church Fenton moving to Martlesham in the following April. Made of volunteer U.S. pilots it was to be one of three ‘Eagle Squadrons’ destined to become famous before the U.S. officially entered the conflict in December 1941. (Also during this time, ‘A’ Flight of the Special Duties Flight would reside here whilst the main parent unit was located at St. Athan, until replaced by the various Radio Servicing Sections).

71 Squadron were initially provided with Brewster Buffalo MKIs, so disappointed with them were they, that it was rumoured the commanding officer ‘instructed’ his pilots to deliberately damage them so that more ‘appropriate’ aircraft would be issued*1. By the time 71 Sqn arrived at Martlesham Heath in early April 1941, these Buffaloes had been replaced and 71 Sqn  was equipped with the much superior Hurricane MKIs, followed soon afterwards, by the Hurricane MKIIA. 71 Squadron then left Martlesham in June 1941 only to return in December that year with Spitfire VBs. They finally departed in May 1942 thus ending their presence  at the ‘Heath’ for good. It wasn’t the last of the Eagle squadrons though, for a very short period of about eight days, 133 Squadron graced the grounds of this Suffolk airfield before departing to Biggin Hill and eventual amalgamation into the USAAF.

Primarily a grass stripped fighter base, Spitfires and Hurricanes were the most commonly seen aircraft here. Exceptions being the very brief visit of Tomahawks of No. 2 Sqn, Mustang MkIs of 26 and 239 Sqns, Typhoons of 198 and 182 Sqns (who were formed here in August 1942) ; Defiants of 264 Sqn; Lysander IIIA of the Air Sea Rescue Flight (formed here May 1941 and latterly 277 Sqn) and a detachment of Lysander IIs of 613 Sqn in September 1940. Thus a wide range of aircraft were to pass through Martlesham adding to the variety and diversity of its aviation history.

Many of those units to use Martlesham’s facilities were short stays, often passing through to other stations either in the U.K. or abroad. Some consisted of days whilst others were perhaps weeks.

In 1942, the airfield was designated as a U.S. Fighter base and the first real permanently stationed units would soon arrive. Following testing, they created two soil-stabilised, oil and tar mixture runways, linked together by steel pierced planking.  Also known as ‘Marston Matting’ or Perforated Steel Planking (PSP), these were strips of metal slotted together that meant no heavy excavations were needed and the tracks could be laid very quickly by small engineering teams. Once work had been undertaken, Martlesham Heath would receive the P-47s and latterly P-51s, of the 356th Fighter Group.

Former RAF Martlesham Heath

Memorial to the 356th FG based at Martlesham Heath.

By the time the airfield had been developed it covered a wide area, and because of it long history, it would consist of multitude of architectural features. Many of these dated back to the First World War and included aeroplane sheds (damaged in attacks) built to various drawings (e.g. 146/16-149/16, 110/16 and 1656/18); Type A aeroplane sheds (based on 19a/24 designs); aeroplane Type B ‘Goliath’ shed (1455/27); blacksmiths and welders workshops; a range of barrack blocks; married and single officers quarters; separate RAF and USAAF latrines; workshops; blister hangars; squadron offices and a wide range of associated buildings.

Around 70 aircraft dispersals were also laid using a mix of both an unusual square, and the more common pan style hardstands.

The 356th FG, arrived here in October 1943, after a 10 month journey that began at Westover Field, Massachusetts. They arrived in England in  August 1943 transiting from Goxhill to Martlesham Heath over the following weeks. Consisting of three squadrons: the 359th, 360th and 361st FS, they would initially be equipped with P-47D ‘Thunderbolts’ lovingly referred to as ‘Jugs‘.

The main duties of the 356th FG was as fighter escort covering the heavy bombers of the American Eighth Air Force as they penetrated occupied Europe. After initial engine difficulties, the P-47 proved to be a reliable and agile workhorse, much against the stereotyped view reflected by its resemblance to a ‘flying brick’. One of the first missions the 356th carried out was to escort a mix of P-47 ‘Thunderbolts’ of the 56th FG fitted with bombs flying in conjunction with B-24 ‘Mitchells’. This new strategy became known as ‘drop-on-leader’ whereby the B-24s would sight the target, and drop their bombs as a signal to the P-47s to drop theirs. The first mission to St. Omer was to produce poor results however, the B-24 bombing mechanisms jamming which resulted in all the bombs overshooting the target.

The 356th would be active throughout the remainder of the war, initially supporting bombers until January 1944 when they took on the role of ground attack, strafing targets such as U-Boat installations, Marshalling yards, Locomotives, airfield flak units and German radar installations. In June 1944 they supported the Normandy invasion going on to assist in the allied push through France,  the low countries and on into Germany itself. With ground attack and fighter aircraft being given almost free-reign, anything that moved became a target. Avoiding civilian areas and civilian traffic was a high priority and the perceived threat of friendly fire on troops below, a distant thought in the minds of the crews. However, not everything went according to plan.

Part 2 will follow next week.


Notes and further reading

*1 Imperial War Museum Website

The 392nd – The Highest Degree of Bombs on Target.

In the northern reaches of Norfolk lies an airfield that was the most northerly American base of the Second World War in East Anglia. Of all its crews that flew on the first mission, only four were still around to fly on the 200th a year or so later. This airfield was home to only one operational flying group, a group that was cited for its incredible bombing accuracy over occupied Europe. In this trip, we visit Station 118, otherwise known as RAF Wendling.

 RAF Wendling (Station 118)

On 15th January 1943, a new bomb Group was formed at Davis-Monthan Field in Arizona, it would be the 392nd BG and would consist of four squadrons: the 576th, 577th, 578th and 579th Bomb Squadrons. On completion of its training, the 392nd would leave the United States, and fly across the Atlantic to their new base in England. These four squadrons would be the first to operate the newly updated B-24 ‘H’ model ‘Liberators’; an improvement of the previous variants by the addition of a motorised front turret, improved waist gun positions and a new retractable belly turret. The supporting ground echelons had left the United States, sailing on the Queen Elizabeth from New York, much earlier, and before the group had received these newer models. As a result, they had neither received any training, or gained any experience with these new updated variants. The arrival of these new aircraft would therefore be met with some surprise, followed by a steep learning curve supported by additional training programmes.

The first B-24s of the 392nd arrived at Wendling, Norfolk, on 15th August 1943, and would soon be joined by the 44th at nearby Shipdham, the 389th at Hethel and the 93rd at Hardwick; four Groups that would be combined to form the Second Bombardment Wing (later 2nd Bombardment Division)*1. Battle hardened from fighting in the Mediterranean Theatre, these other three groups knew only too well the dangers of bombing missions, all having suffered some heavy losses themselves already.

Wendling’s Watch office before it was modified (see below) (IWM FRE 1670).

During September 1943,  the 392nd joined with these other three units flying missions under Operation ‘Starkey‘; probing German defences and gauging their responses to massed allied attacks on coastal regions. Largely uneventful they went on to undertake diversionary missions over the North Sea, the first three being escorted by fighters, and without incident. On the fourth however, the fighters were withheld and the bombers struck out alone.

On this particular flight, 4th October, 1943, the 392nd would gain their first real taste of war, and it would be an initiation they would rather forget. During the battle over thirty Luftwaffe fighters would shoot down four B-24s with the loss of forty-three crew members. A further eleven were injured in the remaining bombers that managed to continue flying and return home – it was not a good start for the 392nd.

Licking its wounds, they would then be combined with more experienced units, flying multiple missions as far as the Baltic regions before returning to diversionary raids again later that month. Viewed with some misgivings by crews, these ‘H’ model Liberators were soon found to be heavier, slower and less responsive at the higher altitudes these deeper missions were flown at.

The 392nd would take part in many of the Second World War’s fiercest operations; oil refineries at Gelsenkirchen, Osnabruck’s marshalling yards and factories at both Brunswick and Kassel were just some targets on the long list that entered the 392nd’s operations records book.

RAF Wendling (Beeston)

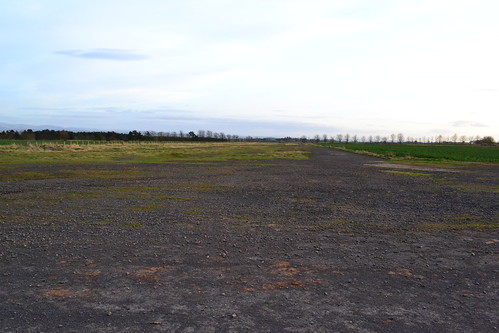
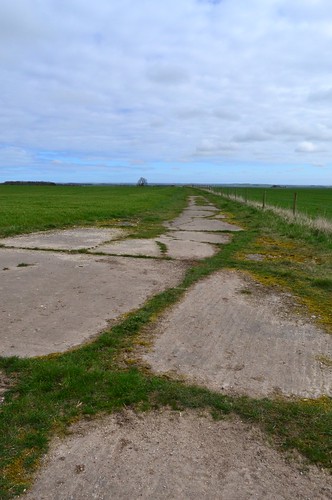
Wendling’s runway looking West.

The massive effort of ‘Big Week’ of February 20 – 25th saw the 392nd in action over Gotha, in an operation that won them a DUC for their part. Upon entering enemy airspace, the formation was relentlessly attacked by Fw-190s, Me 110s and Ju 88s using a mix of gun, rockets, air-to-air bombing and even trailing bombs to disrupt and destroy the groups. Ironically it was the very same twin-engined aircraft and component factory that was the intended target that day; a focus of the Second Bomb Division in an operation that saw the lead section, headed by aircraft of the 2nd Combat Wing, bomb in error due to the bombardier collapsing onto his bomb release as a result of oxygen starvation. Unrelenting the 392nd carried on. They realised and ignored the major error, and flew on to drop 98% of their bombs within 2,000 feet of the intended target. This highly accurate bombing came at a high cost though, Missing Air Crew Reports  (MACR) indicate seven aircraft were lost, with another thirteen sustaining battle damage.

The 392nd would carry on, with further battles taking their deadly toll on both crews and aircraft. In March that same year, the 392nd would turn their attention to Friedrichshafen – a target that would claim further lives and be the most costly yet.

Even before entering into enemy territory, losses would be incurred. Flying in close formation, two B-24s flew too close – one through the prop wash of another – which caused them to collide bringing both aircraft down.  One of those B-24s #42-109824 ‘Late Date II‘, lost half of its crew.

Despite good weather over the target the attack on Friedrichshafen in southern Germany, would have to be led by pathfinders. In an attempt to foil the attackers, the Germans released enormous quantities of smoke, enveloping the town and concealing it from the prying eyes high above. Of the forty-three bombers to fall that day, half were from the 14th Combat Wing of which fourteen came from the 392nd. Despite losses elsewhere, this would prove to be the worst mission for the 392nd, in all some 150 crew men were lost that day.

Bombing targets in Europe was never straight forward and bombs often fell well away from the intended site. On one rather unfortunate occasion at the end of March, the 392nd joined the 44th BG in mistakenly bombing Schaffhausen, a town in neutral Switzerland. The event that not only deeply upset the Swiss, but heavily fed the Nazi’s determined propaganda machine.

Eventually March, and its terrible statistics, was behind them. The 392nd would then spend the reminder of 1944 supporting ground troops, bombing coastal defences in the lead up to D-day (their 100th mission), airfields and V-weapons sites in ‘NOBALL‘ operations. Like many of their counterparts they would support the St. Lo breakout, and hit transport and supply routes during the cold weeks of the Battle of the Bulge.

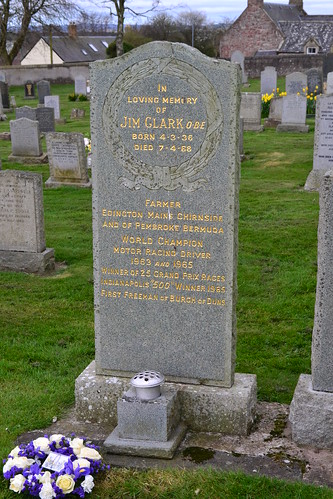
It was during this time, on 12th August 1944 that heroic pilot, 2nd Lt. John D. Ellis, flying B-24H #42-95023, would manage to steer his stricken aircraft away from a residential area at Cheshunt, some 15 miles north of London,  crashing the aircraft near to what is now the A10 road. Sadly all on board were killed in the incident but undoubtedly the lives of many civilians were saved, and a memorial in their memory lies in the nearby library at Cheshunt and on the wall at Madingley, the American War Cemetery, Cambridge.

DSC_0572

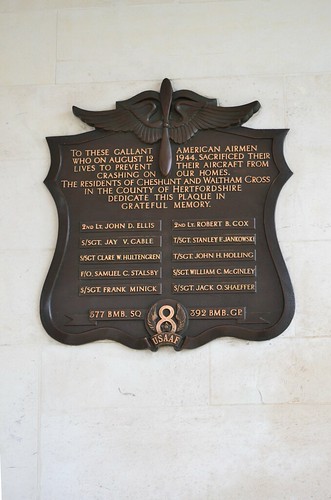
The Memorial Plaque at the American War Cemetery, Madingley, Cambridgeshire.

This was not to be the only accident that the 392nd (nor any other B-24 unit) were to suffer. Crews were finding that these heavier machines were difficult to get out of if hit by flak or attacking fighters. Ferocious fires in the wing tanks and fuselage were leading to many losses, and in particular, the pilots who after fighting to keep aircraft stable long enough for crewmen to jump out, were then finding it viciously spinning the moment they let go of the controls.

On February 16th 1945 Liberator #42-95031 ‘Mary Louise‘ flown by 1st Lt. Albert J. Novik, was hit by falling bombs from another aircraft flying above him. After wrestling for some four and half hours to keep the aircraft flying, he ordered the crew out and then attempted to leave the aircraft himself. This event occurred only a month after a similar incident where he had managed to dive through the open bomb bay to safety. In this instance though, Novik was pinned to the roof as the bomber, half its tail plane missing, spun violently towards the Norfolk landscape beneath. Eventually, after a 7,000 ft fall, he was released from this centrifugal grip by a change in the aircraft’s direction. He managed to crawl down from his position and throw himself out through the bomb bay just seconds before the aircraft exploded, sending burning aircraft parts tumbling all around him. For his actions Novik was awarded the DFC, but many others were not quite so lucky, and perished in these huge lumbering giants of the sky.

On April 25th 1945, Mission 285, the 392nd BG prepared for what would be their last mission of the war. The Target, Hallein Austria. Not only would it end the 392nd’s aerial campaign, but that of the Eighth Air Force, bringing the air war in Europe to an end for the American units based in England.

By then, the 392nd had conducted some 285 missions with a high rate of loss, some 184 aircraft in total, with over 800 young men killed in action. They had dropped around 17,500 tons of bombs on some of the highest prestige targets in the German heartland. The group was cited by Major General James Hodges for its degree of accuracy for bombs on target – higher than any other unit of the 2nd Air Division over 100 consecutive missions. Operations had ranged from Norway to southern France and as far as the Baltic and advancing Russian armies at Swinemunde. Over 9,000 decorations were handed out to both air and ground crews for bravery and dedication.

Bomb dump buildings

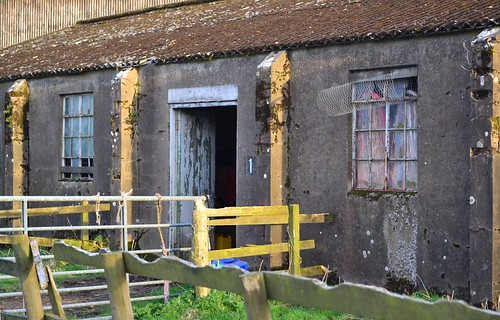
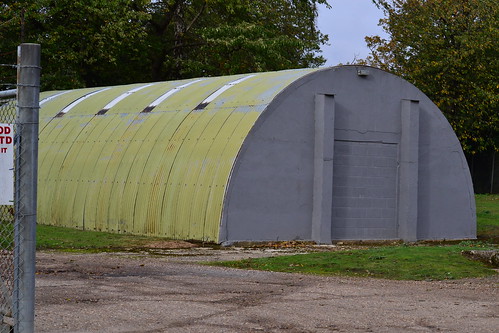
One of several bomb dump buildings now a nature reserve.

After flying food supply missions to the starving Dutch, the 392nd departed Wendling and the site closed down, remaining dormant until it’s disposal in 1963/4.

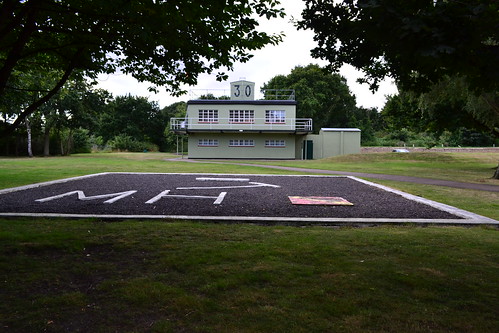
RAF Wendling, otherwise known as Beeston from the nearby village, was classified as Station 118 by the Americans. Initially intended as an RAF Bomber base it was updated during the winter of 1942/43 opening in the summer of 1943. It would have 3 concrete runways of class ‘A’ specification, one of 2000 yards and two of 1,400 yards. The bomb dump which survives today as a nature reserve, was to the south-east, whilst the technical area is to the north-west. Two T2 hangars were located near to these sites and the watch office (drawing 5852/41) seems to have been modified in 1943 with the addition of what may have been a Uni-Seco control room (1200/43). Originally built with an adjoining Nissen hut (operations / briefing room) this is now encompassed within another more modern building, and is not visible from the outside.

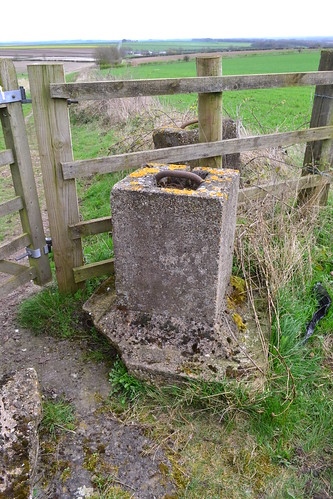
Around the perimeter were a mix of ‘pan’ (28) and ‘spectacle’ (26) style hardstands, all of which have since been removed or built upon. The technical area, housing a range of: stores, workshops, huts and associated buildings, were to the north-west also. Interestingly, Wendling used Orlit huts, built by the Orlit Company of West Drayton, a mix of panel and concrete posts they were more economical than the British Concrete Foundation (BCF) huts initially ordered by the Ministry of Works.

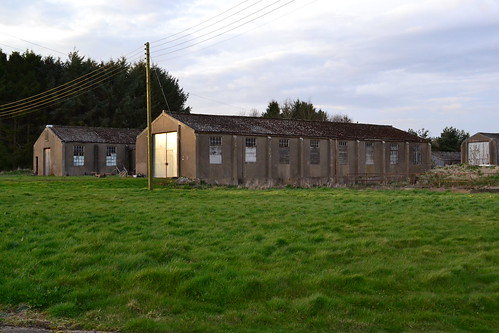
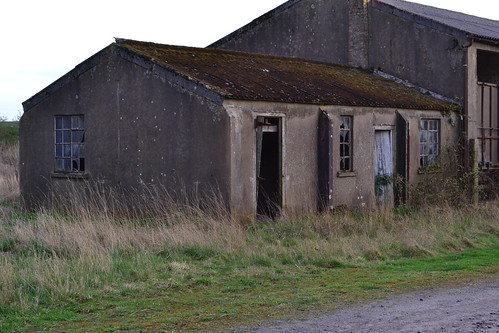
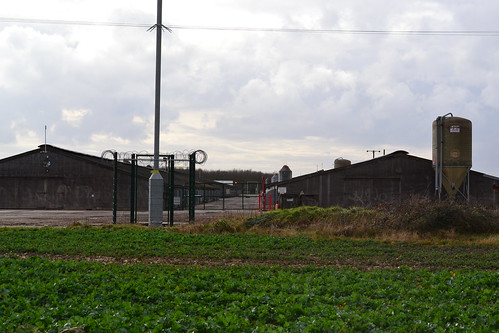
Today, parts of two of the main runways still survive, housing turkey farms these buildings synonymous with Norfolk. The third was removed and the perimeter track has been reduced to a path. The bomb dump is part of a local nature reserve which has very limited parking, but access to the remaining buildings there is straight forward. Many of the buildings from the remaining twelve accommodation sites have been removed, however a number are still believed to be standing bound in heavy undergrowth, or used by local businesses. One currently retains a huge mural covering an entire wall, with evidence of others also within the same building.

DSC_0114

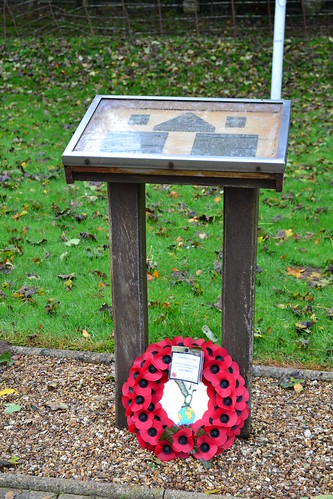
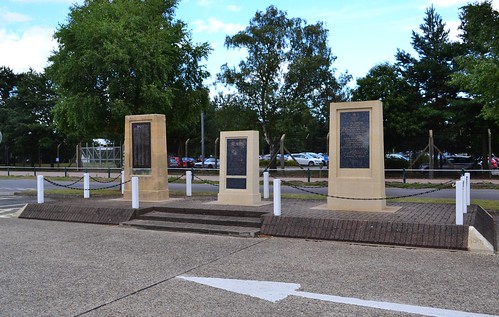
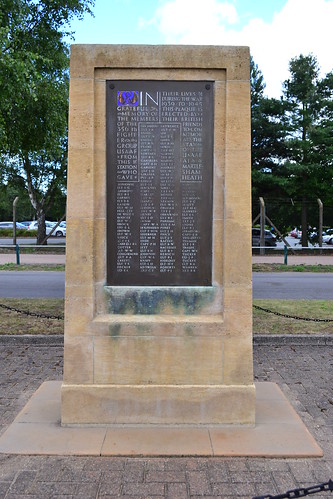
A stunning memorial now stands in memory of those who served.

Unfortunately when I visited Wendling, daylight ran out forcing me to make a retreat and head for home – a return visit is certainly planned for later. Like many other airfields in this part of the country, losses were high, and the toll on human life dramatic, both here, ‘back home’ and of course, beneath the many thousands of tons of high explosives that were dropped over occupied Europe. Now a high number of these sites house turkey farms, small industrial units or have simply been dug up, and forgotten. I hope, that we never forget and that they all get the honour and respect they deserve.

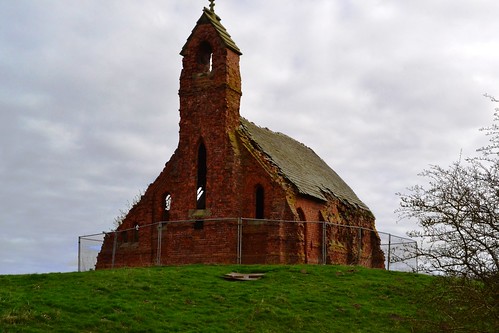
On a last note, there is a remarkable memorial in the Village of Beeston to the west of the airfield site. This is in itself worth a visit. Not only does it mention the 392nd, but all the auxiliary units stationed on the base, something we often forget when considering the Second World War. A nice and moving end to the trip.

DSC_0117

Memorial to the 392nd BG at Wendling.

Notes and further reading.

Wendling forms part of Trail 10.

*1 September 1943 saw a reorganisation of the US Eighth Air Force, and in September, the ‘Wings’ designation was changed to ‘Divisions’. Then in early 1944, a further reorganisation led to further strategic changes of the Air Force, one of which, saw the 44th and 392nd join with the 492nd to form the 14th Combat Wing, 2nd Bomb Division. Both  the 389th and the 93rd became part of the 2nd and 20th Combat Wings respectively.

A detailed website covering every mission, aircraft and most crew members offers a good deal of information and supporting photographs. It is well worth a visit for further more detailed information .

RAF North Pickenham – The Worst Record of the Eighth

There were many airfields in the eastern region of England during the Second World War, and countless crews were lost flying in combat operations. Undeterred and undaunted by these losses, many continued the brave fight to release Europe from the evil grip that was slowly strangling it. Loses were high, but at one particular airfield, the loses of one Group were the highest, and of those that came here, few were to return home alive.

In Trail 9 we visit RAF North Pickenham, an airfield with a short life, but one with a terrible tale of loss and sacrifice.

RAF North Pickenham (Station 143)

RAF North Pickenham was built in the later part of the Second World War (1943/44) and was officially handed over to the USAAF, 492nd Bomb Group (BG), on May 22nd 1944, by an RAF Officer during a ceremonial hand-over parade. This handover would see the culmination of USAAF takeovers of British Airfields – some sixty-six in all. America’s ‘friendly invasion’, would result in eighty-two major operational units moving to the UK, all of which would occupy some seventy-seven military sites in total.

RAF North Pickenham (Station 143) was built with three concrete runways, 50 ‘spectacle’ style hardstands and a substantial bomb store to the north-west. Accommodation for the crews, was divided into a: communal site (site 3), mess site (site 4), six officers’ quarters (sites 6 to 11) and a sick quarters (site 5). Three further sites, 12-14, consisted of a small sentry post, sewage disposal site and H.F.D.F station. All the accommodation areas were to the eastern side of the airfield well away from the extended bomb store to the west.

The 492nd were a new unit, only being activated in the previous October. On arrival in the UK in April, they were assigned to the 2nd Bomb Division, 14th Combat Wing and sent to RAF North Pickenham where they entered combat on May 11th 1944. The main body of the ground echelon was formed with personnel taken from units already in the U.K. whilst the air echelons were trained states-side and then ferried across the southern Atlantic route.

This first mission, which took the 492nd to marshalling yards in north-eastern France, saw 364 B-24s of the 2nd and 3rd Bomb Divisions combine with 536 fighters over occupied Europe. Whilst relatively uneventful for the 492nd, two B-24s did run out of fuel on their return journey; the first, B-24J #44-4087 “Sweet Chariot” crashing at Bury St. Edmunds, whilst the second, came to grief at West Wittering in Sussex. Thankfully, only one crewman was lost (3 were injured), but he was to be the first of the many casualties of the 492nd’s operational war.

RAF North Pickenham

Operations Block, North Pickenham

Throughout the month of May, the 492nd operated against industrial targets in Germany, and being a new unit, their loses would be high. On May 19th 1944, a week into operations, they suffered their first major casualties, eight aircraft in total, all shot down in operations over Brunswick. Loses were not only happening in air either, only two days later, on May 21st, two B-24s collided on the ground whilst taxing -‘What’s Next Doc‘ struck ‘Irishman’s Shanty‘ – causing the former to be written off. It was not a good omen for the 492nd.

In the following month, on June 20th, a massed 2nd Bomb Division formation attacked Politz, an attack that saw the 492nd lose a further fourteen aircraft, six of which managed to limp to Sweden before finally coming down.

Things then went from bad to worse for the 492nd, but undaunted and undeterred, they would continue their quest, attacking V-weapons sites, coastal batteries, and other defences along the Normandy coast. Apart from supporting the St. Lo breakout on July 25th, they continued to attack targets in the German homeland for the remainder of what would be their brief existence.

RAF North Pickenham

North Pickenham’s last remaining hangar before it was burnt down in 2014.*1

Consisting of the 856th, 857th, 858th and 859th Bomb Squadrons, they were not to fare well at all. In total, the 492nd would carry out sixty-six missions accumulating just over 1,600 sorties. During these operations, they would lose fifty-seven aircraft (including six non-operationally) which was the highest loss of any B-24 unit of the entire Eighth Air Force. Talk of ‘blame’ for these losses was rife; some blamed the aircraft’s all metal finish, saying it attracted fighter attention, others pinned loses on the Luftwaffe’s determination to bring down one single group, whilst another placed it solely at the inability of the crews to fly in neat well-structured formations. Whatever the reasons, it was certain that the 492nd were often ‘Tail-end Charlies‘ finding themselves in the weakest and most vulnerable positions of the formations – easy pickings for the now determined and desperate Luftwaffe pilots.

With loses continuing to climb and talk of a jinxed group spreading, an order came though on August 5th 1944 for the 492nd to withdraw from combat missions and take over ‘Carpetbagger‘ operations previously being performed by the 801st at RAF Harrington.  This order would not end the 492nd’s increasing casualties though. On the following day, another two B-24s would both collide on approach to the airfield. #44-4016 ‘Sugar-n-Spice‘ and #42-50719 ‘Sans Souci‘ struck each other causing them both to crash. The accident resulted in the loss of eleven crewmen with another nine injured.

Finally, on 7th August the order was put in place and after the last mission that day, the move began. This reshuffle of numbers and crews was in reality the disbandment of the 492nd, the crews and ground staff being spread far and wide and the 492nd name being transferred to an already well established unit – the 801st.

The loss of these personnel gave North Pickenham a short respite from the rigours of war. But it would only be short. Within a few days, conflict would return as yet another B-24 unit, the 491st Bomb Group, would move in.

Originally designated to reside at North Pickenham, they were instead directed to RAF Metfield, primarily due to the immense progress that the 492nd had made in their training programme. Whilst there must have been concerns around the jinxed airfield, in terms of operational records, the 491st were to be quite the reverse of the 492nd. The 491st arrived at North Pickenham on the 15th August, and continued with their operations over occupied Europe. Like their previous counterparts, they focused on industrial targets in Germany, flying deep in to the heart of the Reich: Berlin, Hamburg, Cologne. Gelsenkirchen, Hannover and Magdeburg.

Ben Glidden front left pilot of ‘Flak Shy’ 491BG (Photo John Glidden)

It was on one of these missions, on November 26th 1944, that they were awarded a Distinguished Unit Citation (D.U.C.) for successfully bombing their target in Misburg despite very heavy loses from a prolonged and determined German counter attack. Out of the original 27 aircraft that set out from North Pickenham that day, 15 were lost to enemy action.

As 1944 turned into 1945 the appalling European weather set in. The cold snows of the 1944/45 winter were one of the worst on record, as troops in the Ardennes and ground crews of the Allied Air Forces were to find out to their discomfort.

Many bombing missions were scrubbed, often at the last-minute, but desperate attempts were regularly made to not only get supplies through, but to bomb strategic positions held by the Germans. On January 5th 1945, heavy snows fell across England and in an attempt to attack German positions, two B-24s of the 491st took off from North Pickenham with disastrous results.

The two aircraft, B-24 #44-40165 ‘Rage in Heaven‘ the unit’s assembly ship, and B-24J #42-50793, both crashed just after take off, with considerable loss of life. As a result, the decision was then made for the 491st to abandon any further attempts to get aircraft airborne, and their part in this operation was cancelled. Even though some 1,000 aircraft of the 1st, 2nd and 3rd Air Divisions would get aloft that day, January 5th would become a black day and notoriously famous for a number of such incidents across the English countryside.

The remains of B-24 #42-50793 lay in the heavy snows of North Pickenham following a crash on January 5th 1945.  One of two 491st aircraft that crashed that day in snow storms. (IWM FRE 8588)

Eventually by April 1945, “The Ringmasters” as they had become known, had amassed over 5000 sorties, dropping over 12,000 tons of bombs, for the loss of only 47 aircraft on operational missions over occupied Europe. In June and July, after cessation of conflict, they began their withdrawal and a gradual return to the United States. A few days of ‘R and R’ then led to their inactivation on September 8th 1945.

After the group left North Pickenham, no other flying squadrons were based here, neither American or RAF, but a brief residency of Thor missiles operated by 220 Sqn between 22nd July 1959 and 10th July 1963, saw the site brought back to life momentarily. Finally, a last reprieve in 1965 saw testing of the Kestrel VTOL aircraft which of course became famous as the Harrier, one of the many British Jet Aircraft to see combat operations in the post war eras.

After the Kestrel trials were over, the site was closed and sold off, returning to a mix of poultry farming, and light industry. Many of the hardstands were removed, buildings left to deteriorate and the perimeter track reduced to a fraction of its former self. As time has gone on wind turbines have sprouted up across the open landscape making good use of the winds that blow across the Norfolk countryside.

RAF North Pickenham

“Stanton” shelter located at South Pickenham.

Despite this decline, there are still signs of this once busy station to see. If approaching from the south, you will pass through South Pickenham first. Follow the leafy road toward the village, but keep a sharp eye open for amongst the trees are a series of “Stanton” air raid shelters of which there are five in total. Many of these are only visible by the escape hatches serving the top of the shelter. These were part of the domestic site that once served the airfield.

Some of these shelters are easily accessible being a few feet from the roadside, but as always, caution is the key word when visiting, and remember the laws of trespass! Moving further on, take a left and you pass a small collection of buildings on the right hand side.

These are the operations block and the store for the American  Norden M7 bomb sight. In a very poor state of repair, they once played a major role in the American offensive over Nazi Germany, – there must be many stories held within their crumbling and decaying walls. Continue past the buildings and you arrive at a ‘T’ junction. Turning right will take you to the airfield, now an industrial site and turkey farm. Access from here is both limited and private. Instead turn left, follow the road along, and then join the B1077. Turn right and drive for a mile or two, the airfield is on your right. A suitable parking space allows views across the field where its enormity can be truly understood. Now containing many turkey sheds along its runways, the outline is distinct and relatively clear considering its age. Up until November 2014 one of the original hangars still remained*1 fire destroying the structure, and what was left then subsequently removed. A number of ordnance huts mark the former location of the bomb dump, these can still be seen in the foreground from this high vantage point. The Watch Office, built to design 12779/41was demolished many years ago but stood opposite you and to the right.

It is also possible to view the main runway. By driving around the site via Swaffham, or retracing your steps though the village, the best view is from the northern end of the airfield on the road from Swaffham to Bradenham, close to the village where the base gets its name. Substantial is size, these runways have fared remarkably well and the sheer size of them easily discernible from the views at this end.

North Pickenham may truly fit the description of ‘ghost’ airfield, its chequered history includes not only one of the worst fatality records of the whole eighth Air Force, but it also attracted a lot of Luftwaffe attention. In excess of 200 German bombs were dropped on it during its short and rather dramatic wartime life. Handed over to the Americans in May 1944, it was the 66th and final one to be so, thus ending a remarkable chapter in world history.

A memorial to the servicemen who flew from North Pickenham, lays silently in the village on the edge of a new housing development. Wreaths from nearby RAF Lakenheath enforce the link between the current American Air Force and Norfolk’s legendary flying history.

On leaving the remnants and stories of North Pickenham, we continue south-east, toward the former RAF Watton, another now extinguished British airfield.

DSC_0056

Memorial dedicated to those who flew from, and never returned to, North Pickenham.

North Pickenham was originally visited in early 2014, this post has since been updated.

*1 This hangar was burnt down in November 2014. My thanks to the anonymous reader for the updates and corrections.