RAF Foulsham – A Leader in Electronic Warfare. (Part 2)

In part 1 we saw how Foulsham began its life and how early squadrons suffered with bad weather and malfunctioning guns. In Part 2, we continue our journey and find out how an American pilot, who crash landed at Foulsham was awarded the Medal of honour.

On that particular day, the aircraft, “Ruthie II“, was in a mass formation heading for Hanover, when a canon shell ripped through the windscreen splitting the pilots head. In addition to this, the oxygen system to the tail, waist, and radio positions was  also inoperable, the top turret gunner had lost both arms and had major injuries to his side; the intercom system was out of action and several crew members had lost consciousness due to the lack of Oxygen.

Morgan grappled with the severely wounded pilot, who had wrapped his arms round the controls, to try and maintain level flight. Morgan decided the protection of the formation was better than heading for home alone, and so for the next two hours he flew in formation holding the pilot back with one hand whilst steering with the other. Eventually the navigator came forward and gave assistance allowing the aircraft to reach the safety of England and Foulsham.

For his actions, Morgan, of Vernon, Wilbarger County, Texas, received the Medal of Honour the following December in a ceremony presided over by Lt. General Ira C. Eaker. The story of Morgan’s bravery would form a part of the story line in the book and movie “Twelve O’Clock High”.*3

The posting of 98 and 180 Squadrons in August 1943 was no coincidence, as the airfield saw further development and new hangars added. These hangars were erected at various locations around the airfield site, ready to accommodate the forty or so Horsa gliders that would soon arrive here escorted by 12 Heavy Glider Maintenance Section. Their arrival marking the beginning of the  preparations for the invasion of Normandy the following year.

A few days later, on September 1st, 1943, the handover of Foulsham took place and 3 Group became the new owners in a move that also signified the forming of 514 Squadron with Lancaster IIs, the less common radial engined version of this famous Avro aircraft.

514 Sqn was initially headed by Acting Wing Commander A.J. Samson D.F.C., although the first to arrive at the airfield was the squadron adjutant. On first inspection, he and his small party found that the office blocks had been completely stripped of all their furniture, even shelving had annoyingly been removed from walls. As a result the offices were virtually unusable, and so a huge clean up operation began in readiness for the ground and air crews who were to shortly follow.

RAF Foulsham

One of the original T2 hangars.

Accommodation sites 2 and 5 were quickly allocated to the squadron for personnel use, and as soon as equipment began arriving, on a rainy and very wet September day, everyone was drafted in to unload and store the various much needed supplies.

To provide flying personnel for the new squadron, a support unit would also be formed at the airfield, that of 1678 Heavy Conversion Unit. The formation of this unit was achieved through the renumbering of the Flight of the same designation, a changeover that took place a month later, on October 16th 1943. The role of this unit was to convert experienced bomber crews over to the new Lancaster.

In the interim period, the new aircraft began to arrive. The first Lancaster ‘DS735’ touching down on 11th September, 1943, followed by three more (DS785, 783 and 784) over the next three days. Their arrival was met not with pomp and ceremony though, but by heavy showers and thunderstorms, the weather that had dogged earlier squadrons continued to play its terrible part in life at Foulsham. Over the next few weeks, aircraft were quickly modified and air-tested ready for flying, by the end of the month, eighteen Lancasters had been flown in and virtually all the crews had arrived ready for converting to the new type.

Over the next month, and although the weather yet again played havoc with flights, cross-countries and air tests were carried out with a high level of success. However, no one could control the weather, and the first planned operational sortie had to be cancelled due to extensive fog that blanketed the Norfolk countryside. Not until November 6th did a break allow any operational flying to take place, and that break allowed two small flights to get airborne.

A mining operation undertaken by four aircraft along with a bombing mission in which only two aircraft got off the ground, were the squadrons break into operational flying; not a major mission, but one that nevertheless broke the ice.

With the poor weather continuing, several more ‘ops’ were again cancelled allowing only the occasional ‘Bulls-eye’ or morning flight to get away. Whilst it must have been frustrating for crews, this did allow them to finally put into practice all the training they had undertaken so far.

Then on the 14th November 1943, news came through from above that 3 Group was being reorganised and that 514 Sqn would be moving from Foulsham to RAF Waterbeach in Cambridgeshire as a result. The move, expected to be completed by the 23rd, would coincide with the first operation to Berlin, a move that also signified the first phase of the ‘Battle of Berlin’. This would also be the first time a 514 Sqn aircraft (DS784 ‘JI-C’) would not return from operations; the loss being a blow to the squadron. Of the seven-man crew, one would be taken prisoner (F/S. B. Haines (RAAF)) whilst a further (Sgt. H. Lucas) would evade capture,  successfully hiding out in Brussels until its liberation in 1944. The remaining five crewmen however, all perished in the aircraft’s crash.

In Part 3, Foulsham passes to new ownership and its life in electronic warfare begins. The new Group will bring new challenges, new aircraft and the installation of FIDO, the Fog dispersal system.

The entire story of Foulsham can be seen in Trail 22.

RAF Foulsham – A Leader in Electronic Warfare. (Part 1)

In Norfolk sits an airfield that only had a short wartime life, but it is one that is more than significant. Used in the electronic warfare role, it went on to house a small number of heavy bomber squadrons all crammed with electronics to detect, monitor and interfere with enemy transmissions.

In conjunction with this, it also saw a detachment of two-seat P-38/F-5 Lightnings, a rare aircraft in this country, and possibly the only one to do so. Dogged by bad weather it was identified as a suitable site for ‘FIDO’ the fog dispersal system, and post war it was used in both the scrapping of DH Mosquitoes and as a storage unit.

In Trail 22 we revisit the former RAF Foulsham.

RAF Foulsham

RAF Foulsham, sits approximately 8 miles north-east of the Norfolk town of Dereham. It had a short active life of just three years, lasting between May 1942 and 1945, at which point it was closed to flying and used as a storage site for military hardware. It remained in this lesser state until the 1980s when it was deemed surplus to requirements and finally closed. The land it stood on, was then sold off to local farmers.

Built over the period 1940-41 by the construction company Kirk and Kirk Ltd, RAF Foulsham occupied land some 173 feet above sea level, and opened under the control of 2 Group Bomber Command. Much of the material that was brought in to construct Foulsham came via nearby railways stations, then along local roads through the village, leaving locals facing endless mud and traffic.

As a war-time airfield, Foulsham would have three tar and wood chip runways, one of which would later be equipped with the fog dispersal system ‘FIDO’, a valuable if not bizarre system designed to dissipate fog along airfield runways.

Foulsham’s three runways were 1,900 and 1,350 yards long, with the main runway heading in a north-south direction. By the end of the war it would have thirty-seven heavy bomber hardstands, nine T2 hangars and one B1, and as such, was a formidable size. Personnel numbers were reflected in this, with accommodation spread over several sites to both the south and east, able to accommodate upward of 2,500 personnel of mixed rank and gender. The ever important technical site sat to the east, with the bomb store situated to the south-west of the airfield, just off the end of the main north-south runway.

RAF Foulsham

The original Fire Tender shed.

The watch office, now long gone, was built to design 518/40 which included and Meteorological section attached to the building. These designs were a development of earlier models using a new 9 inch rendered brick wall as opposed to timber, although timber was initially required for the floors and ceilings. Due to a shortage in wood at the time though, concrete replaced a large portion of these leaving only the balcony and control room using such material.

Whilst Foulsham opened under 2 Group, it would almost immediately – within a month of opening – be handed over to the US forces of the 8th Air Force and be renamed station B.13. However, this change never evolved into anything  more as no American personnel were stationed here, and by the October it was back in RAF hands, and 2 Group once more. The next few years would see the airfield change hands several more times, and with each change would come new aircraft, new personnel and new roles.

The first units to arrive here were those of the host unit 2 Group. Both 98 and 180 Squadron arrived in mid October 1942 after their reformation/formation at RAF West Raynham. During this time, they both began to receive their aircraft, the American built B-25 ‘Mitchell II’. Their transfer across to Foulsham gave the airfield the honour of being the first station to use the type operationally. Both squadrons would remain active in the light bomber role until 18th August 1943 at which point they would depart and the airfield would change ownership once more.

98 Squadron, a First World War unit, had been operating out of Kaldadarnes in Iceland following a terrible loss of personnel when the Lancastria was sunk in June 1940. Their reformation at West Raynham, and subsequent move to Foulsham, had been quickly met with yet more losses, when one of the Mitchells ‘FL206’, spun killing all four members of the crew on board.

After this, the squadron would be dogged by misfortune, the squadron adjutant noting in the Operational Records that excessive rain had turned the site into a “disgraceful condition”; the weather was one aspect the staff would have to put up with for some time to come. *5

For the first sixteen days of November, all but a handful of days were washed out, the despair of staff being felt through the Operational Records, each day met with ‘Lectures continue, adverse weather for flying‘. However, on the 16th, training flights did manage to take place, but it too was met with more sadness as a second set of fatalities occurred.

During the training flight, Mitchell FL179 suffered a bird strike in the carburettor of the starboard engine, this caused the engine to fail. With only one serviceable engine the pilot, Flt. Sgt. K. Williams (s/n: 1062588), tried to land at nearby RAF Attlebridge, unfortunately the aircraft stalled and went into a spin. The resultant crash killed all three aircrew on board and wrote off the Mitchell.

Things were to not get any better for the squadron either. On the 30th, a third crash took yet four more lives when FL708 collided with high tension cables near to RAF Wendling. The explosion from the collision also killed a local farmer who was ploughing his field at the time of the accident. It had been a terrible start for the fledgling unit.

The poor weather continued relentlessly, hampering the squadron’s progress, both on the ground and in the air, with training flights being cancelled on a regular basis. During the small numbers that were taking place, further problems came to light adding to the frustrations already felt by the crews.  Since taking on the initial batch of nine Mitchells on September 18th, the squadron had been having problems with the aircraft especially the guns and their turrets.

Gunners had found that extended bursts of gunfire were impossible, usually no more than a dozen rounds could be fired at any one time, a situation borne out by Wing Commander Foster, the Group Armament Officer, on the 16th December. In an attempt to remedy the situation, an American gun turret specialist visited the squadron, but by the 18th it was considered that the guns were ‘obsolete’.

RAF Foulsham

A defence ‘pill box’.

January was much the same, snow added to further problems and again the aerodrome was noted as being in a “very bad condition“, all flying being cancelled until the middle of the month when a small number of flights did get airborne.

The first battle order came through on January 21st, but due to a late delivery of bombs, it was also cancelled, meaning the squadrons first operation flight wouldn’t take place until the next day.

Six aircraft were ordered to operations, and whilst all made it to the target, one aircraft, FL693, was hit by flak and disintegrated. All on board were presumed killed.  The first months of 98 squadron had been challenging and difficult for those posted here.

180 Squadron had fared a little better, although after walking into a spinning propeller, L.A.C. J. Aspinall was killed, the only fatality of the squadron during the same period.

On July 26th 1943, an emergency landing was made at Foulsham by a B-17F #42-29802 of the 326th BS, 92nd BG, 8th AF, after a traumatic series of events that earned the co-pilot, John C. Morgan Flight Officer (later 2nd Lt.), the Medal of Honour for his valour and courage in action.

In part 2 we see how Morgan earned this prestigious award and how Foulsham continues to develop.

The entire story of Foulsham can be seen in Trail 22.

August 23, 1944 The worst aircraft accident in the UK during WW2.

During the Second World War, Britain’s landscape changed forever. The friendly invasion brought  new life, new music, rationed items became sought after bounties and they were plentiful – if you knew an American.  But this dramatic change in the British way of life could also be explosive and deadly.

Anyone living near to a wartime airfield knew only too well the risks of such a life. Aircraft could ground loop, collide in the air or suffer a major mechanical failure on take off, all of which could result in a massive explosion in a fully laden bomber. There are numerous recordings of such accidents occurring, and the brave attempts of crewmen trying to avoid local housing. One such crash was that of B-17 #42-39825, “Zenobia” which crashed on take off coming to rest in the nearby village of Deenethorpe. Luckily, the crew were able to escape and warn the locals of the impending danger, thus averting a catastrophe when the aircraft, fully laden with bombs and fuel, exploded twenty minutes later. The explosion was so fierce that it was heard nine miles away!

However, not everyone was as lucky, and on August 23rd 1944, Wartime Britain experienced what is considered its worst wartime air disaster. A disaster in which sixty-one people lost their lives when a USAAF aircraft from BAD2 at RAF Warton crashed into the adjacent village of Freckleton in Lancashire.

Warton, or BAD2 (Base Air Depot No. 2), was responsible for the modification and overhaul of US aircraft and engines when they arrived fresh from the United States. They were assembled, modified and transferred from here to front line operational airfields across the UK. A massive operation that began even before the United States had even entered the War.

Initially, Warton was built as a satellite for the RAF Coastal Command station at Blackpool, known at the time as Squires Gate Airfield, an airfield with a history going as far back as 1909. With many pleasure flights, air pageants and civil flights, it was eventually taken over and used for fighters and bombers of Coastal Command.

With many aircraft being shipped into the UK via the Atlantic during the early years of the war, the need for a site to build and then maintain them became evermore apparent and urgent. It was not long after the outbreak of war, that four such sites were earmarked for use by the USAAF as Air Depots, each one dealing solely with aircraft maintenance and refurbishment. The proposal, initiated by Lord Beaverbrook as early as October 1939, which then progressed through discussions between the American and the British Governments in 1941 , specified that these bases would need to be able to deal with large quantities of aircraft and be able to handle aircraft modifications at any stage of the assembly process. In October, these bases were identified by a consortium of American and British representatives, who selected: Warton, Little Staughton (Bedford), Burtonwood (Warrington) and Langford Lodge in Neagh, Northern Ireland, as the most suitable sites.

Warton would be massive, housing almost 16,000 people in over ten accommodation sites, which when compared to a normal Class A airfield of some 3,000 people, was an enormous conurbation. To be adaptable, the runway was strengthened and extended to match that of any wartime airfield, at almost 2,000 yards long, it could take any aircraft brought over from the United States. Along side this were a wide range of ancillary buildings: stores,  maintenance sheds, office blocks, hangars, engine test sheds and fifty dispersal points. As the war progressed, Warton was extended further with the largest European storage shed and further hangars being added in 1944.

The entire site was completed in just nine months, using a combination of construction groups led by Frank Thomas; this included both Alfred McAlpine, and Wimpey, two of the largest airfield contractors at that time.

Station 582 of the US Eighth Air Force was opened August 1942, housing a small contingent of USAAF personnel. Officially handed over to the USAAF a year later, it now had some 5,000 personnel on its books already, all specially trained to handle the unique American aircraft being brought over from the United States.

Each base would specialise, Burtonwood in radial engines and the B-17, whilst Warton concentrated on in-line engines and B-24s. However, that did not mean that this was a ‘closed door’ operation, Warton would, over the period of the war, see every example of US built aircraft pass though its doors, and at its peek, held over 800 aircraft within its grounds.

Living near such a large and active base would bring many benefits, 700, children were given a Christmas party that lasted for a week, the locals were well provided for and money poured into the local economy. However being so close also brought it dangers. There were numerous accidents with parked aircraft being hit as other aircraft taxied past. There were also several crashes, including a North American P-51D-5-NA Mustang #44-13403 that crashed on June 12th, 1944, killing its pilot. The accident being caused by a catastrophic structural failure of the wing assembly. Another P-51D #44-14608 (310th Ferry Squadron, 27th Aircraft Transport Group) was involved in a landing accident at Warton, on October 5th, 1944. The pilot survived, but the aircraft was destroyed in the crash.

Then there was the P-51B-5 #43-6623 that crashed after taking off from Liverpool’s Speke airport, it was was subsequently taken to Warton where it was combined with other parts of P-51Bs that had been dropped on delivery. The new aircraft, aptly named ‘Spare parts‘, would then be used as an unarmed two-seater ferrying VIPs around, delivering small spare parts to the other airfields and collecting supplies of of whiskey from a distillery in Glasgow. The aircraft itself was lost in late 1944 when it experienced engine failure. The two crew bailed out and survived but the aircraft crashed coming to a rest at the bottom of the Irish Sea.

One of the more terrible accidents at Warton involved the collision of two Douglas A-26B-10-DT Invaders, on November 29th 1944, when #43-22298 collided in midair with #43-22336 over Warton Marsh. The crews’ bodies were removed from the site, but the aircraft remained buried in the silt until excavation in 2004. Both aircraft were then transferred to the RAF Millom Museum at Haverigg, Cumbria where they remained until its closure on 1st September 2010. With many of it exhibits being ‘on loan’, they were returned to their original owners whilst the rest were publicly auctioned off in January 2011. The fate of the two Invaders is unknown at the time of writing.

However, it was on Wednesday, August 23rd 1944, that Warton would be shocked by Britain’s worst wartime air disaster and the terrible events that would unfold that day.

Everything appeared normal that day as the workers at BAD 2 and the surrounding area awoke. The news was generally good, the war was heading in the right direction and victory for the allies appeared to be on the cards. There were high pressure zones to the east and west and low pressure to the north. The first 2 weeks of August were generally dry and  warm with spells of sunshine. There had been  a spell of warm weather that continued into the third week, with temperatures reaching as high as 28°C in the south. On the 23rd, early sunshine was expected to change to light rain later on, nothing that should have caused any significant problems to the experienced crews at Warton.

Early on that day, two routine test flights were booked by experienced pilots on newly refurbished Consolidated B-24 Liberators  before they were sent out out to the 2nd Bomb Division. The first, piloted by First Lieutenant John Bloemendal, ‘Classy Chassis II‘, and the second piloted by First Lieutenant Peter Manassero.

After a delayed start, First Lt. Bloemendal and his two crewmen boarded the B-24, ran their ground checks and started the engines. They then departed on was was a routine test flight. Meanwhile, the second B-24 piloted by First Lt. Manassero also departed and both aircraft headed out from Warton. During this time a weather warning was passed to Warton tower informing them of an impending storm, the likes of which even the British had rarely seen. The notorious British weather had played a cruel joke.  In seconds, the summer sky had turned jet black. Daylight had been all but wiped out, Heavy rain lashed the landscape, localised flash floods and unprecedented strong winds battered the Warton skyline. Locals reported seeing trees being uprooted and buildings being damaged such was the strength of the wind and lashing rain.

The tower issued an immediate warning to land the two aircraft. B-24 #42-50291 “Classy Chassis II“,  was given clearance first, the second flown by First Lieutenant  Manassero was to come in next. With visibility down to some 500 yards, the two aircraft approached the airfield in close formation, simply to keep in visual contact. Bloemendal  lowered his undercarriage followed by Manassero. Bloemendal  then began his approach, suddenly retracting his undercarriage informing Manassero he was going round again for another try. But by now, the weather had deteriorated so much that the tower was extremely concerned, and issued an order, to both aircraft, to withdraw from the circuit and abort landings, telling them to fly to the north to avoid the storm. Bloemendal never received the message.

By now contact had been lost between the two pilots, Manassero headed out of the circuit and flew out of harms way, Bloemendal on the other hand had already hit the ground, a massive fireball ensued. Eye witness accounts differed as to what the cause of the crash was, one witness said she saw  lightning strike the aircraft at the wing root, “splitting the aircraft in two“, others say they saw the wings in a near vertical position as if the pilot was banking steeply to turn away.

The aircraft came down across Lytham Road, after hitting the ‘Sad Sack Snack Bar’, purposefully built for the American servicemen of BAD 2. It demolished three houses and the infant section of Freckleton’s Holy Trinity School, which at the time, was full of children between the ages of 4 and 6 who, along with their teachers, were going about their daily routine. The resultant crash led to a fireball, one that eventually took the lives of sixty-one people. Eighteen in the cafe, forty in the school and the three crewmen aboard “Classy Chassis II“.  Many of these dying in the days that followed from severe burns as burning petrol engulfed the school before flowing into the street .

The crash was so devastating that at the inquest, only the School’s register could be used to identify some of the missing children whilst others were identified merely by parts of their clothing painfully presented to grieving parents. First Lieutenant John Bloemendal was only identified by the remains of his dog tags and wedding ring, the only married man aboard the aircraft.

The US servicemen from BAD2 were highly praised in the days that followed for their quick and brave response to the crash. Pulling away debris while the aircraft still burned, attempting to put out the fire and fighting to save whomever they could from the burning wreck that was once Freckleton village school.

The papers understandably ran the story for months and even years afterwards, as more and more information came to light. Some of the injured were so severely burned, they were read their last rights, whilst many had to have long term skin grafts, including some as part of McIndoe’s Guinea Pig Club.

From Lytham St. Annes, to London and New York, the story of Britain’s worst air disaster spread, putting good news from the front line into painful perspective. Whilst convalescing, young survivors were visited by Bing Crosby, who diverted from his tour of American airfields across the UK, to pay his respects. A small gesture to avert the grieving now felt across both sides of the ocean.

A mass funeral service took place in Freckleton on August 26th, the streets were lined with mourners as service personnel carried the many tiny coffins along in one mass parade. Afterwards, a fund was set up by the USAAF, and an area of land was developed into a playground as a lasting memorial to those lost in the accident. A tablet laid at the playground reads:  “This playground presented to the children of Freckleton by their neighbours of Base Air Depot No. 2 USAAF in recognition and remembrance of their common loss in the disaster of August 23rd 1944”.

The inquest into the crash could not prove conclusively as to the cause of the crash. It states:

“The cause of this accident is unknown. It is the opinion of the Accident Investigating Committee that the crash resulted from pilot’s error in the judgement of the violence of the storm. The extent of the thunder-head was not great and he could have flown in perfect safety to the North and East of the field”.

It also states that a possible “rough air structural failure occurred“, although verification of this was impossible due to the total destruction of the aircraft’s structure.

freckleton 28 Aug 1944 funeral procession Photo Ralph Scott

Crowds line the street as US Servicemen carry the many coffins at Freckleton (Photo Ralph Scott, BAD2)

What did arise from the crash was that US service personnel who were trained in the bright blue skies of America, were unaccustomed to the changeable and fierce British weather. Many, like First Lieutenant Bloemenda, often under-estimating the dangers of these thunderstorms and as a result, training was amended to include warnings about such events.

With the eventual withdrawal of US forces from Warton, the memories of that day linger on, regular services are held at Frekleton in remembrance of those sixty-one lives who were all innocent victims of Britain’s worst air disaster of World War Two.

Sources and Further reading

There are many sites that cover this story, in particular I refer you to:

British Newspaper Archive website.

The Lancashire Aircraft Investigation Team Website which has many photographs pertaining to the crash and is well worth a visit.

BAD2 Blog 

The Book “The Freckleton, England, Air Disaster” by James R. Hedtke, details the accident in depth giving eyewitness accounts, background details and transcripts of the conversations between pilots and the tower. It served as a valuable source of information for this post and is worth buying if interested in reading about this further.

Also, the book ‘Blood and Fears‘ by Kevin Wilson, (Weidenfeld & Nicolson) also briefly mentions accounts of the event. Again a good book should you wish to read further.

Lt. Col. Leon Vance 489th BG – Medal of Honour.

Leon vance.jpgThe story of Leon Vance is one of  the saddest stories to emerge from the Second World War. He was a young American, who through his bravery and dedication, saved the lives of his colleagues and prevented their heavily stricken aircraft from crashing into populated areas of southern England. Following a mission over France, his was very severely injured, but miraculously fought on.

Leon Robert Vance, Jr. known as ‘Bob’ to his family and friends, was born in Enid, Oklahoma, on August 11th, 1916. He graduated from high school in 1933 after receiving many honours and being singled out as a high performing athlete. He went on, after University, to the prestigious Training College at West Point in 1935, staying until his graduation four years later in 1939. It was here, at West Point, he would meet and marry his wife Georgette Brown. He and Georgette would later have a daughter, after whom Vance would name his own aircraft ‘The Sharon D’.

Vance would become an aircrew instructor, and would have various postings around the United States. He became great friends with a Texan, Lieutenant Horace S. Carswell, with whom he would leave the Air Corps training program to fly combat missions in B-24 Liberators. They became great friends but would go on to fight in different theatres.

Prior to receiving his posting, Vance undertook training on Consolidated B-24s. Then, in October 1943, as a Lieutenant Colonel, he was posted to Europe with the newly formed 489th Bombardment Group (Heavy), as the Deputy Group Commander. One of the last groups to be assigned to the European theatre, they formed part of the 95th Combat Bombardment Wing (2nd Bomb Division),  Eighth Air Force, and were sent to RAF Halesworth (RAF Holton) designated Station 365 by the USAAF.

The group left their initial base at Wendover Field, Utah in April / May 1944 and their first mission would be that same month on May 30th, 1944, as part of a combined attack on communication sites, rail yards and airfields. A total of 364 B-24s were to attack the Luftwaffe bases at Oldenburg, Rotenburg and Zwischenahn, along with other targets of opportunity far to the north in the German homeland. With only 1 aircraft lost and 38 damaged, it was considered a success and a good start to the 489th’s campaign.

As the build up to Normandy developed, Vance and the 489th would be assigned to bombing targets in northern France in support of the Normandy invasion about to take place further to the south. An area the unit would concentrate on, prior to the Allied beach invasion on June 6th that year.

The day before D-day, the 489th would fly to Wimereaux, in the Pas-de-Calais region of northern France. This would be Leon Vance’s final mission.

File:846bs-b24-42-94860--halesworth.jpg

B-24H Liberator of the 489thBG, RAF Halesworth*2

The group, (Mission 392),  consisted of 423 B-17s and 203 B-24s and were to hit German coastal defences including: Le Havre, Caen, Boulogne and Cherbourg areas as  a precursor to the Normandy invasion. Some 127 P-47s and 245 P-51s would support the attacks. The 489th would assemble at 22,500 feet on the morning of June 5th, proceed to the south of Wimereaux, fly over dropping their payload, and then return to England. On the run in to the target, Vance was stationed behind the pilot and copilot.  The lead plane encountered a problem and bombs failed to jettison. Vance ordered a second run, and it was on this run that his plane, Missouri Sue, took several devastating hits.

Four of the crew members, including the pilot were killed and Vance himself was severely injured. His foot became lodged in the metal work behind the co-pilots seat. There were frantic calls over the intercom and the situation looked bad for those remaining on board. To further exacerbate the problems, one of the 500lb bombs had remained inside the bomb bay armed and in a deadly state, three of the four engines were disabled, and fuel spewed from ruptured lines inside the fuselage.

Losing height rapidly, the co-pilot put the aircraft into a dive to increase airspeed. The radio operator, placed a makeshift tourniquet around Vance’s leg, and the fourth engine was feathered.  They would then glide toward the English coast.

The aircraft was too damaged to control safely, so once over English soil, Vance ordered those who could, to bail out. He then turned the aircraft himself out to the English Channel to attempt a belly landing on the water. A dangerous operation in any aircraft, let alone a heavy bomber with an armed bomb and no power.

Still trapped by the remains of his foot, laying on the floor and using only aileron and elevators, he ensured the remaining crew left before the aircraft struck the sea. The impact caused the upper turret to collapse, effectively trapping Vance inside the cockpit. By sheer luck, an explosion occurred that threw Vance out of the sinking wreckage,  his foot now severed.  He remained in the sea searching for whom he believed to be the radio operator, until picked up by the RAF’s Air Sea Rescue units.

Vance was alive, but severely injured. He would spend a number of weeks, recuperating in hospital, writing home and gradually regaining his strength. Disappointed that his flying career was over, he looked forward to seeing his wife and young child once more. However, on a recuperation trip to London, Vance met a young boy, who innocently, and without thought, told him he wouldn’t miss his foot. The emotional, impact of this comment was devastating to Vance and he fell into depression. Then, news of his father’s death pushed him down even further.

Eventually, on July 26th, 1944 Vance was given the all clear to return home and he joined other wounded troops on-board a C-54, bound for the US. It was never to arrive there.

The aircraft disappeared somewhere between Iceland and Newfoundland. It has never been found nor has the body of Leon Vance or any of the others on board that day. Vance’s recommendations for the Medal of Honour came through in the following  January (4th), but at the request of his wife, was delayed until October 11th 1946, so his daughter could be presented the medal in her father’s name.

The citation for Leon Vance reads:

For conspicuous gallantry and intrepidity above and beyond the call of duty on 5 June 1944, when he led a Heavy Bombardment Group, in an attack against defended enemy coastal positions in the vicinity of Wimereaux, France. Approaching the target, his aircraft was hit repeatedly by antiaircraft fire which seriously crippled the ship, killed the pilot, and wounded several members of the crew, including Lt. Col. Vance, whose right foot was practically severed. In spite of his injury, and with 3 engines lost to the flak, he led his formation over the target, bombing it successfully. After applying a tourniquet to his leg with the aid of the radar operator, Lt. Col. Vance, realizing that the ship was approaching a stall altitude with the 1 remaining engine failing, struggled to a semi-upright position beside the copilot and took over control of the ship. Cutting the power and feathering the last engine he put the aircraft in glide sufficiently steep to maintain his airspeed. Gradually losing altitude, he at last reached the English coast, whereupon he ordered all members of the crew to bail out as he knew they would all safely make land. But he received a message over the interphone system which led him to believe 1 of the crew members was unable to jump due to injuries; so he made the decision to ditch the ship in the channel, thereby giving this man a chance for life. To add further to the danger of ditching the ship in his crippled condition, there was a 500-pound bomb hung up in the bomb bay. Unable to climb into the seat vacated by the copilot, since his foot, hanging on to his leg by a few tendons, had become lodged behind the copilot’s seat, he nevertheless made a successful ditching while lying on the floor using only aileron and elevators for control and the side window of the cockpit for visual reference. On coming to rest in the water the aircraft commenced to sink rapidly with Lt. Col. Vance pinned in the cockpit by the upper turret which had crashed in during the landing. As it was settling beneath the waves an explosion occurred which threw Lt. Col. Vance clear of the wreckage. After clinging to a piece of floating wreckage until he could muster enough strength to inflate his life vest he began searching for the crew member whom he believed to be aboard. Failing to find anyone he began swimming and was found approximately 50 minutes later by an Air-Sea Rescue craft. By his extraordinary flying skill and gallant leadership, despite his grave injury, Lt. Col. Vance led his formation to a successful bombing of the assigned target and returned the crew to a point where they could bail out with safety. His gallant and valorous decision to ditch the aircraft in order to give the crew member he believed to be aboard a chance for life exemplifies the highest traditions of the U.S. Armed Forces”*2

Leon Vance’s actions would be remembered. His local base in Oklahoma was renamed ‘Vance Air Force Base’ on July 9th, 1949. The gate at Tinker Air Force Base, Oklahoma was also later named after him on May 9th, 1997, and his name appears on the ‘Wall of the Missing’ at Madingley American War Cemetery in Cambridge, England.

DSC_0582

The American War Cemetery, Madingley. Leon Vance’s Name Appears on the wall of the missing (to the left of the picture).

Leon Robert Vance, Jr. (August 11th, 1916 – July 26th, 1944)

For other personal tales, see the Heroic Tales Page.

Sources.

* Photo public domain via Wikipedia

*1 “Medal of Honor recipients – website World War II”.

*2 Photo Public Domain via Wikipedia.

RAF North Witham – Leading the way into Normandy.

If you follow the A151 towards the main A1, close to the Lincolnshire / Leicestershire border, and you come across Twyford Woods, and an airfield that is little known about, yet its part in history is perhaps one of the most important played by any airfield in Britain. Famous battles such as the Normandy invasion, the Ardennes and the crossing of the Rhine all took place because of the events that occurred here, and were it not for this airfield, many may not have been as successful as they were. In Trail 3, we head further west to perhaps one of Britain’s best kept secrets – RAF North Witham.

RAF North Witham (Station 479)

RAF North Witham sits quietly amongst the trees of Twyford Woods, a site originally known as Witham Wood, which is now a public space owned and maintained by the U.K.’s Forestry Commission.

Originally, North Witham was one of twelve airfields in the Leicestershire cluster intended to be an RAF bomber station for No. 7 Group, however, it was never used operationally by the Royal Air Force, instead like ten others in the area, it was handed over to the US Ninth Air Force and in particular the IX Troop Carrier Command.

North Whitham control tower

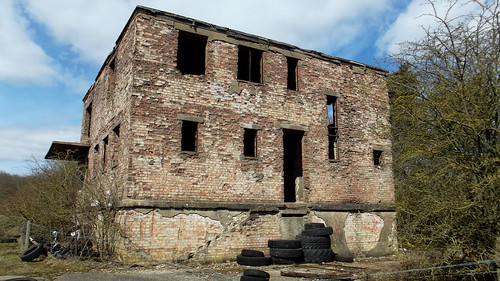
North Witham’s Tower – now a mere shell.

As it was originally designed as a bomber station it was built to the Air Ministry’s class ‘A’ specification, formed around the usual three triangular runways, perimeter track and aircraft hardstands. With construction beginning in the mid-war years 1942/43, its main runway would be 2000 yds long, with the second and third runways 1,400 yds in length and all 50 yds wide. To accommodate the aircraft, 50  ‘spectacle’ style dispersals were built, scattered around the adjoining perimeter track. As a bomber base it had a bomb store, located to the north-eastern side of the airfield, with the admin and technical site to the south-east. The usual range of stores and ancillary buildings adorned these areas. One architectural feature of North Witham was its operations block, built to drawing 4891/42, it was larger than most, with ceilings of 14 feet high. Amongst the myriad of rooms were a battery room, cipher office, meteorology room, PBX, traffic office and teleprinter room, all accessed through specially designed air locks. A further feature of this design was the attachment of a Nissen hut to house plant and boiler equipment, a feature not commonly seen at this time.

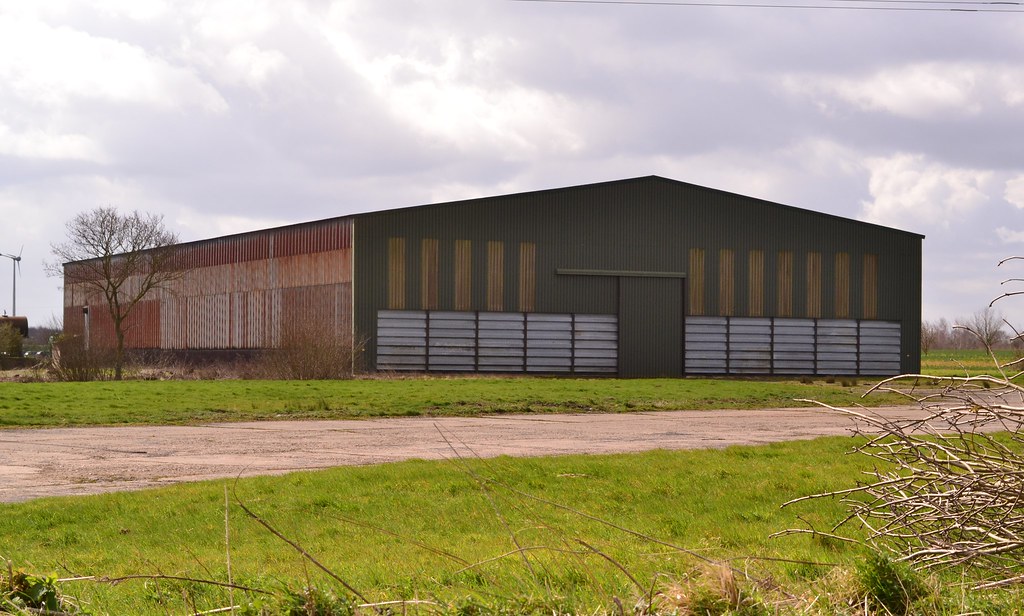
Aircraft maintenance could be carried out in one of two ‘T2’ hangars with additional work space provided by one of six ‘Butler’ hangars. Designed and built by the Butler Manufacturing Company of Kansas, USA, these were supplied in kit form and had to be erected on site by an Engineer Aviation Battalion. These hangars consisted of rigid box section girders over a canvas cladding, and once fully erected, gave a wide 40 ft span. Quite a rare feature, these types of structures were only built in limited numbers during the Second World War and only appeared on American occupied airfields. Post-war however, they were far more commonly used appearing on many American cold-war sites across the UK.

north whitam

A ‘Butler’ hangar under construction by members of the 833rd Engineer Aviation Battalion (EAB) at a very snowy North Witham (@IWM479)

The Ninth Air Force was born in 1942 out of the ashes of the V Air Support Command, and then combined with units already located in the England operating under the American Eighth Air Force. Its initial activities focused on the allied push across North Africa followed by the move up into southern Europe through Italy.

Moving to England in October 1943, it then became the tactical Air Force that would support the Normandy invasion, supplying medium bombers, operating as troop support and finally providing supply flights. Facilitation of this massive invasion required both a huge backup, and an intricate supply and support network. North Witham would form part of this support network through both repair and maintenance of the troop carrier aircraft that were operated by the Ninth Air Force – primarily the C-47s. The main group undertaking this role at North Witham was the 1st Tactical Air Depot comprising the 29th and 33rd Air Depot Groups between January and September 1944*1. One of a number of depots, they were once described as the “backbone of Supply for the Army Air Force”, and had a complicated arrangement that encompassed numerous groups across the entire world theatre.

For such a large base, North Witham would be operationally ‘underused’, the only unit to fly from here being those of the IX Troop Carrier Command (TCC), who would primarily use C-47 ‘Skytrains’ – an established and true workhorse, and one that would go on to supply many air forces around the world.

During the Sicily campaign, it was found that many incoming aircraft were not finding the drop zones as accurately as they should, and as a result, paratroops were being widely and thinly scattered. More accurate flying aided by precise target marking was therefore required, and so the first Pathfinder School was set up.

North Whitham pen

Part of one of North Witham’s 50 dispersal pans.

The IX TCC Pathfinder School (incorporating the 1st, 2nd, 3rd and 4th Pathfinder Squadrons) was formed whilst the TCC was at RAF Cottesmore in Rutland. Initially having only seven C-47 aircraft, it arrived at North Witham on March 22nd 1944. These aircraft were fitted with, at the time, modern Gee radar and navigation equipment, along with SCR-717 navigational radar housed in a dome beneath the fuselage of the aircraft. This combination of equipment would allow the aircraft to be used as ‘Pathfinders’, and would be used to train both crews and paratroops of the 101st and 82nd Airborne to mark targets prior to the main invasion force arriving.

These crack troops would train at North Witham before returning to their own designated bases to pass on their newly acquired skills. The idea being that these troops would set up ‘homing’ stations using ‘Eureka’ beacons that would connect to ‘Rebecca’ receivers in the aircraft (distinguished from the outside by antenna protruding from the nose). This would allow flying to near pinpoint accuracy even in poor weather or at night; something that would be employed with relative success in the forthcoming Normandy landings.

On arrival at North Witham, the Pathfinders were accommodated in the huts originally provided for the depot’s crews – some 1,250 enlisted men and 75 officers. Many of these displaced men were rehoused in tents along the northern end of the site which only added a further strain to the already rudimentary accommodation that was already in place at the airfield. At its height, North Witham would house upward of 3,700 men in total, a figure that included an RAF detachment of 86 men and large quantities of GIs.

After arrival, the crews began training for the invasion. Flying cross country flights enabled them to practise using their new radar sets, flying in all weathers, at night and during the day. By D-Day, all navigators had been using the equipment in excess of 25 hours and were considered more than competent in its operation.

With postponements of the invasion came frustration, crews and paratroops mentally prepared for war were let down, there was little for them to do to release the tension that many must have felt.

On June 5th, after the plan was finally given the go ahead, some 821 Dakotas at various sites across England were primed ready for the initial wave of the invasion. Timing was of the utmost importance. As rehearsals had shown, seconds could mean the difference between life and death – for the crews of the C-47s, the pressure was on.

Around 200 Pathfinders of North Witham were the first to leave the UK and enter the Normandy arena. Departing late in the evening of June 5th, men of the 82nd and 101st Airborne climbed aboard their twenty C-47s and rose into the night sky. North Witham based C-47A*2 ‘#42-93098’ piloted by Lieutenant Colonel Joel Crouch*3, led the way. Nineteen other North Witham aircraft joined Crouch that night, and remarkably only one aircraft was lost in the entire flight. Flying under mission ‘Albany‘, the Douglas built C-47A-15-DK Skytrain, #42-92845 (aircraft #4) was lost en route either due to mechanical failure, or as some sources say, following a direct hit by Anti-Aircraft fire. Either way, the aircraft lost an engine and was forced to ditch in the sea. Once down, the crew and paratroops on-board were rescued by the British destroyer HMS Tartar.

Image result for Lieutenant Colonel Joel Crouch and his crew

The Crew of C-47A #42-93098, a few hours before they left for Normandy. Including Pilot, Lieutenant Colonel Joel Crouch (centre), Captain Vito Pedone (copilot), Captain William Culp (Navigator), Harold Coonrod (Radio Operator), along with Dr. Ed Cannon (physician), and E. Larendeal (crew chief)*1

The aircraft flew in groups of three in an in-line ‘V’ formation; aircraft 1, 2, 3 followed by 4, 5, 6; 19 and 20 (added as a late decision); 7, 8, 9; 10, 11, 12; then 16, 17 and 18. The formation was finally completed with aircraft 13, 14 and 15 bringing up the rear. Each C-47 would deposit its collection of Paratroops over six drop zones (DZ) A, C, D, O, N and T between 00:20 and 02:02.

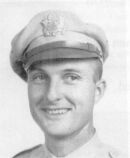
Flying alongside aircraft #19, the only pair on the flight, was C-47 #20 piloted by 1st Lt. Paul F. G. Egan, of Massachusetts. Joining him in the aircraft were: Sgt. Jack Buchannon, Crew Chief (Mass); 2nd Lt. Richard A. Young, Co-Pilot (Ohio); 2nd Lt. Fern D. Murphy, Navigator (PA);  Staff Sgt. Marvin Rosenblatt, Radio Operator (NY) along with ten Combat Engineers of the 101st Airborne who  were dropped at Sainte-Mère-Église on the Cherbourg Peninsula early in the morning 6 June 1944.

Lt. Paul Egan had a remarkable service history, serving in each of the US Army, US Army Air Force and US Air Force after the war, a service that stretched from 1939 to 1967. His remarkable record includes: Pearl Harbour in 1939 and the Japanese attack in December 1941, the Battle of Midway in 1942, followed by advanced training in 1943. This training kept Lt. Egan in military intelligence as a Pathfinder pilot flying mostly C-47s out of both North Witham and later Chalgrove. As well as dropping the paratroopers on D-Day in Operation Market Garden, he also dropped troops in Operation Varsity along with every other major airborne operation flown from England. He also flew bombing missions in B-17s and flew ‘secret’ missions in early 1945. At the signing of the Japanese surrender onboard the USS Missouri on September 2nd 1945, he was the only USAAF representative there, General McArthur wanting someone who was present at Pearl Harbour to also be present at the surrender. His record is certainly remarkable and one to admire.*5

1st Lt Paul F. G. Egan and crew (photo courtesy Jean Egan)

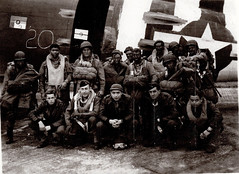
Photo taken at North Witham Air Base, England on June 5, 1944, the night before D-Day. C-47 #20 (note the number chalked in front of the door to ensure paratroops boarded the right aircraft, and the crudely painted invasion stripes) one of the first 20 aircraft to fly with the elite group, the Pathfinders.  Front row: Sgt. Jack Buchannon, Crew Chief; 2nd Lt. Richard A Young, Co-Pilot; 2nd Lt. Fern D. Murphy, Navigator; 1st Lt. Paul F. G. Egan, Pilot (Captain); Staff Sgt. Marvin Rosenblatt, Radio Operator along with ten 101st Airborne Combat Engineers dropped on the Cherbourg Peninsula early morning 6 June 1944, “D-Day” (Photo courtesy Jean Egan).

Pathfinder training continued at North Witham beyond D-Day, well into 1944. The scope of those trained expanding to include Polish paratroops of the 1st Independent Polish Airborne Brigade, who would perform a similar role to their American counterparts. These various Pathfinder groups would go on to have long and distinguished careers, supporting the battles at Arnhem, the Ardennes and also Operation Varsity – the Allied crossing of the Rhine.

As the Allies pushed further into enemy territory, the flying distance from England became too great and so new airfields were either hastily constructed on the continent or captured airfields refurbished. As a result, the Pathfinder School soon moved away to Hampshire and the maintenance units, needed nearer the front lines, gradually departed to these newly acquired bases on the continent.

September 1944 would see big changes in the Ninth and the knock-on was felt at North Witham. Firstly, the IX TCC transferred from the Ninth AF to the First Allied Airborne Army, and as a result, the Air Depot title was changed to IX Troop Carrier Service Wing (Provisional), which was re-assigned to aid and supply the new Troop Carrier Groups (TCG) now based in France. To accomplish this new role, groups often used borrowed or war-weary C-47s, C-46 (Commandos) or C-109s (converted B-24 Liberators) to fulfil their role. Secondly, the Pathfinder School was re-designated IX Troop Carrier Pathfinder Group (Provisional) and they moved away from North Witham to their new base at Chalgrove near Oxford. Now much quieter, life otherwise continued on at North Witham, but it wouldn’t long before the demand for UK-based maintenance and repair work would slow, and within months North Witham’s fate would be finally sealed.

As the end of the war approached, the airfield quickly became obsolete, and the long wind-down to closure, that many of these unique places suffered, began to take effect.

By the time the war was over, the last American personnel had pulled out and the site was handed back to the RAF’s 40 Group who, after using it for a brief spell as a maintenance depot themselves, placed it under care and maintenance. It was used as a munitions and hardware store until 1948, and then finally, in 1956, it was closed by the Ministry and within two years the site was sold off.

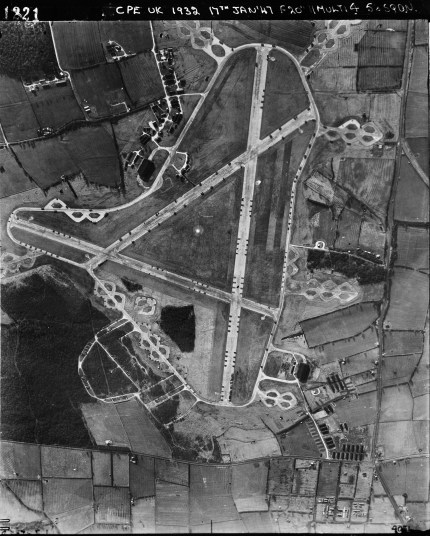
Photograph of North Witham taken on 17th January 1947. The technical site and barrack sites are at the top left, the bomb dump is bottom left. (IWM RAF_CPE_UK_1932_FP_1221)

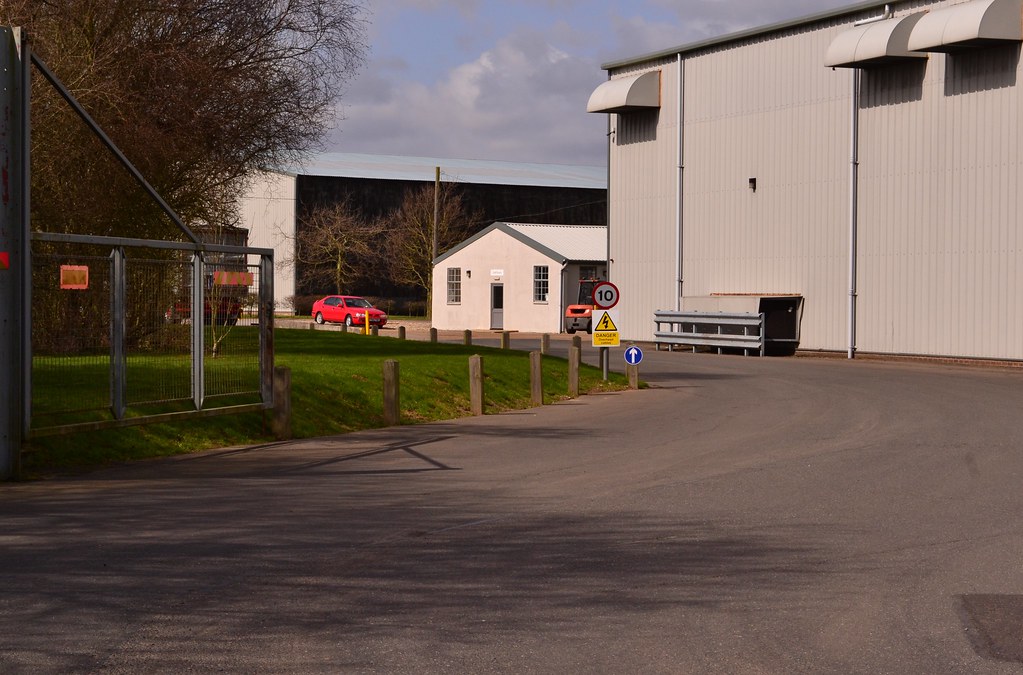
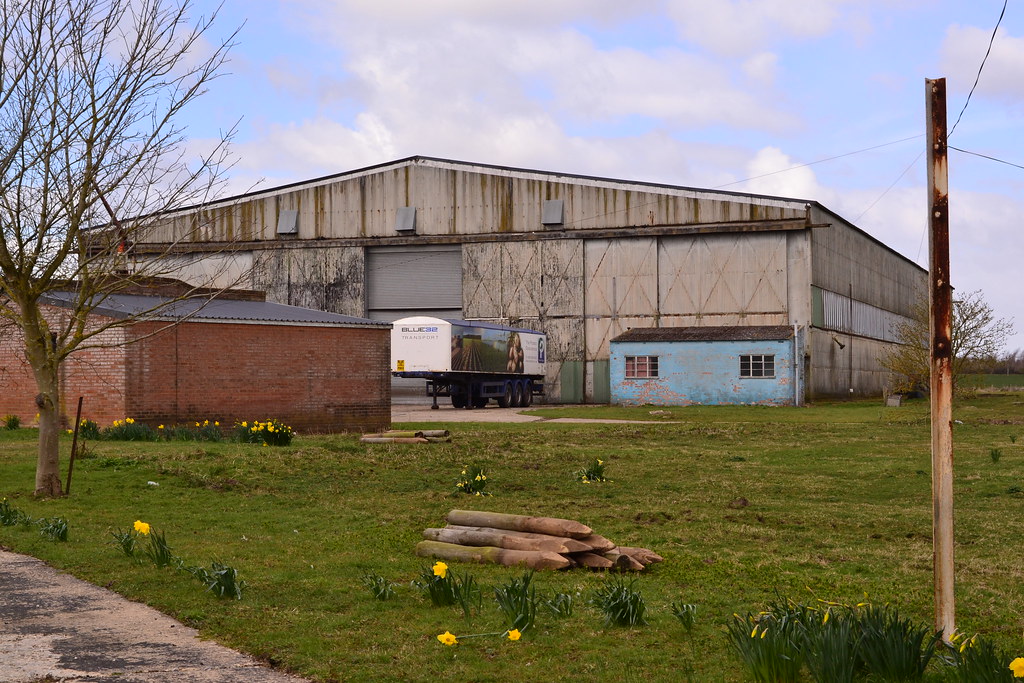
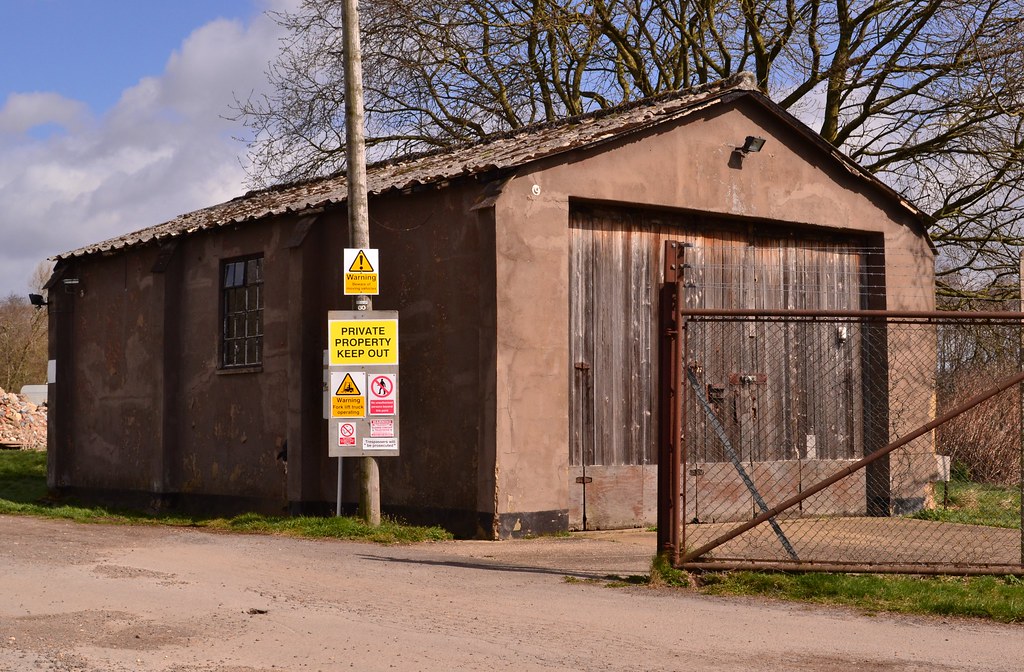
The site, intact as it was, was returned to the Forestry Commission who planted a range of new tress around the site, covering the vast areas of grass. The technical area was developed into a small industrial unit and perhaps most sadly the watch office left to decay and fall apart.

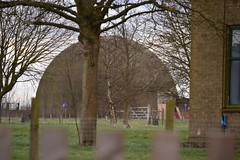
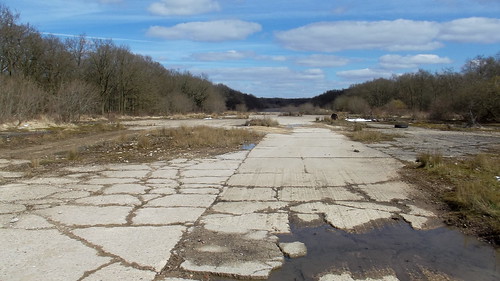
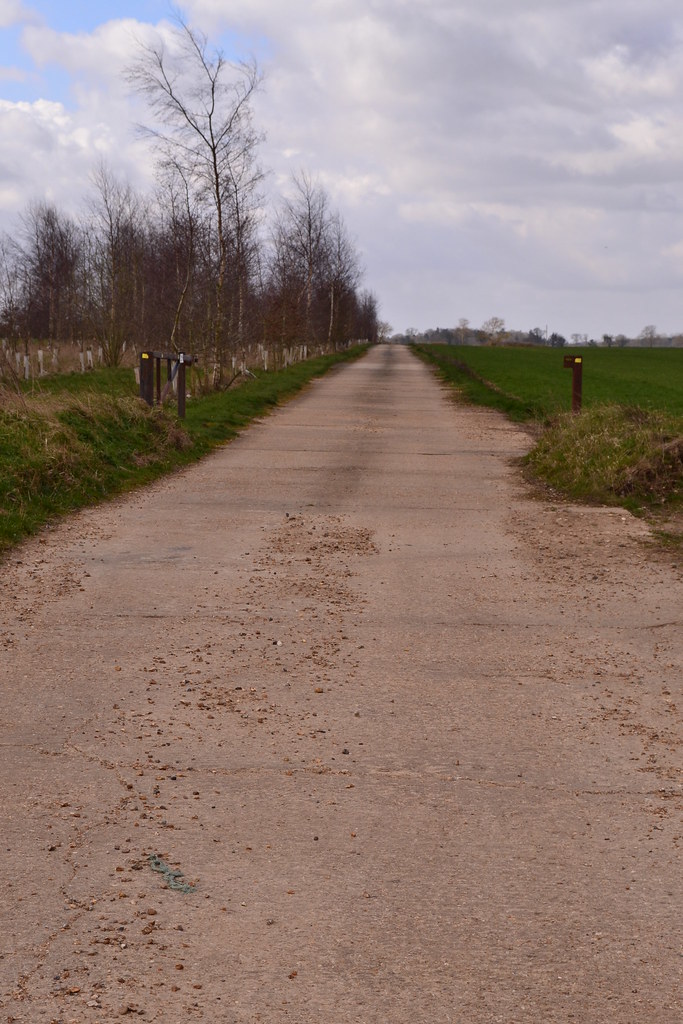
Today the three runways and perimeter track still exist almost in their entirety, and remarkably, in generally good condition. Largely overgrown with weeds and small trees, the remainder is well hidden obscuring what little there is in the way of buildings – most being demolished and the remains left piled up where they stood. However, a T2 hangar is now used on the industrial estate and the watch office still stands tucked away amongst the trees and undergrowth. This area is a favourite place for dog walkers, and because of its runways, it is accessible for prams and pushchairs. Whilst here, I spoke to quite a few people, remarkably none of them knew of the site’s historical significance let alone the office’s existence!

Today the watch office remains open to the elements. Surrounded by used tyres and in constant threat of the impending industrial complex over the fence, its future is uncertain. Access stairs have been removed, but an entrance has been made by piling tyres up to the door – presumably by those wishing to enter and ‘explore’ further. Little evidence of its history can be seen from the outside, even the rendering has been removed, and so, any possible personal links with the past are more than likely now gone.

North Whitham runway

The view of the main runway from outside the tower.

Returning back to the main public entrance along the perimeter track, a number of dispersal pens can be found; overgrown but relatively intact, they are a further sign that even here, war was never very far away.

North Witham was one of those ‘backroom boys’ whose contribution, whilst extremely important, is little known about. The work carried out here not only helped to maintain a strong and reliable fighting force, but one that spearheaded the frontal invasion of Normandy. It served as a cold and perhaps uncomfortable home to many brave troops, many of whom took the fight direct to Nazi Germany.

Standing here today, it is quiet and strangely surreal – you can almost hear the roar of engines. Looking along its enormous runways you get an eerie feeling – how many troops also stood here, spending their last few hours in this quiet place. Looking around now, it is difficult to imagine the immense work that went on here, the gathering of equipment as preparations were made for the big push into Normandy on that famous June night.

North Witham is truly a remarkable place, hidden away amongst the trees as a giant time capsule, a monument to those who lived, worked and died during that turbulent time in 1944-45.

North Whitham runway

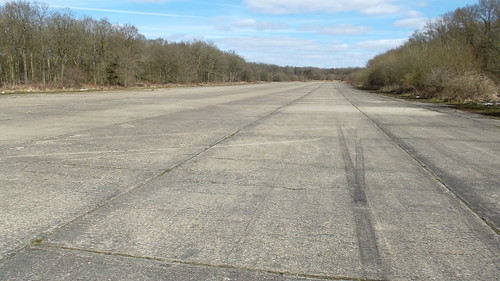
Another view along the main runway.

Sadly in May 2015, Twyford Woods was the scene of a large illegal rave, over 1000 people attended the event where a number of arrests were made in the violent altercations that took place*4. A sad day that would turn the souls of those who sacrificed themselves for the freedom we take for granted so very easily today.

(North Witham was originally visited in early 2013)

Links and sources (RAF North Witham)

*1 American Air Museum in Britain

*2 C-47A #42-93098 itself was later lost whilst flying with the 439th Troop Carrier Group (TCG) on September 18th 1944, whilst flying in support of Operation ‘Market Garden‘ in Holland.

*3 Superb footage of Crouch and his crew as they depart from North Witham is available on-line, it also shows the Watch Tower in its former glory.

*4 A report of the event is available on the BBC News website.

*5 My sincere thanks go to Jean Egan, daughter of Lt. Paul Egan, for the information and photograph.

An excellent website contain photos of paratroops and air crew as they prepare for embarkation and advance through France.

RAF West Raynham Trail 21 – Part 5.

We have now seen how West Raynham developed from an expansion period airfield, through the Second World War and on into the Cold War. With tensions now easing and Government cuts biting hard, the future of West Raynham and the Service, hangs in the balance. But with new jets in the pipeline, changes to the Nuclear deterrent coming, a new direction may save the airfield from immediate closure. We also see how one man takes matters into his own hands and protests as these events which are to shape the future Air Force.

Later in August that same year, Nos. 1 and 54 Squadrons arrived at West Raynham boosting the numbers of personnel present here once more. Both units transferred over from Waterbeach in Cambridgeshire, in a move that saw the return of the Hawker Hunter F.G.A. 9.

No.1 Squadron, one of the RAF’s longest serving squadrons had provided almost continuous service since 1912, and had flown a wide variety of aircraft across Britain, France and the Far East. They brought with them a long and distinguished history.

It was perhaps a No. 1 Sqn pilot who defined West Raynham’s lasting legacy, that of the Flight Commander – Flight Lieutenant Alan Pollock, who around midday on 5th April 1968, flew a Hawker Hunter FGA.9 (XF442) between the two spans of Tower Bridge in London. The stunt, a protest by Pollock already annoyed at the Government’s defence cuts, was to raise the concerns of personnel at the lack of celebration of the RAF’s fiftieth anniversary. After leaving Tangmere (following a celebration dinner) he and his colleagues headed back toward their home base at RAF West Raynham. Pollock then turned away from the group and flew at tree top level along the Thames circling the Houses of Parliament no less than three times, before dipping his wings at the RAF Memorial and heading along the river and home. However, before long he was faced with Tower Bridge and a split second decision had to made. He decided to fly through the arches rather than over the bridge.

His fate was well and truly sealed, he was going to be disciplined and severely. On the way home, his single handed salute to the service he adored included ‘beating up’ Wattisham, Lakenheath and Marham airfields, before carrying out an inverted flypast at West Raynham. On landing, Pollock was arrested by the Military Police, after which a long, drawn out legal process was put into place. Rather than face a public outcry, the authorities gave him the ‘option’ to leave on medical grounds or through the more severe removal under Queens Regulations with the loss of all financial backing.

There was no option, and Flt. Lt. Pollock was sent packing. The political fallout from the event went on for months afterwards, leading to a stronger rebellion from the press who were already gunning for the Wilson Government. No one in authority wanted their ‘dirty washing’ aired in a public hearing.

54 Sqn meanwhile operated out of West Raynham as part of 38 Group Air Support Command.  A role that required them to fly as a ground support unit, operating in conjunction with army ground forces. They flew from West Raynham for seven years, departing at the end of the decade. During this time, they would reinforce the Mediterranean and Germany even locating to Gibraltar after political ‘pressure’ from General Franco.

The 1960s also saw a change in direction for Britain’s defence network, which was brought about by the same 1957 Defence White Paper that saw the demise of 85 Sqn. The basis of this saw manned fighters be replaced by guided missiles along with investment in the V bombers, a retaliatory force that could deliver Britain’s nuclear weapons arsenal.

On September 1st, 1965, the first of West Raynham’s guided surface-to-air missiles arrived. The reformation of No. 41 Sqn with two units (sixteen missiles in each) saw the construction of a secure Bloodhound missile site on the eastern side of the airfield. These MK.II guided weapons would become the main airfield protection system of that time, although their presence only lasted five years before the unit was again disbanded and the missiles put onto storage.

With the birth of vertical take off and landings in the form of the Kestrel (later the Harrier) an evaluation unit was set up here at West Raynham. Designed to test the flying abilities of the Kestrel, up to and including near service conditions, it was made up of pilots from the UK, USA and West Germany. The unit, designated the Tri-Partite Evaluation Squadron Royal Air Force (TES), was designed to see how the aircraft would perform from both airfields and unprepared sites, using its VTOL and STOL capabilities. To this end the unit also used Buckenham Tofts located in the Stanford Training Area, the Army’s huge training area near to Thetford.

Testing any new aircraft is a risky business, the Kestrel being no different, and on April 1st 1965, Kestrel XS696, caught fire and crashed following a take off from West Raynham. Only a month old, the aircraft was struck off charge the same day as a Cat.5(c) and the remains scrapped after all recoverable components had been removed. The pilot was thankfully unhurt in the incident.

The accident didn’t completely deter the US Government though, and at the end of the year, six aircraft were sold to the US for further tests. Initially they were not convinced of its use, but the US Marine Corps were interested, and subsequently a long service began for the Harrier in both the US and here in the UK.

In 1967, Napalm saw a return to West Raynham when famously the Torrey Canyon struck rocks off the Cornish coast. The ship soon grounded and began to break up, spilling its cargo of oil onto rocks and into the waters around Cornwall. The Government decided to bomb the stricken vessel to reduce the impact of the oil spill, and so aircraft from the Fleet Air Arm and RAF were called in to bomb it. No. 1 Squadron were assigned the challenge and four Hunters were tasked with the role. Eventually after several attempts the wreck finally sank and much of the oil was burnt off.

Two years later in 1969, both No. 1 and No. 54 Sqns departed West Raynham. Their gap quickly being filled by No. 4 Sqn who arrived in September that year staying until the following March. Both 1 and 54 Sqns would become new Harrier units, forming squadrons in both Germany and here in the UK.

The dawning of 1972 saw the return of 85 Sqn, who after a spell of some nine years at Binbrook, returned with a new model Canberra the PR.3, a long range photo-reconnaissance aircraft, it was unarmed and relied on its high speed to escape any enemy aircraft.

A month later in February, it was decided to also reform 100 Sqn here at West Raynham, initially using staff from 85 Sqn. Starting off with the Canberra B.2, they quickly began changing these for the T.19, essentially a T.II with its Airborne Intercept radar (A.I.) removed – West Raynham was now awash with Canberras. One of the roles of 85 Sqn was to act as enemy intruders so QRA crews could perform practice intercepts. Although the QRA crews were aware of the nature of the intercepts, Canberras would fly in low and then climb over the UK coast imitating a Soviet bomber – often to great success.

On June 26th 1972 tragedy would strike at West Raynham once more, when a 100 Sqn Canberra T.19 ‘WJ610’ crashed shortly after take off. The Aircraft, crewed by  Flight Lieutenant Nicholas Whitlock (pilot) with navigator Flight Lieutenant John Sheran, struck trees 2 miles south, south west of Rougham whereupon it burst into flames killing both airmen.

In the months before the accident, the aircraft had been on loan to 85 Sqn, although this had no bearing on the cause of the crash itself, but it has led to some confusion as to which squadron it was actually with at that time,

Investigations recorded that the aircraft was one of a pair that took off in bad weather flying on instruments. Then as it entered low cloud, Flt. Lt. Whitlock reported that the aircraft had suffered an undercarriage problem, at which point it peeled away from its leader, the assumption being that Flt. Lt. Whitlock was aiming to deal with the issue in hand. The investigation surmised that he may have been concentrating on the gear issue and became disorientated as a result. It is thought this then led to the accident and the aircraft’s inverted crash.

As a result of the tragic loss, formation take offs by Canberras were subsequently prohibited, any future take offs having a minimum of 30 seconds between each departing aircraft, it was a tragic loss that served to help others*2.

A brief interlude in the autumn of 1972 saw the reformation of 45 Sqn with Hunter F.G.A.9s, once established and organised the unit quickly transferred out, leaving West Raynham behind.

The 1970s saw further big changes within the RAF. The handing over of the nuclear deterrent to the Royal Navy for one along with Britain’s air defence missiles (Bloodhound) being withdrawn and transferred to Germany. However, later concerns over potential attacks forced a review, and as a result, in December 1975, 85 Sqn were disbanded, the aircraft were transferred out, and they were  immediately reformed as a new Bloodhound unit. The missiles were brought out of storage and placed here in Norfolk. Some of the 85 Sqn personnel were absorbed into West Raynham’s 100 Sqn but they would only remain here at West Raynham for a further month before they too moved out.

Bloodhound

Bloodhound Missile at the Norfolk and Suffolk Air Museum (2014)

85 Sqn operated across a number of sites. Primarily based at West Raynham, they had Flights at both Bawdsey on the south Essex coast and North Coates in Lincolnshire. In October 1989 the squadron grew further, absorbing No. 25 Sqn, which gave the unit three more Flights at Wattisham, Barkston Heath and Wyton. By the start of the 1990s though, Bloodhound had become obsolete ‘Rapiers’ being the new low level airfield defence missile, and so Flights ‘B’, ‘C’ , ‘D’, and ‘F’ were all disbanded. This left the HQ (West Raynham), ‘A’ Flight (North Coates) and ‘E’ Flight (Wattisham), until these too were disbanded the following summer.

RAF West Raynham

West Raynham’s Rapier training dome is now of ‘Historic Interest’. (2015)

By the time the 1980s had dawned, front line flying at West Raynham had been scaled back and no operational fighter units were based here. The airfield had entered the long and slow wind down to eventual closure.

By July 1991, with the last of the Bloodhound units being disbanded, the missiles they had been using scrapped or sold to the Swiss military, and the personnel pulled out, the site was left all but empty.

Any residue support units were also removed and in 1994 West Raynham finally closed its hangar doors. The airfield itself remained in MOD hands, but sadly the housing lay empty and it quickly became derelict, targeted by vandals. The accommodation blocks were damaged and windows were smashed. Long debates and scornful banter over the housing shortage boiled over in parliament and sites such as West Raynham were seen as prime land, with a huge infrastructure already in place, they were half way to meeting the needs of a growing community. The MOD eventually gave in, agreed to the sale and the site was handed over.

The two gate guardians, a Bloodhound missile ended up at Cosford Museum whilst the Javelin XH980 , was scrapped on site and disposed of. Since then the site remained closed and quiet.

This closure left what is a rare example of a complete wartime  and post-war airfield. As a result, many of its buildings are now of ‘historical interest’ and attempts at obtaining a Grade II listing to a large number of the airfield’s buildings was made by the English Heritage. Sadly, this was later withdrawn and no follow-up made although the post war Watch Office is now Grade II listed and more recently a private dwelling.

For many years the site stood empty gradually decaying.  A number of planning applications were submitted and some of the accommodation blocks were transformed into private homes. This has thankfully meant that the original style and layout has been maintained. However, the runway and Bloodhound sites have now gone, having been replaced by what is reputed to be, one of Britain’s largest Solar Parks.

In 2016 a proposal was put forward to develop the site into a mix of housing, leisure facilities and industrial units, all utilising the existing buildings where possible. A design brief was put forward by FW Properties who estimated the 158 acre site to be worth £7.3m with a refurbishment value of some £5.2m. The proposal was for a four phase plan to include refurbishment of the original properties for housing, redevelopment of the landscape and infrastructure and new builds to create an integrated community on the site. A grand proposal that would keep the integrity of the site and utilise as many of the buildings as possible.

When I initially visited, the site had been sealed off, but the control tower along with a wide range of smaller ancillary buildings, were all shrouded in scaffolding. The  Officers Mess had seen better days and the adjacent tennis courts had been reclaimed by trees.

The Rapier training dome, original Battle headquarters and wartime pill boxes were also evident. A memorial to the crews of West Raynham had been erected in what is now the centre of a housing area that utilises the old accommodation blocks.

Today, much of it hasn’t changed, many of the smaller buildings continue to decay, but the post war watch office is a private dwelling, open for visitors and tours on heritage days, the guard house is a shop for fire places and the hangars are used by small, light industrial companies.

A Hunter F.1 ‘WT660’ has been acquired and sits near to the modern watch office, previously on display/stored in Scotland, it has been brought back to be refurbished and displayed in the colours it would have worn whilst in the Day Fighter Leader School between 1955 and 1957 here at West Raynham.

RAF West Raynham

The West Raynham memorial sits next in the former accommodation area.

West Raynham is one of only a few complete sites that reflect the development and commitment of Britain’s air defences. Its origins and initial construction in the 1930s has seen continued improvements leading to its gaining a remarkable status that few other sites have gained.

Throughout its history it has seen a wide range of units, personnel and aircraft, it has been a training airfield, a front line fighter defence, a bomber airfield and even a missile base. Its future is now in the hands of a developer, who are implementing a gradual change from airfield to community utilising the main buildings on site to support light industry and housing. What the eventual model will look like only time will tell, lets hope the promises hold and West Raynham becomes a model for other disused airfields before they are bulldozed and all their history cleared for evermore.

I hope to make a further visit shortly and capture some more up to date photos.

The full story can be read in Trail 21 – North Norfolk Part 2.

Sources and further Reading (West Raynham).

*1 National Archives Operational Record Book 114 Sqn August 1941 – AIR 27/882/36

*2 Aviation Safety Network database

*3 National Archives AIR 27/882/36

*4 National Archives AIR 27/1456/75

*5 “Hansard 1803–2005”  digitised editions of Commons and Lords Hansard, the Official Report of debates in Parliament. Hunter Aircraft (report of Enquiry)

National Archives AIR 27/731/1

AIR 27/801/1
AIR 27/882/33
AIR 27/2870/21
AIR 27/971/33

For personal stories and more photos see the West Raynham Association website.

The West Raynham Development Brief published by FW Properties.

My thanks to Jon Booty at the West Raynham Control Tower for corrections.

RAF West Raynham Trail 21 – Part 4.

At the end of Part 3, West Raynham had seen the war out and entered a new stage of life. With more upgrades and new aircraft arriving, its future looked secure. But not all would be well for those stationed here. The mid 50s, would see a tragedy that could have been so much worse.

The immediate post war period then saw fighter trials become the order of the day. The Royal Navy basing many of their types here for various trials and research projects. With two second line squadrons bringing their aircraft here No 746 Sqn  and No 787 Sqn, the last piston engined examples to fly from West Raynham were the Fireflys and Hellcats of 746 Sqn RN, operating as part of the Naval Fighter Development Unit.

With the departure of the last aircraft, West Raynham was once again earmarked for upgrading which included amongst other things, another new watch office, designed to replace the mid-war example that had served so well. An additional extension to the perimeter track was also planned in, as was the creation of further, larger hardstands. In addition to all this, an increase in personnel was also envisaged and so extensions to the accommodation areas were also planned in once more. These upgrades were not subject to the same planning constraints as those originally built, and as such these buildings were not as ‘impressive’ as the older, original examples that remained on the site.

This particular watch office example (294/45), was a new and modern approach to airfield control buildings, incorporating for the first time an airfield control room (ACR later called Visual Control Room) the first of its kind. What made this building more significant than its predecessors was that it was designed with three floors as opposed to two, a style more commonly seen at wartime Naval stations.

The ground floor was primarily used as crew rest rooms (air and fire) with a kitchen, GPO equipment and a meteorological room. The first floor contained a planning room with a large plotting table and map wall, a feature reminiscent of World War II watch offices. A number of smaller rooms were also located off this room, providing accommodation for the Wing Commander and a Navigation Officer. The top floor was primarily the airfield control room (ACR) again a plotting table and additional staff rooms were located here. Also found here was the airfield lighting panel, R/T equipment and access to the ‘glasshouse’ above, with its distinguishable slanted windows. This floor gave a complete 3600 view around the entire airfield, a much improved view over pre and mid-war designs. The very design of this building has since been its saviour, as the best example of only one of five examples, its architectural interest, rarity, ‘completeness’ and interior systems, have enabled Historic England to list it as a  Grade II building; this should at least offer it some protection from future development or demolition.

On completion of the work the airfield was passed to The Central Fighter Establishment (CFE) under the control of the RAF, where it began a new role as Britain’s top fighter training establishment, taking the airfield through the 1960s and on into the 1970s.

The CFE was a huge organisation formed in late 1944 through the amalgamation of a number of other training units: The Fighter Interception Unit, Air Fighting Development Unit, Fighter Combat School and the Fighter Leader School to name but a few. It would use personnel from across the military spectrum including: the RAF, Fleet Air Arm, Army Air Corps and the United States Air Force.

THE ROYAL AIR FORCE, 1950-1969

Aircraft of the Central Fighter Establishment (CFE) October 1962, before moving to RAF Binbrook. Aircraft represented: (L to R): Spitfire (P5853), EE Lightning F.1 (XM136), Gloster Javelin, Hawker Hunter F.6 (XF515) & Hawker Hunter T.7 (XL595). In the foreground are personnel representing the CFE including RAF, Fleet Air Arm, Army Air Corps and United States Air Force. (@IWM RAF-T 3476)

During this time, West Raynham operated as both a front line fighter base and as an aircrew training airfield. This would mean a huge influx of personnel and so a  return to the high numbers of staff and aircraft that had been seen here during the war-time period.

In 1956, tragedy struck The Central Fighter Establishment here at West Raynham, when on 8th February, eight Hunter F1s took off from the airfield to carry out an exercise only to have six of them crash.

The exercise, a 4 against 4 dogfight involved two instructors and six students, and took place around 45,000ft in airspace above the airfield. By the time it had been completed, the weather over West Raynham had deteriorated so much that the eight aircraft had to be diverted to an alternative airfield, and RAF Marham was assigned. The cloud base was by now very low over West Raynham, as little as 250ft in places, and so a visual landing was almost impossible without GCA talk down (Ground Controlled Approach). Unfortunately, there was substantial R/T congestion that day and Marham GCA had great difficulty in picking up the Hunters. By now, the group had paired off and each pair had descended, flying low over West Raynham to pick up a heading for Marham’s runway (both runways were almost in direct line of each other), most of the aircraft were by now down to just minutes of fuel in their tanks.

By the time the aircraft were approaching Marham, the weather there had also deteriorated, and as such, the aircraft were unable to make a GCA landing. Of the eight, two managed to land one running out of fuel as it departed the runway, but the remaining six aircraft struggled, low on fuel and unable to see the ground, it became a near catastrophe.

Of those six, Hunter ‘WW639’ ‘N’ descended to 250 ft, after which the pilot lost visual contact with his leader. Now lacking sufficient fuel to land safely or divert elsewhere, the pilot elected to climb to 2,000 ft and eject. The Hunter, now pilot-less and without power, then crashed 3 miles south of Swaffham.

The second Hunter, ‘WW635’ ‘L’ was the only aircraft to have a fatality. The aircraft crashing four-and-a-half miles north-west of Swaffham killing the pilot Sqn. Ldr. R.J. Tumilty, (31).

The pilot of the next aircraft, Hunter ‘WW633’ ‘H’, descended to 500 ft, but with limited ground visibility also decided to climb away. Unfortunately he suffered an engine flame out and so ejected from the aircraft leaving it to crash in a field three-and-a-half miles north-west of Swaffham.

The fourth Hunter, ‘WW603’ ‘G’ attempted to land, but only managed a wheels up landing after also suffering a flame out. The aircraft came down not far from the eastern side of the airfield, the pilot escaping unhurt.

The fifth pilot, that of ‘WT639’  ‘N’, descended to 600 ft after being unable to contact Marham GCA. The cloud at this level was very dense, and also after losing his leader he too elected to climb away. As with other Hunters that day, he also suffered a flame out  and so ejected at 2,500 ft leaving the aircraft to fall to Earth in a forest 2.5 miles south-west of Swaffham.

The final aircraft, ‘WT629’ ‘T’ suffered the same fate as many of the others. After running out of fuel, and unable to see the ground at 600 ft, the pilot elected to climb to 4,000 ft and eject.  Now without either power or a pilot, the aircraft crashed in fields 2 miles northwest of Swaffham.

In a ministerial briefing after the Court of Enquiry had published their report, it was noted that the aircraft were not defective nor was there any question of inadequate fuel being supplied. The short range of early jets and these Hunters in particular being acknowledged by those present. The board highlighting that “the accidents were primarily caused by the sudden and unexpected deterioration in the weather“.

The board then questioned the basis of the divert to Marham, as it was based on the assumption that the weather was good at Marham.

The question then arises whether, notwithstanding the deterioration that had taken place at West Raynham, the decision taken to divert the aircraft to Marham, spaced for visual landings, was correct. This diversion was ordered on the assumption that visual landings would be possible”.

The conclusion was that mistakes had been made and the report then went on to firmly lay the blame at the controller’s feet:

The findings of the enquiry concluded that this was an error on the part of the controllers at West Raynham, “who failed to appreciate that, because of the relative positions of the two airfields, it was probable that any deterioration in the weather at West Raynham would affect Marham shortly afterwards, thus necessitating Ground Control Approach landings there”.*5

As a result, controllers at West Raynham were subjected to disciplinary action over the incident, one of whom was removed from his post. It was a sad day indeed for the squadron and for all those who were involved at West Raynham. However, what turned out to be a loss of one life could have been so tragically worse.

The 1960s then saw even more changes at the airfield. As tensions across the world began to rise once more, so the country was put on alert. At West Raynham more new squadrons would arrive, the first, 85 Sqn, arrived at the airfield in September 1960, bringing more front line fighters to the site, this time it was Gloster’s distinguishable delta, the Javelin FAW 8.

Whilst at their previous base RAF West Malling, the squadron had been dogged with both starter problems and the serviceability of the A.I. radars on the Javelins; both of which continued after they arrived at West Raynham. At the end of the month senior officials from both the RAF and G.E.C. visited the base  with a view to resolving the ongoing A.I. situation. However, the problems persisted even after they had gone, problems which merely compounded other issues the squadron were having around poorly fitted equipment, bad weather and surprisingly a lack of married quarters.

The Javelin was brought in to complement the Lightning, operating in the Night Fighter and all weather role, it was designed to intercept bombers that threatened the cities or airfields of Britain. In order to train aircrew in this role, a number of ‘support’ units were also established during this time. These included the Javelin Operational Conversion Squadron, a unit set up to convert pilots to the Javelin from other aircraft; the Fighter Support Development Squadron; the Fighter Command Instrument Training Squadron; the Radar Interception Development Squadron; the Night All Weather Wing and the Night Fighter Development Wing, along with numerous other units that supported the training of fighter pilots at this very busy airfield.

In July / August 1962, there were a spate of engine fires in Javelins at West Raynham, something that seemed to be a problem with these aircraft. Three such events affected XJ128, XA646 and XA701 during a three week period. There are no reports of injuries as a result of the incidents, and records simply show ‘engine fires at start up’. But it would appear to have been a rather regular occurrence at this time.

85 Squadron was then disbanded on March 31st 1963, a move that was forced by Duncan Sandy’s White Paper cutting back military expenditure on front line fighter units. They immediately reformed the next day taking over from the Target Facilities Squadron. They obtained new aircraft to fulfil the role, the Canberra T.11 – a B.2 converted to facilitate target towing, fighter interception and navigator training; all achieved through the fitting of a nose radome and A.I. radar. Their stay at West Raynham only lasted one more month though, when they finally left, transferring out to RAF Binbrook in Lincolnshire.

As Duncan Sandy’s White paper cut deep into the heart of the RAF, many of those connected with the Force were angered. In the last part of West Raynham, we see how one man took matters into his own hands only to suffer the severe consequences.

The full story can be read in Trail 21 – North Norfolk Part 2.

RAF West Raynham Trail 21 – Part 3.

In Part 2 we saw how Basil Embry was assigned to West Raynham but never made it, attacks by Blenheims on the German fleet and how the B-17 was used for trails as an RAF bomber. In part 3 we see more daring attacks by West Raynham aircraft, one of which saw the awarding of fifteen medals to airmen, many of which were West Raynham crews.

The summer of 1941 saw a great deal of activity at West Raynham. The changes, led by the departure of 90 Sqn in June, was quickly followed by the departure of West Raynham’s long standing 101 Sqn to Oakington in July. This meant that space was freed up for two new squadrons 114 Sqn and 268 Sqn along with a detachment of 614 Sqn.

RAF West Raynham

One of the many ‘H’ accommodation blocks on site (2015).

The first of these units, 268 Sqn, was not based here but stayed on a short temporary basis whilst on a ‘Bulldog‘ exercise; ‘A’ and ‘B’ echelons transferring in on the 20th June from RAF Snailwell near Newmarket. At the time, the exercise was said to be the biggest such operation to be held in the UK, an event that saw co-operation between air and ground forces. A section from this party travelled from West Raynham to open an Advanced Landing Ground (ALG) at Barton Bendish, not far from Downham Market, in Norfolk. The next day was then spent opening communication lines between West Raynham, the Corps Headquarters and Barton Bendish.

Over the next couple of days aircraft flew out of both Barton Bendish and West Raynham, amassing some twenty-five sorties in all, mainly low-level reconnaissance flights, collecting a mass of information about the ‘ground forces’ taking part in the exercise. On the 24th, the exercise was completed, and both air and ground staff departed West Raynham heading back to their base at Snailwell.

The second squadron, a detachment of Lysander IIIs, arrived here from the Macmerry based 614 Sqn. The small unit exchanged these aircraft for Blenheim IVs shortly after their arrival, performing in the Air Sea Rescue role for almost a year before they too departed this Norfolk site.

The last of the three units, 114 Sqn, arrived overnight of the 19th / 20th July, crews and ground personnel ferrying aircraft and equipment to West Raynham in three separate parties. With little time to settle in, operations began almost immediately.

On the 22nd, with ten aircraft heading to targets along the French coast, attacks were made by six Blenheims from between 10,000 and 15,000 ft on sheds and slipways, a number of hits were seen and the sheds appeared to be badly damaged in the attack. On leaving the target, clouds of smoke were seen to be rising from the ground, a welcome sight for the unwelcome intruders. A further three aircraft however, failed to find their primary target in a separate attack, and a single aircraft on a beat patrol also failed to locate a target, and so no bombs were dropped by either of these two sections. Flak was generally light on all occasions and still the Luftwaffe failed to make a dedicated appearance.

These intruder operations continued on, and on July 23rd another small raiding party attacked similar targets in similar locations, these however, were met with considerably more anti-aircraft fire. Regardless of the intense ground fire though, all aircraft returned without any major problems although some had received extensive damage to their air frames.

During August, a major attack was arranged with massed fighter escort on target GO.1237 – the Knapsack Power Station in northern Germany. The attack was to involve fifty-four Blenheims along with their fighter escorts. The operation, led by Wing Commander Nicol, was a daylight raid which took place in the late morning between 400 and 500 feet. Considerable damage was seen to be done to the plant; chimneys were hit, pipes were fractured, sheds were hit by bombs and a considerable amount of debris was thrown up into the air. The attack, the first of several, had proved to be a big success. The return journey then proved to be as eventful as the attack itself; flying at low-level, Dutch citizens were seen to wave to the bombers, a cheering site no doubt, and certainly one more pleasurable than the unfortunate flight of ducks that were struck by  some of the aircraft. One of the observers on return commented “the impact was as terrifying as flak“.*1

The attack was considered so successful and so daring that an entry was made in the London Gazette 357237 on 12th September 1941, in which the crews’ bravery was highlighted and the many awards that had subsequently been granted were listed. It read:

Air Ministry, 12th September, 1941.
ROYAL AIR FORCE.

“The KING has been graciously pleased to approve the following awards in recognition of gallantry displayed in flying operations against the enemy: —

On the morning of I2th August, 1941, Blenheim bombers carried out  simultaneous attacks on the great power stations near Cologne. A strong force attacked the station at Knapsack, whilst a smaller force attacked two stations at Quadrath. These missions involved a flight of some 250 miles over enemy territory which was carried out at an altitude of 100 feet. At Knapsack the target was accurately bombed and machine gunned from between 200 and 800 feet and at Quadrath both power stations were hit from the height of the chimneys; the turbine House at one of the two stations was left a mass of flames and smoke. The success of this combined daylight attack and the co-ordination of the many formations of aircraft depended largely on accurate timing throughout the flight. That complete success was achieved, despite powerful opposition from enemy ground and air forces, is a high tribute to the calm-courage and resolute determination displayed by .the following officers and airmen, who participated, in various capacities as leaders and members of the aircraft crews”.

The medals included two DSOs, ten DFCs and three DFMs. Among them was Wing Commander James Nicol (DSO); Acting Squadron Leader Alan Judson (DFC); Flying Officer Herbert  Madden (DFC) and Acting Flying Officer Thomas Baker (DFC) all of 114 Sqn. The remaining awards being given to crews in other squadrons who also took part in the daring attack.

Two days after the operation, on the 14th August, Wing Commander James Nicol along with Sqn. Ldr. Judson and Sgt. Davidson, with their respective crews, travelled to RAF Polebrook to meet the A.O.C about the operation. The A.O.C. chatted to the men before congratulating them on their great success. The next day, Sgt. Griffiths (W.Op/G) travelled to London to make a recording for the BBC about the raid, talking about it from an eye-witness’s point of view. The recording was then broadcast over the next two days giving both the squadron and the nation a much needed boost in morale.

The joy for Wing Commander Nicol was to be short lived though. On the 19th August 1941, his plane failed to return from operations, Nicol along with Sgt. E. Jones and F.O. H. Madden were classed as “Presumed Missing”, they were later found to have been killed. A second Blenheim from the squadron also went missing that night, a reconnaissance flight with the loss of three more crewmen.*3 Nicol and his crew remain with no known grave and so are all commemorated on the Runnymede Memorial.

The October saw more changes to the gunnery training unit being performed here at  West Raynham. 2 TTF was disbanded and renamed as 1482 (Target Towing and Gunnery) Flight. Some additional aircraft were brought in including the Defiant and Tomahawk, but their work, towing targets for gunners to aim at, continued on. In late 1942, it would change name again this time becoming 1482 (Bomber) Gunnery Flight. The unit would eventually disband in 1944 at Swanton Morley, the use of such units now being seen as obsolete.

The opening of January 1942, saw 114 Sqn off operational flying as a new training flight was created from within the unit. The number of new recruits, many of whom had directly transferred across from army co-operation units, was so high that this flight had became urgent. For the time being, gunnery training, formation flying and other training flights took precedence over all operational flying.

The training was interrupted on February 12th 1942 though, when orders came through to 114 Sqn to immediately dispatch six aircraft to attack the German warships Scharnhorst and Gneisenau which were making their way up the English Channel from Brest to their home docks in Germany. Joined by Prinz Eugen and a host of other vessels, this became known as the “Channel Dash” in which Bomber Command, the Fleet Air Arm and the Royal Navy all had a hand in. The first West Raynham group took off early afternoon and attacked from a height of 15,000 ft, diving through cloud cover they experienced “intense flak”. A second order came through some three hours later for a further three aircraft from 114 Sqn, and they too departed, bombed up, to attack the fleet.

As with the first wave, they dived through cloud from 15,000 ft. Not only did they experience intense flak, but the weather was appalling, heavy rain and poor visibility made sighting very difficult. Some bombs were dropped and photographs were taken, but the attack was not a success and the Blenheims returned to West Raynham, some still with their bombs on board after having been unable to sufficiently see their targets.

In September, there was another change at West Raynham with the forming of yet another new squadron, 180 Sqn along with the reforming of a former World War I unit, 98 Sqn, both within a day of each other.  Given North American B-25 ‘Mitchell’ IIs, both units very quickly moved out of West Raynham, each one transferring to RAF Foulsham where they would begin performing new duties within the month.

The departure of 114 Sqn in November signalled another major change for this Norfolk airfield. Now effectively left without any operational squadrons, a major refurbishment was on the cards, and it wouldn’t be too long before the contractors would move in.

For the whole of 1943, little flying activity took place here at West Raynham. A short interruption by the arrival and subsequent departure of 342 (Lorraine) Sqn (a Free French unit) on April 1st and May 15th respectively, did little to delay the upgrading.

The entire site was then expanded. The first move was to replace the two grass runways with concrete and tarmac examples (one 2,000 yards and the other 1,400 yards). In addition, more hardstands were added around the perimeter track, and on the technical site, a new watch office was constructed.

West Raynham

One of the many buildings left on site.

A new two storey design (4698/43) the Watch Office allowed new airfield lighting equipment to be installed at the site. This would assist aircraft when landing or taking off, making the airfield more visible when needed.

In addition to these improvements, the accommodation area was also expanded, this is was thought, would allow for the perceived influx of new personnel. By the end of the upgrading, West Raynham would be able to accommodate up to 2,500 men and 660 WAAFs.

In December 1943, the airfield passed over to 100 (Bomber Support) Group, where upon two more squadrons arrived at the newly refurbished base – 141 Sqn and 239 Sqn. Both these units would operate the D.H Mosquito the ‘Wooden Wonder‘ in a variety of marks: II, FB, VI and NF 30, all performing as night intruders. Both units would retain these aircraft to the war’s end and their eventual disbandment in the summer of 1945.

That month was not only filled with intruder flights, but football matches. A series of games culminated on December 23rd when a West Raynham team beat Norwich City 5-1 – a marvellous result for the RAF.

Outside of football, sorties continued, and for 141 Squadron, their last operational flight was to bomb the airfields at Hohn and Flensburg in Germany using Napalm gel. Buildings were set alight and a dog-fight ensued but one Mosquito was unable to jettison one of its Napalm tanks, and brought it home to West Raynham dropping it on the runway. The damage this caused meant that those crews from 239 Sqn who had also been out, supporting bombing raids at Keil, had to divert to alternative airfields. The subsequent problems led to the 239 Sqn Wing Commander being somewhat annoyed, blaming the “untidiness of a pilot of No. 141 Squadron who brought home one of his nasty oil bombs and dropped it on the runway“.*4 More associated with Vietnam, the squadron had dropped in excess of 11,000 gallons of the gel causing extensive damage by the war’s end.

With the announcement of VE day just days later, the celebrations began. The airfield beacon was changed to flash ‘V’ instead of ‘WR’, and the ‘Sandra Lights’ (three search lights positioned around the airfield which could be directed upwards to form a homing cone) were switched on. A large bonfire was enjoyed by all and even with 22 barrels of beer, there was a lot of “quiet fun and no excesses at all“.

The month closed with a great deal of uncertainty, a comment in the Operational Record Books summing up the general feelings: “The cessation of operational flying and the transition to a semi peace-time basis, is a little disturbing after the day to day activities of the months gone by.”

Understandably as talk of the Far East or disbandment became rife, many questions were asked about their future . The Wing Commander of 239 Sqn adding his personal concerns to the ORB*4Who is going where? Am I for the Far East? If so, on what type? Am I going to Transport Command? Am I going to be a flying instructor again?” These thoughts no doubt reflecting those of many based around Britain’s wartime airfields at this time.

With the arrival of VE day thoughts of those at West Raynham quickly turned elsewhere. In Part 4 of this visit, we see how West Raynham undergoes another upgrade, the airfield takes on a new role and West Raynham enters the jet age.

The full story can be read in Trail 21 – North Norfolk Part 2.

RAF West Raynham Trail 21 – Part 2.

Carrying on from Part 1, we see a new Station Commander appointed. His determination to lead by example though, led to an ‘unfortunate incident’ which prevented his arrival here at this Norfolk site. We also see how West Raynham aircraft took part in attacks on the German fleet and a new heavy bomber arrives for trails.

It was also at this time that a new station commander was appointed, Acting Group Captain Basil Embry, whose career to date had been varied and long. He had served in the RAF for 20 years already, in locations that included Turkey, the Middle East, the Far East and the UK. Embry led by example, taking his squadron into daring battles over Norway much against the ideals and wishes of those who were higher up in the chain of command. The move to put him in charge at West Raynham was considered an attempt to restrict his flying ambitions forcing him to keep his feet firmly on the ground. A move that Embry didn’t appreciate.

Royal Air Force- 2nd Tactical Air Force, 1943-1945. CL2739.jpg

Sir Basil Embry and his staff (right). Wikipedia

On the day of his appointment, he had one last flight, and took both his crews and a new Commanding Officer, Wing Commander L.R. Stokes into battle. However, his luck was to run out, and on leaving the target near St. Omer, his aircraft was shot down. The air gunner was killed in the attack, but Embry, along with his navigator, managed to bale out. What happened next was a dramatic series of events that led to Embry attempting to escape three times finally being successful on the last attempt. After making his way across France to Spain, he then made his way back to England where he took up active service once more.

Embry was highlighted as a possible leader for the new Pathfinder Group, but he  was overlooked by Arthur Harris in favour of Donald Bennett. However, this did not inhibit Embry’s career, for he reached the heights of Air Chief Marshal and a service record with the RAF that extended long after the war had ended.

However, the incident meant that Embry never made it to West Raynham, his absence being briefly filled by the arrival of 139 Sqn. As the personnel were settling in, they were greeted with the news that their own Commanding Officer, Wing Commander Louis W. Dickens, was to be awarded the DFC for his action in leading nine Blenheims in an attack in which they faced heavy Luftwaffe opposition. The entire Squadron, apart from a ‘skeleton staff’, were all given eight days leave following the announcement.

Shortly after, and as was with many other units who found themselves here, 139 Sqn were soon ordered out of West Raynham once more, and by early June all squadron personnel had departed, neither Embry nor 139 Sqn had experienced much of this expanding Norfolk airfield.

The pattern of sort stay squadrons would continue on, and June would see yet another one, that of 18 Sqn, who on arrival, made their headquarters in No. 2 Hangar at the airfield. Classed as a medium bomber squadron it would have the ‘standard complement of personnel’ split into two flights. Another Blenheim unit, they quickly took up operations flying over Germany and the low countries, attacking targets in northern Germany, France and Belgium. These initial operations were regularly hampered by poor weather though, and many of the aircraft had to regularly return early due to fog, heavy cloud or rain. On the better days, when attacks were successful, sorties took them over Holland and Northern France attacking airfields and barges moored along the coast.

The squadron was soon transferred out of West Raynham though, and by early  September, 101 Sqn was once again the only operational flying unit at the airfield.

At this point, it was decided to redevelop the airfield with new hardstands being constructed around the perimeter track. The process would last well into 1941 before it was completed, but it would allow aircraft to be parked and maintained on hard surfaces rather than grass where manoeuvring must have proven difficult over the previous poor winter months.

The new year brought a new tactic to 2 Group. With fighter flights failing to bring the Luftwaffe up to engage, it was decided to send the light bombers of 2 Group to entice them up. These ‘Circus‘ operations were designed to bring enemy fighters up so the escorting Spitfires and Hurricanes could engage with them.  Primarily as bait, this new tactic would be the main focus for the Group for the remainder of the year.

Then in April 1941, another new major operation was mounted and it would be 101 Sqn who would be the first to take part.

Officially known as ‘Channel Stop’, the idea was to prevent enemy shipping from using the English Channel, the vital link between the North Sea and Baltic bases and the wide open expanses of the Atlantic Ocean. Aircraft transferred across to RAF Manston in Kent, where they would be kept on alert to attack at a moments notice. Their targets being any enemy shipping seen attempting to traverse the narrow stretch of water between England and France. These attacks would be carried out during daylight hours, and backed up at night by Motor Torpedo Boats (MTB) from the Royal Navy. The first of the 101 Sqn Blenheims assigned to the role, flew from West Raynham to Manston during April, and on the 28th, their first targets were spotted. Over the next few days, a number of ships were attacked with mixed results, a 2,000 tonne vessel being one of the more prized examples that fell to the Blenheims.

But by the 9th May, aircraft losses had mounted significantly, and so the remaining six aircraft of the flight were sent back home and a temporary stop was put to the operation. It was at this point, that the now outdated Blenheim would finally be replaced with the Wellington, a new aircraft with its unique geodesic design was now appearing at the Norfolk site.

The month of May also saw the return of 90 Sqn, a unit that had been resident here at the outbreak of war with their Blenheims. This time they were not bringing twin engined models with them though, this time it was the Fortress I the mighty US four engined heavy, the B-17.

AMERICAN AIRCRAFT IN ROYAL AIR FORCE SERVICE 1939-1945: BOEING MODEL 299 FORTRESS.

A B-17 Fortress I, AN521 ‘WP-K’, of No. 90 Squadron taken at Hatfield, during an inspection of newly-arrived American aircraft by the Chief of the Air Staff and the US Air Attache. (© IWM CH 2873)

90 Squadron were trialling the use of the bomber, and whilst based at West Raynham, they also operated from RAF Great Massingham and RAF Bodney in an attempt to see if these grass airfields were suitable for the Fortress. However, it was quickly realised that such an operation with these models was not feasible and so they departed a month later, transferring out to RAF Polebrook, in Northamptonshire. Further tests revealed problems with the B-17’s guns at high altitude, the cold causing many to freeze and become inoperable. Within four months of arriving, the B-17s were sent packing, their use as an RAF bomber having been rejected.

In Part 3 we see more activity at West Raynham, and a daring raid by Blenheims in which no less than fifteen medals were awarded for action. We also see a return to attacks on the German fleet, an attack that would be met with very heavy resistance.

The full story can be read in Trail 21 – North Norfolk Part 2.

RAF West Raynham Trail 21 – Part 1.

From Sculthorpe in Trail 21, we travel a few miles south, just a stone’s throw to its sister station and another of Britain’s post-war relics. This site, closed as late as 1994, was then sold for housing development and light industrial use. With its founding in 1938, it was a long standing and also important post-war airfield, one that saw many units and aircraft types adorn its runways and buildings. In my last visit, the site was closed off and under development, so today we revisit the airfield and see what has become of it since then. As the gates are now open, we delve once more into the history of the former RAF West Raynham.

RAF West Raynham

West Raynham lies in the heart of Norfolk, west of the village that gave it its name, and five miles south-west of Fakenham. The entire site covers some 158 acres, and encompasses around 37,000 sq metres of buildings.

As a classic expansion period airfield (using garden city principles with squares and tree-lined avenues), it was built during the period 1937-39. As was common at that time, it had a number of neo-Georgian buildings, notably the Officers Mess and unmarried Officers’ quarters – the larger examples even having servants’ quarters built within. Airfields of this period had to pass a severe scrutiny from both early environmental and planning groups, and so were built with aesthetics, rather than functionality, in mind. The restrictions placed on new developments meant that these pre-war stations were far more ‘ornate’ in design than their wartime counterparts.

RAF West Raynham

The classic Officers’ mess, a neo-Georgian style building built with aesthetics in mind (2015).

Construction of the airfield was initially undertaken by the Allot Ltd company. It had two grass runways both of which were replaced later in May 1943 by hard  concrete and tarmac examples. The longest of these runways at 2,000 yds, lay north-east to south-west and the shorter at 1,400 yds directly east to west.

During its initial construction, four ‘C’ Type hangars were erected, two of which were allocated to the Ministry of Aircraft Production (MAP).  These hangars, were a mid 1930’s design which used reinforced concrete, and were commonly found on pre-war airfields, thus their dominating appearance became well known on the British landscape at that time. In close proximity to the hangars stood the Watch Office (with Fort) – another 1930’s design (built to drawing 207/36) it also utilised concrete as it was strong and in abundance at this time. Also found close by were the gunnery/training dome, a range of technical stores, workshops and numerous ancillary buildings as was common to airfields of this pre-war period.

C Type Hangar

One of the four hangars (2015). The newly installed solar panels can just be seen where the runways would have been.

The perimeter track was built with thirty-six heavy bomber design hardstands, and the accommodation area (which being non-dispersed was located on the airfield site) could house around 2,000 personnel. Following later developments the number of hardstands  were increased as was the accommodation area. At its peak, West Raynham could house around 3,000 personnel.

The site officially opened in May 1939, just prior to the outbreak of war, under the control of No. 2 (Bombing) Group whose headquarters had by now moved to RAF Wyton. Formed on March 20th 1936, the group was made up of five Wings: 70 (Upper Heyford), 79 (Watton), 81 (here at West Raynham), 82 (Wyton) and 83 (Wattisham). As a parent airfield West Raynham would use nearby Great Massingham as a satellite, with relief landing grounds at both Bircham Newton and North Pickenham. To deter marauding Luftwaffe bombers in the area, two decoy sites would also be used, one at Fulmodestone and the other at Gateley.

In May 1939, the first two squadrons arrived at West Raynham. Transferring across from Bicester were 101 Squadron and 90 Sqn, both flying with the twin engined Bristol Blenheim IV. On arrival though, it was found that the airfield was far from ready, and only with personnel carrying out the remaining work, did it finally become operational three days later.

The two squadrons soon took part in long distance flights over France. Inter mixed with these were tactical training exercises, with 101 Sqn acting as the enemy attacking ‘distant’ targets, these being ‘protected’ by other units. By August though, the situation on the continent had deteriorated considerably, and war seemed inevitable. As a result, and shortly after being sent to 5 A.T.S. Penrhos for training, both squadrons were quickly recalled to West Raynham and preparations began for war.

On 2nd September, mobilisation orders came through instructing the units to ‘Scatter’ aircraft. This national scheme was implemented to spread aircraft around alternative airfields, thus ‘thinning them out’ in case of an attack. Both units used a variety of airfields including: Bircham Newton, Brize Norton, Weston-on-the-Green and later Upwood, sending small groups of aircraft to each site.

In both units, staff vacancies were quickly filled with new recruits, and whilst both squadrons remained as training squadrons, they were nonetheless brought up to a war footing. Then in the middle of September, 90 Sqn were stood down once more, now awaiting official transfer from 2 Group to the 6 Group Training Pool.  Transferring out of West Raynham to their new home at Upwood, they left 101 Sqn the only active unit here.

101 Sqn was at the time led by Wing Commander J.H. Hargroves, who presided over twenty-two officers and 207 airmen. Between them, they would fly twenty-one Blenheim aircraft divided into two flights – ‘A’ and ‘B’.

In preparation for flights over France, the aircraft were given the Air Ministry (squadron) letter ‘N’. After being fitted with long range drop tanks, they had their engines boosted to provide the greater take off power needed for the additional weight they would now carry.

For the next three months though little happened, Britain had now entered the Phoney War. Initially alerts and false alarms came through thick and fast, crews being ready to respond at a moments notice.  However, nothing came of these alarms, and so the squadron was repeatedly ‘stood down’ from action. At Christmas, with no immediate threat pending, it was decided to grant four days leave to the majority of the squadron personnel, with many off site visiting family, the airfield all but shut down.

January 1940 brought little change, and even though still classed as a training unit, 101 Sqn remained at the ready to respond to action. To make the lull in action even worse, the cold weather now worsened and snow began to fall across the country. What training flights that were occurring were now hampered by the bad weather and cold winter air.  On several days West Raynham was classed as ‘unserviceable’, snow and a frozen surface preventing aircraft from taking off or landing. The poor weather lasted well into March with only sporadic flying taking place. With such poor conditions and inexperienced crews, training flights would ultimately result in some accidents,  the handful that did occur soon culminating in fatalities.

During this time it was decided to set up a new unit to take on the training role that 101 Sqn were currently performing. This would allow 101 to officially become an ‘operational’ squadron. To this end, 2 Group Target Towing Flight  (2 TTF) was formed  here at West Raynham, operating the Fairey Battle, Gloster Gladiator and the Avro Tutor. The relief to 101 Squadron however, would not be felt for some time, and it would be the middle of the year before they would be ready to take on the might of the Luftwaffe.

On the 7th, March 1940, a break in the weather allowed a number of crews from 101 Sqn to take part in an air firing exercise at Wainfleet Sands, but for one of those crews things would go very badly wrong.

RAF West Raynham

The Officer’s Mess in rather a sorry state. It is earmark for redevelopment (2015).

The Blenheim IV, ‘N.6165’ piloted by F.O. F.C Mottram with A/Sgt. A.E. Maudsley and Cpl. R. Hartland on board, crashed at Botesdale near to Diss. The pilot and observer were both killed in the accident whilst the wireless operator escaped with injuries. A second aircraft, a Fairey Battle also from 101 Squadron, also ran into difficulties that day. More fortunately for the crew of this aircraft though, it managed a forced landing with no further problems nor injuries to those on board.

During April another new training squadron was formed here at West Raynham, that of 76 Sqn, which was supposed to fly the Hampden. After being disbanded earlier that month at Upper Heyford, any thoughts of longevity were soon dismissed, when before any real organisation could take place, and for whatever reason, the squadron was disbanded once more. Its life at West Raynham lasting just four weeks.

As the weather improved so training flights gradually picked up again for those based at this Norfolk airfield, and by May operational sweeps over the North Sea had begun, with reconnaissance flights out looking for enemy shipping. But still 101 squadron failed to see any major action and so flights became routine.

By May 1940 the skies of southern England were beginning to hot up. With attacks on airfields signifying the start of the Luftwaffe’s campaign to destroy the RAF, West Raynham would not be immune.

Although these attacks were mainly targeted at airfields in the south, West Raynham would be visited on no less than twelve different occasions, the first of which was on 25th. Whilst little damage was done to the airfield, the war had nonetheless been brought home to those who were stationed here, it had become incredibly real at last.

In Part 2 a new Station Commander is due to arrive, but his determination to led by example leads to an ‘unfortunate incident’ meaning his arrival at West Raynham is prevented from happening. We also see attacks on the German Fleet and a new, heavy bomber arrives for trials.

The full story can be read in Trail 21 – North Norfolk Part 2.