Lt. Jack Watson 303rd BG. – From Villain to Hero.

The end of training flights in the Second World War in the quiet and blue skies of the United States, were occasionally ‘celebrated’ with flyovers and ‘buzzing’ of the home town of family or girl friends. Whilst this unofficial activity was frowned upon, in general, a blind eye was turned by Commanding Officers of the various Groups. However, one such activity was not taken quite so lightly, and almost led to the end of a promising career before it had even started.

At RAF Molesworth (Station 107) not far from Huntingdon, Cambridgeshire, the 303rd Bomb Group (BG) had been serving the Allied offensive since mid September 1942. They had taken heavy casualties after participating in many prestige missions including the disastrous August and October raids on the ball-bearing plant at Schweinfurt. The invincibility of the heavily armed B-17 was very quickly shown to be a myth.

After a period of calm, primarily due to persistent bad weather rather than any  significant strategic military decision, the USAAF was allowed unofficial time to recuperate, rebuild and rearm. During this period, new recruits and aircraft poured into the United Kingdom via either the Northern or the Southern transit routes over the Atlantic Ocean.

On one of these aircraft was Lt. Jack Watson, a ‘green’ pilot’ who had recently completed his training, and was now on his way to fight in a war a long way from his Indianapolis home.

jack watson page

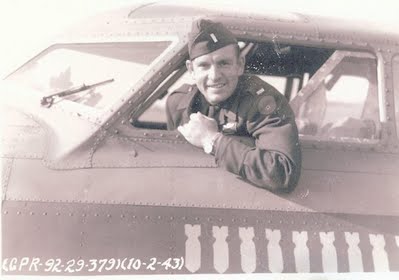
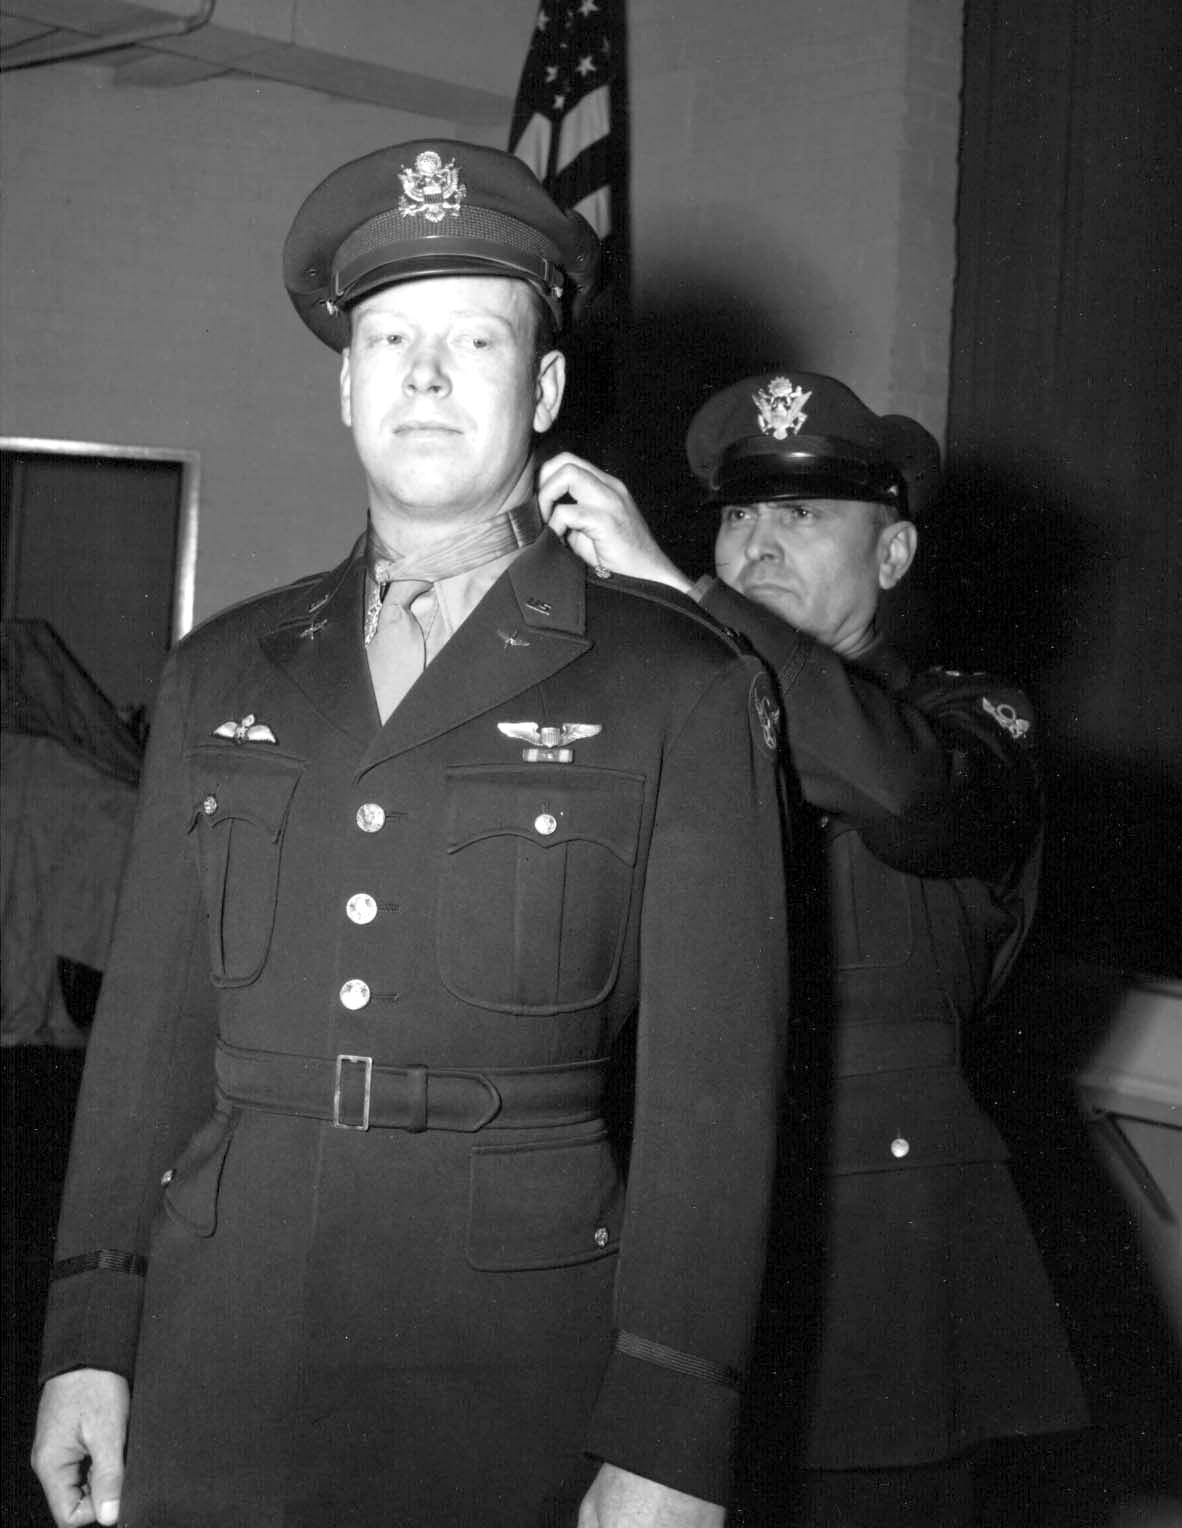
A fresh faced 2nd Lt. Jack Watosn who bravely brought home his burning and crippled B-17 bomber after ordering his crew to bail out. (IWM UPL 32160)

On eventual arrival at Molesworth, Lt. Watson was soon to experience for himself the horrors and reality of war. On January 11th 1944, he was part of a 291 bomber force attacking both the FW190 production factory as Oschersleben and the Junkers factory at Halberstadt, Germany. On what became one of the blackest days for the Group, eleven out of the forty aircraft dispatched were lost, an attrition rate of just over 25%, which was also the highest loss of the entire force.

On the inward flight, the weather, which had dogged much of the winter, closed in over the continent.  A recall message was sent out, the 2nd and 3rd Divisions turning for home, but it was ignored by Brigadier General Robert F. Travis, 1st Bombardment Division Commander in the lead plane – ‘The Eight Ball‘. Original orders were to bomb by visual methods but if cloud cover prevailed then pathfinder Liberators  were to mark the target.

As the weather had deteriorated, cloud being present as high as 24,000 feet, fighter cover was all but withdrawn. The bombers were now virtually on their own and much smaller in number.

Alerted early on, the Luftwaffe had managed to form an enormous welcoming party for the now weakened force. It would be the strongest collection of Luftwaffe aircraft since the October raids, and it was waiting, eager for blood.

The first contact between the two forces was made over the shallow waters of the  Zuiderzee on the inward flight. A collection of rocket-firing fighters launched a gruesome attack on the lead section of the 303rd, an attack that lasted for several hours and took out numerous aircraft.

From the Initial point (IP) to the target, flak was light but accurate, more aircraft took hits and further damage was sustained by the formation. Those bombers that did get through managed to bomb the target, the accuracy of which was considered ‘excellent’.

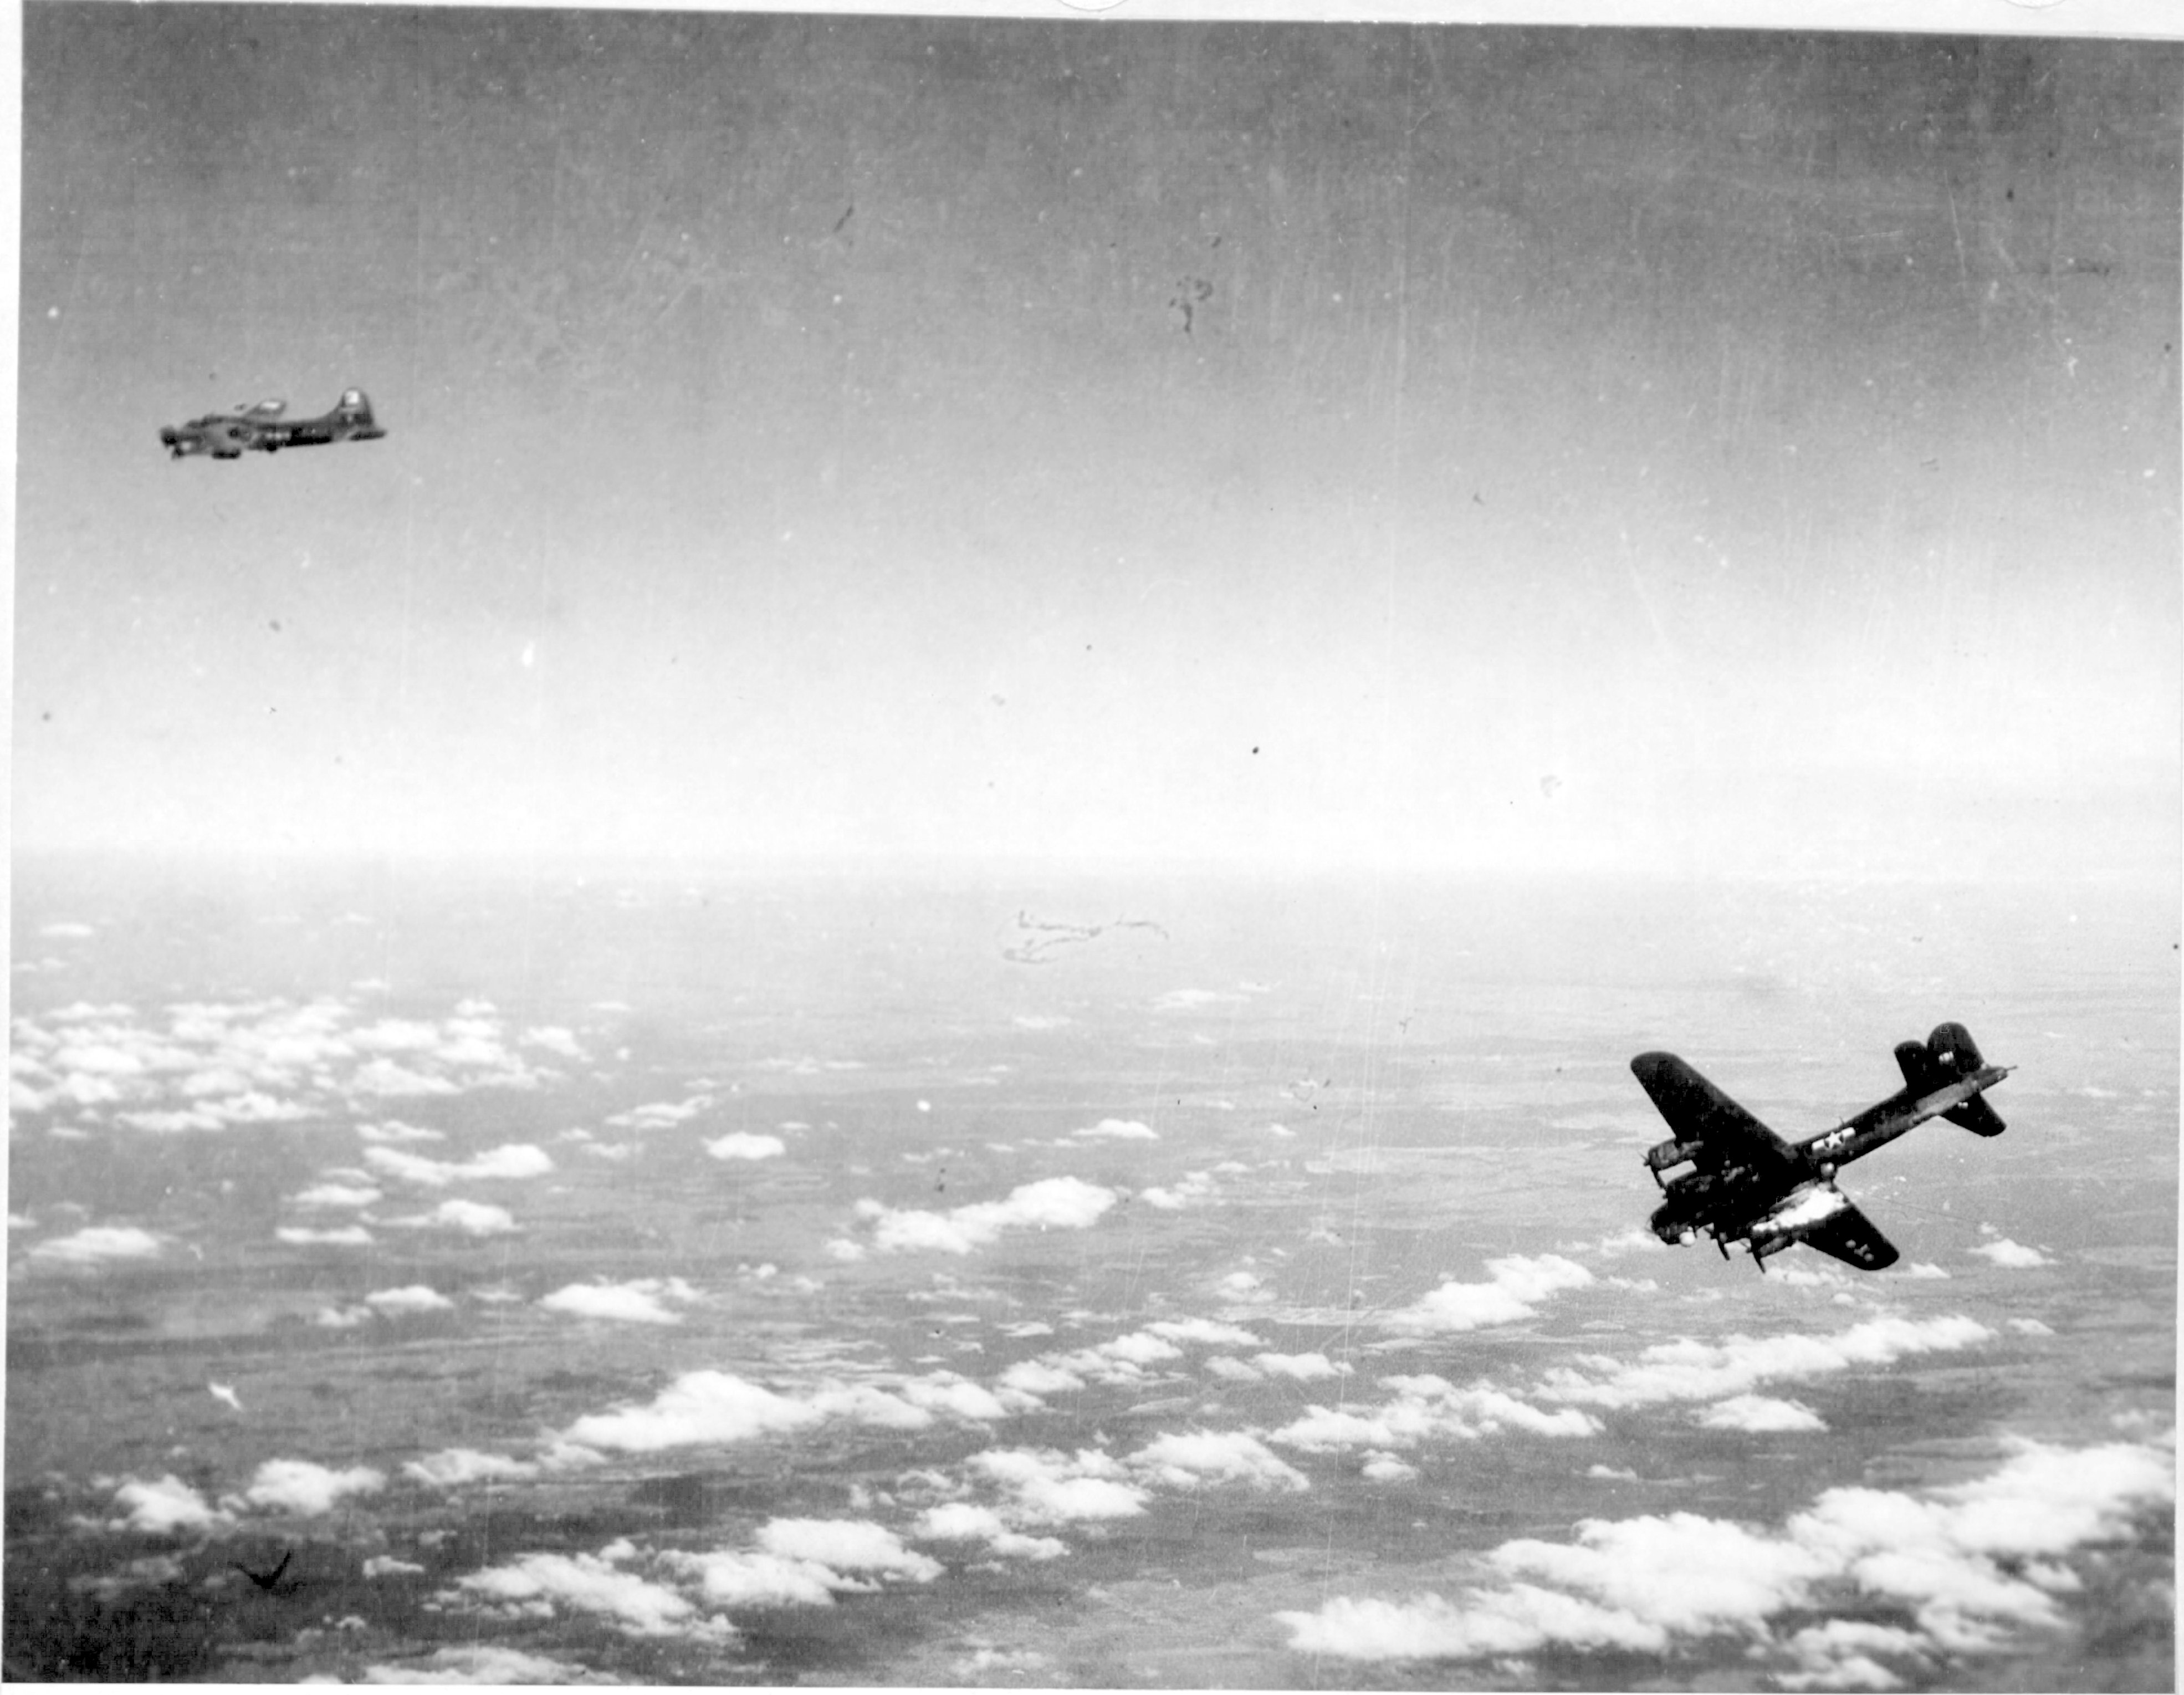
On the return flight  B-17F #42-29524 ‘Meat Hound‘, piloted by Lt. Jack Watson was attacked again by waves of enemy fighters who zoned in on the bomber and its supporting formation. With many aircraft now crippled, the B-17s were easy targets for the fierce and determined Luftwaffe defenders.

Lt. Watson’s aircraft, (a B-17F-55-BO, which had previously been assigned to the 306th BG transferring to the 303rd in July 1943), was hit hard over Durgerdam. The damage looked terminal, two engines were on fire, there was substantial damage around the wing root and the left elevator had been shot completely off. With such damage, not only was the aircraft difficult to control but it was losing vital airspeed and altitude as well.

Lt Watson, gave the bail out order, holding the aircraft steady until all the crew had departed. Lt. Watson, who had by then put the aircraft on automatic pilot, was himself preparing to jump, but the thought of the cold waters below forced his retreat to the cockpit and the challenge of getting home alone.

Of those who did jump, four fell into the Ijsselmeer and sadly drowned, and another four were caught by occupying forces and sent to POW camps. The ninth, Lt. Col. Clayton David, the Co-Pilot, managed to evade capture eventually making his way back to England. Clayton’s journey took him through Holland and Belgium and on into France, where he headed south, eventually crossing the Pyrenees into Spain. From there, he reached Gibraltar eventually returning to England in May 1944, four months after he was reported as ‘Missing in Action.’ For his efforts he received the Purple Heart*1.

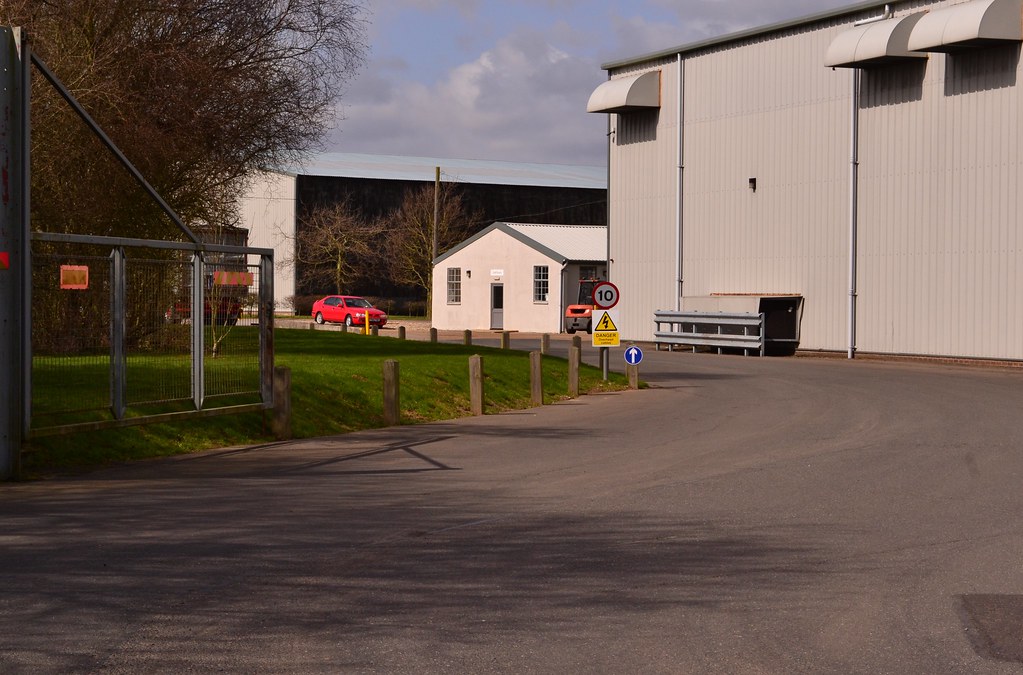
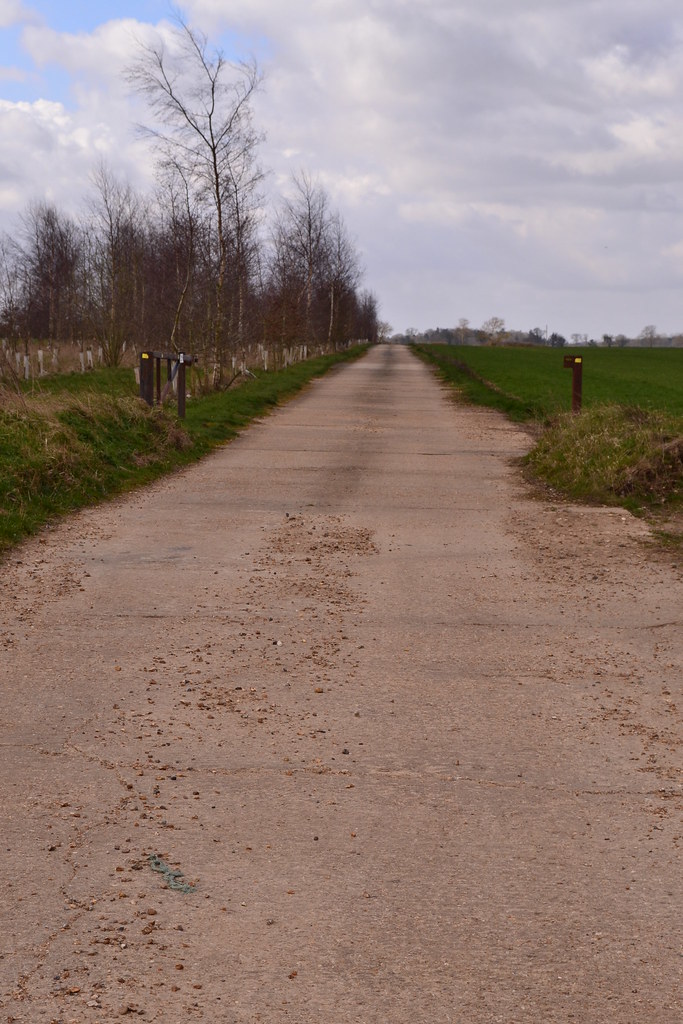
Lt. Watson, now alone in the crippled B-17 fought on, keeping the aircraft flying toward England. Once over home territory he brought the aircraft down through the thick cloud that had dogged so many of Britain’s airfields that winter, landing at RAF Metfield, an American Fighter airfield home at that time to the 353rd Fighter Group.

So severe was the fire on the aircraft that it took fire crews a considerable time to extinguish it. These crews were not only amazed to see just one crewman exit the aircraft, but also to find an unexploded shell sitting directly behind the pilots seat.

WM UPL 32171

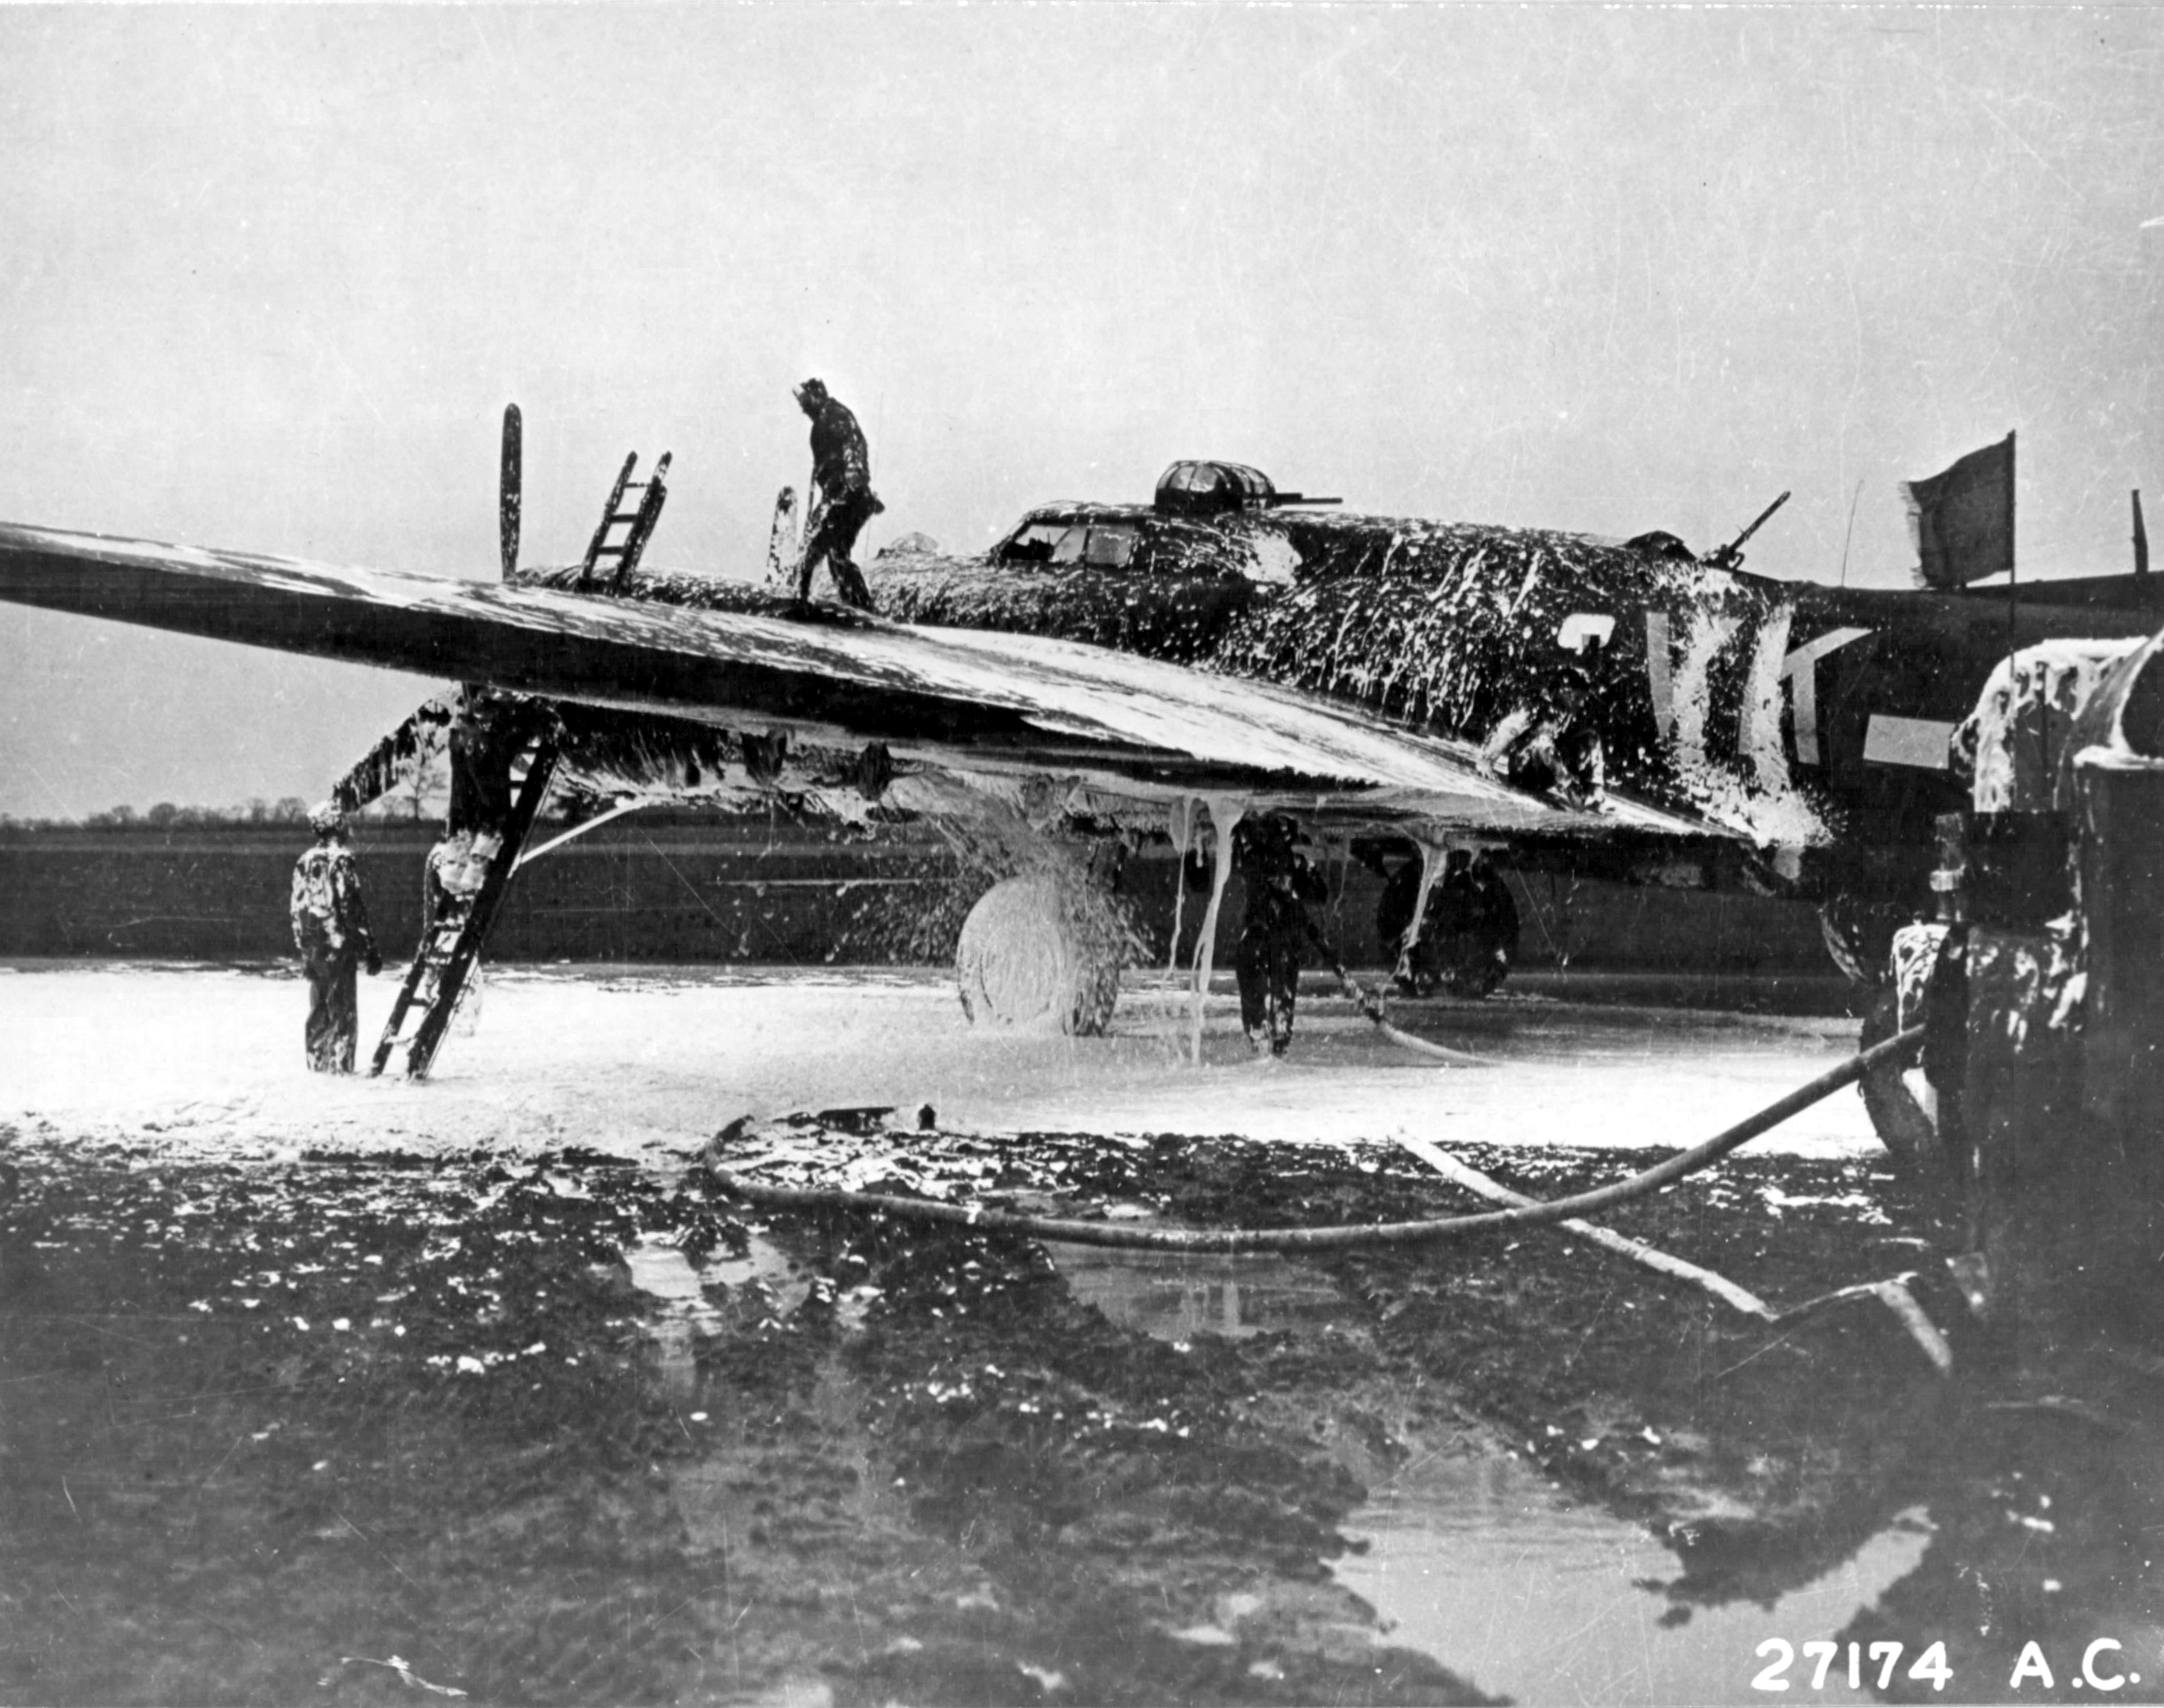
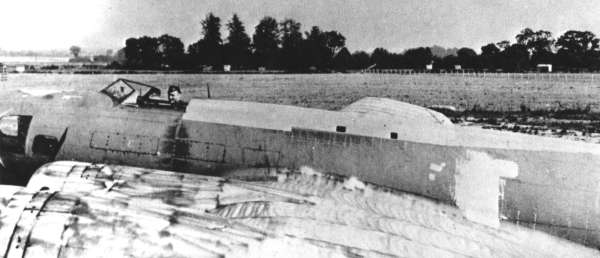
B-17 ‘Meat Hound‘ on the ground at Metfield, Suffolk after landing with two burning engines. The aircraft was subsequently written off and salvaged for usable parts.  (IWM UPL 32171).

On his arrival back at Molesworth, Lt Watson received a telegram sent by New York Mayor Fiorello LaGuardia, forgiving Watson for his villainous activity previously in late 1943.

It was at this time that Watson along with three other pilots; 2nd Lts. Robert Sheets, Elmer Young, and Joseph Wheeler, buzzed the World Series game between St. Louis Cardinals and the New York Yankees at the Yankee Stadium, New York. Mayor LaGuardia was so incensed by the action at the time, that he insisted Watson and the others be disciplined, court martial proceedings being instigated as soon as the four landed in Maine*2.

However, it was not to be, the top brass needing every aircraft and crewman they could muster, sent the four on their way with a $75 fine and a stiff telling off!

Although tinged by the sad loss of his crew, the villain of the World Series’ Buzzing, had gone on to prove himself more than a worthy pilot, making history in more ways than one.

Yankee Stadium, Bronx, NY, October 5, 1943 – B-17 Flying Fortress bombers makes a surprise visit during the first game of the 1943 World Series

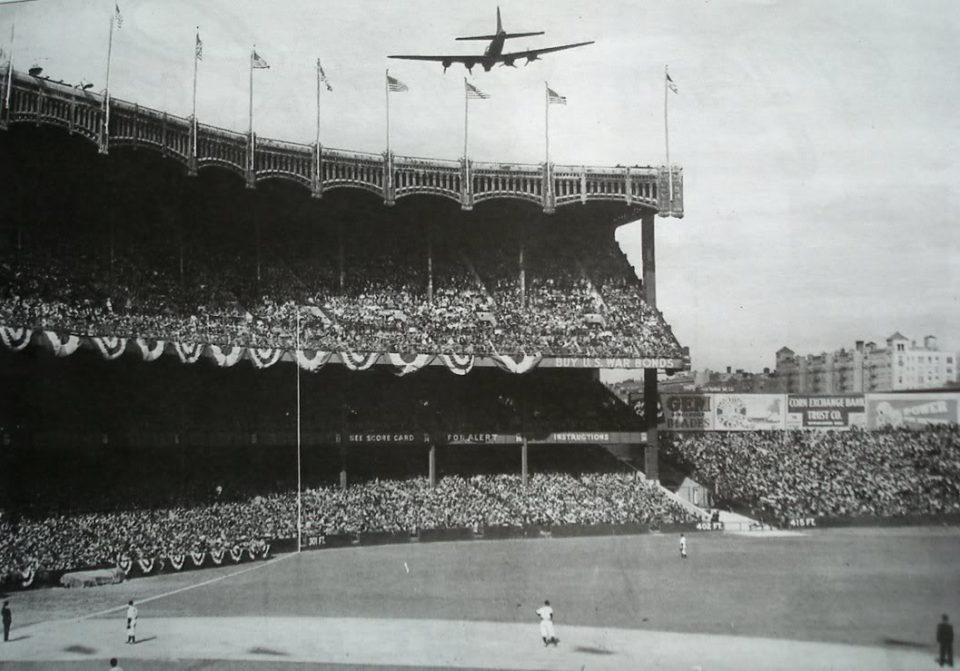
A Boeing B-17 ‘buzzes’ the Yankee stadium October 5th 1943. (Author unknown).*3

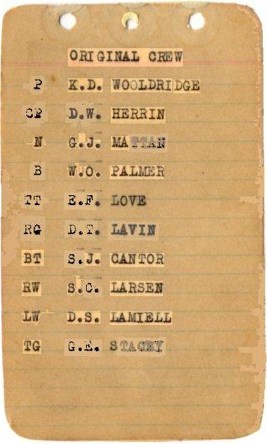
The crew of ‘Meat Hound‘ were:

Pilot – 2nd Lt. Jack Watson (Returned to Duty)
Co-Pilot – Lt Col. Clayton David (Evaded)
Navigator – 2nd Lt. John Leverton (POW)
Radio Operator –  Stf. Sgt. Harry Romaniec (KIA)
Bombardier – 2nd Lt. Vance Colvin (KIA)
Flight Engineer/Top Turret Gunner – Stf. Sgt. Sam Rowland (POW)
Right Waist Gunner – Sgt. William Fussner (KIA)
Left Waist Gunner – Gene Stewart (POW)
Tail Gunner – Sgt. Roman Kosinski (POW)
Ball Turret Gunner – Sgt. Fred Booth (KIA)

The B-17F, #42-29524, was delivered to Denver 31st December 1942; then assigned to the 423rd BS (306th BG) as ‘RD-D’ at Thurleigh 2nd March 1943. It was later transferred to the  358th BS (303rd BG) as ‘VK-K’ based at Molesworth on 30th July 1943.

For their efforts in this mission, the 303rd Bomb Group were awarded a Distinguished Unit Citation, the only time the entire unit achieved such an accolade.

This and other similar stories appears in Heroic tales of World War 2.

Sources and Further Reading.

Missing Air Crew Report 4269

*1 Herald-Whig Obituaries Website accessed 27/5/19

*2 303rd BG website ‘Outfield Fly’ by Hap Rocketto accessed 27/5/19

*3 Photo appeared in ‘Old-Time Baseball Photos and Essays’, blogsite. accessed 27/5/19

The Transformation of 2nd Lt. Kermit D. Wooldridge, 379th BG, 525th BS.

Kermit D. Wooldridge’s future looked dim as a teenager. The troubled youngster was described as truant, incorrigible, and a run-away. He dropped out of high-school. Born to deaf-mute parents who could not control him, he was raised by an uncle in Lubbock and Abernathy, Texas.

Bored and headed for trouble, on July 12, 1934, Kermit Wooldridge, age 17, joined the US Army. No one would have predicted that a few years later he would find himself in the midst of the most important war America would ever fight. It was unimaginable that he would pilot the formidable four-engine heavy bomber – the B-17 Flying Fortress.

Enlisted man Wooldridge – with a GED in one hand and a forged document of parental permission in the other – would soon be whipped into shape by the United States Army.

Private Wooldridge spent five years with the 7th Cavalry, Ft. Bliss, Texas. In 1939, Corporal Wooldridge was transferred to the Hawaiian Coast Artillery Corps.

K.D. Wooldridge in his B17

K.D. Wooldridge in his B-17

Life for Wooldridge changed on Dec. 7, 1941. The bombing of Pearl Harbor heightened urgency for pilots in our woefully inadequate Army Air Corps (now the USAAF.) Two weeks later, Dec. 24, 1941, Kermit Wooldridge was commissioned a 2nd Lt. – appointed on a temporary basis for “the duration of the present emergency.” On that day, the now disciplined, military-indoctrinated “Woody” Wooldridge began pilot training, initially in twin engines, and later in the B-17 four engine bomber.

Looking at his military records, the amount of time to learn to fly an aircraft in wartime was greatly abbreviated. Pilots and airmen were needed – and fast. Air schools and fields were authorised. Wooldridge’s military records show he began intensive pilot training Dec, 24, 1941 (200 hrs flight time) for one year. Training in the B-17 followed – completed in fewer than six months.

KDW_(L)_and_crew_B-17__1943_200_dpi

Pilot Wooldridge (L) and His Crew Beside their B-17

On June 9, 1943, with eighteen months flight training total (495 hrs flight time) Wooldridge – along with thousands of other eager airmen – would land at Kimbolton Airfield, England. On June 29, 1943, he would fly his first mission of the war – the bombing of Paris.

The transformation of a truant high school dropout was well on its way.

At Kimbolton Airfield, 2nd Lt. Wooldridge, 379th Bomb Group, 525th Bomb Squad, who formerly scorned the written word, began a chronicle of each of his 25 missions over Nazi-occupied Europe. Returning from each mission, pilot K.D. Wooldridge typed on small diary pages his recollection of that day’s work – targets bombed, engagements with Nazi fighters, planes being shot down, crippling damage to his own bombers and horrible loss of life.

His written work, “Personal Diary of Kermit. D. Wooldridge, Combat Raids Commencing June 29, 1943” was dedicated to his wife Marjorie Wooldridge with these chilling words:

“IN CASE I DON’T MAKE IT BACK ONE OF THESE DAYS.”

"To be sent to my wife" Wooldrige's diary KDW_Original_crew_from_scan
To Be Sent To My Wife Wooldridge’s diary Original Crew List of Wooldridge’s B-17

The missions were from June 29 to December 13, 1943.

Kermit Wooldridge would return home to the United States and his wife, where I would be born in November, 1944. Wooldridge would spend 25 years in the Army, retiring a Lt. Colonel in 1958. He and his my mother would raise four children.

Lt. Wooldridge, After Last Raid on December 13 1943

It was only after retirement from the Army that the wayward young man who wrote of the horrors of war as a 26 year-old, would then go to college and begin a second career as a math teacher.

After his death in 1994, my mother gave me the diary and asked me to do something with it one day. I did not read it until many years after his death. His story is not unique – my dad was an ordinary man, who along with his crews, was put into extraordinary circumstances. They all acted heroically, but would not like to be called heroes.

Over one-third of the B-17s over WWII Europe were lost.

I donated my father’s diary to the Library of Congress in Washington, D.C.

Here are a few excerpts from the diary of Lt. Kermit Wooldridge. The entire diary is online, each raid separately. sites.google.com/view/wooldridge-diary-wwii-pilot/home

Raid 18: 10/14/43

“Today we took off with a load of three 1000’ demos and a load of incendiaries. Our target the ball bearing plant at Schweinfurt, Germany. We had been briefed several times for this target and we knew it was going to be rough. It turned out to be the roughest ride that I ever hope to see…… we dropped our bombs OK and turned away from the target and ran right into the whole German air force….they were coming through the group in droves and shooting all the way. One FW190 rammed my right-wing man head on. They both went down in flames. They kept coming in groups of five and ten at the formation and in less than five minutes five of the seven ships in the squadron that I was leading had been shot down.

Well I and the other ship joined another squadron that had only four ships left. For the next hour and a half the fighters kept hammering at us. I was really doing violent evasive action to make them miss.   My ball turret gunner asked me if I thought I was flying a P-38. Well frankly I was giving her all she could take but still had no hope of making it back…we were near out of gas and it was time to do something if it was wrong….when the altimeter got down to an indicated 200 ‘ above the ground I started praying. One of the many that I had said today. When the reading was low (80 feet) the navigator said he saw a row of lights ahead. Sure enough there was a field about half a mile ahead. We went straight in and landed for we were too low to make much of a turn.

About half of our tail was shot off and the wings and fuselage were full of holes. The crew was O.K.”

KDW_and_wife_Marjorie__Bomber_returns_to_US_Dec,_1943

News cutting showing Wooldridge’s return from War.

This post was written by Frances Bekafigo, the daughter of Kermit D. Wooldridge.  My gratitude goes to her for allowing me to share these most personal details. She regularly posts extracts from the diary on Twitter @FrancesBekafigo and the full diary can be found on her website at sites.google.com/view/wooldridge-diary-wwii-pilot/home

This is an excellent recount of the life of a young B17 Pilot and is well worth a read.

Kimbolton

RAF Kimbolton Memorial Today

Robert C Frascotti, USAAF, 352nd FG, 486th FS. RAF Bodney (Trail 8)

D-Day began many months if not years ahead of June 6th 1944. That day was to become famous as the biggest, most important day in the Second World War.

As the world’s largest amphibious assault force assembled along the South Coast of England, thousands of aircrew prepared for what was to be the most incredible night of their lives.

Across the Midland Counties, American ground crews prepared their fighters and paratrooper aircraft. Along southern England, the same scene was being played out. RAF crews too prepared Stirlings, Lancasters and Horsa gliders; fighter groups were briefed and paratroopers readied their gear. The invasion was on!

Flying an operation of this magnitude was going to require guts, daring and precision flying. There was little room for error.

In the lead up to June 6th, the RAF and USAAF had been bombing prime targets across Northern France to soften up the defending Germans. Supply lines were severed and gun emplacements destroyed. Beachhead bunkers had been heavily targeted, and supporting artillery further inland, hit hard.

In the air, fighters had been downing the Luftwaffe in an effort to gain vital air superiority over the drop zones.

At home, huge attempts were made to keep the plans and preparations as secret as possible. An intricate operation of deception was being played out; dummy airfields were built, camps and troop movements were hidden under cover and concealed in forests.

At an airfield in Norfolk, the day was to begin very badly for one particular young pilot. He was 1st Lt. Robert C. Frascotti of Milford, Massachusetts.

In the days leading up to D-Day at RAF Bodney (USAAF Station 141), the 352nd FG had been flying intruder missions over France, attacking ground targets and completing air superiority missions. P-51s were rapidly being prepared, and the growth of black and white stripes adorning aircraft, hinted of an imminent invasion.

In the late hours of June 5th, the P-51s were being fueled up and armed, ready for an early morning takeoff.  The weather was not at its best and a low mist shrouded the airfield reducing visibility. The mission ahead was to support the troops landing on the Normandy beaches.

At 02:30, the pilots climbed in, fastened their belts and awaited the signal to launch D-Day. First to leave were the 486th FS. To help with the takeoff, temporary lights were placed along the runway, guiding the aircraft safely out of harm’s way into the night sky. One of these aircraft, unfortunately struck the lights knocking them out and plunging the airfield into darkness once more. Lining up behind them were the second flight of the 486th, including Frascotti’s P-51.

When lining up, the flight were unaware that they were off centre. Frascotti and his wingman, Lt. Carlton “Bud” Fuhrman, accelerated away and raced down the runway. Fuhrman watched Frascotti to his left when suddenly there was a massive fireball. Thinking someone had dropped their external fuel tanks, Fuhrman pulled up sharply and pushed on through the flames hoping his engine would not falter resulting in him crashing into the raging fire below. Momentarily blinded by the now total darkness, Fuhrman, pushed the stick forward and fought against the impending stall. Eventually his sight returned and he was able to read his instruments once more. Looking back, he could see Frascotti’s fully fueled plane engulfed in fire with no hope of an escape. Frascotti died instantly. The accident report filed after Frascotti’s death stated that an inadequately lit tower along with poor weather and high levels of traffic had caused him to inadvertently strike the unfinished new control tower at Bodney resulting in the ignition of his fuel. Tragically, Frascotti died instantly, and the aircraft was a total loss.

Frascotti’s plane, a blue nosed P-51B-5 Mustang, 43-6685 was named ‘Umbriago‘. In Italian, ‘umbriago’ means ‘drunk’. Frascotti could have named his plane for that reason, but it could also be he was referring to the World War II-era song of 1944, “Umbriago”by Jimmy Durante about a fabled friend of the same name. The song lyrics end with, “So when you feel low, better send for my friend, Umbriago.”

At a mere 21 years of age, 1st Lt. Robert C. Frascotti had many tributes written about him. There was one benefit of his tragic accident: the following aircraft now had a ‘guiding light’ by which they could safely takeoff and leave for Normandy.

Frascotti was born on February 13, 1923 into a very close-knit and patriotic family in Milford, Massachusetts. (His father fought in World War I where he was gassed). Frascotti was awarded his pilot wings in Marianna, Florida on March 25, 1943, then completed advanced fighter training before deploying to England in March 1944. He joined the 486th FS of the 352nd FG, otherwise known as ‘The Blue Nosed Bastards of Bodney”.

1st Lt. Donald “Red” Whinnem of Hartford, Connecticut, was best friends with Frascotti since the early days of flight school. On D-Day at Bodney, “Red” took off without incident and flew for sixteen hours, returning to discover the tragedy that had occurred. “Red” says of his friend, “Bob was the nicest guy you would ever want to know, and a great athlete as well. He could stir up laughter anywhere he went, and he was great fun to be with. Bob would sing a song or tell a story and cheer everyone up. You couldn’t ask for a better friend, and he was closer than a brother to me.”

During his service, Frascotti was credited with the destruction of two enemy aircraft on the ground whilst strafing enemy airfields. On D-Day, he departed for his 89th mission. This was to be his last mission of the war as he was due to return to the States leaving conflict behind him. Sadly, he never made that journey home to Massachusetts until many years later.

Initially, Frascotti was buried in England. His remains were eventually taken back to Massachusetts in 1948 after his next of kin had his body exhumed, and he now lies in the Sacred Heart Cemetery, in Milford. Lt. Robert C. Frascotti VFW Post 1544 in his hometown, now bears his name, and on December 6, 2013, as part of the annual “Wreaths Across the Worcester and Norfolk District”, a group of local veterans, families and friends, laid a holiday wreath at Calzone Park in Milford to remember the fallen veterans of the area, including Frascotti. Since the war, every year until his death in 1998, 1st Lt. Donald “Red” Whinnem travelled to Frascotti’s grave in Milford to pay his respects and remember his wartime friend.

Fly-pasts and tributes continue to be paid for Frascotti, in both the United States and here at RAF Bodney, Norfolk. 1st Lt. Robert C. Frascotti will long be remembered for his brave sacrifice, and we that are here, are honored to continue to tell his story.

As for RAF Bodney, the airfield is now an Army training camp and part of the Stanford Training Area (STANTA) in Thetford Forest. Little remains of the airfield today but the history held within its decaying walls will long live on.

RAF Bodney can be visited in Trail 8 – Swaffham and her Neighbours (Part 1).

IMG_2210

Robert Frascotti next to his P-51B, 43-6685, named ‘Umbriago’ . At 21 years of age he was killed on his final mission before returning home. (Photo – Marc Hamel)

The last flight of Joe Kennedy and Wilford Willy – (RAF Fersfield).

There has been much written about the young Kennedy, his life, his family and his death, but a lot of information around his death has remained ‘unknown’ for many years. Even today, the actual cause of his death is not clear and will probably remain so.

Joseph Kennedy Jnr was based at RAF Fersfield (originally RAF Winfarthing) in Norfolk (Trail 27), and had only been there a few weeks before he tragically died on August 12th 1944, whilst operating on secret operations. A tragic loss, this is the last flight of Joseph Kennedy and Wilford Willy from RAF Fersfield, Norfolk, England.

The Crew – Lieutenant Joseph Kennedy Jnr.

Joseph Kennedy was born July 25th 1915, Nantasket, Massachusetts, he was the eldest brother of eight siblings including John F. Kennedy. He was son to Joseph Patrick Kennedy and Rose Fitzgerald. Throughout his life he had been pressured into the political life by his father who had high hopes that his son would become the future President. Joseph Jnr wanted to please. As war loomed, Joe Kennedy Jnr rose to the challenge seizing his opportunity to become the ‘shining light’ of the Kennedy family.

The Kennedy parents instilled a desire to be competitive, to win and succeed and to be the best. This came out in Joseph during his time at both home and at school. The pressure on Joseph was enormous, and it was clearly evident throughout his short life.

Joseph lived in the shadow of his younger brother John, who would captain a PT boat in the Far East, and in Joseph’s absence, go on to become President of the most powerful nation on Earth. John was the brighter, the more determined of the two, and this caused friction between them. Joe always wanting to ‘out-do’ his brother persevered, but never seemed to quite make it.

It was this determination and rivalry that perhaps led Joseph to do what he did, to impress, to be the best and the ideal way he thought was as a war hero.

With a remarkable academic background behind him, Joseph Kennedy joined the U.S. Naval Reserves on October 15th 1941, reporting to the Naval Air Station (N.A.S.) at Jacksonville, Florida the following day. After several months of training he received his commission and on January 10th 1943 he joined a flying patrol squadron. In May he became a Junior Grade Lieutenant transferring to a bomber squadron in the following July that year. In 1944, on July 1st, he was promoted to Lieutenant United States Naval Reserve. His military life would last just over one month.

Joseph was posted to RAF Dunkeswell serving under the RAF’s Coastal Command. Flying a PB4Y he would carry out U-Boat searches over the Atlantic around the Bay of Biscay and the Atlantic. As he accumulated flying hours, he rarely came into any real danger, even when posted to cover the Allied invasion fleet over Normandy he rarely came into contact with any opposing aircraft or vessels.

Joseph Kennedy’s opportunity came when volunteers were asked for to undertake a special secret and dangerous operation. He jumped at the chance to be a hero.

Joseph Kennedy arrived at RAF Fersfield, Norfolk on 30th July 1944 where he was trained for two weeks.  On August 10th 1944 he wrote a letter home, it would be his last communication with his family. Joseph Kennedy was to become a pilot in operation Anvil.

Lieutenant Wilford John Willy

Sadly, Lieutenant Wilford J. Willy (s/n: O-137078), has remained in the shadows probably because the status of Joseph Kennedy Jnr. A tragic loss nonetheless and no less an important one. Willy was born 13th May 1909, New Jersey. He enlisted in the Navy in 1928, gaining his Naval Wings on April 30th 1937, just two years after he had married his sweetheart, Edna C. Schaffery, the women he left behind. On advancing through the rank of Chief Petty Officer,  he was awarded Lower Grade Lieutenant (April 28th 1942) and two months later, on June 26th, he achieved the rank of Lieutenant. Willy served at a number of operational stations, including Pearl Harbour, before being posted to RAF Fersfield, in Norfolk.

Willy, now an expert in Radio Operations and procedures, became the Executive Officer of the Special Air Unit One (S.A.U.1), the rank he achieved when he took off with Kennedy on August 12th 1944.

Operations Anvil and Aphrodite.

Whilst Drone technology and research had been around as early as World War I, it was still relatively unchartered territory. However, radio controlled drones (modern name Unmanned Aerial Vehicles or U.A.V.s) were already being used with relative success for target practice by the RAF and USAAF during World War II. The ‘Queen Bee’ being one of many used by the RAF. The Germans had also been investigating drone and guided bomb use through examples such as the Mistel aircraft (the most successful being a combination of either a FW-190 or Me-109 mounted above a Ju 88).

Both the  USAAF and USN were undertaking secret trials into drone aircraft operations with the view of attacking the heavily defended and ‘impenetrable’ submarine and ‘V’ weapons sites across northern France . The aim, to stop, or at least reduce, the Nazi’s use of the V1, V2 rockets and the development of the new V3 canon.

Codenamed ‘Aphrodite‘ by the USAAF,  and ‘Anvil‘  by the Navy, they were two secret operations running side by side. The idea behind these operations, was to remove all excess equipment from war-weary B-17s and B-24s, fill them with explosives, such as the British Torpex, put in radio receivers so that the drone (baby) could be controlled by a separate aircraft (mother) and fly them into designated targets. A volunteer crew of two would take off, set the aircraft in flight and then bail out over the U.K. or English Channel, leaving the ‘baby’ in the control of the ‘mother’ aircraft. These would then fly, by remote control, to the target when they would be put into a dive destroying whatever they hit.

The controls of the B-17 . The arm linkage moved the control column in response to the radio controls. (credit USAF)

The idea was remarkable but not new, and the equipment whilst innovative for its day, was limited to say the least. In all the operations undertaken only one drone ever reached its target, and that was through more luck than skill.

‘Azon’ (from AZimuth ONly*1) controls had been used successfully on individual 500lb or 1000lb bombs, where the control box was attached to the rear of the bomb and controlled by the bomb aimer through a joy stick. Using two directional controls (left or right) he could direct a bomb very accurately onto a given point. The downside of Azon, was that range and fall had to be determined in the usual way by the bomb aimer and could not be altered once the bomb had left the aircraft.

Azon had been used and proven in attacking bridges, railways and other longitudinal targets and was very accurate with a good bomb aimer. However, because of its limitations, it could only be used in one dimension and therefore was not capable a making a ‘baby’ take off.

Two aircraft types were identified for the project. Boeing’s B-17 ‘Flying Fortress’ and Consolidated’s B-24 ‘Liberator’. These once converted would be given new identifications BQ-7 (usually B-17Fs) and BQ-8 (B-24D/J). In each case it was deemed that two crew members would be needed to raise the ‘baby’ off the ground, partly because of the strength needed to pull back the control columns in these heavy bombers. Once airborne, they would climb to around 20,000ft, arm the Torpex, set the aircraft on a trajectory to the target, switch on the receivers and bail out.

About twenty-five  BQ-7s were modified, but it is not known accurately how many USAAF BQ-8s were converted. However, it is known that at least two naval PB4Y-1s (the naval version of the B-24 of which 400 had been converted from B-24 status – these were given s/n 31936 – 32335) were converted to BQ-8 standard; one of which was flown by Lt. Kennedy and  Lt. Willy on the 12th August 1944.

A number of support aircraft were needed for each mission. Prior to the attack a Mosquito XVI of the 653rd BS would photograph the target. Then the ‘baby’ would be accompanied by at least one fighter (either P-38 or P-51) incase the ‘baby’ lost control and had to be shot down and for fighter escort; a ‘mother’ either a Lockheed Ventura or another B-17 modified to CQ-4 standard, and a photographic  Mosquito from the 8th Combat Camera Unit (CCU) to record inflight behaviour. A post mission photo reconnoissance operation was carried out by the 25th BG at Watton to analyse the effectiveness of the bombing. It therefore took a lot of fuel, crew and aircraft to fly one drone to its target.

Because of the design features of the bombers, the USAAF looked into removing the cockpit to allow easy departure. The only aircraft that received this treatment was B-17F, “Olin’s 69’ERS” 42-30595 formally of 560BS, 388BG at Knettishall. It was never used on an Aphrodite mission  and was scrapped post war after being used for training in the open cockpit mode.  The BQ-8  (B-24) also had modifications made in the form of a widened hatch in the nose allowing for an easier escape from the aircraft. Once modified, the aircraft would have had all previous markings removed, and a special white or yellow paintwork applied to identify them from other bombers. To assist the controllers in sighting the ‘babies’ whilst in flight, the aircraft were fitted with a smoke canister that would be ignited allowing the bomb aimer to see the aircraft as it began its dive. In addition to this, two cameras were fitted to some ‘babies’ that transmitted pictures to the mother or support ship. These pointed at the controls and through the plexiglass. A revolutionary step forward in drone technology.

USAF designation system

A modified B-17 (BQ-7) with its canopy removed, this aircraft became a training drone. (Credit USAF)

In all, there were fifteen missions undertaken by the USAAF and USN, but none were to successfully hit their targets.  These included: Mimoyecques (Fortress); Siracourt (V1 Bunker); Watten (V2 Bunker); Heligoland (U-boat pens); Heide; Le Havre (docks); Hemmingstedt (oil refinery); Herford (marshalling yard) and Oldenburg (Power station). Both the operations and entire programme were cancelled only a few months after the Kennedy/Willy mission.

The last flight.

At RAF Fersfield, on August 12th 1944, Lieutenants Joseph Kennedy Jnr and Wilford J. Willy, both of the S.A.U. 1 of the Fleet Air Arm Wing Seven, boarded their converted B-24 Liberator, s/n 32271 (ex USAAF B-24J 42-110007)*2 and began their preflight checks. The aircraft was filled with 21,270lbs of explosive. At 17:55 and 17:56 two Lockheed Ventura ‘mother’ aircraft took off, followed by a further navigation aircraft and then the ‘baby’ at 18:07. The ‘baby’ climbed to 2,000 ft, the two ‘mothers’ 200 feet higher and slightly behind. They were joined by two Mosquitos, one for monitoring the weather, and the second, A USAAF F-8, to photograph the ‘baby’. This aircraft was flown by pilot Lieutenant Robert A. Tunnel and combat camera man Lieutenant David J. McCarthy. There was a further B-17 relay ship, a P-38 high altitude photo reconnaissance aircraft and five P-51 Mustangs to provide fighter cover.

The group set off toward the target at Mimoyecques , Northern France. They were to fly south-east toward the Suffolk coast, then turn south and head toward the target. Once level and stabilised, Kennedy and Willy handed over control to one of the ‘mother’ ships Then they reached the first control point (CP) at which time the group began to turn south; the ‘mother’ controlling the ‘baby’. Shortly after the turn was completed (about two minutes) Kennedy was heard to give the code “Spade Flush”, then at that 18:20 the ‘baby’ disintegrated in what was described as “two mid-air explosions” and a “large Fireball”.*4 The explosion, spread debris over a large area of the Suffolk countryside killing both crew members instantly. The following Mosquito also suffered damage and minor injuries to its crew. Following the explosion, all the aircraft were ordered back to base and the crews debriefed.

Many months (and indeed years) of investigations followed, but no firm conclusions could be drawn as to the precise cause of the explosion that ripped the aircraft apart. A number of speculative theories were drawn up, but the most plausible is that the electronic arming system was faulty and when Kennedy or Willy flicked the switch, an electronic short occurred that caused the bombs to detonate. Oddly the film that was in the following Mosquito has never been seen or made public – if indeed it was filming at that time.

The cause of deaths of Joseph Kennedy and Wilford Willy still remain a mystery to this day.

Joseph Kennedy wanted to be a hero. He wanted to be talked about as the one who achieved and outshone his brother. Sadly, this dream cost him his life.

Page 1 of August 23, 1944 condolence letter to the parents of Lt. Joseph Kennedy, Jr.,

The letter sent to the Kennedy’s after Joseph’s death.*3

Page 2 of August 23, 1944 condolence letter to the parents of Lt. Joseph Kennedy, Jr.,

The letter sent to the Kennedy’s after Joseph’s death.*3

This fateful mission and its two crew members are remembered across the world. In France, the Mimoyecques museum contains a memorial honoring both pilots, and their names are carved in the Tablets of the Missing at the American Cemetery, Madingley, Cambridge. Kennedy has a ship the Destroyer ‘USS Joseph P. Kennedy Jr.’ DD850 named after him and this is now a museum in Battleship Cove, Fall River, Massachusetts. Both aviators were awarded the Naval Cross posthumously,

joe kennedy

Lieutenant Joseph P Kennedy Jr, USNR, appears on the Wall of the Missing at the American Cemetery, Madingley, Cambridgeshire.

Lieutenant Jospeh P. Kennedy Jnr had no dependents but Lieutenant Wilford J. Willy left a widow and three children.

Sources and further reading.

*1 Azimuth being the clockwise horizontal angle from a given point (usually North) to a second given point.

*2US Navy and US Marine Corps BuNos, Third Series (30147 to 39998)‘  Joe Baugher, accessed 20/8/15

*3 Photos taken from ‘A People at War‘  Archives.Gov, Accessed 20/8/15

*4Crisis Hunter: The Last Flight of Joseph P. Kennedy Jr.’ Paul Elgood, Columbia Point, 2014 pg 45, 65,

For a list of USAAF drones and pilotless missiles, see here.

For the details on Drones see Wikipedia.

For more information and types, see Mistel aircraft, on Wikipedia.

Brigadier General Frederick W. Castle – Heartbreak on Christmas Eve, 1944

On the morning of December 24th, 1944, Brigadier General  Frederick W. Castle (s/n 0-319375), woke to the greet the day, and like most pilots facing perilous missions, he probably wondered if it would be his last. However, knowing what I know about Castle from my research, he was a calm, confident and highly competent pilot, so most likely he had every reason to believe in the success of his next mission. Sadly though, that was not to be the case. Castle never made it back that night. On Christmas Eve of 1944, this brave pilot lost his 30th and final battle.

Lieutenant Colonel Elliott Vandevanter of the 385th Bomb Group with Colonel Frederick W Castle (centre) of the 487th Bomb Group and Brigadier General Curtis A LeMay. *1

Frederick W. Castle was born on October 14th, 1908 at Fort McKinley in Manila, the Philippines. He came from an active military family and was the son of Col. Benjamin Frederick Castle. Following the end of World War 1, he was to settle in the United States in Mountain Lakes, New Jersey.

From a young age, Castle was destined to follow in his fathers footsteps, groomed for a life of military service. He attended Boonton High School and Storm King Military Academy before moving on to the US Military Academy from where he graduated in June 1930.

His first service was with the New Jersey National Guard, where he stayed for two years  transferring to the Air Corps, March Field, California, then onto Kelly Field in Texas. Castle gaining his wings in October 1931.

Serving as a pilot with the 17th Pursuit Squadron for 3 years, he eventually left the forces returning to civilian life but holding a reserve status. With the entry of the United States into the Second World War, Castle would be called upon by his good Friend Ira Eaker, returning to the fold in January 1942, and being promoted within two months to Major. By the following September, Castle had been promoted yet again, he was now a Lieutenant Colonel.

With the forming of the Eighth Air Force in England, headed by General Ira Eaker, Castle was one of seven high-ranking officers selected to fly with him on the dangerous route over the Bay of Biscay, eventually arriving at Hendon wearing their civilian clothes. Joining Eaker on February 20th 1943 in the DC-3 from Lisbon were: Lt Colonel Frank Armstrong Jnr, Major Peter Beasley, Captain Beirne Lay Jnr, Lt. Harris Hull and Lt. William Cowart Jnr.

Castle desired a combat role, and this desire would lead to him taking over the command of the ailing 94th Bomb Group. His methods of command were initially considered weak, but in the face of low morale and apprehension, he personally took the 94th to some of the furthest targets yet, his first being Oschersleben in the heart of Germany; a mission that went on to inspire the film “12 o’clock High“.  Castle went on to fly in many combat missions including numerous high prestige targets, a role that took him on to Brigadier General and command of 4th Combat Wing.

On Christmas Eve 1944, following a week of poor weather, orders came though for a maximum effort mission, involving every available B-17 and B-24 in support of the troops in the Ardennes. Airfields, supply lines and troop movements were to be attacked, and following weeks of poor weather, a break was at last predicted.

As a joint effort, this would be the largest single attack to date involving 500 RAF and Ninth Air force bombers, 800 fighters and just short of 2,050 Eighth Air Force bombers. Such was the demand for aircraft, that even ‘war weary’ examples, were hastily armed and prepared, many unfit for more than assembly or training duties. Truly an armada of incredible proportions.

General Arnold with Colonel Frederick W Castle, Brigadier General Curtis LeMay, General Williams and General Anderson during a visit to RAF Rougham, home of the 379th BG. *2

Taking lead position, Frederick Castle, was in B-17G-VE, ’44-8444′ “Treble Four“, an aircraft that had itself seen battle experience. Assigned to the 836BS, 487BG, and at RAF Lavenham, it was previously damaged in a raid over Darmstadt. The aircraft was  later salvaged in January 1945.

A veteran of 29 missions, Castle was a more than a competent leader. They set off, the weather was as predicted but with a haze that restricted ground level visibility. It was this haze prevented the fighters from leaving causing an all important delay in the escorts. This delay was not considered a major problem at the time however, as the escorts being faster, would soon catchup and overtake the heavily laden bombers. The Luftwaffe, in an unprecedented move, brought forward fighters into the Liege area to meet the oncoming bombers before any escorts could reach them. In the first few minutes of the battle, four of the 487th BG’s aircraft were downed and a further five forced to land in Belgium.

Castle’s lead plane, suffering problems with one of its engines (possibly due to previous battle damage) was attacked by the first wave of fighters, action was taken to leave the flight and join a formation further back. It was then attacked again, the aircraft catching fire, and the navigator being wounded.

Castle took control, and even though still being attacked, refused to jettison the bombs for fear of killing civilians or allied troops below. Further attacks led to both engines on the starboard wing catching fire, which ultimately led to the fuel tank exploding sending the aircraft into an uncontrollable spin.

Through Castle’s actions, seven of the crewmen were able to leave the aircraft, sadly  though not all survived.

Frederick Castle died in the crash, his body is now buried in Henri-Chapelle American Cemetery, Liege, Belgium, Plot D, Row 13, Grave 53.

His citation reads:

“He was air commander and leader of more than 2,000 heavy bombers in a strike against German airfields on 24 December 1944. En route to the target, the failure of 1 engine forced him to relinquish his place at the head of the formation. In order not to endanger friendly troops on the ground below, he refused to jettison his bombs to gain speed maneuverability. His lagging, unescorted aircraft became the target of numerous enemy fighters which ripped the left wing with cannon shells. set the oxygen system afire, and wounded 2 members of the crew. Repeated attacks started fires in 2 engines, leaving the Flying Fortress in imminent danger of exploding. Realizing the hopelessness of the situation, the bail-out order was given. Without regard for his personal safety he gallantly remained alone at the controls to afford all other crewmembers an opportunity to escape. Still another attack exploded gasoline tanks in the right wing, and the bomber plunged earthward. carrying Gen. Castle to his death. His intrepidity and willing sacrifice of his life to save members of the crew were in keeping with the highest traditions of the military service*3.”

For his action, Frederick W. Castle was awarded the Medal of Honour posthumously. In 1946, the Castle Air Force Base, in the heart of California’s San Joaquin Valley, was dedicated in his name, and on June 20th, 1981, the Castle Air Museum was officially opened on the now closed base, for the purpose of preserving the Air Force and Castle heritage. Museum details can be found on their website. His  name is also on a plaque in the Memorial Park, in Mountain Lakes, New Jersey.

The awarding of the Medal of Honour, reflected the determination and personality of one of Eakers “Original Seven”, who chose to leave a safe position for a combat role, taking on the demoralised 94th, and leading them into some of the Second World War’s most ferocious air battles.

Sources and further reading.

*1 Photo from Roger Freeman Collection, IWM, FRE9833

*2 Photo from Roger Freeman Collection, IWM, FRE9879

*3 Congregational Medal of Honour SocietyWebsite, accessed 22/12/15

Mountain Lakes Library, Website, accessed 22/12/15

“The B-17 Flying Fortress Story”, Roger A Freeman, Arms and Armour, 1997.

Air Forces Historical Support, Division,  Website, accessed 22/12/15

“The Mighty Eighth”, Roger Freeman, Arms and Armour, 1986.

2nd Lieutenant John C. Morgan – Medal Of Honour

On July 26th 1943, a dramatic and heroic act enabled not only the safe return of a badly damaged B-17, but also the majority of its crew, who no doubt, would have otherwise perished or at best, be captured and incarcerated. For his actions that day, the co-pilot, John C. Morgan Flight Officer (later 2nd Lt.) was awarded the highest military honour a US serviceman can receive – the Medal of Honour.

Born on August 24th, 1914 in Vernon, Wilbarger County, Texas, Morgan was the son of an attorney and the oldest of four children. At the age of 17 he graduated from Military school, going on to attend a number of further establishments including: the Amarillo College, the New Mexico Military Institute, a teacher college and a university, both in his home state Texas.  In 1934 he learned to fly, a passion that would shape his future.

john morgan page

Lieutenant John C “Red” Morgan of the 482nd Bomb Group with a B-17 Flying Fortress. (IWM FRE 2007)

After leaving education early , Morgan moved to Fiji where he worked on a plantation growing pineapples, staying there for four years until 1938. Still wanting to fly, he returned to the United States aboard the liner S.S.Monterey, where upon he tried to enlist in the US Army Air Corps. However, the Air Corps considered his education to be too poor, and so he was refused entry. With little alternative, Morgan sought employment in the booming Texas oil fields instead. A vast desert of oil pumps, Texas’ rich oil fields had begun what became known as the ‘Usher age’ – the start of the great period of oil.

In December 1939, Morgan married Margaret Maples in Oklahoma City, sadly though, the marriage would last just seventeen months. The cause of the demise of the union is not known, but it was whilst working in the oil fields that Morgan sustained a broken neck, an industrial accident that would potentially end all future prospects of work.

With his opportunities now restricted, in 1940, he attempted to join the US Army, and unsurprisingly was classified as medically unqualified for military service (graded ‘4-F’). Undeterred though, Morgan then tried an alternative route, enlisting in the Royal Canadian Air Force (RCAF) on August 4th, 1941. Somehow, Morgan manged to pass his medical gaining his place within the armed forces of Canada. Training at Saskatchewan and Ontario, he soon transferred to England and the instructor training site RAF Church Lawford. Following a spell  with the RAF, Morgan was awarded the rank of Flight Officer, a status he took with him on his transfer in March 1943 to the fledgling USAAF.

His initial posting would be flying in B-17s with the 92nd Bomb Group’s 326th Bomb Squadron, based at RAF Alconbury. The 92nd had only been activated a year earlier initially flying anti-submarine operations off the US coast. After moving to England in July\August, they carried out minor operations before taking on the training of replacement bomber crews. Major operations for the 92nd didn’t begin in earnest until the May 1943.

On his fifth mission, two months later, on July 26th 1943, John C. Morgan (s/n: O-2044877) would be co-pilot in B-17F #42-29802  “Ruthie II“. The aircraft, one of nineteen from the 92nd, was one of sixty from the 1st Bombardment Wing heading for the tyre plant at Hanover, when a canon shell ripped through the windscreen splitting the pilots head. The B-17 also suffered damage, the oxygen system to the tail, radio and waist gun positions was now inoperable. In the relentless attack that followed, the top turret gunner lost the use of both of his arms, one being completely shot off, as well as major injuries to his side; the intercom system was put out of action and several crew members had lost consciousness due to the lack of Oxygen.

Luftwaffe aircraft repeated their attacks, causing extensive injury and further damage to the B-17. The navigator, Keith Koske, tried in vain to assist the stricken top turret gunner, but in desperation, attached his parachute and pushed him out of the aircraft. Thankfully it worked, the gunner somehow survived the descent and was cared for by German surgeons until being repatriated n 1944.

Morgan meanwhile grappled with the severely wounded pilot, 1st Lt. Robert Campbell, who had by now wrapped his arms around the controls, to try and maintain level flight. Morgan, taking control, decided the protection of the formation was better than heading for home alone, and so for the next two hours he flew on holding the pilot back with one hand whilst steering with the other. Eventually, after completing the bomb run, the navigator came forward and gave assistance allowing the aircraft to reach the safety of England and RAF Foulsham. Sadly, 1st Lt. Robert Campbell died from his terrible injuries shortly after the severely damaged B-17 landed at Foulsham .

For his actions that day, Morgan received the Medal of Honour in the following December. The ceremony was presided over by Lt. General Ira C. Eaker. Morgan’s citation read*1:

The President of the United States of America, in the name of Congress, takes pleasure in presenting the Medal of Honor to Second Lieutenant (Air Corps) John Cary “Red” Morgan (ASN: 0-2044877), United States Army Air Forces, for conspicuous gallantry and intrepidity above and beyond the call of duty, while serving with the 326th Bombardment Squadron, 92d Bombardment Group (H), Eighth Air Force, participating on a bombing mission over enemy-occupied continental Europe, 28 July 1943. Prior to reaching the German coast on the way to the target, the B-17 airplane in which 2d Lt. Morgan was serving as copilot was attacked by a large force of enemy fighters, during which the oxygen system to the tail, waist, and radio gun positions was knocked out. A frontal attack placed a cannon shell through the windshield, totally shattering it, and the pilot’s skull was split open by a .303-caliber shell, leaving him in a crazed condition. The pilot fell over the steering wheel, tightly clamping his arms around it. Second Lt. Morgan at once grasped the controls from his side and, by sheer strength, pulled the airplane back into formation despite the frantic struggles of the semiconscious pilot. The interphone had been destroyed, rendering it impossible to call for help. At this time the top turret gunner fell to the floor and down through the hatch with his arms shot off at the shoulder and a gaping wound in his side. The waist, tail, and radio gunners had lost consciousness from lack of oxygen and, hearing no fire from their guns, the copilot believed they had bailed out. The wounded pilot still offered desperate resistance in his crazed attempts to fly the airplane. There remained the prospect of flying to and over the target and back to a friendly base wholly unassisted. In the face of this desperate situation, 2d Lt. Morgan made his decision to continue the flight and protect any members of the crew who might still be in the ship and for two hours he flew in formation with one hand at the controls and the other holding off the struggling pilot before the navigator entered the steering compartment and relieved the situation. The miraculous and heroic performance of 2d Lt. Morgan on this occasion resulted in the successful completion of a vital bombing mission and the safe return of his airplane and crew.”

(Whilst his citation notes July 28th as the day of Morgan’s action, the Hanover raid actually took place on July 26th and the citation is an error.)

Morgan receives the MOH from Lt. General Ira C. Eaker (IWM UPL 29867)

Morgan then returned to duty, undertaking further operations in a bomber over occupied Europe.

On March 6th 1944, Morgan would once again find himself in the thick of a heavy and prolonged battle over Germany. Flying withing a formation of 262 1st Bomb Division aircraft, it would prove to be another decisive day.

Morgan’s B-17. #42-3491 ‘Chopstick’, was flying with the 812nd BS, 482nd BG from Alconbury, when the aircraft was hit by flak over Berlin. The aircraft, which had been fitted with H2X , caught fire and exploded. Only four crew members were able to escape the fireball, Morgan amongst them. Once on the ground, their safety was by no means ensured, and very soon all four were captured by German ground forces. Morgan himself was incarcerated in Stalag Luft I for the next fourteen months. The remainder of the crew on board all perished.

For his actions and continued dedication to the Air Force, Morgan was rewarded with a promotion to the rank of 2nd Lieutenant, a move that occurred  in September 1944.

It is believed that this event made Morgan (who was now on his twentieth-sixth mission) the only known Medal of Honour recipient, to have been captured after receiving the Medal.

@IWM UPL 29865

#42-3491 ‘Chopstick‘ with Morgan on board. This plane is one of the original twelve H2X radar equipped pathfinders. Hit by 88mm flack near Berlin on 6th March 1944, the No.3 engine caught fire setting fire to the wing, causing the aircraft to explode and crash near Lake Havel, Berlin.  The plane was the lead bomber and Colonel Russell Alger Wilson, Commander of the 4th Bomb Wing, was onboard as Combat Leader. Wilson was one of the those killed in the explosion. (@IWM UPL 29865).

After the war Morgan remained in the new reformed air force, the USAF, serving in Korea until his retirement as a Lieutenant Colonel in 1953.

On January 17th, 1991 Morgan passed away, being was laid to rest at Arlington National Cemetery in Virginia, Section 59; Site 351.

The incredible story of Morgan’s bravery would form a part of the story line in the book and movie “Twelve O’Clock High”, when at the beginning, Lt. Jesse Bishop’s B-17 belly lands with a badly injured crew. (08:00 – 14:05).

Sources and further reading.

*1 The Congregational Medal of Honour website.

92nd BG website

B-17 Bomber Flying Fortress – The Queen Of The Skies website

Arlington National Cemetery website

RAF Foulsham – A Leader in Electronic Warfare. (Part 5)

Part 4 revealed how FIDO proved to be a valuable asset to Foulsham. A new model of aircraft arrived along with its US crews and the war entered its final year. Now, as the war draws to a close, the future looks uncertain.

FIDO’s record at Foulsham was, like many other airfields, a great success. Only on the night of 23rd February 1945 did fatalities occur whilst using the system. With several aircraft on ops that night, fog again prevented many from returning to their own bases, and a Mosquito from 239 Sqn based at nearby RAF West Raynham, attempted a landing without permission. FIDO had just been lit but some of the pipes had burst adding smoke to the fog that had by now risen to 50 feet above the runway. The pilot, 23 year old Flt.Sgt. Leonard Twigg attempted to land Mosquito NF.30 ‘NT354’ only to miss the runway and land some 70 feet to one side, colliding with a Halifax of 192 Squadron parked at its dispersal. The pilot was killed in the incident but the navigator (Flt Sgt. Turner) managed to escape with injuries. As a result only one other aircraft, a Halifax, landed that night, the others being diverted to alternative airfields.

Two other 192 Halifaxes were lost that night, both being shot down over Germany with the loss of almost all sixteen crewmen – the only three survivors being taken prisoner. Both Halifax MK. IIIs ‘DT-T’ and ‘DT-O’ carried British, Australian and other commonwealth crews.

But the events of the 23rd February would pale into insignificance on the next night- the worst on record for the Australian 462 Sqn. Considered ‘minor operations’, they were tasked with dropping window, flying ahead of seventy-four training aircraft who were acting as a diversionary raid over northern France. Four of the squadron’s aircraft were lost that night, with the loss of twenty-six of the thirty-one lives. A further 100 group aircraft, a B-17 from RAF Oulton was also lost that night, these five accounting for the bulk of the losses of that one operation.

The late spring of April 1945 produced further poor weather, and FIDO was brought into action once more (possibly for the last time) on the night of 18th/19th. The use of FIDO that night allowed some thirteen aircraft to successfully land, providing a safe landing for crews who were no doubt by now, looking to the war’s end and a apprehensive return to peacetime,.

By August 1945 the war in Europe was over and squadrons were already beginning to disband. The FIDO system was drained and dismantled after providing a safe take-off or landing for a considerable number of aircraft. For 462 Sqn, the 24th September 1945 signified the end of its road. Eleven months after its reformation at Driffield, it ceased to exist, being removed from RAF inventory for good. Its demise also signified the coming of the end of flying operations at Foulsham and ultimately its closure.

In June 1946 the airfield was closed to all flying duties, whereupon it became the final resting ground for a large number of Mosquitoes prior to scrapping. Foulsham then remained ‘in-service’ until the mid 1950s, with a US Army Special Signals Unit, until the MOD deemed the site surplus to requirements. It was then sold off in the 1980s and its doors closed for the last and final time.

RAF Foulsham

A former workshop nestled between two refurbished T2s.

Foulsham, like many of its counterparts in this region played a major part in the electronic war, monitoring and jamming radar transmissions for larger formations of bombers. Despite this important and ground breaking role, Foulsham had only a short operational existence.

Many of Foulsham’s buildings have surprisingly withstood the test of time. Whilst the runways have all but gone, now farm tracks and tree lines, some of the buildings do still remain and even from the roadside, you can see what must have been a remarkable place during its short, but hectic life. The road passes along the eastern side of the airfield, here, you can still see a number of the original T2 hangars, three in total, now utilised by a local potato business. (‘Addison Farm’ as it is aptly named, is in recognition of Air Vice Marshall Edward Barker Addison, the only person to Command 100 Group*2 during the war). Whilst two of these hangars have been re-clad, the third is still in its original metal. Hidden amongst these structures, are some of the original technical buildings, again some refurbished, some original. The mass concrete bases signify the manoeuvring areas linking this area to the main section of the airfield to the west.

At this point, there was until recently, gates separating the dispersal area to the east (now farm dwellings) to the hangar area on your left. During the War, this road was surprisingly open to the public and aircraft would be manoeuvred across the road, traffic being halted by an RAF Policeman.

Further to the north, beyond this area passing an air raid shelter, is the original entrance and further technical area. A pill-box, marks where the main entrance was. Turn left here and follow the road west. To your right you pass the original Fire Tender shed, a B1 hangar and other minor buildings in varying states of disrepair. To your left, a further T2, partially refurbished partially original. Further along, the road crosses the original N/S runway, full width remnants to the right and a tree-lined track to the left mark clearly where the enormous concrete structure was laid. The road ahead, is the where the 08/26 runway ran as it disappears over the brow of the hill. The road then turns away north leaving the runway and airfield behind you.

As with all airfields, the accommodation blocks and bomb stores were scattered well away from the main airfield. With some searching, evidence of these may be found amongst the hedges and trees, public roads utilising the concrete sections of RAF road laid down originally.

Whilst the main layout of Foulsham is difficult to see from the road, the last remaining buildings have fared quite well and remain some of the better examples of original wartime architecture. There is a distinct ‘feel’ to the site that transforms you back in time to the days when heavy bombers and lighter twin-engined aircraft would rumble along its runways. Recent and ongoing development work by the farmer seems to be sympathetic and ‘in tune’ with the site, many buildings being reclaimed from nature and now ‘on show’ to the passing public. Whilst all are on private land, they are easily seen and it seems that there may be a winning formula here that other land owners could quite easily follow and preserve what is left of our disappearing heritage.

RAF Foulsham

The remains of the 08/26 runway.

In the nearby village of Foulsham, beneath the village sign, stands a memorial to the crews and personnel who once served at RAF Foulsham.

The entire story of Foulsham can be seen in Trail 22.

Sources and Further Reading (Foulsham)

*1 Williams, G. “Flying through Fire – FIDO the Fogbuster of World War Two“. Alan Sutton Publishing, 1995.

*2 There is a 100 Group Association that keeps the memories of 100 group alive.  A number of Veterans from the group meet for reunions, coming from all over the world.

*3 The Congregational Medal of Honour Website.

*4 Bowman, M., “100 Group (Bomber Support)” 2006, Pen and Sword.

*5 National Archives: AIR 27/782/1

National Archives: AIR 27/1156/59
National Archives: AIR 27/1156/60
National Archives: AIR 27/1456/69
National Archives: AIR 27/1917/17
National Archives: AIR 27/1917/18
National Archives: AIR 27/1156/43

Sweetman. J., “Bomber Crew – Taking on the Reich“, Abacus, 2004

Janine Harrington, secretary for the Association, writes her own books based around 100 Group, read it through her blog.

Janine’s writings are inspired by her mother’s story of her wartime fiance Vic Vinnell of 192 Squadron at Foulsham, who, together with Canadian pilot Jack Fisher, never returned from a secret operation on the night of 26th / 27th November 1944.

The wartime memories project, has a section focusing on RAF Foulsham and people trying to trace crew members who served there. It is worth a look through perhaps you may know someone from there.

RAF Foulsham – A Leader in Electronic Warfare. (Part 4)

In Part 3, we saw the arrival of FIDO at Foulsham, a system yet to be fully tested. As poor weather continues to hamper operations, FIDO eventually comes into its own and proves its worth. A new aircraft arrives with its aircrew, and its an aircraft not commonly seen in UK skies.


On 27th April 1944 seven aircraft, a mix of three Halifaxes, two Mosquitoes and two Wellingtons, were detailed to operations performing ‘special duties’ over the continent. On their return, Mosquito DZ377 ‘DT-L’ landed first. Moments later, Halifax MZ564 ‘DT-X’ came in behind. After what appears to have been an error by the ground control staff, the Halifax landed on-top of the Mosquito without any knowledge of the heavy bomber’s crew. The situation had been made worse, not only by the poor weather, but by the fact that the Halifax appeared to have no working radio and that aircraft navigation lights had been extinguished due to an air raid warning at the airfield.

The accident occurred *4, after the Senior Control Officer had flashed a steady ‘green’ to the Mosquito pilot, who was at the wrong height and (apparently) accepted the light as permission to land. The result being, the two aircraft came in to land simultaneously with near disastrous consequences. However, there were no causalities except for the Senior Flying Control Office being posted and demoted for his misjudgement of the situation.

Meanwhile, the FIDO installation continued, with initial test burns being made in July. This first burn consumed some 16,250 gallons of fuel*1, and although results were positive, it wouldn’t be until the end of the year before the system would be put to the test and its first operational use.

Being such a ‘specialist’ unit, 192 Sqn  operated for a short time in conjunction with a detachment of P-38/F-5 Lightnings of the USAAF. It would appear that there were five aircraft, Lightning 155, 156, 479, 501 and 515, operated by ten aircrew (Lt. Zeilder, Lt. Alley, Lt. Richards, Lt. Stallcup, Flt. Off. Vasser, Lt. Kunze, Capt. Brink, Capt Adams, Capt. Dixon and Lt. Holt) rotating around each one. The P-38 being a single seat fighter had to be modified to a two-seater to take the ‘Special Operator’. The purpose of this detachment was to search over the Zuider Zee in south Holland looking for signals associated with enemy radar controlled missiles – V2s. Often these searches would occur in pairs, but occasionally singular. On October 26th, Lightning 515 piloted by Capt. F. Brink with special operator Lt. F. Kunze, sent a message stating their intention to ditch in the North Sea. Using a position 60 miles off the Norfolk coast, four aircraft, two Mosquitoes and two Halifaxes, were immediately dispatched to search the area, unfortunately no sign of the aircraft was seen nor the crew. An Air-Sea-Rescue launch was also dispatched to the area locating items of wreckage that was later identified as part of a P-38 Lightning. The crew though, were never found.

December 1944 was one of Bomber Commands busiest. On the 9th the poor weather broke sufficiently for operations to take place. Four aircraft were ordered to fly, two Mosquitoes, a Wellington and a Halifax. The Mosquitoes, flew to Germany to monitor and record R/T transmissions; the Wellington monitored Knickebein transmissions thought to be used for Flying Boat activities whilst the Halifax was sent to the Ruhr for a ‘window’ dropping exercise. Unfortunately the Wellington had to return due to the bad weather whilst the Halifax failed to get airborne and crashed beyond the runway.

The aircraft, a Halifax III piloted by  F.O. N. Irvine, had 22 operations under its belt. However, with time up at 18:28, the four engined heavy was unable to get airborne and ran off the end of the runway into an adjacent field. In the accident MZ817 ‘DT-O’, “Pete the Penguin” was badly damaged but thankfully none of the crew were injured and all walked away unhurt.

ROYAL AIR FORCE BOMBER COMMAND, 1942-1945.

Halifax B III, MZ817 ‘DT-O’, “Pete the Penguin” 192 Squadron, after running off the runway, 9th December 1944.  @IWM HU 60601

December was an eventful month for Foulsham. With the continuing bad weather, Bomber Command were having great difficulty getting aircraft back safely. On the night of the 18th/19th, a particularly poor night, the FIDO installation at Foulsham was finally lit and used operationally.

On that night, a large force of Lancasters were ordered to perform four operations to the Polish port of Gdynia on the Baltic coast. Along with the heavy bombers were a number of 100 Group aircraft including those from 192 Sqn based here at Foulsham. Five aircraft were ordered out on ‘Special Duties’, four Halifaxes and a Mosquito, in which ‘Window’ was dropped by three of them over the Rhur, whilst the other two monitored German radio transmissions – one 50 miles west of Stettin and the other over Gdynia.

On return to Foulsham, it was found that the airfield, as were many others in the area, was fogbound, and it had become necessary to light FIDO. The alert went out to all FIDO airfields and at Foulsham the burners were lit just after 02:00 hrs. A lack of experience and waterlogged pipes meant the system was not fully burning until some 25 minutes after the initial lighting, but just in time for the first aircraft ‘S’ Sugar to approach the runway.

The first aircraft to land was Halifax III LW623 piloted by Wing Commander D. W. Donaldson who, even after encountering strong winds caused by the fires, made a safe and successful landing. He is recorded as being the first captain to land such an aircraft at Foulsham.

Following on behind Donaldson was B-17 ‘R’ Roger from nearby RAF Oulton, who like many others, was flying on fumes. The pilot had just one chance and as he approached, he ordered the crew to take up crash positions. With visibility down to some 100 yards, he brought the B-17 in making a relatively good landing in appalling conditions between the rows of flames lining either side of the runway. Two further B-17s landed that night, one on three engines and another who missed the runway and became bogged down in the mud alongside.  By the end of the night after all aircraft had been received, the burners were extinguished and visibility over the airfield diminished  once more.

By the end of December, fifteen aircraft had benefited from the installation of FIDO at Foulsham; a system that had enabled them all to land safely in conditions that would otherwise have necessitated either finding an alternative site or bailing out. A third option was of course available, but the consequences almost final and fatal.

Whilst all this was going on, it was decided to create a new unit at Foulsham to support the electronics group. The Bomber support Development Unit (BSDU) were formed here during the April of 1944. Born out of the Special Duties (Radio) Development unit they would go on to disband at Swanton Morley in 1945 to become the Radio Warfare Establishment. Whilst here at Foulsham though, they would operate both Mosquitoes and Spitfire VBs along with the Tiger Moth and Avro Anson.

A further Halifax unit would grace the skies of Foulsham in the remaining months of the year. Also an electronics unit, 462 (RAAF) Squadron, was brought in to enable full coverage of ECM work as the war drew to its close. A former RAF Driffield unit, the squadron spent most of the last few days of the month transporting equipment to Driffield train station before departing themselves for Foulsham.

The weather over the winter of 1944 – 45 was one of the worst recorded. The Allies had reached the Ardennes where a final desperate counter attack was mounted by the Germans. Embedded in the thick woodland, troops fought both the weather and the enemy whilst much of the air cover was prevented from flying due to the continuing fog and snow.

At Foulsham some operations did occur, and on some occasions FIDO had to be lit to enable aircraft to either take off or land. January saw particularly strong winds, rain and snow, necessitating all personnel being tasked with snow clearing on January 10th. On the 15th, whilst climbing to cruising altitude the starboard outer engine caught fire. The engine was feathered and action taken to remedy the situation. However, a feathered propeller soon began windmilling causing dangerous drag and the fire spread. The bale out order was given but only two members of the crew were able to escape before the wing became detached and the aircraft came crashing to earth in a fireball. The two who escaped (Sgt. G. Sandy and F/Sgt N. Reed) were both injured in their landing, none of the others escaped with their lives.

On another occasion, an American B-24 had difficulty of its own and whilst attempting to land, crashed after over shooting the runway. The aircraft was eventually salvaged after coming to a stop on a local road.

Liberator ‘DC-F’, (s/n 42-95464) of the 577th BS, 392nd BG over ran the runway at Foulsham, 14th February 1945. (IWM FRE 7993)

In Part 5, the final part, Foulsham begins the slow down of activity, the war draws to a close and the future becomes uncertain. Apprehension falls across the airfield as flights begin to reduce and personnel are posted out.

The entire story of Foulsham can be seen in Trail 22.

RAF Foulsham – A Leader in Electronic Warfare. (Part 3)

In Part 2, we reached a milestone in the life of Foulsham as it was on the brink of changing hands once more. As the new Group takes over new challenges are about to be faced, and FIDO, the fog dispersal system is desperately needed to counter the appalling weather.

By the 25th November, the move had been completed, and both 514 and 1678 HCU had now departed the airfield. With Foulsham now empty, it would undergo yet another change of ownership, this time to 100 Group, the specialists in electronic warfare. This change of ownership would, as before, bring another two new units, 192 Sqn and a supporting training unit 1508 (Blind Approach Training) Flight.

100 Group was formed that November as 100 (Special Duties) Group under the Command of Air Commodore E.B. Addison CB, CBE with its headquarters at Radlett in Hertfordshire. The aim of the move was to place all the electronic units under one single command, thus unifying its aim and bringing together all the resources of the thinly spread units. One of the main aims of the Group was to provide ‘spoof’ operations, confusing the ground operators and radar controlled night fighters, thus spreading them over wider areas. This would in turn, it was hoped, reduce the number of casualties from RAF bombers and achieve better bombing results as a consequence.

Other duties of the Group would involve the jamming of radar and radio equipment used by German aircraft and ground stations, monitoring German airways and providing incorrect orders to German crews using native speaking RAF crewmen. The war had become a battle of science.

RAF Foulsham

One of four T2 hangars.

Over November and December, airfields were taken over and aircraft supplied to the new Group. Squadrons were brought in to fill these sites and the Group grew from strength to strength.

A newly registered unit, 192 Sqn (formed a year before at RAF Gransden Lodge)  operating a mix of Wellingtons, Mosquitoes, Halifax IIs and more  recently, their newly acquired Halifax Vs, were transferred over to Foulsham, in one of the first moves to the airfield.

Formed through the renumbering of 1474 (Special Duties) Flight, 192 Sqn had been previously been monitoring the German Ruffian and Knickebein beams. In their new form they would monitor, amongst others, the western approaches to the Bay of Biscay, monitoring and recording night fighter channels.

However, the winter weather was up to its usual tricks, and it played havoc with initial flights. But despite this, within 48 hours of their arrival, 192 Sqn was classed as operational, and a memo to that effect was sent off to Headquarters 3 Group Bomber Command.

With no flying over the next three days due to the continuing bad weather, initial flights were able to begin on the 29th November, with three aircraft, all Wellingtons, performing Special Duties Flights over the Bay of Biscay. After landing at Davidstow Moor for refuelling, there was a major electrical fault at the airfield and the entire flare path and flying control facilities were put out of action. As a result, the three Wellingtons were grounded and unable to continue their flight home.

The weather continued to play havoc for the crews at Foulsham. A flight planned for a Mosquito and two Wellingtons on the 1st December had to be postponed and then finally cancelled. The next day, 2nd December 1943, three aircraft were ordered to fly to the Frisian Islands and the Dutch coast, but one had to return due to the pilot’s escape hatch blowing off, and a second overshot the runway on take off becoming bogged down in the mud. The aircraft was damaged but the crew were unhurt in the incident.

On December 7th, Foulsham officially became part of 100 Group and another unit No. 1473 (Radio Counter Measures) Flight also arrived here to assist with the ELINT (Electronic Intelligence) operations. By February 1944, it was decided to merge the Flight with 192 thus forming a ‘C’ Flight. With additional Mosquitoes and Ansons – the hardware inventory at Foulsham was now growing rapidly.

Much of December suffered the same fate as its preceding months however, poor weather rendering flying unsuitable, leaving many aircraft and their crews grounded for prolonged periods of time.

100 Group’s inaugural operation on the night of 16th / 17th December, did not however, go in their favour. On what has become known as ‘Black Thursday’ the RAF bomber force of over 480 aircraft, took heavy losses. These losses whilst high over occupied territory, were made far worse by poor weather which claimed some eight aircraft from 97 Squadron at RAF Bourn – one sixth of its strength,

The beginning of the new year, 1944, saw big changes not only in Bomber Command, but at Foulsham also. As the second phase of the ‘Battle of Berlin’ began, Stirling squadrons and now Halifax units were being pulled out of the front line bombing campaign; their shortcomings becoming all to obvious as losses in the types began to mount. The poor weather continued to cause misery across Britain’s airfields, rain and fog preventing large  continuous attacks on the German heartland.

The interminable fog was the driving force behind the new FIDO system now being installed at Foulsham. Bomber command had initially asked for eight airfields across the UK, but by the end of 1943 they were seeking twelve, and Foulsham (designated Station XXI) was identified as one suitable.

William Press were given the contract to install the system, and by mid February work had begun. Supplying the huge storage tanks was going to be a challenge though, and so a new siding was constructed at nearby Foulsham railway station. Its not known for sure whether the fuel was then piped the two mile distance to the airfield, or brought across in tankers, but whichever it was, it required a good deal of extra work.

At the airfield site, three storage tanks were assembled on Land at Low Farm, located at the northern end of the main runway. The much needed pump house and control point were also located here. Operators were kept on a 24 hr watch system, being billeted near to the equipment in two Nissen huts, one for officers and the other for ‘other ranks’.

RAF Foulsham

One of the air raid shelters used around wartime airfields.

Initial plans were for a mile of runway to be lined with the Haigill MK IV burners, with intersecting burners placed in trenches across the two intersecting runways. The placing of these burners, well out of the way of moving aircraft, initially being a difficult challenge to overcome.

Operating the burners was a tedious and dangerous job. After opening the valves and allowing petrol to fill a pool through which the operator had to walk, a match was thrown into the pool and the poor ‘Erk’ had to then run as fast as he could and throw himself into a small indentation in the ground hoping the flames would pass over and not ignite the clothes he was wearing. Once the burn had been achieved and all aircraft were down safely, the system was shut down and allowed to cool. Once the pipes were cool enough to touch, some 72,000 holes along the length of the pipes adjoining the runway had to be cleaned out to prevent a build up of soot. It was perhaps, one of the most tedious but vital jobs, RAF personnel had to perform.

Before the system could be fully tested though, a bizarre accident happened that resulted in no crew injuries, but two badly damaged aircraft and a Senior Flying Control Officer being posted and demoted.

In the next part (4) Foulsham’s  appalling weather accounts for a bizarre accident. The arrival of a new and relatively unique aircraft brings excitement to the site and FIDO really comes into its own.

The entire story of Foulsham can be seen in Trail 22.

RAF Foulsham – A Leader in Electronic Warfare. (Part 2)

In part 1 we saw how Foulsham began its life and how early squadrons suffered with bad weather and malfunctioning guns. In Part 2, we continue our journey and find out how an American pilot, who crash landed at Foulsham was awarded the Medal of honour.

On that particular day, the aircraft, “Ruthie II“, was in a mass formation heading for Hanover, when a canon shell ripped through the windscreen splitting the pilots head. In addition to this, the oxygen system to the tail, waist, and radio positions was  also inoperable, the top turret gunner had lost both arms and had major injuries to his side; the intercom system was out of action and several crew members had lost consciousness due to the lack of Oxygen.

Morgan grappled with the severely wounded pilot, who had wrapped his arms round the controls, to try and maintain level flight. Morgan decided the protection of the formation was better than heading for home alone, and so for the next two hours he flew in formation holding the pilot back with one hand whilst steering with the other. Eventually the navigator came forward and gave assistance allowing the aircraft to reach the safety of England and Foulsham.

For his actions, Morgan, of Vernon, Wilbarger County, Texas, received the Medal of Honour the following December in a ceremony presided over by Lt. General Ira C. Eaker. The story of Morgan’s bravery would form a part of the story line in the book and movie “Twelve O’Clock High”.*3

The posting of 98 and 180 Squadrons in August 1943 was no coincidence, as the airfield saw further development and new hangars added. These hangars were erected at various locations around the airfield site, ready to accommodate the forty or so Horsa gliders that would soon arrive here escorted by 12 Heavy Glider Maintenance Section. Their arrival marking the beginning of the  preparations for the invasion of Normandy the following year.

A few days later, on September 1st, 1943, the handover of Foulsham took place and 3 Group became the new owners in a move that also signified the forming of 514 Squadron with Lancaster IIs, the less common radial engined version of this famous Avro aircraft.

514 Sqn was initially headed by Acting Wing Commander A.J. Samson D.F.C., although the first to arrive at the airfield was the squadron adjutant. On first inspection, he and his small party found that the office blocks had been completely stripped of all their furniture, even shelving had annoyingly been removed from walls. As a result the offices were virtually unusable, and so a huge clean up operation began in readiness for the ground and air crews who were to shortly follow.

RAF Foulsham

One of the original T2 hangars.

Accommodation sites 2 and 5 were quickly allocated to the squadron for personnel use, and as soon as equipment began arriving, on a rainy and very wet September day, everyone was drafted in to unload and store the various much needed supplies.

To provide flying personnel for the new squadron, a support unit would also be formed at the airfield, that of 1678 Heavy Conversion Unit. The formation of this unit was achieved through the renumbering of the Flight of the same designation, a changeover that took place a month later, on October 16th 1943. The role of this unit was to convert experienced bomber crews over to the new Lancaster.

In the interim period, the new aircraft began to arrive. The first Lancaster ‘DS735’ touching down on 11th September, 1943, followed by three more (DS785, 783 and 784) over the next three days. Their arrival was met not with pomp and ceremony though, but by heavy showers and thunderstorms, the weather that had dogged earlier squadrons continued to play its terrible part in life at Foulsham. Over the next few weeks, aircraft were quickly modified and air-tested ready for flying, by the end of the month, eighteen Lancasters had been flown in and virtually all the crews had arrived ready for converting to the new type.

Over the next month, and although the weather yet again played havoc with flights, cross-countries and air tests were carried out with a high level of success. However, no one could control the weather, and the first planned operational sortie had to be cancelled due to extensive fog that blanketed the Norfolk countryside. Not until November 6th did a break allow any operational flying to take place, and that break allowed two small flights to get airborne.

A mining operation undertaken by four aircraft along with a bombing mission in which only two aircraft got off the ground, were the squadrons break into operational flying; not a major mission, but one that nevertheless broke the ice.

With the poor weather continuing, several more ‘ops’ were again cancelled allowing only the occasional ‘Bulls-eye’ or morning flight to get away. Whilst it must have been frustrating for crews, this did allow them to finally put into practice all the training they had undertaken so far.

Then on the 14th November 1943, news came through from above that 3 Group was being reorganised and that 514 Sqn would be moving from Foulsham to RAF Waterbeach in Cambridgeshire as a result. The move, expected to be completed by the 23rd, would coincide with the first operation to Berlin, a move that also signified the first phase of the ‘Battle of Berlin’. This would also be the first time a 514 Sqn aircraft (DS784 ‘JI-C’) would not return from operations; the loss being a blow to the squadron. Of the seven-man crew, one would be taken prisoner (F/S. B. Haines (RAAF)) whilst a further (Sgt. H. Lucas) would evade capture,  successfully hiding out in Brussels until its liberation in 1944. The remaining five crewmen however, all perished in the aircraft’s crash.

In Part 3, Foulsham passes to new ownership and its life in electronic warfare begins. The new Group will bring new challenges, new aircraft and the installation of FIDO, the Fog dispersal system.

The entire story of Foulsham can be seen in Trail 22.