Loss of Wellington Z1327 – 17th February 1942

On February 17th 1942 a cross-country training flight was planned in which the crew of No. 460 Squadron RAF would fly from their base at RAF Breighton in the East Riding of Yorkshire, to Peterborough, Harwell, Pershore, Sywell and then back to Breighton.

At 19:20 the Wellington MK.IV ‘Z1327’ (listed in the operational record books as V1327) took off. On board were a crew consisting of all Sergeants: Sgt. James Henry Ware  (RAAF) (s/n: 402897), Sgt. Robert Litchfield Tresidder (RAAF) (s/n: 402894), Sgt. William Leonard Ashplant (RAFVR) (s/n: 1170676), Sgt. Cyril Caradoe Davies (RAFVR) (s/n: 1052270), Sgt. Frederick Dutton (RAFVR) (s/n: 1006728) – the youngest member – and Sgt. Cyril Raymond Dickeson (RAFVR) (s/n: 1292128), a mix of pilots, wireless operators, observers and Air Gunners.

The initial part of the flight went according to plan and contact was made between the ground Station at RAF Holme-upon-Spalding Moor at 22:22 hours moments before the aircraft crashed into a hillside killing all on board. In the fire that followed the crash as Farnley Tyas near to Huddersfield, the Vickers Wellington was also destroyed being written off charge shortly after. It is thought that the aircraft was off course by almost 40 miles and may have been looking for landmarks, when it hit the roof of a cottage  sending it crashing into the hillside.

This was the first 460 Sqn fatality since the squadron was formed in the previous November. Four of the crew remain buried together at All Saint’s Church, on the hill overlooking the village of Holme-upon-Spalding Moor.

All Saint's Church

Sgt. C.R. Dickeson (RAFVR)

All Saint's Church

Sgt. W.L. Ashplant (RAFVR)

All Saint's Church

Sgt. R. L. Tresidder (RAAF)

All Saint's Church

Sgt. J. H. Ware  (RAAF)

Sources:

AIR 27/1907/1 National Archives.

The 446th BG (H), “The Bungay Buckaroos” Part 1

In Trail 14 we visit an airfield that was built in the mid part of the war and one that took some time to establish itself as a front line bomber station. However, it is one that would have its own share of problems, heroic acts, records and sacrifice.  In the second part of this trip, we visit the former airfield RAF Bungay.

RAF Bungay (Flixton) (USAAF Station 125)

Bungay airfield lies in Suffolk, above an area known as the Waveney Valley, about two miles from the village from which it takes its name and fifteen miles from Norfolk’s county town of Norwich. It served under a variety of names: HMS Europa II,  RAF Flixton,  RNAS Bungay and USAAF Station 125. However, throughout its short life, it remained primarily under the control of the United States Army Air Force as a heavy bomber station designated Station 125.

Construction began in 1942, by Kirk & Kirk Ltd, but the work would not be completed for at least another two years until the spring of 1944. Even though the site was unfinished, the first units to be stationed here, would be so in the autumn of that same year, 1942.  Initially designated as a satellite for the heavy bombers of RAF Hardwick, it would be some time before Bungay would establish itself as a fully operational front line airfield.

With the invasion of North Africa dominating the European theatre, a build up of military might would see many of Britain’s airfields taken over and utilised for both men and machinery. A part of this build up was the arrival of the twin-engined units the: 47th, 310th, 319th and 320th BGs operating the North American B-25 Mitchell. The 310th BG initially arrived at RAF Hardwick, over September and into October, where they would continue their flying training before departing for North Africa. The 310th consisted of the usual four Bomb Squadrons: 379th, 380th, 381st and 428th BS, and it was whilst training at Hardwick that one of these squadrons, the 428th, would move across to Bungay. Their arrival here was no more than as a dispersed site, allowing for free movement of aircraft in the busy skies over this part of East Anglia. At the end of their short stay, they would rejoin the main Group and depart for the warmer climates of North Africa.

The next group to arrive was something considerably bigger but also posted from nearby RAF Hardwick, the 329th BS of the 93rd BG with their B24 Liberators. Known affectionately as ‘Ted’s Travelling Circus‘ (after the CO, Colonel Ted Timberlake), the 93rd BG earned their unique name as a result of their constant moving around, continuously being spread across, what must have seemed, the entire European and Mediterranean theatres of war. Often split between the two, rarely were the Group ever together for any length of time.

During this period UK-based units of the 93rd at Hardwick began transferring to the 2nd Bombardment Wing, where they began training for ‘special duties’. Gaps in the 329th BS were filled with crews from the other 3 squadrons of the Group (328th, 330th, 409th) and were moved here to Bungay. Once here, the aircraft were fitted with the British ‘Gee‘ system and crews trained in its use. A remarkably accurate system of radio navigation, it was devised initially by Robert Dippy as a short-range aid for blind landings, but its success encouraged its development for a much greater use by the  Telecommunications Research Establishment (TRE) at Swanage.

RAF Bungay (Flixton)

The remains of Bungay’s NE-SW runway looking north-east.

Bungay was Initially planned to equip the 44th BG, but the 329th were chosen over them and within a very short time the crews were ready, and ‘Moling’ mission could now begin. Designed as a ‘blind bombing’ utility, and because of fears of the system falling into enemy hands, heavy cloud cover was needed for operations to go ahead. Such conditions occurred early in 1943, on January 2nd, when four B-24s of the 329th set off from Bungay for the Ruhr. Unfortunately, as they neared the target, the cloud cover broke and the flight was exposed. This exposure prevented Gee from being used as it was intended, and the aircraft returned both without bombing and without using their Gee successfully. The weather again proved to be the Achilles heel in the planning on both the 11th and 13th January, when similar conditions were experienced and again all aircraft returned without bombing. These erratic weather conditions carried on well into March, the last attempt being made on the 28th, after which it was decided to abandon the idea, and ‘Moling’ operations were cancelled.

It was not a complete disaster for the 329th though, the experience of flying over occupied territory and using blind bombing equipment, meant they were able to transfer to a new Pathfinder role, now skilled in equipment not known about in other units of the USAAF.

At the end of these trials, and in the absence of her sister squadrons, the 329th joined up with the 44th BG in a move that led to their imminent departure from Bungay.

Following their departure, the work on Bungay’s construction continued. Built to Class A specifications, it would have three concrete, tarmac and wood chip runways intersecting to form the ‘A’ frame. Thirty-six frying pan and fourteen spectacle hardstands provided dispersed aircraft accommodation and two T2 hangars provided covered space for maintenance and repairs. The main technical area lay to the west of the airfield, the bomb store to the east and the main administration site (site 2) across the road to the west. As a dispersed site, many of its accommodation areas would be hidden amongst the trees beyond here. Linked by a maze of footpaths and small roadways, there were two communal sites (sites 3 and 4), seven officer and other ranks sites, a WAAF site, a sewage works and a sick quarters. In all it could accommodate around 3,000 men and women of mixed rank. Updating of the watch office included the addition of a Uni Seco control room (5966/43) by anchoring it to the roof of the already built observation room. By late autumn 1943, it was completed and the site was handed over to the 446th BG (H), Bungay’s most prominent resident, who would become known as  “The Bungay Buckaroos”.

Their arrival here commenced on 4th November 1943, with four squadrons of B-24s – the 704th, 705th, 706th and 707th – all of which formed the larger 20th Combat Wing of the Second Bombardment Division, Eighth Air Force. The remainder of this wing included those of Hardwick’s 93rd BG and Seething’s 448th BG.

The 446th’s journey took the ground echelons from Arizona, to Colorado and onto Bungay via the Queen Mary,  and the air echelons the southern air route via Brazil and Marrakesh. Under the command of Colonel Jacob J. Brogger, they would begin operations on the 16th December 1943. Throughout their term here the 446th would attack prestige targets including: U-boat installations, Bremen’s port, the chemical plants at Ludwigshafen, Berlin’s ball-bearing plants, the aero-engine works in Munich and the marshalling yards at Coblenz. In addition to these, the 446th would support the Normandy invasion, the break out at St.Lo, and drop supplies to the ground forces at both Nijmegen and in the snowy conditions of the Ardennes.

This remarkable list of strategic targets would begin with Bremen. The mission would see twenty-three heavy bomber groups along with a Pathfinder group drop over four thousand 500lb general purpose bombs and over ten thousand 100lb incendiary bombs. During the raid four B-17s would collide in mid-air and as for the 446th, they would not escape without loss. Two of their aircraft would crash, one of which, a Ford built B-24H-1-FO Liberator #42-7539, “Ye Old Thunder Mug“, would run out of fuel and crash near to its home airfield at Bungay.

The 446th would unusually send just one aircraft to Bremen four days later. This aircraft, a 704th BS Liberator, #42-7494 “Bumps Away” was hit by flak over Texel, one of the Dutch Wadden Islands. The strike sheered the tail turret sending the aircraft momentarily out of control. After the pilot (Second Lieutenant Thomas B. Long) stabilised the aircraft, it went on to complete its mission only to collide with another B-24 of the 392nd BG on its return journey. The collision sent the Liberator crashing into the North Sea killing all those on board*1.

Then on the 22nd, the 446th were sent back to Germany, this time Osnabruk. On this mission, B-24 #42-7611, another 704th BS Liberator thought to be ‘Silver Dollar‘, was hit by falling bombs from above. The aircraft fell from the sky killing eight of the crew with another two surviving, both being taken prisoner by the Germans. On board this aircraft was right waist Gunner Sergeant Walter B. Scurlock who had survived the crash landing in “Ye Old Thunder Mug” earlier that month on the 16th. It had been a difficult start for both Sgt. Scurlock and the 446th.

A B-24 of the 446th BG lands at a cold and frosty Bungay 24/12/44 (IWM FRE 6571)

January 1944 then took the men of the 446th to Kiel, but the cold and icy winter would be as much of an enemy to the group as the occupying German forces were a short distance across the sea. With several missions being curtailed during the month, those that did take place were prone to their own problems. On the 7th, the Bomb Group was unable to rendezvous with the 392nd and returned without bombing; on the 11th, the mission to Brunswick was recalled, again due to the bad weather. Following a Noball mission to St. Pierre-des-Jonquies on the 14th, the group were grounded for a week after yet more bad weather closed in. The continuing poor conditions prevented further immediate attacks,  but the 28th would see the weather ease and the start of four days of consecutive flights to Frankfurt, Brunswick and two further Noball targets.

February, March and April were much more conducive to flying activities but the weather still played its part in cancelled or aborted operations. As the lead up to D-Day began, breaks in the weather allowed for strategic targets to be hit, airfields and marshalling yards, along with yet more Noball targets.

April 22nd 1944 saw the USAAF’s Mission 311, a mission that would become notorious in the history of the Eighth Air Force. On this day, the Eighth would lose more aircraft to enemy infiltrators than at any other time in its wartime history. The mission was to attack the  marshalling yards at Hamm, which was considered a highly important strategic communications target, especially in the lead up to the allied invasion of Normandy. Hamm was especially chosen as it was said to be capable of dealing with up to 10,000 railways wagons a day, making it the busiest marshalling yard in Germany, and a prime target for the heavy bombers of the Allied forces.

On that particular day, over 800 bombers, a mix of B-17s and B-24s, were ordered to attack in three waves, each with its own designated target. The bombers were to take off from their respective bases between 17:50 and 18:21, but even before the stream arrived over the target, Bungay would bear witness to what was about to happen that night.

In part two we shall see what happened on the night of April 22nd and how Bungay developed during the closing stages of the war and beyond.

RAF Holme – From Bomber base to Fighter Development (P2)

After part 1, we continue at Holme-on-Spalding Moor. Holme has recently changed hands owing to the reorganisation of Bomber Command boundaries. 101 Squadron had departed and now 78 Sqn were moving in.

76 Sqn had been through a number of disbandments and reforms since its original inception in 1916.  Being reformed in 1941, it arrived here at Holme-on-Spalding Moor from Linton-on-Ouse, another Yorkshire base. It was truly a multi-national squadron, made up of Polish, Norwegian, New Zealand and Canadian crews.

76 Sqn would see the war out at Holme, progressing through a series of Halifax upgrades, from the Mk.V, to the better performing MK.III and onto the MK.VI, a model they used in the final operations on 25th April 1945.

Shortly after arriving at Holme, 76 Sqn would suffer their first loss, with the downing of Halifax MP-Q #DK224, on the night of 22nd/23rd June 1943. On board this aircraft was Group Captain D. Wilson (RAAF) their station commander.  Of the eight men on board all but one (Sgt. R. Huke’s, parachute failed to open after he had baled out of the aircraft) survived, seeing the war out as POWs. Whilst the crew survived, albeit in captivity, it was none the less a blow to the station losing such a prestigious officer. The mission to Mulhelm saw 557 aircraft of mixed types attack and destroy 64% of the town including road and rail links out of the city, virtually cutting it off from the outside world. Whilst a heavy loss for those on the ground, it also suffered the loss of thirty-five aircraft, 6.3% of the force, a figure well above the ‘acceptable’ limit of Bomber Command losses.

File:Royal Air Force Bomber Command, 1942-1945. CE91.jpg

Halifax B Mk.II, DK148 ‘MP-G’ “Johnnie the Wolf”, of No. 76 Squadron RAF rests at Holme-on-Spalding Moor, after crash-landing on return from an operation to Essen on the night of 25th/26th July 1943. The propeller from the damaged port-inner engine flew off shortly after the bombing run, tearing a large hole in the fuselage. The mid-upper gunner immediately baled out, but the pilot, F/L. C. M. Shannon, regained control of the aircraft and managed to bring the rest of the crew back to Holme. © IWM (CE 91).

Perhaps one of the more bizarre accidents to happen at Holme was the death of a car driver who ended up on the runway as aircraft were taking off. On December 7th 1944, Halifax MK.III #NA171 ‘MP-E’ piloted by F/O. W. MacFarlane had begun its take off run when the pilot noticed a car parked on the runway. Unable to stop or divert, he lifted the huge aircraft up over the car, but clipping it as he passed. The occupant of the vehicle was killed but the aircraft carried on relatively unscathed. This same aircraft was brought down later that month over Kola with the loss of all but one of the crew.

For the duration of the war, 76 Sqn would take part in some of the heaviest air battles over Germany: Essen, Koln, Hamburg, Nurnberg and Berlin, in which losses were sustained in all. By the war’s end, 76 Sqn had been credited with 5,123 operational sorties, in which they had lost 139 aircraft, the highest number of missions by any Halifax squadron.

By the end of the war, it was decided that Bomber Command was to be reduced, No. 4 Group would become a transport group, No. 4 (Transport) Group, a change of ownership meant not only a change of role but a change of aircraft too. The Halifaxes were swapped for C-47 Dakotas in May 1945, and three months later the unit transferred from Holme to Broadwell and eventually the Far East.

Other resident units at Holme including No. 1689 (Bomber) Defence Training Flight (15th February 1944 – 7th May 1945) were also disbanded as their services were no longer needed. Many of these training flights had already disbanded by the end of 1944, as the force was being cut back and reduced. The Spitfires, Hurricanes and other assorted aircraft being disposed of in various manners.

RAF Holme on Spalding Moor

One of two turret trainers still on site.

As 76 Sqn left, another Dakota unit moved in to the void left behind, but 512 Sqn, a short-lived squadron, left in the October and eventual disbandment in 1946.

For the next six years Holme-on-Spalding Moor was left in a state of care and maintenance, slowly degrading over that time. At this point Holme’s future took a turn for the better when No. 14 (Advanced) Flying Training School  was reformed in response to an increase in pilot training needs. Reformed along with a small number of other training flights such as 15 Flying Training School, at Wethersfield, they were short-lived units, operating aircraft such as Airspeed Oxfords. No. 14 AFTS disbanded at the end of January 1953 at Holme.

However, the demise of 14 AFTS was to allow the airfield to transfer to the USAF, for deployment of its bombers of the Strategic Air Command (SAC). A move that would require extensive upgrading of the airfield including lengthening of the main runway to 2,000 yards. The USAF moved large amounts of equipment through Holme, while the main airfield at Elvington was also upgraded. The extensive work carried out here though would not to come to anything, and after three years the USAF pulled out leaving Holme empty once more.

RAF Holme on Spalding Moor

The perimeter track bends round the former technical site.

However, it was not the end of Holme, the upgrading work meant that Holme airfield had a good long runway capable of taking the modern fast jets coming on-line. Blackburn Aviation Ltd, who were based not far away at Brough, saw the potential and began to carry out trials of the new Blackburn NA.39 ‘Buccaneer’. A rugged carrier-borne, high-speed, low-level strike aircraft, it went on to serve in both the Royal Navy and the RAF – the prototype (XK486) being first flown at RAE Bedford on 30th April 1958, piloted by Derek Whitehead.

As Brough could not accommodate the Buccaneer, the aircraft were towed on their own wheels, backwards, along the roads around the area. Protected by a Police escort, they were commonly seen in the back streets of Holme being prepared and test flown from the new runway at Holme airfield.

An aviation firm established by Robert Blackburn in 1911, Blackburn Aviation became an established aircraft manufacturer during the interwar and war years, producing models such as the T-4 Cubaroo of which only two were built, the B-2 trainer and the B-24 Skua, the first British aircraft to shoot down an enemy aircraft on 25th September 1939.

Blackburn concentrated on ship-borne aircraft, many, including the early variants, having folding wings. In the Second World War they produced the B46 Firebrand, a successful aircraft, of which they produced just over 200 models of different variants. The Buccaneer was their modern version and proved to be just as successful. In the 1950s they also produced the Beverley, which at the time was the largest transport aeroplane in the world.

Over the next 40 years, the British aircraft industry would go through major changes, big names like Blackburn were amalgamated into Hawker Siddeley Aviation, then British Aerospace and finally the modern BAE Systems.

Bruntingthorpe May 2016 106

AT the former RAF Bruntingthorpe, Buccaneers regularly perform fast taxis along the runway. A sight and sound that once graced Holme-on-Spalding Moor.

The change brought new opportunities for Holme. The development of the American McDonnell Douglas F-4 Phantom allowed for testing at Holme, along with Harriers and Hunters of Hawker Siddeley fame. Trails of the Phantom included taking it to the extremes of its performance envelope, pushing the aircraft through maximum turns at supersonic speeds. Don Headley, Hawker Siddeley’s Chief Test Pilot at Holme, described the tests as “arduous” but “exhilarating nevertheless”.*3

Being a test pilot was a dangerous job, pushing aircraft to unknown limits. Deputy Chief Test Pilot with Blackburn Aircraft, Gartrell R.I. “Sailor” Parker DFC, AFC, DSM had to eject from the first prototype Buccaneer XK486 on 5th October 1960 when it got into difficulty following the artificial horizon breaking whilst in cloud. Both he and his passenger, Dave Nightingale, managed to escape the aircraft without injury. However, he didn’t have such a lucky escape when on 19th February 1963, the aircraft he was testing, Buccaneer XN952, went into an upright spin following a Low Altitude Bombing System (LABS) demonstration over Holme airfield.

In this manoeuvre, the aircraft flys in low enters a climbing loop and then releases the bomb near to the top of the loop, the aircraft completes the loop pulling away before the bomb strikes the target (also called ‘Toss’ or ‘Loft’ Bombing).  During the demonstration there was a loss of control due to a ‘roll-inertia coupling’ resulting in violent pitching and yawing, and loss of control as the aircraft rotated on all three axes. In the accident both Parker and his back seat observer, Mr Gordon R. C. Copeman (Senior Flight Test Observer), ejected from the aircraft, but Parker was too low, and Copeman fell into the burning wreckage after it had hit the ground. *4

Eventually on December 7th 1983, Buccaneer XV350 and Phantom XV429, took off  from Holme for the final time signifying the final closure of Holme airfield, a closure that ended a long history of aviation. With that, the name ‘Blackburn’ was gone forever, but the legacy of Robert Blackburn and his remarkable work in the aviation field would live on for many years yet.

No longer required or aviation purposes, Holme was sold off, the runways and Perimeter tracks were dug up, and the grounds returned to agriculture.

Sadly, the technical area which is now an industrial estate, is run down and tatty. Many of the original buildings are used by small businesses, furniture manufacturers, tool makers and car part suppliers. Buildings that are not used are run down and in dangerous conditions, fenced off they have a limited life span left. That said however, it remains quite intact and there are a good number of buildings left to see.

RAF Holme on Spalding Moor

Sadly many of the buildings are in a poor state of repair and have only a short life left.

If approaching from the village of Holme-on-Spalding Moor along Skiff Lane, you arrive at the first of three entrances. The first is the former perimeter track located at the north end of one of the secondary runways. The runway has long gone, but there is a hardstand still present, its large circular footprint giving a good indication of the nature of the site. This road leads round to the technical area and where the watch office was. A Post-war Fire Tender Shed does still stand here, but the office was believed  demolished in 1984. This road is gated and access is not permitted beyond here.

Continue along the road and a second entrance allows access to a small number of buildings of the former technical site. There is evidence across the road of further buildings but these have been removed leaving only their foundations visible. Continue passed here and you arrive at the main entrance, the two memorials are located just inside on the left hand side.  Continue along this road and you are entering the technical area, with a number of buildings on either side. Distinctly clear are the turret trainers and parachute stores, all in use with small businesses. At the end is one of the T2 hangars, re-clad and in use but inaccessible. Driving / walking round here you can see many of the former stores and admin blocks that formed the heart of the operations.

Some of these buildings are fenced off and in a dangerous condition, others have been better looked after, most are used by small businesses.

Commemorative memorials can be found at the former entrance to the site, including one to Group Captain (Lord) Cheshire VC, OM, DSO, DFC, who commanded 76 Sqn before being posted to Marston Moor. A highly respected man, he fought for changes to the Halifax to improve its handling and performance, and also post war, for funding for the memorials that stand at the entrance. His record of achievement and dedication is well versed across the history books and internet.

RAF Holme on Spalding Moor

Memorial to Group Captain Leonard Cheshire.

Holme-on-Spalding Moor is a remarkable airfield that is steeped in history. From the early days of the 1941 to the end of 1983 it saw some of the most heroic acts and the greatest advances in aviation. It took the fight to the heart of Nazi Germany, it led the way in state of the art fighter testing, rising like a phoenix out of the ashes until its final dying day.

Its present condition does not sadly reflect the enormous contribution it, and its personnel played in those turbulent years of history. Whilst having a largely intact technical area, its condition is a sad reflection on the importance we place on these once busy and historical places. Even with considerable development between inception and closure, and an ever-changing facade, the main heart of Holme always remained, but today sadly, it is a heart whose beat is slowing and one that will no doubt eventually stop and die. A remarkable place indeed.

Not far from here are both the airfields at Breighton and Melbourne, both of which have flying activities still going on, ‘intact’ runways and a number of buildings are still present. Also in Holme village is the All Saints Church, sadly kept locked out of hours, it has a window of remembrance dedicated to the crews of 76 Sqn and their heroic battle against Nazi Germany. It also has a number of graves from those who never saw peacetime again. It is certainly worth a visit.

Sources and further reading.

*1 The base system was brought in following the need for more airfields at the end of 1942 when the United States was drawn into the war. To ease administrative and support problems associated with multiple airfields, they were combined into a groups of 3 (or 4) with a parent station and 2 (or 3) satellites. Overall command was given to the HQ airfield (or base) headed by an Air Commodore. Approved in February 1943, it was rolled out over the following year.

*2 Australian War Memorial, Article number P04303.010

*3 Caygill, P., “Phantom from the Cockpit“, Leo Cooper Ltd; First Edition edition (26 July 2005) Pg 134

*4 ejection-history Website accessed 27/8/18.

ORB AIR 27/1902/1 National Archives

The 458 Squadron website aims to preserve the Squadron’s history paying tribute to those who served.

Chorley, W.R., Bomber Command Losses of the Second World War, Midland Counties Publications (1994)

BAE Systems website, accessed 27/8/18.

RAF Holme – From Bomber base to Fighter Development (P1)

In this next part of Trail 40, we head to the south-east of York, to an airfield that started off as a bomber airfield in the early stages of the war. As Bomber Command operations grew, so did the airfield, and so too did the casualties rise.

Post war, it went on to play a minor part in the cold war as an American air base, then like a phoenix out of  the ashes it rose to feature in the development of modern British fighter jets. Sadly, it all ended with the demise of the British aviation industry, now a handful of dilapidated buildings form the core of a rundown industrial estate that was once RAF Holme-on-Spalding Moor.

RAF Holme-on-Spalding Moor (RAF Holme/Spaldington)

The parish of Holme-on-Spalding Moor is  the largest historic parish in the county of  East Riding, covering 11,514 acres, with  a history that goes back as far as the iron age. The majority of the parish was, before the mid 1700s, a moorland, a bog in many places, that only the brave or knowledgeable could safely cross. The village and surrounding area is dominated by the medieval All Saints Church, that sits on land called Beacon Hill, 45m above sea level, about half a mile to the north-east of the village. The village  sits approximately halfway between York and Hull, whilst the airfield itself lies a few miles south-east of the village in the small hamlet of Tollingham.

Construction began in late 1940 as a bomber airfield for the expansion of the RAF’s No 4 Group, one of forty-three built in Yorkshire. It would initially cover around 400 acres, taking land from four separate local farms, an area that extended to over 1,500 acres as the war progressed.

RAF Holme on Spalding Moor

Many of the buildings still stand used as an industrial site.

Designed in the early stages of the war, as a parent station for Breighton and Melbourne (implemented after the introduction of the Base system in February 1943*1), Holme-on-Spalding Moor (or Holme) was built as a dispersed airfield with accommodation constructed to the north-east away from the main airfield site, the start of a new design aimed at reducing casualties in the event of an attack.  As a Scheme ‘M’ airfield, it would have one austerity measure ‘J’ type hangar and two type T2 hangars, designed to replace the former Type ‘C’ hangar. By the end of the war, these numbers would have been increased giving a total of five Type T2s and one ‘J’.

Whilst not a Class A airfield (implemented in 1942), Holme was built with three intersecting concrete runways, thirty-six dispersed hardstands and a watch office (designed to drawings 518/40 & 8936/40) built of brick, concrete and timber. As a parent airfield, the office would have a meteorological section attached.

The technical site was located to the north side of the airfield (within the legs of an upturned ‘A’ with the bomb store to the north-west and the dispersed accommodation area to the north-east. At its peak it housed upward of 3,000 personnel of mixed rank including nearly 500 WAAFs. For many, Holme-on-Spalding Moor was not a particularly pleasant stay, the locals objecting to the influx of airmen into their quiet community, forcing ‘nights out’ to go much further afield. Those who stayed here considered it bleak, cold and damp with few comforts, but like many personnel on Britain’s wartime airfields, they made the best of what they had.

Once the airfield was declared open, it was handed to No. 1 Group to train (Australian) bomber crews on the Wellington bomber. The first major squadron to arrive was 458 Sqn (RAAF), formed at Williamtown, New South Wales, under Article XV of the Empire Air Training Scheme. Many airmen were posted to Canada to finish their training, before finally being sent to the UK and their first operational squadron. The first thirty-seven of these qualified airmen spent the majority of August 1941 en route to the UK, arriving at Holme later that month, where they joined with other commonwealth airmen to form the squadron. The first aircraft they would use was the Vickers Wellington MK.IV, a model they retained until January/February 1942, when they replaced them with the MK.IC. At the end of March that year, 458 Sqn transferred to the Middle East, retaining various models of Wellingtons for the remainder of the war.

RAF Holme on Spalding Moor

Very easily visible is one of the few hardstands that survive at Holme today.

Whilst here at Holme-on-Spalding Moor, 458 Sqn would focus on the strategic bombing campaign against Germany, taking part in operations that took them to numerous cities in both Holland and Germany.

On the night of 20th/21st October, ten aircraft from 458 Sqn  joined twenty-five other aircraft in a raid on the port of Antwerp. With other raids targeting Bremen, Wilhelmshaven, and Emden, it would be a busy night for Bomber Command. On board one the of the 458 Sqn aircraft (Wellington IV #Z1218, ‘FU-D’) was: Sgt. P. Hamilton (Pilot); Sgt. P. Crittenden; P/O. D. Fawkes; Sgt. T. Jackson; Sgt. A  Condie and Sgt. P. Brown. The aircraft would depart Holme-on-Spalding Moor at 18:39, on the squadron’s first operational sortie. The weather that night was fair but cloud covered much of the target, and so many aircraft returned with their bomb loads intact. On route, just after midnight, Wellington ‘FU-D’ was shot down by a German night-fighter, with all but Sgt. Brown being killed.

The average age of these men was just 23, Sgt. Philip George Crittenden (aged 20) was the first Australian airman to be killed whilst serving in an RAAF Bomber Command squadron. He, along with the remainder of the crew, were buried in the Charleroi Communal Cemetery, Belgium, and is commemorated on Panel 106 at the Australian War Memorial.

Pilots of No. 5 Flight at No. 4 SFTS, Saskatoon, Canada. The majority of the students are recently arrived members of the RAAF, who travelled to Canada under the Empire Training Scheme. Third row back, left side:  Sgt Phillip George Crittenden 400410 (KIA 20th/21st October 1941)*2

A second 458 Sqn bomber (#R1765) was lost on the night of 22nd/23rd October, on operations to Le Harve. Hit by flak, the aircraft made it back to England where the crew baled out. Only one crewman, Sgt. Hobbs, failed to do so, his body was subsequently found in the bomber’s wreckage. A third Wellington was lost before the year was out, that of  #R1775 which lost contact at 20:35 on the night of 15th/16th November 1941, with the loss of all crewmen.

The October also saw the arrival of No. 20 Blind Approach Training (BAT) Flight, formed at the sub-station RAF Breighton, they moved here in the same month only to be disbanded and reformed as 1520 Beam Approach Training (BAT) Flight. This addition brought Airspeed Oxfords and Tiger Moths to the airfield, and was designed as part of the pilot’s training programme teaching night landing procedures.

January 1942 saw little change, with the loss of three further aircraft, one (#Z1182) ‘FU-G’ due to icing causing the aircraft to crash just after take off, a further two were lost 3 days later,  #R1785 was hit by flak and crashed over the target, with #Z1312 hitting high tension wires after returning home suffering flak damage from an aborted mission. In total there were twelve airmen killed and six injured in just three days, a terrible startto 458 Sqn’s entry into the European war.

During the February 1942, 458 Sqn began changing their Mk.IVs for MK.ICs, and then on March 23rd they moved out of Holme-on-Spalding Moor and set off to the Middle East, where they remained until the war’s end.

RAF Holme on Spalding Moor

Original hangars once housed Lancasters, Halifaxes and Buccaneers!

This left 1520 (BAT) Flight the sole users of Holme-on-Spalding Moor, until the August when, for a short period of six weeks, 460 Sqn Conversion Flight stationed a flight of Halifaxes here from the sub-station at Breighton. The four engined heavies then went through a period of changes eventually taking on the Lancaster.

After their departure, the end of September saw another Wellington squadron arrive, that of 101 Sqn RAF. The squadron, who transferred in from No. 3 Group, remained off operations for a short while whilst they converted to the new Lancaster, a major change from the poorer performing twin-engined ‘Wimpy’.

It was during one of these training flights that 101 Sqn would suffer their first accident at Holme, when it was thought, a photo flash flare exploded causing structural failure of the  Lancaster’s fuselage whilst flying over Wales – all seven crewmen were lost in the tragic November accident. During the autumn and winter months training would continue as Wellingtons were gradually withdrawn from front line operations, and units converted to the four engined bombers, primarily the Lancasters. Holme-on-Spalding Moor was no different, and once over, 101 Sqn would continue where 485 Sqn left off, taking the fight to the German heartland. During 1942-43 they would lose six aircraft in non-operational flights and fifty-nine during operations.

During January 1943, the first three aircraft of the year would be lost; Lancaster Mk.Is #W4796 ‘SR-R’, #ED443 ‘SR-B’ and # ED447 ‘SR-Q’ were all lost on operations to Essen and Hamburg with no survivors. Twenty-one fully trained aircrew were gone along with their aircraft.

Whilst the Lancasters of 101 Sqn fared reasonably well compared to other units, casualties being generally light, there was one night that stood out above all others, a night that would devastate the crews of 101 Sqn.

RAF Holme on Spalding Moor

The parachute store is now a tool shop.

On the night of 4th/5th May 1943, during the Battle of the Rhur, 141 Halifaxes, 255 Lancasters, 10 Mosquitoes, 80 Stirlings and 110 Wellingtons headed for Dortmund. A massive force, it was the largest single force below the 1,000 bomber raids so far, it was also the first major attack on Dortmund. Reports say that marking was accurate, but decoy fires lit on the ground drew many bombers away from the actual target. Even so, damage was extensive, with large areas of the city being flattened, over 3,000 buildings were either destroyed or damaged and 1,700 people either killed or injured. Sadly, 200 POWs were amongst those killed, alas a new record had been set for ground casualties. As for the Lancaster force, only six were lost, a small percentage compared to the other aircraft, but all six were from 101 Squadron.

All aircraft took off between 21:40 and 22:05 and headed out toward Germany. Of the six lost, one was lost without trace #W4784 ‘SR-E’ piloted by Sgt. W. Nicholson, and another ‘SR-F’ #W4888, piloted by F/O. N. Stanford, was shot down by a night fighter crashing in Friesland with the loss of six. The remaining four crashed either on their way out from, or on their return to, the airfield. ‘SR-G’, #W4863 piloted by Sgt. J. Browning (RNZAF) crashed at Scorton near to Richmond, Yorks; ‘SR-U’ #ED776, piloted by F/S. F. Kelly crashed short of the runway without injury; ‘SR-X’ #ED830, piloted by Sgt.F Smith hit trees near to Little Ouseburn, Yorkshire, and ‘SR-T’ #ED835 piloted by W/O. G Hough, was hit by flak but managed to return to Holme-on-Spalding Moor crashing a few miles away between Hotham and North Cave. On this night twenty airmen were lost, one was taken as a POW and seven sustained injuries of varying degrees. It would be the worst night for 101 Squadron for many months.

All Saint's Church

W/O. Gerald Hough killed on the morning of May 5th 1943 on 101 Sqn’s worse night of the war so far.

With the final loss taking place on the night of 12th June 1943, 101 Sqn would three days later, depart Holme-on-Spalding Moor for good, moving to Ludford Magna in Lincolnshire. A move that was triggered by the reorganisation of Bomber Command boundaries, Holme being taken over by No. 4 Group RAF.

The move would mean there would be no peace at Holme though, as 101 Sqn departed 76 Sqn arrived not with Lancasters though, but the other four engined heavy – the Halifax.

In Part 2 we see how 78 Sqn coped with the Halifax, an aircraft that was overshadowed by the Lancaster. Initially a poor performer, with improved engines it began to make its mark. It was slow process and in the meantime casualties for Halifax crews remained high. We also see what happened to RAF Holme post war, and how it played its part in the development of Britain’s jet fighters.

The Development of Britain’s Airfields (Part 8).

In this, the last of the series looking at the development of Britain’s airfields, we look at the Watch Office, perhaps the most atmospheric of buildings associated with Britain’ wartime airfields. The hub of an airfield control, it was where aircraft were counted out and back, where the battle was monitored and the cries of those who fought in the air war were heard.

Though only a recent addition to airfield architecture, it developed quickly and became one of the technologically advanced offices in the world.

Watch Offices.

The Watch office, Watch Tower or in American terms Control Tower, was the centre piece of any airfield, the place in which all operations were controlled. Even today, the control tower is the one feature that stands high above the rest of the airfield with commanding views across the entire site.

Many of these watch offices remain today, some as fabulous museums, some as private dwellings, but many are sadly derelict or even worse – gone altogether. This that do survive create a haunting and evocative feeling when seen from inside.

Thorpe Abbotts Museum

The beautifully restored Thorpe Abbots Watch Office (design 15683/41).

Unlike hangar development, the watch office appeared quite late in the development of the airfield, only really coming into being as war seemed inevitable. Before this, a rudimentary office was often all that was used, usually attached to the side of the main hangar, and was used to ‘book’ aircraft in and out. But by the mid war period the watch office had become a major structure on the airfield, a standard design (depending upon the airfield use) with two or more floors and often a ‘glass house’ for observation purposes.

For obvious reasons the watch office was built away from other buildings with clear sight over the entire airfield, an important aspect if controllers were to keep watch on the many aircraft that were moving about the airfield space. A vital asset to the airfield it was often targeted by marauding bombers, and in the case of attack, the controllers within would relocate to an emergency battle headquarters, hidden at ground level on a remote part of the airfield, but still with views across the site.

The basic watch office was often adapted rather than demolished and rebuilt, this can and does, cause great confusion as to its design origin. Further more, on some sites, the original was abandoned but not demolished, and a new office built elsewhere on a nearby site, thus giving rise to two offices on the one airfield eg. Matlask and Martlesham Heath

The Watch Office as we know it was first seen on military airfields in 1926 and resembled a small bungalow with bay windows. Those constructed on bomber bases would be slightly smaller than those on fighter bases, a fighter base office having a pilots office attached. The idea behind this was to keep pilots as close to the airfield  control centre so they could quickly be scrambled and report back to the airfield controller on their return. These early design were found on airfields such as Bircham Newton in Norfolk, Hendon and Tangmere and were all built to the same  basic 1926 drawing design only modified to take the extra pilots room.

The standard shape of the World War 2 Watch Office stems back to the mid 1930s, with the introduction of a two-storey building that was square in design. Like similar buildings of its time, it was brick, a building material that was replaced with concrete, in 1936.

RAF West Malling Control Tower under refurbishment

West Malling a 5845/39 design which is now a coffee shop.

By the end of the expansion period, and with the introduction of hard runways, it was realised that the non-dispersed sites gave poor visibility for early watch offices, views across the airfields were not clear and so a quick remedy was called for. The answer lay in two choices, (a) demolish the current buildings  and rebuild it in a better location, or (b) add an extension. In many cases the former was the better idea and this progressed quite quickly, however, where the latter was chosen, remedial work required alteration of the building whilst it remained in use.

A further complication to these designs was the introduction of meteorological sections, which all new buildings erected at the beginning of the war now had. This gave a mix of design styles, enough though there was only a small selection of design drawings from which to work.

These late expansion period and early war designs introduced the idea of ‘viewing platforms’ or parapets, surrounded by safety railings along the front of the building. These deign also had very large glass fronted walls, bright and airy they allowed a lot of light to enter the building but gave cause for concern later on, when it was realised that a bomb blast would cause severed injury to the occupants in an attack. It was also found that during night operations, large windows were more difficult to black out and so smaller windows offered both better protection and greater ease of black out.

As building materials became scare, particularly wood and brick, concrete became the norm. This change also led to drawing changes even though the basic design inside and out, was the same.

In order to appreciate the changes to watch office designs, one needs to consider the different roles that airfields played during the war. Bomber Command airfields would have a differ office to a fighter Command airfield, which in turn, had a different office to a satellite or night-fighter station.

Thorpe Abbotts Museum

Watch Offices give commanding views across the airfield. (Thorpe Abbots).

The regional control stations where these first offices were being built were certainly getting the better choice at this time, standard fighter and bomber airfields having to use inferior designs that very soon became outdated and inadequate for the needs of the airfield.

During the massive building programme of 1941/42, there was some effort made to standardise all airfield Watch Offices, this resulted in the 1941 design drawing no. 12779/41. This was to be the basic airfield watch office design, with its parapet, six large windows to the front and outside access steps. As older airfields were brought up to Class A Specification, many had these new Watch Offices built to replace the older original ones. Some simply had adaptation of the original. Here the use of the airfield had a bearing on the watch office modification / design, and whilst the basic 12779/41 model was employed, slight variations did exist where the airfield was not a bomber airfield.

Therefore various adaptations of this did follow, examples of which include the slightly smaller 13023/41 (RAF Cottam), those with modified smaller windows 15371/41 (Kimbolton) and 343/43 (Martlesham Heath),  and the smaller Night-Fighter design 15684/41 (Winfield). Being a Night-Fighter station Winfield, had the same basic design but construction methods were totally different. This new design 15684/41, would become standard at all night fighter bases.

All these alternative designs appear outwardly very similar to the original, but differ mainly in window design only, although the physical size of some is different.

RAF Winfield

The Night-Fighter station Watch Office at Winfield (15684/41) is a similar design but smaller, having only four windows in the front.

This design, 343/43, eventually became the most common design for watch offices and appeared on all operational stations and Operation Training Unit airfields after 1943, using a set of six half-size windows across the front.

Tower (2)

The smaller windows of Parham (Framlingham) were half the original design size (12779/41 modified to 343/43).

A further addition was the glass observation room located on the roof of the Watch Office. These were generally only applied to Group control offices, and gave an excellent all round unrestricted view of the entire airfield. Examples that exist today, such as Framlingham above, are replicas but have been built to very high standards.

Former RAF Martlesham Heath

Martlesham Heath is a similar design to Framlingham (modified to 343/43) – Note the runway heading board on the roof.

At the end of the war some airfields such as Sculthorpe and West Raynham had their Watch Offices modified as they changed roles to Very Heavy Bomber Stations. This new design 294/45, improved on former buildings as a complete new design based on a steel frame with precast concrete floors. It had an extra floor added and then the octagonal ‘glass house’ or Visual Control Room with slanted glass to reduce glare.

Control Tower

Sculthorpe’s modified tower gives 360 degree views over the airfield. A three-story block it utilises the former World War 2 Watch Office.

The Watch Office has been the hub of airfield command and control since the mid 1930s, it has developed from the humble shed to a multi-functional technologically advanced building dominating the skyline of the airfield today. Sadly though, many are now gone, and of those that are left only a few remain in good condition or open to the public.

Summary

The war-time airfield incorporated numerous building designs and shapes, certainly far too many to cover here, the wide variety of technical buildings, synthetic trainers, parachute stores, headquarters and general stores, all changing as the war progressed.  The design and materials used in these structures was as varied as the designs themselves. But as the RAF grew so too did the airfields they used. The runways, the hangars, the technical buildings and accommodation sites have all grown alongside. Sadly many of these buildings have now vanished, but the process and speed at which they developed has been unprecedented. From humble grass strips with wooden shacks to enormous conurbations with numerous buildings, they have become iconic symbols representing decades of both aviation history and human sacrifice.

The entire page can be viewed separately:

Part 1 – The Road to War.
Part 2 – The Expansion Period and airfield development.
Part 3 – Choosing a site.
Part 4 – Building the airfield.
Part 5 – Airfield Architecture.
Part 6 – Runways and Hardstands.
Part 7 – Hangars and aircraft sheds.

or as a whole document.


The Development of Britain’s Airfields (Part 6).

After considering the architecture of Britain’s airfields in Part 5, we turn to the hard surfaces, primarily the runways. Developed out of necessity, they created a steep learning curve for those involved in their construction. Many problems were found, many materials were tried, but ultimately they were built and even after their removal for hardcore, many have left scars in the tissue of the earth that remind us of their once massive presence.

Runways, Perimeter Tracks and Hardstands

In the pre-war years, the development of hard runways and large airfields was a new phenomena, hard surfaces being a new aspect still very much a topic of considerable controversy. In the First World War, water logging and mud was an issue even for the small biplanes that filled the skies over Britain and  France. To overcome this, ash was spread over landing surfaces and to some degree successfully, but even though many local remedies were tried, it wouldn’t be taken seriously until the Second World War loomed.

Glatton (Conington) second runway markings

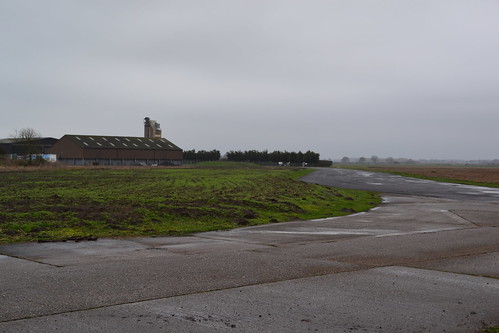
Runways like this one at Glatton (Conington) remain in good condition and used by the local flying club.

At this point the typical airfield layout included up to four grass runways, one of 1,300 x 400 yards and three of 1,000 x 200 yards, many were even smaller. Bomber and Fighter Command, realising that not only would the new era of aircraft call for longer, hard runways on its airfields, but the need to maintain year round activity was essential if Britain was to defeat the Luftwaffe.

Both Fighter and Bomber Command pushed the Government to allow these to be developed, on the one hand Sir Hugh Dowding, fighting the corner for Fighter Command, pressed home the need for hard surfaces on his fighter airfields, whilst Sir Arthur Harris on the other, pushed for hard surfaces on his bomber airfields.

The entire process was lengthy and complex, and lacked in-depth, professional knowledge. The first hard ‘pavements’ later runways and taxi ways, being constructed based on road building techniques and knowledge. So before any firm decisions could be made, trials would need to be carried out to determine not only whether or not they were indeed needed, but if so, how they should be best constructed.

Initial steps in runway construction was started as early as 1937, where ‘flexible’ runways were constructed comprising layers of brick or stone covered with two further layers of tarmac and a coat of asphalt to seal the structure in. Concrete pavements, which proved to be much stronger were either 150 mm or 200 mm thick slabs laid directly onto the ground after the topsoil had been removed by heavy machinery. As would be expected, these early designs failed quite quickly under the heavy loads of the fighters and bombers that were coming into service. Rapid repairs were carried by adding a further layer of tarmac (6.5cm) and another layer (2cm) of sealant.

These early flexible constructions continued to fail whereas the concrete designs stood up to much more wear and tear and proved longer lasting. However, time was short and the learning curve would be steep.

The test to determine these needs was to take a Whitley bomber, laden to equal its full operational weight, and taxi it across a grassed surface.  A rather primitive assessment, it was intended to ascertain the effects of the aircraft on the ground beneath. Trials were first carried out at Farnborough and then Odiham, and these were generally successful, the Whitley only bogging down on recently disturbed soils. Further trials were then carried out at RAF Stradishall in March 1938, and the results were a little more mixed. Whilst no take offs or landings took place during these trials, the general agreement was that more powerful bombers would have no problems using grassed surfaces, as long as the ground was properly prepared and well maintained. All well and good when the soils were dry and well-drained.

By April 1939, the Air Ministry conceded, and agreed to lay runways at a small number of fighter and bomber airfields, of which Kenley, Biggin Hill, Debden and Stradishall were identified.  Whilst construction was slow, only two fighters airfields being completed by the outbreak of war, progress was finally being made.

These initial runways were only 800 yards long and 50 yards wide, but were extended later that year to 1,000 yards long, as aircraft were repeatedly running off the ends on to the grassed areas. Over the years Stradishall in particular, would be further developed, its longest runway eventually extending to 2,000 yards.

RAF Charterhall

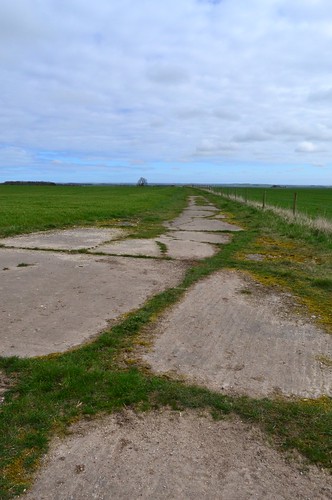
The runway at Charterhall in the borders, breaking up after many years of use both by training units and as a motor racing circuit post war.

During the early war years, the demand for airfields grew. By early 1940 the requirement was for three runways as close as possible at 60o to each other, and of a minimum length of 1,000 yards with room for extension up to 1,400 yards. This then became the norm by late 1940 especially at bomber airfields, with the main runway being 1,400 yards and subsidiaries at 1,100 yards. A month later, this increased by another 200 yards with a requirement to be able to extend to 2,000 and 1,400 yards respectively.

However, these short piecemeal responses were not sufficient and it was both a continual problem and a thorn in the side for the Air Ministry. Sir Arthur Harris, in raising his concerns for airfields belonging to Bomber Command, also pushed the need to develop good, long and reliable surfaces. He voiced his frustration in a vehement letter*6 to Lord Beaverbrook in 1941, In which he states:

“For twenty years everybody on the stations and the squadrons has been screaming for runways without avail.”

and he continues stressing the need for hard surfaces particularly in winter as:

“Through not having runways our effort will be seriously detracted from in normal winter conditions and reduced very probably to zero in abnormal winter conditions.”

He then goes on to state that Britain’s views were ‘blinkered’ saying that:

“Every other nation throughout the world has long been convinced of the necessity for runways…”

By the summer of 1941, the length of runways had again increased, all stations would now have a main runway of 2,000 yards and two subsidiaries of 1,400 yards and where this was not possible, then a minimum of 1,600 and 1,100 yards (fighter and night fighter stations being shorter at 1,300 and 1,400 yards respectively).

The harsh winters were less than ideal for laying concrete (by far the best material for the job) but any delay could mean the difference between success and failure. Elaborate testing was therefore passed over, materials were laid and experience led the way. This method of trail and error, led to many instances of runways having to be dug up and relaid, this in itself led to problems as aircraft, men and machinery had to then be moved and housed elsewhere. The American Eighth Air Force suffered greatly with these problem, fully laden bombers repeatedly breaking through the surface or falling off the edges as it gave way.

Another consideration was that of training and satellite airfields. As the need for new pilots increased, the training of new recruits intensified. The harsh winters were causing major headaches for these airfields as mud, stones and other winter debris was causing continuous problems for flying. With both man power and materials being in short supply, suitable alternatives were sought.  A number of solutions were offered all very similar in their design and material.

The answer it seemed lay in steel matting – of which twelve different types were used – the more common being : Sommerfeld Track, Pierced Steel Planking (PSP – also called Marston Mat), or Square Mesh Track (SMT).

Sommerfeld track was a steel mat designed by Austrian Kurt Sommerfeld. The tracking was adapted from a First World War idea, and was a steel mat that when arrived, was rolled up in rolls 3.25 m (10 ft 8 in) wide by 23 m (75 ft 6 in) long. It was so well designed that a full track could be laid, by an unskilled force, in a matter of hours. Each section could be replaced easily if damaged, and the entire track could be lifted and transported by lorry, aeroplane or boat to another location and then reused.

Sommerfeld track (along with these other track types) were not only used commonly on training and satellite airfields, but also on Advanced and Forward Landing Grounds in Kent and later France after the Allied invasion of Normandy. In the build up to D-Day, 24 Advanced Landing Grounds in southern England were created using this form of Steel Matting,

Tracking had to be robust, it had to be able to withstand heavy landings and be non-conspicuous from the air. Sommerfeld track met both of these, and other stringent criteria very well, although it wasn’t without its problems. Crews often complained of a build up of mud after heavy rain, and concerns over both tyre and undercarriage damage were also extensively voiced; several records reporting tail wheels being ripped off after catching in the track lattice.

Because of the poor state and short length of runways, bombers were still regularly running off the ends, especially at night, or being unable to fly because the surfaces were poor or even unusable. A number of ideas were tested out to alleviate the problem, one such idea led to twenty sites testing arrester hook facilities. Several heavy bombers: Halifax, Manchester, Stirlings  and later the Lancaster,  were all modified to undertake these trials, with Woodhall Spa becoming the first airfield to have the full complement of six arrester sets.

Runway arrester gear

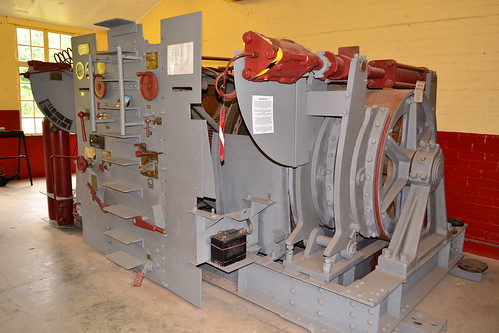
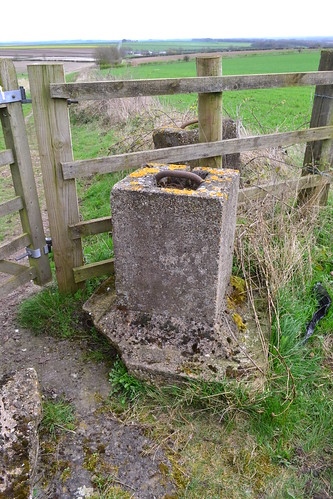
Runway arrester gear at Woodhall Spa.

The idea was met with scepticism, but trials went ahead and in January 1942, a list of priority airfields was sent out to the Headquarters of No. 1,3,4, and 5 Groups RAF detailing those twenty sites selected for the equipment. At the top of the list was RAF Woodhall Spa in Lincolnshire, followed by Bottesford, Swinderby, Ossington, Syerston, Middleton St. George, Linton, and ending with Waterbeach and Stradishall. By late 1942 Woodhall Spa was ready and in October, five landings were made by an Avro Manchester.  A month later the decision was made to install units at all major operational airfields, but this never came to fruition and the idea was soon mothballed. By 1943, it had been forgotten about and the 120 or so units built were scrapped (many being left buried where they were laid).

It was finally during early 1942 that a standard design airfield would be put in place. Known as the Class ‘A’, it would be the standard to which all new airfields and updated older sites would be made.

A Class A airfield would be designed around three hard concrete runways, shaped like an ‘A’ with each runway at 60o  to each other where possible. The main runway would be aligned with the prevailing wind again were possible to allow aircraft to take off/land into the wind as often as possible (north-east, south-west). In several cases, due to land features and local restrictions, this was not always possible, and so many permutations of design were seen as a result.

Rapidly becoming the largest part of the airfield layout, the runways and other paved areas – perimeters tracks, aprons and hardstands – were now given high priority. The standard now called for a main runway of 2,000 yards with two subsidiaries of 1,400 yards. Each of these would be 50 yards wide whilst the connecting perimeter tracks would be 50 feet wide. Along side these runways would be an emergency landing strip, a grassed area given a landing surface of 400 and  200 yards respectively.

Dues to the high numbers of bombers returning badly damaged and unable to make safe and proper landings, a small number of emergency strips were created by extending the main runways to 4,000 yards long and 400 yards wide. One such airfield was RAF Manston in Kent. Being on of the closest airfields to the continent, it was often the first place a stricken aircraft, especially a bomber, would seek out.

Whilst the general layout of airfields did not change for the remainder of the war, some further runways were extended to 3,000 yards, one such example being RAF Sculthorpe in Norfolk which was prepared to take the heavy B29 ‘Superfortress’ and post war, the B-36 ‘Peacemaker’.

A further point worth mentioning here is that of dispersals, not required pre-war, they were also an aspect of airfield architecture that were born out of the Second World War. In the inter-war years, aircraft were housed either on a central pan (apron or ramp) or within hangars. These collections of aircraft were easy targets and even a small amount of munitions could cause huge damage. In 1939 the need for dispersals was therefore recognised and so to address the issue, hedges were removed and tracks created that took aircraft away from the main runway but kept them within easy reach of the airfield site. The initial design was that of the ‘frying pan’ a 150 ft circle connected to the perimeter track by a small concrete track.

However, by 1942, it was found that aircraft were clogging up these tracks, some even ‘falling off’ the concrete onto soft soil and so blocking following aircraft in their tracks. The answer was the ‘spectacle’ or ‘loop’ hardstand, so-called by their oval shape, generally in pairs, that allow aircraft in and out without the need to turn or block access tracks. From 1942 onward, this model became the standard hardstand for all Class A airfields, and the aim was to have 50 such hardstands placed strategically around the perimeter, with 25 at satellite airfields. As the threat of attack diminished toward the end of the war, ‘finger’ or ‘star’ dispersals began to appear, much less effective than the predecessors, they were however cheaper and easier to construct.

RAF Milfield

Unusual as many training airfields didn’t have aircraft pans, RAF Millfield, in the borders, had several

In addition to hardstands, pens were built on fighter stations. The first, an experimental pit, was dug at Feltwell, whilst overly expensive and obtrusive, it did lead the way to aircraft pens later on, pens that were developed as either type ‘B’ or ‘E’  on these fighter airfields. The main difference here is that the early type ‘B’ had cranked side walls whereas the ‘E’ had walls that were straight. The former requiring more space, was later phased out in favour of the ‘E’, named so by its shape, using side and back walls to protect the fighter or small bomber located within.

Remains of Type 'B' fighter Pen

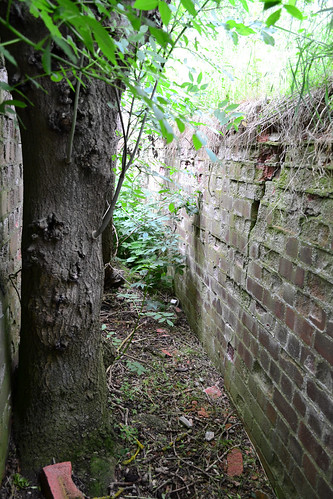
The remains of a Type ‘B’ Fighter Pen at Matlaske.

RAF Macmerry

A Type ‘B’ Pen at RAF Macmerry. The cranked wall can be seen to the right, with the central wall on the left. The entrance is to the bottom right.

Examples of these pens were located at Matlaske (type ‘B’ – built to design 7151/41) and Macmerry in Scotland, whilst the type ‘E’ were found on airfields especially those around London that included Biggin HiIl, Kenley and North Weald.

Kingscliffe airfield

One of the ‘E’ type pens found at Kings Cliffe. Adapted with rifle slits for additional defence.

These pens were designed to specific dimensions and were designed as either a ‘Hurricane’ or ‘Blenheim’ to accommodate either a single engined or twin-engined aircraft. Within the back wall of these pens was a shelter for up to 25 personnel, and in some cases, they had Stanton Shelters built-in to the structures. Some, for example, at Kings Cliffe in Northampton, remain with rifle slits for additional protection from ground forces.

King's Cliffe airfield

Inside the aircraft pen shelter at King’s Cliffe.

Whilst the majority of these shelters were manufactured using banks of soil, sandbags, brick or concrete, there was a least one example at RAF Drem, in Scotland which used logs cut to size and shape and built in the style of a Scandinavian house. It is these various designs of aircraft pen that paved the way to modern hardened aircraft shelters (HAS) seen on military airfields today.

From the early days of grass runways to the massive lengths of concrete that were created up to and after the mid 1940s, runways and hardstands have become a defining factor in airfield design. The sole purpose of an airfield – to get aircraft off the ground as quickly as possible, get them to their target and them get them home again – led to the development of both runway lengths and construction materials, much of which has paved the way for modern airfields today. These early leaps into runway designs have enabled larger and heavier aircraft to make those important journeys that we very much take for granted in this the modern world of air travel and general aviation.

In the next section we look at one of the buildings most associated with the airfield. An early form of aircraft storage, its role changed as it was soon realised that aircraft needed to be dispersed and not grouped together on large aprons as they were in the prewar era. Aesthetics and neatly lined up aircraft were no longer an important factor in front line flying, but safety and the ability to repair aircraft quickly and efficiently were. Here we introduce the hangar, a huge building often of a temporary or transportable nature, that became one of the more longer lasting structures of airfield architecture.

Sources and further reading. 

*6 Letter from Arthur Harris to Lord Beaverbrook, February 1941 – AIR 19/492 – National Archives

50 Aviation Trails Reached!

I am pleased to announce that since starting Aviation Trails four years ago, I have now reached that magic number of 50 Trails around Britain’s wartime airfields, a feat I never thought would happen.

Each Trail covers two or more sites, in some cases six, many three, covering in total, over 100 former RAF and USAAF airfields and museums around Britain.

I can honestly say its been a terrific four years, in which I have learnt a lot about Britain’s wartime past, the men and machines that flew from these places and the tragedies that occurred at so many. The development of these airfields was staggering, the process of construction, and the subsequent decay just as eye-opening. These sites and the people who used them, have changed both the British and world landscape, leaving in many cases scars that may never heal. The buildings and stretches of concrete that remain are monuments to human endurance and sacrifice, a sacrifice that we hope may never have to be repeated.

RAF Tibenham Perimeter track

The perimeter track at the former RAF Tibbenham.

During these four years there have been several changes at many of these sites, hangars and other buildings have gone, runways are continuing to be dug up as they become prime land for development. As we speak there are numerous sites under planning proposals, whilst others are waiting in the wings to hear what their fate will be.

To compile these trails I have personally visited each and every one of these sites, even a field has a certain something when you know who stood there before you.

To all those who have visited, commented and followed me on this journey, I thank you, I hope you have enjoyed the journey back in time as much as I have writing it. I hope that through these trails, the memories of those who gave their all may live on so that future generations may know who they were and what they did, so that we may enjoy the peace we do today.

Here’s to the next 50!

Andy.

RAF Andrews Field – (Great Saling/Station 485) – Trail 33: Essex Part 1.

RAF Attlebridge  (Station 120) – Trail 7: Northwest Norfolk.

RAF Barton BendishTrail 7: Northwest Norfolk.

RAF Biggin Hill (Westersham) (Station 343) – Trail 4: Kent Part 1.

RAF Bircham NewtonTrail 20: North Norfolk (Part 1).

RAF Bodney (Station 141) – Trail 8: Swaffham and Her Neighbours (Part 1 of 3).

RAF BournTrail 31: Southern Cambridgeshire (Part 2).

RAF Brenzett (ALG) – Trail 18: Kent Part 2.

RAF BruntonTrail 47: Northumberland.

RAF Bungay (Flixton) (Station 125) – Trail 14:  Central Suffolk (Part 1).

RAF Bury St. Edmunds (Rougham) (Station 468) – Trail 16: West Suffolk (part 1).

RAF Castle CampsTrail 45: Essex (Part 2).

RAF Caxton GibbetTrail 29: Southern Cambridge (Part 1).

RAF Charterhall Trail 41: The Borders of Scotland and England.

RAF ChedburghTrail 49: Bomber Command – Bury St. Edmunds to Haverhill

RAF Collyweston Trail 37: The Northern Reaches of Cambridgeshire.

RAF Coltishall – Trail 7: Northwest Norfolk.

RAF ConingsbyTrail 1: Lower Lincolnshire.

RAF CottamTrail 40: Yorkshire (East Riding).

RAF CranwellTrail 2: Lincoln Borders and Newark.

RAF Debach (Station 152) – Trail 39: Suffolk around Ipswich (Part 1).

RAF Debden (Station 356) – Trail 46: Essex Part 3,

RAF Deenethorpe (Station 128) – Trail 6: American Ghosts.

RAF Deopham Green (Station 142) – Trail 27: Southern Norfolk (Part 3).

RAF Digby (Scopwick) – Trail 1: Lower Lincolnshire.

RAF Docking – Trail 20: North Norfolk (Part 1).

RAF Downham Market (Bexwell) – Trail 7: Northwest Norfolk.

RAF Drem – Trail 42: Edinburgh’s Neighbours.

RAF East Fortune – Trail 42: Edinburgh’s Neighbours.

RAF East Kirkby Trail 1: Lower Lincolnshire.

RAF East Wretham (Station 133) – Trail 13: Southern Norfolk around Diss (Part 2).

RAF Eye (Brome) (Station 134) – Trail 14: Central Suffolk (Part 1).

RAF Fersfield – (Station 130) – Trail 28: Southern Norfolk (Part 4).

RAF FoulshamTrail 22North Norfolk (Part 3).

RAF FowlmereTrail 32Southern Cambridgeshire (Part 3).

RAF Framlingham (Parham) (Station 153)Trail 39: Suffolk around Ipswich (Part 1).

RAF Glatton (Station 130) – Trail 6: American Ghosts.

RAF Gransden Lodge – Trail 31: Southern Cambridgeshire (Part 2).

RAF Graveley – Trail 29: Southern Cambridge (Part 1).

RAF Grafton Underwood (Station 106) – Trail 6: American Ghosts.

RAF Great Dunmow (Station 164)- Trail 33: Essex (Part 1).

RAF Great MassinghamTrail 21: North Norfolk (Part 2).

RAF Great Sampford (Station 359) – Trail 50: Haverhill’s neighbours – Wratting Common and Great Sampford.

RAF Hardwick (Station 104) – Trail 12: Southern Norfolk around Diss (Part 1).

RAF Hawkinge – Trail 18: Kent Part 2.

RAF Hethel – Trail 38: To the West of Norwich.

RFC HinghamTrail 38: To the West of Norwich.

RAF Hunsdon – Trail 25: Hertfordshire.

RAF Kimbolton (Station 117) – Trail 6: American Ghosts.

RAF King’s Cliffe (Station 367) – Trail 6: American Ghosts.

RAF LanghamTrail 23: North Norfolk (Part 4).

RAF Lashenden (Headcorn) – Trail 18: Kent Part 2.

RAF Lavenham (Station 137) – Trail coming soon.

RAF Little Snoring – – Trail 22North Norfolk (Part 3).

RAF MarhamTrail 7: Northwest Norfolk.

RAF Martlesham HeathTrail 48: Suffolk around Ipswich (Part 2).

RAF Matching (Station 166) – Trail 33: Essex Part 1.

RAF Matlask (Station 178) – Trail 34: North Norfolk (Part 5).

RAF MattishallTrail 36: North Norfolk (Part 6).

RAF Mendlesham (Station 156) – Trail 15: Central Suffolk (Part 2).

RAF MepalTrail 11: Around Ely.

RAF Methwold – Trail 8: Swaffham and Her Neighbours (Part 1).

RAF Millfield –  Trail 47: Northumberland.

RAF Narborough (Narborough Aerodrome)- Trail 7: Northwest Norfolk.

RAF North CreakeTrail 23: North Norfolk (Part 4).

RAF North Pickenham (Station 143) – Trail 9: Swaffham and Her Neighbours (Part 2).

RAF North WealdTrail 25: Hertfordshire.

RAF North Witham (Station 479) – Trail 3: Gone But Not Forgotten.

RAF Old Buckenham (Station 144) – Trail 13: Southern Norfolk around Diss (Part 2).

RAF Oulton – Trail 34: North Norfolk (Part 5).

RAF Polebrook (Station 110) – Trail 19: Northamptonshire American Ghosts II.

RAF Rattlesden (Station 126) – Trail 15: (Central Suffolk (Part 2).

RAF SawbridgeworthTrail 25: Hertfordshire.

RAF ScamptonTrail 30: Scampton and the Heritage Centre.

RAF SculthorpeTrail 21: North Norfolk Part 2.

RAF Shipdham (Station 115) – Trail 10: Swaffham and Her Neighbours (Part 3).

RAF Snetterton Heath – (Station 138) – Trail 27: Southern Norfolk (Part 3).

RAF Spanhoe Lodge (Station 493) – Trail 6: American Ghosts.

RAF Steeple Morden – Trail 32: Southern Cambridgeshire (Part 3).

RAF Stoke OrchardTrail 24: Gloucestershire.

RAF Stradishall- Trail 49: Bomber Command – Bury St. Edmunds to Haverhill

RAF Sutton BridgeTrail 3: Gone But Not Forgotten.

RAF Swannington – Trail 36: North Norfolk (Part 6) 

RAF Swanton Morley – Trail 38: To the West of Norwich.

RAF Thorpe Abbotts (Station 139) – Trail 12: Southern Norfolk around Diss (Part 1).

RAF Tibenham (Station 124) – Trail 13: Southern Norfolk around Diss (Part 2).

RAF Tuddenham – Trail 16: West Suffolk (Part 1).

RAF Tydd St. Mary – Trail 37: The Northern Reaches of Cambridgeshire.

RAF Upwood – Trail 17: The Pathfinders.

RAF Warboys – Trail 17: The Pathfinders.

RAF Watton (Station 376/Station 505) – Trail 9: Swaffham & Her Neighbours (Part 2).

RAF Wendling (Station 118) – Trail 10: Swaffham and Her Neighbours (Part 3).

RAF West Malling Trail 4: Kent Part 1.

RAF West RaynhamTrail 21: North Norfolk Part 2.

RAF WethersfieldTrail 45: Essex (Part 2).

RAF Westley – Trail 16: West Suffolk (part 1).

RAF WinfieldTrail 41: The Borders of Scotland and England.

RAF Winthorpe Trail 2: Lincoln Borders and Newark.

RAF WitchfordTrail 11: Around Ely.

RAF Wittering  – Trail 37: The Northern Reaches of Cambridgeshire.

RAF Woodall SpaTrail 1: Lower Lincolnshire.

RAF Wratting CommonTrail 50 – Haverhill’s neighbours – Wratting Common and Great Sampford.


July 2nd 1919, H.M.A. R.34 Sets A World Record Flight.

On July 2nd 1919 at 01:42, airship R.34 lifted off from the airfield at East Fortune, east of Edinburgh, to make an epic voyage – the first crossing of the Atlantic Ocean east to west by a powered aircraft.

R.34 possibly at East Fortune. (author unknown)

Conceived as early as 1916, R.34 was built at the works of William Beardmore and Co. Ltd. of Inchinnan near Glasgow. At 634 feet in length with a top speed of 62 mph, she would have five 270 hp Sunbeam ‘Maori’ engines, and would cost £350,000 to build. Her massive size gave her an impressive 1,950,000 cubic feet for gas storage, and she would be equivalent in size to a Dreadnought battleship. A major step forward in airship design, her aerodynamic shape reduced total air resistance to that of just 7% of an equivalently sized flat disc.

As she was designed under war specifications, R.34 would be built to carry twenty 100 lb and four 550 lb bombs, a range of Pom-Pom guns, Lewis machine guns and a small number of two-pounder quick-firing guns; but as she wasn’t finished until after the war, none of these were ever fitted, nor was she ever flown in anger.

Completed in early 1919, she just missed out on achieving the record of the first Atlantic crossing, being laid up by damage caused by poor handling, and thus beaten to the record now held by Alcock and Brown.

In May, she arrived at East Fortune airfield, a major airship station in East Lothian, from where she carried out a number of test flights including an endurance flight across the Scandinavian countries. In July she was set to make the first  Atlantic crossing, east to west.

In preparation for the flight, eight engineers were sent to the United States to train ground crews in the safe handling of the airship. The Admiralty provided two  warships, the Renown and Tiger, as surface supply vessels, and should R.34 have got into difficulty, she could have been taken in tow by one, or both of the two vessels.

On the evening of 1st July 1919 the ship was fueled to capacity (some 6,000 gallons), and in the early hours of the morning she was moved out of her shed and prepared for the flight. Her captain, Major G. H. Scott, gave the order to release early, and at 1.42 am (GMT) R.34 lifted slowly in to the Scottish sky.

After battling strong winds and Atlantic storms, R.34 finally arrived at Mineola. Huge crowds had turned out to greet her and her crew, a grandstand had been erected, parks and public spaces were packed with onlookers. Major J. Pritchard (The Special Duties Officer) put on a parachute and jumped from the airship to become the first man to arrive in America by air. He helped organise ground staff and prepared the way for R.34 to safely dock. As she settled on her moorings, she had not only become the fist aircraft to fly the Atlantic East to West, but broke the current endurance record previously held by the North Sea Airship NS 11, also based at East Fortune.

A record was made, R.34 had put British Airship designs and East Fortune firmly on the map. After 108 hours and 12 minutes flying time, R.34, her crew and two stowaways: William Ballantyne and a small tabby kitten called “Whoopsie”, had landed at Mineola, Long Island, New York.

After a 3 day stay in which the crew were treated like the heroes they were, R.34 was prepared for the homeward journey. On Wednesday July 10th 1919, at 23:54 she lifted off and set sail for home.

With prevailing winds carrying her eastward, she made an astonishing 90 mph, giving the opportunity to cut some of the engines and preserve fuel. This gave the crew a chance to divert over London, but due to a mechanical breakdown, this was cancelled and R.34 continued on her original route. Poor weather at East Fortune meant that she was ordered to divert to Pulham Air Station, Norfolk, but even after clarification that the weather had improved, her return to East Fortune was denied and she had to continue to Pulham – much to the disgust of the crew on board. At Pulham, the reception was quiet, RAF personnel greeted her and secured her moorings. She has covered almost 7,500 miles at an average speed of 43 mph.

Eventually after a major refit at East Fortune, R.34 left for the return to Pulham. After six weeks of static mooring, R.34 was sent to Yorkshire, to Howden Airship Station. Here she was used to train American crews, was modified for mast mooring and used for general training duties. During one such training mission, she was badly damaged in strong winds, and after sustaining further damage whilst trying to moor and secure her, she began to buckle. Falling to the ground, she broke up and was damaged beyond repair. R.34 was then stripped of all useful materials and the remainder of her enormous structure sold for scrap – a rather ungainly ending to an incredible and historical machine.

H.M.A. R.34 and her crew had become the first to cross the Atlantic east to west, they had achieved the  longest endurance flight, and become the first aircraft to complete a double-crossing of the Atlantic.

East Fortune

The memorial stone at East Fortune airfield commemorating the epic flight of R.34.

The Flight Crew for the Atlantic journey were:

Major G. H. Scott A.F.C – Captain
Captain G. S. Greenland – Second Officer
Second Lt. H. F. Luck- Third Officer
Second Lt. J. D. Shotter – Engineering Officer
Major G. G. H. Cooke DSC – Navigator
Major J. E. M. Pritchard O.B.E. – Special Duties
Lt. G. Harris – Meteorological Officer Second
Lt. R. F. Durrant – Wireless Officer
Lt. Commander Z. Lansdowne – Representative U S Navy
Brigadier General E. M. Maitland – Special Duties
Warrant Officer W. R. Mayes – First Coxswain
Flight Sergeant W. J. Robinson – Second Coxswain

Sergeant H. M. Watson – Rigger
Corporal R. J. Burgess – Rigger
Corporal F. Smith – Rigger
F. P. Browdie – Rigger
J. Forteath – Rigger Corporal

H. R. Powell – Wireless Telegraphy
W. J. Edwards – Wireless Telegraphy

W. R. Gent – Engineer
R. W. Ripley – Engineer
N. A. Scull – Engineer
G. Evenden – Engineer
J. Thirlwall – Engineer
E. P. Cross – Engineer
J. H. Gray – Engineer
G. Graham – Engineer
J. S. Mort – Engineer
J. Northeast – Engineer
R. Parker – Engineer

W. Ballantyne – Stowaway
“Whoopsie” – a small tabby kitten and stowaway

The crew of R.34 Crew – with the crew pets.

East Fortune airfield appears in Trail 42.

RAF Cottam – Built and Abandoned.

Up in the Yorkshire Wolds stands an airfield that could have been considered as one the Air Ministry’s ‘less sensible’ decisions. Open to the elements, this site was built but never fully used by an operational flying unit, in fact, Cottam could be considered one of the RAF’s more expensive bomb dumps, used primarily for munitions storage toward the war’s end. In its construction it would have accommodation, a hangar, and a watch office, along with three concrete runways – all the makings of an RAF bomber base, yet it was often desolate and empty. Even though it wasn’t used operationally, it did have its own problems however, and its own casualties . As we head across the River Humber into the East Riding of Yorkshire, we visit the former RAF airfield, RAF Cottam.

RAF Cottam.

Designed originally as a satellite for RAF Driffield, Cottam airfield lies high up in the hills on Cottam Well Dale, about 5 miles north of Driffield, just a stones throw from the village of Langtoft, and the tiny parish of Cottam. At 475 ft. above sea level, it is one of the higher peaks in the area which makes it popular with dog walkers and ramblers alike.

The airfield site encompasses the site of the ancient village of Cottam, (on maps of the late 1600s it appears as Cotham) of which only the church remains.  A lone building, it stands neglected and derelict, a reminder of a small community that has long since gone.

RAF Cottam (Yorkshire)

The abandoned medieval church marks the boundary of Cottam airfield and a community long gone.

The Air Ministry decided to build an airfield here to be used as a satellite and possible bomber base. The airfield would have a watch office with detached operations block (the separate block designed to drawing 13023/41). As construction was completed before June 1941, it would be classed as a Type ‘A’ building, and would need to be modified to bring it up to the newer Type ‘B’ standard as were being built on later airfield sites. Under the Type ‘B’ scheme, Cottam would have a Watch Office built to design 13726/41, then adapted by the fitting of smaller ‘slit’ windows more in line with bomber and O.T.U. satellite airfields of that time (15683/41). Sadly, the entire building was demolished in 1980, and no there are no signs of its existence left on site today.

A single T1 hangar provided space for aircraft repairs and maintenance, and accommodation, although sparse, would accommodate around 1000 men and 120 women of the Maintenance Command by December 1944.

RAF Cottam (Yorkshire)

The remains of the secondary runway looking west.

Cottam officially opened in September 1939, and as a grassed airfield, would only be used for dispersed aircraft from Driffield’s 4 Group Bomber Command, flying Whitleys of 77 and 102 Sqn. Cottam was also used later on for the Fairy Battles of 4 Group Target Towing Flight (4G T.T.F.) also based at Driffield at that time.

It wouldn’t be long though before Cottam would have its first accident. On July 1st 1940, a dispersed aircraft, Whitley V, (N1391) ‘DY-H’ of 102 Sqn, swung on take off causing minor damage to the aircraft. Luckily there weren’t thought to be any casualties in the incident, but the aircraft was rendered unable to fly, and the damage was sufficiently serious to need it to be taken away for repairs.

A month later, the 15th August 1940, signified a major point in the Battle of Britain, one which saw all of the Luftwaffe’s air fleets deployed for the first time, in a full and coordinated attack on the British mainland. This day saw the heaviest fighting of the Battle with attacks ranging from the south coast to east Yorkshire, and up to Edinburgh. This also meant the start of a number of attacks on British airfields and Driffield would not be left out. In this first attack, a Luftwaffe force of some 50 Junkers Ju 88s attacked the airfield damaging or destroying 12 aircraft on the ground – many of these were Whitleys. This attack was particularly devastating for a number of reasons, one of which was that it caused the first death on active service of a Bomber Command W.A.A.F., (A.C.W.2) Marguerite Hudson, who was killed after delivering stores to the site. This attack caused extensive damage to both the airfield site, infrastructure, and aircraft, and for a short period whilst repairs were undertaken, some aircraft were moved and dispersed here at Cottam. Indeed, on 27th September 1940, 4 Group T.T.F moved over to Cottam where they stayed for a month, not returning until the 24th October, once repairs had been completed and air attacks had all but ceased.

RAF Cottam (Yorkshire)

The secondary runway looking east, this part is full width but built upon.

It is possible that these attacks may have led to the demise of one 77 Sqn Whitley V (N1355) ‘KN-X’ flown by Sgt. James Walter Ward RAFVR (741435), who undershot on landing at Cottam, hitting a fence, causing the undercarriage to later collapse. The five occupants of the aircraft were unhurt, but the aircraft itself was later struck off charge on 22nd September 1940, after assessment at Armstrong Whitworth in Baginton*1. Ward himself was killed with his crew only five days later, when his aircraft, Whitley V, (N1473) was shot down by flak over Noord Brabant, 2km from Vijfhuizen, on September 25th 1940. He died along with P/O C. Montague, himself a veteran of three previous serious crashes.

By the end of August 1940, both 77 and 102 Sqns had departed Driffield and so Cottam, which left it only being used by the Fairy Battles of 4 G T.T.F. During the winter months Cottam was abandoned by these aircraft, presumably due to its inclement weather conditions, but dispersed aircraft did return again in the spring and summer months. In October 1941, 4G T.T.F. reformed at Driffield as 1484 T.T.F., and it is at this point that it is thought their use of Cottam ceased.

RAF Cottam (Yorkshire)

The perimeter track looking east. The main airfield is to your left.

Under the Ministry’s airfield expansion plan, new airfields of the early 40s were built with concrete surfaces. ‘Older’ grass sites, like Cottam, were upgraded having new runways laid down in an effort to reduce water logging and provide a more stable surface for the heavier bomber aircraft coming in. To meet these upgrades Cottam’s three runways – all consisting of concrete and wood chip – were built; the main being just short of 5,300 ft., with the two further runways around 4,000 ft. in length. Pan style aircraft dispersals were also added which gave Cottam a new look and hope for the future. However, and even though huge amounts of money had been spent on the airfield, it was decided it was not to be used further, as either a satellite or a bomber station. Cottam was offered to various other military groups who all turned down the location for various reasons. The army did take up residency for a short while until March 1944, whereupon it was then used to store vehicles for the impending invasion of Normandy.

RAF Cottam (Yorkshire)

Blocks from the former site, and the beautiful views across the Wolds from one of the highest peaks in the area.

It is believed that further forced landings took place at Cottam during this time. Firstly, a damaged B-24 ‘Liberator’ came down after sustaining damage on a raid; and secondly, it is also thought that a Halifax landed here after an S.O.E. mission. Sadly at present, I can find no further official details of these events, and cannot therefore expand on them further.

Toward the end of the year 91 Maintenance Unit (M.U.) were based here*2 using the runways and hardstandings to store ammunition and other stores that were delivered by road from the rail yard at Driffield. A spell of residency for 244 Maintenance Unit carried on the storage work before the airfield was finally abandoned and closed in June 1954.

Returned to agriculture, the airfield is mostly gone, a section of the easy-west runway does still exist, and in part, at full width. Footpaths allow for walks across the site allowing views along the runway in both directions, they also allow walkers to use the remains of the perimeter track and secondary runway – albeit as a track. The frame of an air-raid shelter and the standby set house (designed to drawing 13244/41) are in situ, although by far the runways are the most prominent feature surviving today.

Access is best made from the Cottam Lane junction. The path leads up through the site of the medieval village of Cottam where the church still stands. This takes you south onto the airfield site itself and along the two runways. The walk extends along the perimeter track to the south, where debris from the perimeter track can also be seen.

Built high on the Wolds of Yorkshire, it is hard to understand why such a site was chosen. In winter, it could be bleak, windy and very cold. Landing conditions must have been difficult at best, and treacherous at worst. Its history of accidents tell their own tale.

In 2016, Cottam Airfield was the subject of a wind farm review, and a battle between the locals and the energy firm R.W.E, began. As yet though the site remains free of turbines, a gem for walkers and those wishing to experience the natural beauty of the Yorkshire Wolds. The open air and fabulous views hide a strange history, one that goes back long before the Second World War, but one that has only scars to tell the tale in this oddly historical, but beautiful part of Yorkshire. *3

Source and further reading:

*1 This was reported on a number of sites (Air Safety Network) but no records could be found referring to the accident in the Operational Records Book recorded by 77 Squadron at that time.

*2 See the National Archives website for details.

*3 News report on the proposal.

The Hull and East Riding at War Website has a range of information on the area during the Second World War.

My thanks go to Ronnie and Jo for the great walk, and for being such fabulous hosts.