RAF Upwood (Trail 17) – The Graveyard of RAF Squadrons (Part 1)

In the second part of Trail 17 we visit a station  with a history going back to World War One. This airfield saw a spy caught and hanged; the making of a film using Lancaster bombers, and more recently the site of a hospital for the treatment of victims of a nuclear war. Ever since its closure it has been the subject of numerous failed planning applications, and seems to have hung on by the skin of its teeth – perhaps until now.

This site must rank as one of Britain’s largest collection of ex military buildings (albeit subjected to the usual vandalism) for its collection is huge, and its a collection that includes wartime hangars. We of course go to RAF Upwood near Huntingdon.

RAF Upwood

RAF Upwood is a remarkable site to visit. Its buildings remain very empty stripped of their dignity and daubed with a wide range of graffiti, yet within its boundaries lay many years of history.

Located in the south-western corner of Cambridgeshire, not far from both RAF Alconbury and RAF Warboys, Upwood is possibly one of the countries most photographed aviation sites.

RAF Upwood has seen no less than twenty-two different RAF flying units grace its runways, the majority of these being post war operational units, many coming here prior to their disbandment – it is perhaps the graveyard of RAF squadrons.

However, whilst the latter part of the 20th Century saw it gain its recognition, its origins lay way back in the First World War.

Originally opened in September 1917, as Bury (Ramsey) after the adjacent village, it had no permanent buildings and was merely a grassed airfield with no fixed squadrons of its own. Towards the end of the war though, in 1918, five hangars and a small number of huts had been built, and it was at this time that it became officially known as ‘Upwood’.

RAF Upwood

Post war, Upwood served as a hospital and most of the buildings survive.

Then, when the war ended, the personnel departed and the site was cleared of all military related artefacts, the site being returned to the local community once more.

However, the impending conflict in the late 1930s, required a massive rethinking into Britain’s defences and the need for greater air power. A number of locations were earmarked for opening, and as a former airfield, Upwood was one of them. Designed as a medium bomber station, plans were put in place for as many as five large hangars, although only four were ever completed.

Opened in early 1937, during the expansion period of pre-war Britain, it was home to both 52 and 63 Squadrons Royal Air Force. In March the two newly formed squadrons arrived, 52 Sqn from Abingdon, No. 1. Bomber Group, and 63 Sqn from Andover, No. 2 Bomber Group. At the time of opening conditions were far from ideal, only half of the total number of hangars had been built, and more importantly, there was no provision for permanent accommodation; instead, crews were faced with a rushed collection of inadequate, temporary blocks. 52 Sqn were first, followed two days later by 63 Sqn, by which time conditions had changed marginally for the better, the officers mess being one such building to open as a permanent structure – clearly rank was to have its privileges.

For 52 Sqn it was a complete change, the move being managed over just two days, which also saw them transfer to No. 2 Bomber Group bringing them in line with 63 Sqn. Initially, 52 Sqn brought with them seven Hawker Hinds, then four more on the 8th and a further two on the 10th, bringing the total number of aircraft on role to thirteen. Six of these Hinds were immediately put into reserve saved for the formation of a ‘B’ Flight.

Meanwhile, 63 Sqn began to upgrade their aircraft taking on four replacement Audaxes, each being delivered straight from the A.V. Roe factory (Woodford Aerodrome)  in Manchester. With a further three and then two more being delivered from A.V. Roe’s on the 17th and 18th respectively, the number of aircraft at Upwood now amounted to twenty-two.

This was a busy time for Upwood, with personnel coming and going, new postings arriving and staff being posted out, there was considerable movement before things finally began to settle down and operations bed in.

On the 22nd and 24th, both squadrons took turns to carry out search operations over the local countryside looking for the remains of a DH Moth belonging to Mary Russell, the Duchess of Bedford, which disappeared on the evening of the 22nd during a snowstorm. Both searches proved unsuccessful, with no sightings been made. It later transpired that the Duchess had crashed into the North Sea, her body never being found.

With 52 Sqn’s ‘B’ Flight being formed on April 6th and 63’s on the 12th, the scene was almost set, and with visits by both Air Chief Marshall Sir John Steel KCB, KBE, CMG (Air Officer Commanding in Chief of Bomber Command), and then the Under Secretary State for Air a few days later; Upwood was finally on the map and making progress toward being both operational and fighting fit.

63 Squadron would then take a step forward, having the honour of being the first operational unit to receive the new Fairey Battle, K7559 landing at Upwood on May 20th 1937, some 6 months before 52 Sqn received theirs.

Throughout the summer of 1937, the number of delivered Battles gradually increased, each one coming directly from Ringway Aerodrome, one of Fairey’s main sites. For 63 Sqn, the following months would be a busy time ‘showing off’ their new aircraft to various dignitaries from around the globe. A massive PR stunt, it started with the Gaumont British Film Company, who filmed nine of the aircraft taking off, landing and flying in formation, scenes being recorded for the film “Under the Shadow of the Wing“.

During this period, Upwood would be inundated with visitors; his Highness the Duke of Aosta along with Italian representatives started the ball rolling, followed by: Major Woutieres of Belgium; Lt. Lim Weir K’nei of the Chinese Air Force; Air Chief Marshal Sir E. Ludlow-Hewitt KCB, CMG, DSO, MC; Air Commodore S. Goble CBE, DSO, DSC. and even a consortium from Germany – General der Flieger Milch, General Lieutenant Stumpff, General Major Udet along with their entourage. These three high ranking officials were, from the 1930s onward, key to the development, build up and use of Germany’s illegal Luftwaffe. Accompanying them, were a number of high ranking British Air Force personnel, who openly guided the party through a range of inspections of the Battles, a programme of events that included a flying display at RAF Mildenhall.

Generalfeldmarschall
Erhard Milch March 1942 (Source: Wikipedia)

By the end of 1937, 63 Sqn had flown 2,256 hours, many of these to show off their aircraft. With little else to do at this time, a range of pageants and shows kept the crews busy in between the obligatory gunnery and navigation training sessions.

1938 would be filled with similar such undertakings, but as the year drew on training  would take on a more serious and predominant role, mock bombing attacks being regularly practised by the squadron on various sites including Upwood itself.

After a short period away training at West Freugh, the squadron was placed in a ‘precautionary’ state, in readiness for immediate mobilisation – the threat of war in Europe now growing ever stronger. This period was short lived however, and the squadron temporarily returned to normal duties, with yet more visits from both high ranking officials and royal dignitaries from overseas.

November 25th 1938, would be a sad day for Upwood crews, training flights proving to be hazardous, and even fatal.

New Zealander P.O. K Vare, managed to land and walk away from Battle K7603 as it burned on a nearby railway line, whilst 63 Sqn Battle K7567 crashed in poor weather whilst undertaking a navigation exercise over Hampshire. The aircraft, piloted by P.O. J Ellis (killed), collided with trees severely injuring Cpl. A Thoroughgood and ejecting AC2 V. Rawlings. Being thrown from the aircraft was possibly Rawlings’s saviour, the likely hood of being killed himself higher had he not been.

Fairey Battle Mk.I (K7602) of 52 Squadron, at RAF Upwood.© IWM H(am) 179

On the 16th December, in a ceremony attended by the station staff, P.O. Ellis’s ashes were scattered over the airfield, the procedure being carried out from another Fairy Battle from the squadron.

After a short Christmas break, 63 Sqn returned to their duties once more, training flights, many of which were in conjunction with squadrons from other airfields, increasing in frequency as events across the Channel took on an even more sinister turn.

In mid March, a new policy was issued that would affect the operation of both the Upwood squadrons. This policy turned both 52 and 63 into ‘non mobilising’ units, meaning that the more senior officers would remain on site as instructors, whilst the ‘regular’ crews would be posted to operational units. The spaces left by these vacating staff being filled by Volunteer Reserves from the various Flying Schools. After a period of some months, these trained staff would revert to civilian status, but as reserves, they could be called upon if, or more likely when, war was declared – the war machine was again stepping up a gear. A further element of this change was the allocation of 10 new Avro Anson aircraft, each of these twin-engined training aircraft arriving over the next few weeks direct from Woodford.

This period would see world tensions rise even further, and as war looked even more likely, changes were again made to Upwood’s staff. Rehearsals in dispersing aircraft were carried out, passes were restricted to ensure sufficient numbers were always on hand in case of war being declared, and mock attacks on the airfield were carried out. During these mock attacks ‘Gas’ was sprayed by both ‘attacking’ aircraft and from a ground based “High Pressure Jenny”, a devise developed in America to spray water and steam over the outside of aircraft.

Upwood then experienced a second fatal accident, which occurred on the night of 25th July 1939, the crash involving Fairy Battle K9412 of 63 Sqn with the loss of all on board: Sgt. Albert Shepherd, Sgt. Aubrey Sherriff and AC2 William Murphy. The aircraft struck the ground and caught fire whilst taking part in one of these preparatory exercises.

The end of August saw a further ramping up of the gears with the implementation of the Bomber Command War Order (Readiness ‘D’). Aircraft of both squadrons were now restricted to essential tests and practises only, being dispersed across the airfield, bombed up but without fuses, ready for flight. Personnel were also put on high alert, anyone on leave was recalled and had to return back to the station.

As September dawned, the full readiness ‘D’ plan was brought into full force. 52 Sqn were ordered to disperse aircraft at nearby Alconbury, with twenty-four Battles and five Ansons being flown across, along with a small guard and a selection of maintenance personnel. The Royal Air Force as a body was mobilised by Royal Proclamation, and preparations were made for war, the entry in the Operations Record Book for 63 Sqn simply stating:

3rd Sept. 11:00 “A state of war is declared between Great Britain and the German Reich

In Part 2, Upwood goes to war, major changes come in terms of both aircraft and infrastructure. New squadrons arrive and an unwelcome visitor is caught.

The entire text can be read in Trail 17 – The Pathfinders.

Flt. Lt. William Devaux Woodruff Hilton (RCAF) – Berwickshire.

In the graveyard at Duns, in Berwickshire, not far from the village and former airfield RAF Charterhall (Trail 41), are two graves of nationals a long way from home.

Both airmen died in service whilst flying from RAF Charterhall, an Operational Training Unit airfield that prepared night fighter crews before posting to relevant night fighter squadrons.

The first grave is that of Flt. Lt. William Devaux Woodruff Hilton (RCAF)  who died on 23rd July 1942.

Flt. Lt. Hilton (Duns Cemetery)

Flt. Lt. William Devaux Woodruff Hilton

Flt. Lt. William Hilton (s/n: C/1626) was born on May 17th 1916, to D’Arcy Hilton (himself an ex pilot of the US Army Flying Corps in the First World War) and Gladys Woodruff, in Chicago, Illinois. He signed up for a flying career joining the RCAF as the United States were not at that time at war and therefore he was unable to train with the US forces.

Flt. Lt. Hilton reached the rank of Pilot Officer on 29th January 1940 after completing further training at RAF Twinwood Farm in Bedfordshire and RAF Acklington in Northumberland. On completion of this training, he was posted to RAF Charterhall and 54 Operational Training Unit (OTU), where he would fly Beaufighters.

The summer of 1942 suffered from poor weather, so poor in fact, that there were many restrictions on flying time, July only having 2,104 hours in total. This bad weather was to be responsible for many flying accidents and deaths that year, of which Flt. Lt. Hilton would be one.

On July 23rd 1942, he was tasked with flying a model new to him, the Bristol Beaufighter, and was taken by an instructor on several circuits to better acquaint himself with the various controls and idiosyncrasies of the aircraft. After several successful landings and take offs, the instructor passed Flt. Lt. Hilton to fly solo, and handed the controls of  Beaufighter #R2440 over to him. His instruction to Hilton was to stay within the circuit of the airfield, sound advice as one of Scotland’s summer storms was rapidly approaching.

Hilton duly carried out the order and took off to perform various solo flight tasks. An experienced pilot, Flt. Lt. Hilton found no problem landing or taking off himself and completed one full circuit before things went wrong.

On the second  circuit of the airfield, Flt. Lt. Hilton somehow got lost, whether through an aircraft malfunction or pilot error, it is not known, but after entering bad weather, the aircraft was instructed to climb to a safe height which it failed to do. Moments later, the Beaufighter was heard circling over the nearby town of Duns before ploughing into low-lying ground, one mile south-east of the town. At the time of the accident the aircraft’s undercarriage was in the down position. The crash killed Flt. Lt. Hilton instantly, the aircraft being torn apart by hedges and the subsequent slide along the ground. A board of enquiry was set up and investigations carried out, but no blame was apportioned to Hilton and the case was closed.

Flt. Lt. Hilton, an experienced pilot, somehow got into trouble, and that combined with the bad weather he was in, resulted in the loss of his life at the young age of just 26. To this day the cause of the crash is not known and Flt. Lt. Hilton remains buried in Scotland not far from the crash site, he is however, many thousand miles from home.

Flt. Lt. Hilton is buried in Duns graveyard in Sec. R. Grave 2.

The second airman’s grave in the graveyard at Duns, is that of Sgt. Thomas Alan Rutherford s/n 406626 (RAAF) who died on 14th August 1942, age just 20.

Sgt. Rutherford (Duns Cemetery)

Sgt. Thomas Rutherford

Sgt. Thomas Rutherford, born to Stamford Roy Rutherford and Laura May Rutherford, of Cottesloe, Western Australia, came from an aviation family, his father Stamford Rutherford RAAF (296635) and older brother Sgt Bernard Rinian Roy Rutherford RAAF (406540), were also serving Air Force members. As with many families who had siblings serving in the forces at this time, Sgt. Rutherford’s brother was also killed in an air accident, earlier that same year.

Sgt. Rutherford was born 3rd August 1922 at Brampton, England but enlisted in Perth Western Australia, on 3rd February 1941.

After completing his training, he also transferred to 54 OTU at RAF Charterhall in the Scottish borders.

August 1942 was, like July before it, a particularly bad month weather wise, which saw only 1,538 hours of flying carried out by 54 OTU. Only a small portion of these, just short of 400, were by night, the remainder being daylight flights. As a night fighter training station, this would be difficult for trainers and trainees alike, but undeterred they flew as many sorties as they could.

On August 14th, Sgt. Thomas Rutherford climbed aboard Blenheim Mk. V #BA192 along with is observer Sgt. James Clifford Kidd (s/n: 1417331). They dutifully carried out their pre-flight checks and lined the aircraft up ready for take off from one of Charterhall’s runways. After lifting off the Blenheim struck a tree causing it to crash. Both Sgt. Rutherford and Sgt. Kidd were killed instantly in the accident.

It is not known what caused the aircraft to strike the tree, whether it be pilot error or aircraft malfunction, but it was an accident that resulted in the loss of two young men far too early in their lives.

Sgt Rutherford is buried at Sec. R. Grave 3 next to Flt. Lt. Hilton.

Further reading.

McMaster University Alumni has further details of Flt/ Lt. Hilton’s life and career.

Commonwealth War Graves Commission website

National Archives of Australia website

RAF Leeming Part 2 – The Canadians arrive.

In part 1, we saw how 4 Group had been operating mainly Whitleys from Leeming, and how the squadrons here had taken a beating in the European skies. Now, following the departure of the last elements of 10 Sqn. in August 1942, Leeming was all but empty, and ready to be handed over to the Canadians. With the introduction of the four engined heavies, hopefully things would begin to change and the losses of before would be lessened. Harris was now in charge of Bomber Command, new directives and a renewed focus would see the first of the 1,000 bomber raids, perhaps now, the air war would turn.

Formed in October 1942, 6 Group was born out of Article XV of the Riverdale Agreement, which allowed the formation of distinct squadrons manned by personnel from across the British Commonwealth – primarily Australia, Canada and New Zealand. This would, in theory, allow the aircrews of these countries to keep their national identity whilst serving in the Royal Air Force, and allowing the governments of these nations to have a say in the service of these crews. However, Britain did not want this – fearing interference from abroad in strategic matters – and so an agreement was drawn up whereby they would keep their nationality but serve under the full control of the Royal Air Force.

After negotiations on 17th April 1941, it was agreed that there could be 25 Canadian squadrons created (along with 18 Australian and 6 New Zealand Squadrons). But with shortages of trained personnel, and slow progress  through the British Commonwealth Air Training Plan (BCATP), many of these squadrons took a long time to come, and many units were simply filled with a range of nationalities, thus defeating the original objectives of the agreement.

Ultimately though, 44 Canadian, 16 Australian and 6 New Zealand squadrons were formed operating across a range of fields. Of these, 15 Canadian squadrons operated within Bomber Command – one transferring to the Pathfinders of 8 Group.  As the war progressed, and air superiority fell to the allies, Bomber Command took fewer casualties, and so the number of  individual nationals serving within each squadron began to rise. By the time the war began to close, these squadrons had had their  national identities and character restored, and they were by now, either Canadian, Australian or New Zealand Squadrons in their own right.

Transferring so many units from other countries would initially cause confusion, with similar numbered units appearing in both the RAF, Canadian, Australian or New Zealand Air Forces. To overcome the problem, Canadian squadrons were allocated the first fifty numbers of the ‘400’ block (400 – 449), and so Canadian born squadrons were renumbered accordingly once they had transferred to the UK*4. With this, 6 Group was born, and over the next few years it would become synonymous with Yorkshire, utilising the many airfields found within its boundaries.

At Leeming, six of these fourteen units would operate, Nos: 405, 408, 419, 424, 427 and 429, all between August 1942 and May 1946 when the last two resident groups would disband.

The first of these squadrons to arrive would be 419 (Moose) Squadron.

419 Sqn. were only at Leeming a short time, a transition stop between 13th and 18th August 1942, just prior to the forming of 6 Group. Preparations for the move began a few days earlier with an advance party of twenty-five personnel making the journey to Leeming from Mildenhall by train. On the 11th, the squadron was stood down from operations and all hands helped load equipment onto another train consisting of 25 goods wagons. Loading took place at night at Shippea Hill, a small desolate, and rarely used station not far from Mildenhall airfield.

On the 12th, a second train was laid on in which 200 personnel were loaded onto 30 cars, led by Flt. Lt. D. S. McCann, they made their way north arriving at Leeming Bar station at 21.40 hrs. After unloading, a warm and no doubt welcome meal was provided, and then the personnel all retired for the night. Also on the 12th, a further 150 personnel transferred by air, flying in seventeen of the squadron’s aircraft. They made their way from Mildenhall, not to Leeming airfield but to RAF Skipton, where they stayed the night. The next day, they made the last leg of the journey, transferring across to Leeming landing on the one serviceable runway. Here they unloaded and prepared the airfield for operations. However, the stay was short lived, a visit by the Canadian Minister of National Defence for Air, the Honorable Charles Gavan “Chubby” Power, MC. PC., and Air Marshall L.S. Breadner the following day, preceded the squadron’s move out from Leeming to RAF Topcliffe, where operations would finally finally began once more.

Named 419 (Moose) Squadron they were named after their first Commanding Officer, Wing Commander John “Moose” Fulton, and displayed a Canadian Moose in the centre of their unit crest. Not joining 6 (R.C.A.F.) Group until the following year, they flew Wellingtons into Leeming going on to be resident at several of the Group’s airfields. It was 419 Sqn. pilot Andrew Charles “Andy” Mynarski, who would so bravely try to save the life of his trapped tail gunner; Mynarski himself dying from the severe burns he received in the action. The Gunner, Cpl. Pat Brophy, remarkably survived the aircraft’s crash, and it was his testimony that led to Mynarski receiving the Victoria Cross.  The Canadian Warplane Heritage Museum in Hamilton, Ontario have restored and fly, one of only two air worthy Lancasters as a memorial and tribute to Mynarski’s brave efforts.

Canadian Lancaster C-GVRA

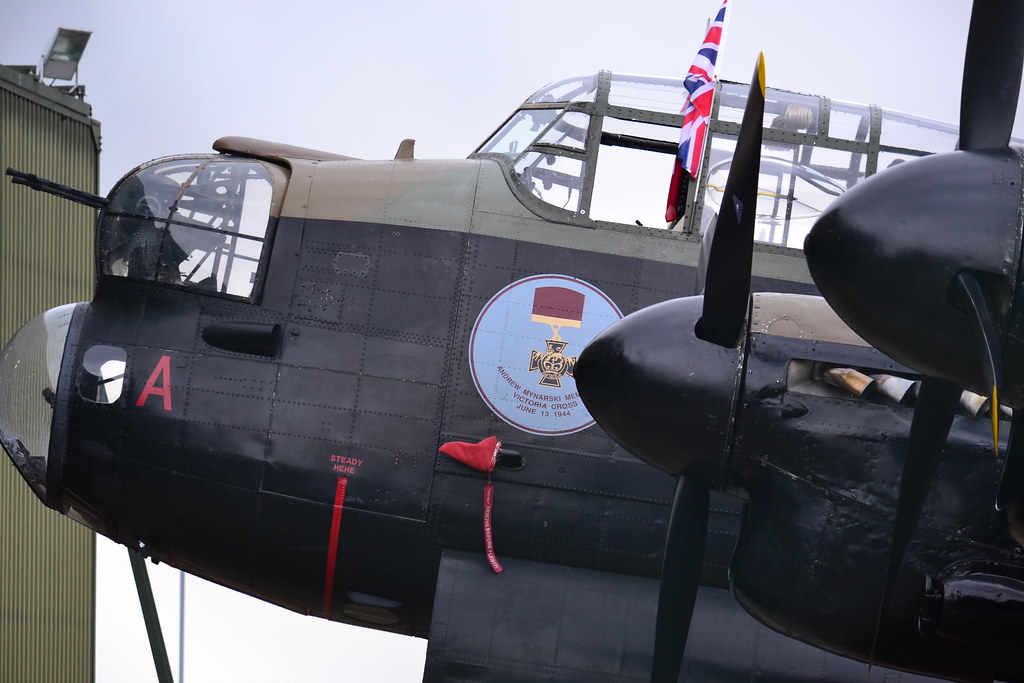
Canadian Lancaster KB726 ‘VR-A’ dedicated to Andrew Mynarski on her arrival at RAF Coningsby August 2014. The dedication to Mynarski being displayed beneath the Lancaster’s cockpit.

A rather impromptu visit interrupted changes at Leeming, when P.O. Colin Frank Sorensen (RCAF) was practising aerobatics in the Leeming vicinity in Spitfire P8784. During a manoeuvre his engine cut out, luckily he was able to make a wheels up landing after gliding into Leeming. The aircraft was badly damaged in the landing but the Danish born Sorensen walked away unhurt.

The second of the six Canadian Squadrons to arrive at Leeming, 408 (Goose) Sqn., made their appearance on 14th September 1942, the squadron arriving whilst  in the process of changing over from the Hampden to the Halifax. After a busy, but ‘run of the mill’ period, October would prove to be rather significant, although the Operational Record Books wouldn’t quite recognise it as such. The entry for October 1st 1942*3  states:

1.10.42.

Today started a month which proved to be a rather dull one from the historian’s point of view, but a very busy one for the squadron. The printed word can hardly paint the picture of industry of receiving aircraft and modifying them for operations, of air and ground training and of personnel going to and coming from various courses of instruction on Halifax aircraft and equipment.

This entry would kick off a short period of major events that were in no way ‘run of the mill‘! Firstly, on the 2nd October, confirmation was received at Leeming that two of 408 Squadron’s aircrew had successfully evaded, making their way to Gibraltar after being shot down over Belgium in the former Commanding Officer’s aircraft. Their remarkable journey had taken them across the European continent to safety – quite an amazing achievement in itself. Unfortunately, there had been no word as yet as to the whereabouts of the Commanding Officer.

After that on the 11th, the first of the new four-engined heavy bombers arrived, two Halifax MK.Vs, which were subjected to great scrutiny and discussion by the crews. Their presence giving the squadron a renewed keenness to get back to operations. As they milled around the aircraft, morale was instantly lifted, and a new impetus had been injected. By the end of the month there would be thirteen MK.V’s all being modified ready for operations.

Additional changes on the 12th, saw 408 (RCAF) Squadron Conversion Flight along with 405 (RCAF) Conversion Flight merging to become 1659 Canadian Conversion unit (Heavy Conversion Unit) here at Leeming, the record books playing down the historical  importance of early October 1942.

This impetus would see 408 Sqn. through to early November without loss, until on the afternoon of 9th November 1942, Halifax V, DG238 piloted by Flt. Sgt. R. Bell DFM, stalled and crashed 5 miles east of Croft airfield. The entire crew were tragically lost in the accident in which they were participating in a fighter affiliation exercise. The event marked not only the first loss for 408 Sqn. since arriving here at Leeming, but the first loss of any Halifax V in the whole of Bomber Command.

However, within a month of the first Mk.V’s arriving at Leeming, 408 Sqn. would begin receiving another mark of the Halifax, this time the MK.II with its Merlin XX inline engines. They would keep this model for a further year until replacing them, for a short while, with the Lancaster.

The November tragedy would round off 408’s year, taking them into 1943 and a new year that would see Bomber Command finally ready – fully trained and fully operational with four engined heavies. Harris would waste no time in using this to his advantage, striking at the many cities deep in the heart of Germany time and time again.

By January 1st, 1943, 4 Group had transferred no less than ten airfields over to the Canadians, their numbers rising as more and more aircrews were passing through the training programme. Along with Leeming, the Canadians now operated from: Croft, East Moor, Middleton-St-George, Topcliffe, Dalton, Skipton-On-Swale, Dishforth, Linton-On-Ouse and Tholthorpe. The Canadians were quickly becoming a force to be reckoned with.

For 408 Sqn. 1943 finally saw them confirmed as operational with seventeen MK.IIs and one MK.V on their books, it would also see their first operational casualty. On January 23rd, Halifax MK. II ‘EQ-C’ lost power in both starboard engines, this loss of power caused the aircraft to crash near to Ossington in Nottingham. Thankfully though, all the crew escaped unharmed, but it was a rather unfortunate start to 408’s mission record.

Engine fires and engine failures would see several other aircraft crash over the next few months. On return from Koln on the night of 14th – 15th February, Halifax ‘EQ-U’ crashed when the port outer engine burst into flames on the approach to the airfield. After gaining some height the pilot Flt. Lt. R. Boosey ordered the crew to evacuate the aircraft. All but one, an American, survived, his parachute failing to open in time.

Following the attack by a night-fighter on 1st – 2nd March, Halifax EQ-H,  also suffered engine failure on the port side. As a result of the attack, the pilot F.O. A. Stewart (RNZAF), dropped his bombs and turned the aircraft for home. Picked up by another night fighter, the lonesome aircraft was again attacked this time the result was more decisive, the Halifax being shot down. After the crash, three of the crew were taken prisoner, the remainder managing to avoid capture going on to evade their enemy.

Enemy action may have also caused a further Halifax’s loss on the night of 12th – 13th March. Whilst on finals returning from Essen,  Halifax ‘EQ-S’ lost both port engines as they also cut out. Unable to control the violent yaw, the aircraft came down not far from Leeming airfield, again thankfully all the crew escaped unharmed, the aircraft coming off much worse.

The ground crew doing maintenance work on a Halifax II of No 408 Squadron at Leeming, August 10th, 1943.

The ground crew completing maintenance work on a Halifax II of No 408 Squadron at Leeming, August 10th, 1943. days before they departed Leeming. (National Defence Image Library, PL 19510 – Via Juno Beach Centre)

During March 1943, a further Canadian unit arrived at Leeming airfield – 405 (Vancouver) Squadron. They were the first Canadian unit to have been formed overseas, and the first to carry out an operational mission. It then went on to be the only Canadian unit to be part of Bennett’s elite Pathfinder Group. 405 Sqn. also had the honour of being the first to operate the Canadian built Lancaster, the MK.X, although its entry not occurring until the dying days of the war. Remaining at Leeming from early March to mid April, 405 Sqn. departed for Gransden Lodge on the 19th. Their journey to Leeming had taken them through Driffield, Pocklington, Topcliffe and Beaulieu, a two year journey that had started on April 23rd 1941.

405 (Vancouver) Sqn had earlier taken part in the controversial 1,000 bomber raid on Cologne, and had taken part in maritime operations before joining 6 Group. Their stay here being a brief one, being transferred by special train (X771) to Gamlingay station, and onward travel to Gransden Lodge and 8 Group.

It was also during April, that another Canadian unit would pass through Leeming, 424 (Tiger) Squadron, staying here for just one month before moving on.  424 Sqn. took their name from the Hamilton Wildcats, a Canadian Rugby team that played in the city of Hamilton, Ontario, after the people there adopted the Squadron as their own. Formed in December 1942 at Topcliffe, they operated Wellington IIIs which they changed for MK. Xs prior to moving over to Leeming, and eventual departure to North Africa.

The fifth Canadian unit to reside at Leeming arrived on 5th May 1943, in the form of 427 (Lion) Sqn. Four days earlier, orders had been received by 427 Sqn. that their aircraft (Wellington MK.X) were to be flown to RAF Skipton-On-Swale to form a new Canadian Squadron 432 (Leaside) Sqn., after which, their personnel were to be transferred here to Leeming, where they would receive new Halifax MK.Vs.

On the next day, twenty-one aircraft and five crews led by Sqn. Ldr. W. McKay of Vancouver, flew to Skipton, taking with them equipment and personnel. The departure was honoured by a party in the Officers’ and Sergeants’ messes both of which had been opened to all ranks, resulting in a party of true ‘Lion Squadron’ style.

The 4th and 5th then saw the transfer of the crews and equipment to Leeming, the stark contrast between a main station and satellite station coming as a pleasant surprise for the personnel of 427 Sqn. The transition from one to the other meant that there would be no flying for the squadron over the next few days, aircraft not having been fully modified or prepared for operational duties.

With two full squadrons now operating at Leeming, Halifaxes were littered across the airfield, the hardstands almost bursting with the different examples.

It was at this time (8th) that the BBC visited Leeming, making a documentary film illustrating the flight of the commanding Officer and his crew and how they had gallantly won their collection of medals. It was impeccable timing as another medal was also awarded that day, the squadron’s first DFM to Flt. Sgt. Higgins for his part in recent operations.

Over the next few days, aircrew took great pride in adorning their new aircraft with painted motifs, a tradition that had become steadfast in American circles and now more frequent within Bomber Command.

On the 24th May, the M.G.M. film company officially adopted the Squadron, in a grand ceremony outside the hangars, in which speeches were made and medals were awarded. During the ceremony a draw was held in which seventeen names were put into a hat and one drawn out. The lucky winner got to chalk the name of Lana Turner on his aircraft, Turner being one of M.G.M’s biggest stars and an icon of Hollywood glamour. The lucky pilot was Sgt. Johnson who had the privilege of chalking her name on his aircraft in front of a cheering crowd.

Image result for Lana Turner

Lana Tuner – the pin up of Canadian crews. Wikipedia (public domain)

On the 28th the squadron finally became operational with the first mission the next day to Wuppertal. With thirteen aircraft booked to fly, one suffered technical difficulties and so only twelve made it into the air. All returned to Leeming with only one having to land away at Thurleigh due to severe damage. 427 Squadron’s war had now officially begun at Leeming.

As the summer progressed so too did operational sorties. An increase in sorties also meant an increase in risk. After all the parties and the celebrations, 427’s morale was high, but it would be short-lived, the dangers of the air war were about to be made very clear to the crews of Leeming.

On the night of 12th – 13th June, Halifax V DK183 (427 Sqn) was brought down by a night-fighter over Germany. In the attack three crewmen were killed, another was injured and three others were taken prisoner, but there was yet more to come.

A near tragic accident was only just avoided on the 16th when Flt. Sgt. E. Johnson landed after a training flight. On landing, the aircraft swung badly, and in avoiding a group of airmen, Johnson crashed the Halifax – thankfully without injury.

June continued its onslaught when on a mission to Krefeld, three of Leeming’s longer standing 408 squadron aircraft were shot down. Of the twenty-one crew aboard only seven made it out alive, all the survivors being taken prisoners of war. On the following day (22nd – 23rd) it would be 427 Sqn’s turn and another four aircraft would be lost. This time, only two of the twenty-eight survived, both being picked up by German forces and incarcerated in POW camps. In two nights, forty-nine airmen had been lost, nine of them ending up in German internment camps. But the bad spell was not yet over, another three 427 Sqn aircraft;  DK135, DK144 and DK 190 along with a 408 Sqn MKII, JB858, were lost two nights later – another fourteen airmen were gone and seven more taken prisoners of war. The end of June simply couldn’t come soon enough.

But July would carry on in the same vein, 408 Sqn. losing two aircraft on the night of 3rd – 4th July, JB796 ‘EQ-C’ was lost with all but one of the crew, whilst JB913 ‘EQ-F’ was lost shot down by a night-fighter just after midnight. Two of this crew evaded whilst the others were taken prisoner by the German authorities. Both aircraft were on operations to Koln.

With a further three lost at Gelsenkirchen on the night of 9th – 10th July, two more on July 13th – 14th and one further aircraft on 27th – 28th July; the summer would come to a close with 408 having lost forty-two Halifaxes since being made operational earlier that year. 427 Sqn were not far behind in the loss stakes, the Canadians were taking a heavy battering and the mess halls must have seemed remarkably light.

It was during this time that the pilot of 408 Sqn Halifax ‘JD174’, F.O. Donald Thomas Bain RCAF (s/n: J/9412) would earn the DFC for his actions in saving his crew. The aircraft had departed from Leeming 9 minutes after midnight on the night of the 14th to bomb Aachen as part of a 374 strong force of allied bombers. After having the hydraulic system badly damaged by night fighters, Bain lost his attackers only to be subjected to further attacks on the homeward leg of the flight. Again, F.O. Bain managed to loose his pursuers, and once over the English coast realised that the damage to the hydraulics was more extensive than perhaps they first thought. The undercarriage could not be lowered, and so a belly landing was the only way the aircraft was going to be put down. However, with his bomb bay still full of bombs, this was not an option and so F.O. Bain gave the bail out order, turned the aircraft toward open ground and departed himself. After landing badly and breaking both ankles, F.O. Bain was discovered by a local farming family who, suspicious of his accent, dragged the wounded airman back to the farm house where he managed to convince them he was in fact Canadian, and not an enemy spy in disguise. He was then treated for his injuries and allowed to return to operational duties later on.

Bain’s received a DFC for his actions in saving his crew, the citation appearing in the Third Supplement of the London Gazette on August 6th 1943 which stated:

Flying Officer Donald Thomas Bain (Can/J.9412), Royal Canadian Air Force, No. 408 (R.C.A.F.) Squadron. One night in July, 1943, this officer piloted an aircraft to attack Aachen. Whilst over the target area, the bomber was seriously damaged when engaged by an enemy fighter. Despite this, Flying Officer Bain made several  determined runs over the objective. On the return flight 2 more enemy fighters were encountered but Flying Officer Bain out-manoeuvred them. By superb airmanship and great tenacity he succeeded in flying the crippled bomber to this country. He displayed commendable courage and a fine fighting spirit in circumstances of great difficulty.”

At the end of August, 408 Squadron were then transferred out of Leeming moving to RAF Linton-On-Ouse, another of 6 Group’s airfields a short distance away. With 427 Sqn. now being the only squadron on site, there was once again room for one final Canadian unit to join them.

The last Canadian squadron to use Leeming arrived on August 13th 1943, 429 (Bison) Sqn who like 427 Sqn. had swapped their Wellingtons for Halifaxes. The transition for the majority of these squadrons taking the same steps, from Wellington to Halifaxes and onto Lancasters and eventual disbandment.

429 Sqn. were only based at two airfields in their entire operational history, East Moor where they were formed, and Leeming where they were disbanded.

In January 1944 the Halifax Vs of 427 Sqn. were replaced by the MK.III. All this changing between aircraft models was proving to be a headache for the ground crews. Whilst some components were common and easily maintained, others were not, new tooling being required particularly when changing from radial to in-line Merlin engines.

By now the air war was swinging in the favour of the allies and tactics employed by the Luftwaffe were becoming more calculated and desperate. Attacking a bomber from  its blind spot – underneath – had long been a method used by Luftwaffe night fighter pilots, and as a result mid upper gunners were rapidly becoming redundant. To counteract this, it was considered achievable by removing the Halifax’s turret in 429 Sqn aircraft and covering over the resultant hole. Now a window could be inserted into the belly of the aircraft and the redundant gunner, laying on a mattress, could be used to look out for attacking aircraft from beneath*7. The lighter load also meant that the aircraft could gain a little more speed and altitude, always a bonus when in a heavy bomber over occupied territory.

In the early part of 1944, Leeming suffered a series of puzzling fires, all minor, but none the less strange. The civilian workforce were suspected and as a result four were relieved of their duties in June with another 24 being reprimanded for their behaviour*7.

Halifax B Mark III, LW127 ‘HL-F’, of No. 429 Squadron RCAF, in flight over Mondeville, France, after losing its entire starboard tailplane due to bombs dropped by another Halifax above it. © IWM (CE 154)

On July 18th 1944, Operation ‘Goodwood’ was put in place. The operation required the bombing of five German held positions to the east of Caen, prior to the British Second Army’s attack.  429 Sqn. were part of this massive raid of 942 aircraft of which 260 were Halifaxes. Whilst flying on this mission Halifax LW127 was struck by falling bombs from aircraft above, its tailplane being severed completely off on the one side. Now difficult to fly, the pilot Flt. Lt. G Gardiner (RCAF) gave the bail out order, of the seven in the aircraft that day, three lost their lives, one evaded and three others were taken prisoner. A second Leeming aircraft (427 Sqn.) LV985, was also lost that day, this time with the loss of all those on board. This apart, the mission was considered a complete success with Bomber Command dropping 5,000 tons of bombs and US Forces an additional 1,800 tons.

The striking of bombers from above was not an uncommon one, for a similar event occurred on August 3rd, when another 427 Sqn Halifax LW163 ‘U’ was hit no less than three times by falling bombs from above. The pilot, F.O. L. Murphy, managed to keep the aircraft flying, delivering his own bomb load on target before returning to Leeming this time making a safe landing. Once on the ground the damage could be properly assessed, a hole had been made through the fuselage behind the turret, with a further hole through the starboard mainplane.

The supply of materials was always difficult during war time, and a shortage of bombs at Leeming caused another headache for ground crews. A shortage of 1000lb bombs meant that bombs had to be ‘borrowed’ from Dishforth until new supplies could arrive. The lead up to D-Day was particularly busy, with some 37,000 bomb tails having to be collected from Skipton in readiness for an all out maximum effort.

In May 1944 the Halifax IIIs of 427 Sqn. were replaced by Avro’s magnificent showpiece the Lancaster Mk.I and MK.III; a four engined heavy that had been born out of the disastrous, under powered twin-engined Manchester. For a year 427 Sqn. flew operations in the RAF’s ultimate bomber. By the end of the war, 427 Sqn. had dropped over 8,500 tons of bombs, in just over 3,200 sorties, the majority of these occurring in 1944. In total 101 crews had been lost  in operational sorties between 1943 and 1945 from Leeming, a stark ending to a bright and happy start.  427 Sqn was eventually joined in the flying of the Lancaster by 429 (Bison) Sqn. who eventually swapped their Halifaxes for the Lancaster in May 1945.

With the end of the war in Europe and eventually the war in Japan, celebrations began in earnest at Leeming. Its doors were thrown open to the locals and many parties were held in celebration. Trips were offered to the WAAFs and ‘thank yous’ paid to the ground crews through flights over bombed German cities.

In August 1945, the last two squadrons of 6 Group passed over to 1 Group, operating under a new command following the disbandment of the ‘Base’ concept. Leeming being No. 63 base disbanding on August 31st, 1945. The base concept, implemented during the war, improved both administrative and technical services across a group of stations, streamlining the two processes by giving overall control of several airfields to one ‘base’ station.

By now Britain’s airfields were littered with unspent ordnance and it had to be disposed of. The skies continued to be full of the sound of heavy bombers taking these bombs out over the sea where they were dropped into the waters below. With disbandment on the horizon and a return to civvy street, there would be one last roll of the dice and one last casualty to remind the Canadians that flying can be a dangerous game.

On November 5th 1945, whilst on a training flight, Lancaster RA571 ‘AL-D’ of 429 Sqn crashed into a hillside, four of those on board, one an aero-mechanic, would not be returning home to a civilian life.

In the remaining months crews from both 427 and 429 took part in the repatriation flights under Operation ‘Dodge‘. Flying out to Italy, many crews ‘extended’ their stay before returning home to Leeming.  By May 1946, most crews had by now departed and on the 31st, both 427 and 429 Squadrons officially disbanded, the Operational Record Books*5 stating:

The return to Canada of Nos. 427 and 429 Squadrons, the last of the Canadian Heavy Bomber Squadrons which so ably operated in Bomber Command throughout the war and subsequent emergency, cause a regrettable break in an unforgettable relationship of the air, founded during (unreadable) heroic days and nights when the command bore the brunt of the offensive against the enemy.”

It goes onto say:

During the war, the R.C.A.F. Squadrons in Bomber Command (unreadable) for themselves the most commendable operation which will forever remain prominent in the history of air warfare, and in the annuls of Bomber Command. Not the least of these are the proud operational records, too long to mention here, of Nos. 427 and 429 RCAF Squadrons.”

it ends:

I sincerely hope that our mutual ties of comradeship which have been closely knit in war will endure, and that they will be fostered throughout the peace by the more peaceful activities of our two great nations.”

Both the importance and the contribution of Canadian crews (or any other nation for that matter) can never be understated. Trained through the British Commonwealth Air Training Plan in Canada,  they would go on to form a third of the total number of Bomber Command air crews operating during the Second World War. They would become some of the elite bomber crews, one of the fourteen squadrons forming part of Bennett’s Pathfinder force in 8 Group.

With that, Leeming was put into wind down, the rear party departed and Leeming was then at peace once more. But the skies over Yorkshire would not stay quiet for long.

In the final part of this trail, Leeming enters the jet age, its future still in the balance as many of Britain’s airfields are closed and sold off. But with new aircraft coming on line and a new threat looming from the east, Leeming survives and takes on a new role.

Australian Flt. Sgt. Rawdon H. Middleton VC (RAAF) 149 Sqn RAF

100641

Pilot Officer Rawdon Middleton (RAAF)*1

Middleton (s/n: 402745) was born on 22nd July 1916 in Waverley, New South Wales, Australia. Son of Francis and Faith Middleton, he was educated at Dubbo Hugh School. Nicknamed ‘Ron’ by his friends, he was a keen sportsman excelling at many sports particularly cricket and football. After leaving school, he worked as a ‘Jackaroo’ (cattle handler) until joining the Royal Australian Air Force on the 14th October 1940 under the Empire Air Training Scheme. He learnt to fly at Narromine, New South Wales and then was sent to Canada for further training in preparation for his posting to the UK. He finally arrived in Britain in September 1941, as a second pilot, and his first operational squadron was No. 149 Squadron RAF, who were flying Short Stirling bombers out of both Lakenheath and nearby Mildenhall in Suffolk.

P01019.003

Five student pilots from No. 7 Empire Air Training Scheme (EATS) course at No. 5 Elementary Flying Training School (5 EFTS) Narromine. They are left to right: Aircraftman (AC) Gordon Orchard; AC Douglas Scott; Leonard Reid; Pilot Officer (PO) Douglas Wilberforce Spooner (DFM); PO Rawdon Hume Middleton*2

Middleton’s first experience of operations, was in a Short Stirling over the Rhur, the industrial heartland of Nazi Germany. After spending a short time with 149 squadron he moved temporarily to No. 7 Squadron (RAF).

In July 1942, as first pilot, he was given his own aircraft and crew, it was also around this time that he returned to 149 squadron.

Their first mission together would be on July 31st, to bomb the strategic and heavily defended target, Düsseldorf. Middleton and his crew would continue to fly together and took part in other prestigious missions; namely Genoa on the 7th of November and his 28th mission, Turin on the 20th November. His 29th and final mission, would take place on the night of 28/29th November 1942.

In the early evening of the 28th he took off in Stirling BF372 coded ‘OJ-H’ as part of the raid on the Fiat works in Torino, Italy, along with 227 other aircraft which included – 117 Avro Lancasters, 46 Short Stirlings, 45 Handley Page Halifaxes, and 19 Vickers Wellingtons.

Middleton’s crew consisted of: Ft.Sgt. Leslie Anderson Hyder, Ft. Eng: Sgt. James Ernest Jeffrey, Bomb Aimer F.O. G. R. Royde, Wireless Operator: Sgt. John William Mackie; Gunners: P.O. N. E. Skinner, Sgt. D. Cameron and Sgt. H. W. Gough. Three of these had already completed their tour of 30 operations and could have left. However, their dedication to Middleton kept them together.

The mission would take the aircraft over the Alps and the Stirling, laden with bombs and fuel combined with having a notoriously poor ceiling, had to negotiate through the mountains rather than fly over them. A factor that often resulted in a high number of casualties.

Once over the target area, OJ-H was subjected to an extreme flak barrage. With poor visibility, Middleton had to make three passes over the target area to enable his crew to positively identify it. It was on the third pass that a shell burst hit the cockpit. The resulting damage was severe, and fragments had hit Middleton’s head badly injuring him. His right eye was lost and his skull exposed. There were further hits on the aircraft’s fuselage causing considerable damage to the control systems and airframe. Knocked unconscious by the blast, Middleton lost control and the aircraft plummeted through the skies to an altitude of around 800ft. The second pilot, Fl.Sgt. Hyder eventually managed to take the controls, release the bombs over the target and then pull the aircraft into a climb, safely reaching 1,500ft.

With his aircraft severely damaged, Middleton had a choice, get his crew to bail out over occupied France and certain capture, fly to Africa or head back to England; a journey that would last over 4 hours and put the aircraft at risk of attack and the crew in danger. Wanting to give them a fighting chance of getting home, he opted for the latter, and set a course for England.

SUK10501

Middleton was buried with full military honours at St. Johns Church, Beck Row. Suffolk.*3

The aircraft experienced a number of attacks as they crossed occupied France, but Middleton, fighting for survival, kept reassuring the crew that he would get them home. Eventually, and against all the odds, they made the English coast, and once over land Middleton ordered the crew to bail out. Five crewmen left the stricken aircraft whilst the other two remained to help him control it. Turning for the Channel, Middleton ordered the two remaining crew members to bail out, whilst he stayed at the controls, steadying the aircraft.

By now the Stirling was very low on fuel and it finally gave up the fight and crashed at 03:00 on the morning of November 29th 1942. Middleton, too injured and too weak to escape the wreckage, drowned within the aircraft fuselage. His two crew members, Sgt. James Ernest Jeffrey (576050) age 19 and Wireless Operator Sgt. John William Mackie (994362) age 30, despite escaping, also drowned. Both the bodies of Sgt Mackie and Sgt. Jeffrey were washed ashore later that day on the 29th.

Middleton’s body remained in the aircraft, but was eventually freed from the wreckage by the action of the sea, and was washed ashore on Shakespeare Beach, Dover, in February 1943. His remains were taken to RAF Lakenheath and he was buried in St John’s churchyard, Beck Row, within sight of his airfield in Suffolk, with full military honours. Middleton was only 26 and only one mission away from ending his tour and returning home.

For his action, dedication and bravery, Flt. Sgt. Middleton was posthumously awarded the Victoria Cross, the first to any serving member of the R.A.A.F in World War II. He was also posthumously awarded a commission as Pilot Officer, backdated to mid November before his sortie to Turin. Thirty years later, in 1978, Middleton’s V.C. was presented to the Australian War Memorial, in Canberra for safe keeping and preservation.

For their actions, the other crew members received three DFMs and two DFCs. Fl.Sgt. Leslie Hyder (DFM) was injured, P.Officer. N. Skinner (DFC) was also injured, along with Sgt. H. W. Gough (DFM). F.O. G. R. Royde (DFC) and Sgt. D. Cameron (DFM) escaped unhurt.

The London Gazette published a report on 12th January 1943. It said:

“Fl. Sgt. Middleton was captain and first pilot of a Stirling aircraft detailed to attack the Fiat Works in Turin one night in November, 1942. Very difficult flying conditions, necessitating three low altitude flights to identify the target, led to excessive petrol consumption, leaving barely sufficient fuel for the return journey. Before the bombs could be released the aircraft was damaged by anti-aircraft fire and a splinter from a shell which burst in the cockpit wounded both the pilots and the wireless officer. Fl. Sgt. Middleton’s right eye was destroyed and the bone above it exposed. He became unconscious and the aircraft dived to 800 ft. before control was regained by the second pilot, who took the aircraft up to 1,500 ft. releasing the bombs, the aircraft meanwhile being hit many times by light flack. On recovering consciousness Fl. Sgt. Middleton again took the controls and expressed his intention of trying to make the English coast, so that his crew could leave the aircraft by parachute. After four hours the badly damaged aircraft reached the French coast and there was once more engaged and hit by anti-aircraft fire. After crossing the Channel Fl. Sgt. Middleton ordered the crew to abandon the aircraft. Five left safely, but the front gunner and the flight engineer remained to assist the pilot, and perished with him when the aircraft crashed into the sea”.

Funeral service for 402745 Flight Sergeant Rawdon Hume Middleton, the RAAF’s first VC winner. He was buried with full military honours in a country churchyard near his station. Air Vice Marshal H. N. Wrigley represented the High Commissioner for Australia (Mr S. M. Bruce) and the RAAF. The graveside service was conducted by Squadron Leader H. C. Thrush of Prospect, SA, RAAF Chaplain. (Australian War Memorial Public Domain)

Middleton’s citation read:

“Flight Sergeant Middleton was determined to attack the target regardless of the consequences and not to allow his crew to fall into enemy hands. While all the crew displayed heroism of a high order, the urge to do so came from Flight Sergeant Middleton, whose fortitude and strength of will made possible the completion of the mission. His devotion to duty in the face of overwhelming odds is unsurpassed in the annals of the Royal Air Force”.

In honour of Middleton’s bravery, Number 1 RAAF Recruit Training Unit at RAAF Base Wagga has renamed the club in his name, the “Middleton VC Club”, and he also appeared on one of the 1995 Australian 45c stamps. The dining hall located at the nearby (now American) base at RAF Mildenhall in Suffolk, has also been named in his honour.

St. John's Church Beck Row, Mildenhall

Fl. Sgt. Rawdon Hume Middleton, VC (RAAF) 149 Sqn RAF, St. John’s Church, Beck Row, Suffolk.

Middleton was a brave and dedicated young man who gave his life to save those of his crew. Each and every one of them acted with the highest dedication, sadly for some, it cost them dearly.

Sources

*1 photo courtesy of Australian War Memorial, image 100641, Public domain.

*2 photo courtesy of Australian War Memorial, image P01019.003, Public domain.

*3 Photo courtesy of Australian War Memorial, Image SUK10501, Public domain

*4 Photo courtesy of Australian War Memorial, Image SUK10500, Public domain

Heroic tales – Aviation Trails.

Remembrance Sunday – Fogo Churchyard – Lest we forget.

On this, Remembrance Sunday, we pay tribute and homage to those who gave the ultimate sacrifice, to those who put their lives on the line so that we may live peacefully and free.

Not far from the former RAF Charterhall airfield in Berwickshire, is a small church that dates back to the late 1600s. The hamlet in which it stands, Fogo, is small. In 2004 it had a population of just 21 people, yet it is the resting place of 16 service personnel from the Second World War. These are Commonwealth graves with men from: the Royal New Zealand Air Force; Royal Australian Air Force; Royal Navy Volunteer Reserves;  Royal Air Force Volunteer Reserves; Royal New Zealand Navy and the Royal Canadian Air Force, all of whom died in service on and around RAF Charterhall.

Fogo Church

The sixteen men lay together in a Commonwealth War Graves Commission site.

These are those sixteen – We shall remember them:

Fogo Church

F.O. John Morris, (s/n: J/10253) RCAF, killed October 24th, 1942.

F.O. John Morris was one of many pilots who suffered as a result of the autumn storms. It is believed he lost control of his Beaufighter MKIIF (R2313) whilst in the clouds and crashed into the ground in the local area.

Fogo Church

F.O. Thomas James Donohue (s/n: 411880) RAAF, Killed November 10th, 1942.

F.O. Donohue was one of many Australian crewmen to pass through Winfield and Charterhall. Sadly it was to be the final resting place for F.O. Donohue, his Blenheim MK V (BA111) crashing into the ground following the port engine cutting out. This was the third Blenheim crash of the month.

Fogo Church

Sgt. Clarence Leonard Hutchesson (s/n: 401729) RAAF, Killed November 13th, 1942.

On the 13th November Beaufighter MKIIF R2378 took off from RAF Winfield with Pilot Sgt. Hutchesson and Navigator Sgt. R. Bell on board. The aircraft collided with another Beaufighter (T3359) near to Kettleshall Farm, Poleworth. Both crewmen in R2378 were killed, whilst the other crew managed to fly back to Winfield where they landed safely.

Fogo Church

Flt. Sgt. Terence Cosson (s/n: 417024) RNZAF, Killed June 9th, 1943.

Flt. Sgt. Cosson was killed when the Beaufighter he was flying (V8163) spun into the ground and burned.

Fogo Church

Petty Officer Airman Arthur Herbert Percy Archibald (s.n: 3171) RNZN, Killed July 19th, 1943.

Petty Officer Airman Archibald was flying a Fairy Barracuda MKII (DP868) from the RNAS Worthy Down to Scotland when he got into difficulties. The engine failed, after which the aircraft crashed at Charterhall killing him.

Fogo Church

Flt. Sgt. Will Andrew (S/n: 415280) RNZAF, Killed July 27th 1943.

July 1943 saw a high number of accidents at Charterhall, Flt. Sgt. Andrew being one of the first fatalities of the month. He was killed when his Beaufighter (T3419) swung on take-off. This action caused the aircraft to collide with a blister hangar and then crash into a taxiing Beaufort. The pilot of the Beaufort was uninjured although the aircraft sustained considerable damage.

Fogo Church

Flt. Sgt. Edward John Stacy Williams (s/n: 409952) RAAF, Killed September 19th, 1943.

Flt. Sgt. Williams was killed following a night flight engine fire. The pilot of the Beaufighter (T3361) Flt. Sgt. McGrath reported to RAF Winfield that he and his navigator were bailing out, but the when the aircraft was later found in the area, the bodies of both crewmen were still inside – both dead.

Fogo Church

F.O. Gordon William Bigmore (s/n: 418047) RAAF, Killed October 18th, 1943.

It is believed that on the 18th, F.O. Bigmore lost control of his aircraft, Beaufighter MKIIF (T2438) whilst in cloud and on approach to the airfield. The aircraft collided with high ground killing the pilot and causing severe injuries to the navigator F.O. Hirst.

Fogo Church

Sgt. Gilbert Douglas James Hanlon (s/n: 1333983) RAFVR, Killed February 17th, 1944.

Sgt. Hanlon was killed when he lost control on final approach to the airfield at Winfield. The Beaufighter MKIIF (R2375) collided with the ground some 2 miles south of the airfield on farmland.

Fogo Church

Sub-Lieutenant (A) James Allen Luke, RNVR, Killed March 1st, 1944.

March 1944 started off badly, when Sub-Lieutenant (A) Luke (above) and Sub-Lieutenant (A) Newburgh-Hutchins (below) tried to land their Fairy Fulmar in a snow storm at nearby RAF Winfield. The aircraft, a Fulmer MKI (X8696), was on a flight from the trials aircraft carrier HMS Pretoria Castle when it flew into the snow storm.

Fogo Church

Sub-Lieutenant (A) Christopher Newburgh-Hutchins RNVR, killed March 1st, 1944.

Fogo Church

W/O. Hamilton Alexander Douglas (s/n: 405843) RAAF, Killed March 18th, 1944.

On March 18th, W/O. Douglas of the RAAF was killed when the Miles Martinet T.T. (EM481) he was flying crashed on take-off at RAF Charterhall.

Fogo Church

Flt. Lt. Michael John Dunn O’Leary DFC  (s/n: 77614), RAFVR, Killed May 11th, 1944

Flt. Lt. O’Leary DFC was involved in what was possibly Charterhall’s most serious accident, when Beaufighter V8614 suffered an engine failure on the starboard wing; the aircraft unable to gain height, crashed into the ground. Flt. Lt. O’Leary was one of four crewmen killed, a crew that included two instructors and two pupils. O’Leary had just been awarded his DFC for gallantry prior to arriving at 54 OTU.

Fogo Church

F.O. John Owen Scott (s/n: 151287) RAFVR, Killed August 5th, 1944.

F.O. Scott was killed in early August when his Beaufighter MKIF (V8739) suffered engine failure at 800 feet and spun into the ground at Charterhall.

Fogo Church

F.O. Frank Ernest Larkman ( s/n: J/42709) RCAF, Killed March 3rd, 1945.

F.O. Frank Ernest Larkman was another crewman involved in a serious accident, when the Beaufighter NF VI (KV976) he was a pupil in, lost both its artificial horizon and its gyros. At 5,000 feet and in cloud, the pilot Flt. Sgt. Wedgewood as instructor, perhaps became disoriented and the aircraft crashed into the sea 3 miles north of Berwick. A further unknown crewman who was also aboard, also died in the incident.

Fogo Church

F.O. Ernest Arthur Clough (s/n: 147069) RAFVR, Killed July 13th, 1945.

Sadly many crews lost their lives at, or after, the war’s end. Flt. Lt. Clough was one such man. Flying a Hawker Typhoon IB (RB210) of 56 OTU from Winfield, he flew into high ground near North Charlton, Northumberland, in the resultant crash on July 13th, 1945, he was killed.

RAF Charterhall and RAF Winfield were both training grounds where many airmen were trained using unfamiliar or war-weary aircraft. As a result of inexperience, bad weather or in many cases, technical issues, there were a number of accidents many of which ended tragically. These sixteen are just a few of those who lost their lives in these accidents and are now buried in this quiet and secluded part of Scotland.

Lest we forget.

Fogo Church

Fogo Kirk in the autumn sun.

RAF Barton Bendish – Norfolk

In Trail 7 we visited north-west Norfolk, staring at the market town of Downham Market heading on toward Norwich. Here we pass seven airfields and a bomb store. In the second visit of this trail, we leave Downham, travel East to find a few miles along, a field, unmarked and to all intents and purposes, insignificant. It did however, play a vital role and serve several squadrons.

RAF Barton Bendish

At the outbreak of war, orders were issued to all airfields across the UK to implement the ‘Scatter’ directive, a plan to relocate aircraft at various satellite airfields to disperse them away from the main airfield and possible German attack. This meant that many squadrons were spread over several airfields for short periods of time until the immediate threat, or perceived threat, had subsided.

This was first seen at Barton Bendish (a satellite of Marham) when Wellingtons of 115 Sqn located at nearby RAF Marham were placed here. With no cover, the protection Barton Bendish offered seemed small in comparison to the main airfield at Marham.

The openness and cold of Barton Bendish has been noted in several scripts, and this caused problems in the winter months when starting cold engines. ‘Johnnie’ Johnson recalls in Martin Bowman’s book “The Wellington Bomber“*1 how they had to start the Wellington’s engine by getting it to backfire into the carburettor thus igniting unspent fuel in the air intake. This was then allowed to burn for a few seconds warming the carburettor allowing the engine to start. Careful timing was paramount, the danger being that the aircraft could catch fire if you were not cautious!

In the early part of the war Barton Bendish was also used as a decoy site, a flare path being lit at night to attract enemy bombers away from Marham a few miles down the road. How effective this was, is not known, but it may well have saved one or two lives at the main airfield.

Also during 1941,  26 Squadron (RAF) flying Tomahawk IIs were stationed here for three days from the 27th – 30th September, as was 268 Squadron on several other occasions. Also flying Tomahawk IIs, they passed through here during May 1941, then again between the 21st and 25th June 1941, 28th and 30th September 1941 and then again on the 25th/26th October 1941, 268 Sqn who were then based at RAF Snailwell, used the airfield as ‘the enemy’ in  a station defence  exercise, whereby they would perform mock attacks on Snailwell using gas, parachute and low flying strafing attacks methods. Being little more than a field, Barton Bendish provided no accommodation for the visitors, and so the aircrews slept in tents overnight, these being removed the next day after the attacks had been made.

By 1942, the Stirling was becoming a predominant feature at Marham, and with Barton Bendish being too small for its required take off distance, Downham Market became the preferred satellite, Barton Bendish being sidelined for other minor uses.

Little exists about its existence or purpose other than a few mentions in the operational record books of these squadrons, or recordings in the writings of RAF Marham personnel. Rumours state a ‘huge military (HQ) bunker’ and hard standings, but these are more likely farmer’s concrete pans, abundant across the area. No physical buildings (other than pill boxes) were ever thought to have been built and the airfield is listed as a satellite or landing ground of the parent airfield RAF Marham. No other signs seem to exist of the airfield. Another case of an airfield completely disappearing!

Continuing on from Barton Bendish, toward Norwich we shortly arrive at RAF Marham, one of the RAF’s few remaining front line fighter stations.

Sources and further reading

National Archives AIR 27/1563/9

*1 Bowman, M. “The Wellington Bomber“, (2015), Pen and Sword

RAF Methwold -History was made, War was won and Lives were lost.

Whilst visiting the Swaffham (Norfolk) area, this was perhaps more prominent than in many of the other places I’d been. Like other sections, this area was predominately American in nature, forming the back bone of the USAAF, bomber squadrons of the 8th Air Force. An area rich in aviation history there are numerous tales of heroism and valour to be found. Our first stop along Trail 8 is RAF Methwold.

RAF Methwold

Methwold Village sign

Methwold village sign

Located between Downham Market and Thetford, Methwold is a small rural setting on the edge of Thetford Forest. Its village sign and combined memorial, remind the passer-by of its strong air force links – a Lockheed Ventura taking off over the village church.

Methwold was actually built as a satellite for nearby RAF Feltwell and as such, had few squadrons of its own. Being a satellite its runways were of grass construction with little in the way of luxuries for accommodation.

On the day war broke out in Europe, 214 Squadron, equipped with Wellington MKIs, moved from RAF Feltwell to here at Methwold. Feltwell being larger, offered a prime target for the Luftwaffe and so their loss would be Methwold’s gain. The first production Wellington, the MKI was powered by two 1,000 hp Bristol Pegasus XVIII radial engines, and would soon be updated and replaced by the MKIA; the main difference being a change in gun turret from the Vickers to the Nash & Thomson. As part of Bomber Command, 214 Sqn did not carry out its first operational bombing flight until June 1940 some four months after it had left Methwold; but that is not to say casualties were not suffered.

On Monday November 6th 1939, Wellington L4345, crashed whilst circling on approach to Methwold. The accident resulted in the deaths of both crewmen, Pilot Officer J. Lingwood and Aircraftman 1, – A. Matthews.

Tragic accidents were not uncommon in these early stages of the war, another similar incident occurring at Methwold only a month later. In mid December, Pilot Officers W. Colmer and R. Russell-Forbes, along with Leading Aircraftman J. Warriner, were all killed whilst on approach to the airfield flying in another Wellington, R2699. Both these Officers were only recently commissioned and were still considered relative flying ‘novices’.

In February 1940, 214 Sqn departed Methwold and transferred to RAF Stradishall leaving only a small number of Wellington IIIs of 57 Sqn detached from their parent station at Feltwell. These would, in September 1942, be replaced by the mighty Lancaster, the four engined bomber that formed the backbone of the RAF’s Bomber Command.

The Intelligence Room of No. 140 Wing, No. 2 Group, at Methwold, Norfolk. © IWM (HU 81315)

Little happened at Methwold for the next two years, then in October 1942, 21 Sqn arrived. After having flown many missions against coastal targets in the Mediterranean, they were disbanded at Luqa only to be reformed and re-equipped at Bodney the same day. After changing their Blenheims for Venturas in May 1942, they transferred to RAF Methwold where they stayed for six months.

Operating both the Ventura MKI and II, they were the first Bomber Command squadron to re-equip with the type, and were one of the small number of squadrons who took part in the famous Eindhoven raid, attacking the Philips radio factory in December 1942. The daring Operation Oyster, would see the loss of sixteen aircraft – three of which belonged to 21 Sqn. Two of these aircraft crashed in enemy territory, whilst the third ditched in the North Sea after having been hit by enemy gunfire. Using a mix of Venturas, Bostons and Mosquitoes, this mission perhaps revealed the true vulnerability of such aircraft over enemy territory, a warning that would violently repeat itself in the months to come.

The spring of 1943 would again see changes at Methwold; as 21 Sqn departed, the ‘Flying Dutchmen’ of 320 (Dutch) Sqn would move in. 320 Sqn, were formed after the German forces invaded the Netherlands and consisted of mainly Dutch nationals. They carried out both anti-shipping and rescue duties before transferring, from Leuchars, to Methwold via Bircham Newton. Upon arriving here, 320 Sqn was absorbed into No. 2 Group and would shortly swap their Hudson VIs for Mitchell IIs. After a very short transfer period, they then departed Methwold, moving to the much larger base at Attlebridge.

Two further squadrons of Venturas arrived at Methwold in the early spring of 1943. Both 464 (RAAF) and 487 (RNZAF) Sqns were formed, transferred and disbanded in unison, and both consisted of commonwealth crews. Having entered the war in a baptism of fire, they also flew alongside 21 Sqn on the Eindhoven raid; 464 Sqn contributing fourteen aircraft whilst 487 contributed sixteen – each squadron losing three aircraft and all but four of the twenty-four crewmen.

RAF Methwold

One of the original hangars at Methwold.

The Venturas earned themselves the unsavoury title the ‘flying pig‘ partly due to their appearance and partly due to poor performance. Based on the Lockheed Model 18 Lodestar, it was primarily a passenger aircraft and even though it had powerful engines, it performance was low and so operational losses were often high.

On May 3rd 1943, whilst on a ‘Ramrod‘ mission, eleven out of twelve (one returning due to engine trouble) 487 Sqn aircraft were lost to enemy action, and all but twelve of the forty-four crewmen were killed. Of these twelve, Squadron Leader Leonard H. Trent, was captured and taken to Stalag Luft III where he participated in the ‘Great Escape‘. On his eventual return to England at the end of the war, he was awarded the Victoria Cross for his leadership in ensuring the bomb run was completed despite heavy enemy resistance and very high losses.

In the summer of 1943, both 464 and 487 Squadrons became part of the newly formed Second Tactical Air Force; a move that led to their departure from Methwold, along with a new role and new aircraft.

Following their departure, Methwold was passed over to 3 Group and was designated to receive the heavy four-engined bombers of Bomber Command. To accommodate them, the site was upgraded to Class ‘A’ standard. Three runways were built, five hangars (four ‘T2s’ and one ‘B1’) were erected, and a wide range of ancillary buildings added. Aircraft dispersal consisted of 36 hard standings mainly of the spectacle type.

The incoming ground and aircrews would be accommodated in areas to the east of the airfield, buildings were sufficient for a small bomber site of some 1,800 men and just over 300 women, by no means large.

In this interim period on March 13th, a lone American P-47 #42-74727, suffered engine failure whilst on a routine training flight in the area. In an attempt to land at Methwold, the P-47 Thunderbolt crashed, slightly injuring the pilot but writing off the aircraft.

The first of the heavy bombers to arrive at the newly constructed Methwold were the mighty Stirling IIIs of 218 Sqn. A small detachment from RAF Woolfox Lodge, they would operate from here along side 149 Squadron who moved here from RAF Lakenheath in May 1944. 149’s record so far had been highly distinguished. Participating in the RAF’s second bombing mission of the war on September 4th, they had gone on to take part in the first 1,000 bomber raid, attacked prestige targets such as the Rhur, and had taken part in the Battle of Hamburg. They had also been in action in the skies over the Rocket development site at Peenemunde. They had gone on to drop essential supplies to the French Resistance, and one of its pilots, Flight Sergeant Rawdon Middleton, had won the VC for his valour and determination in action. 149 Sqn would go on with the offensive right up until the war’s end, replacing the ill-fated Stirlings with Lancaster MKIs and later the MKIIIs in August 1944.

During the D-Day landings, 149 Squadron were tasked with dropping dummy parachutists away from the Normandy beaches. As part of Operation Titanic, they were to deceive the German ground forces, aiming to draw them away from the Normandy beaches, thus reducing the defensive force. A task that proved relatively successful in certain areas of the invasion zone, it caused confusion in the German ranks and pulled vital men away from drop zones. During this dramatic operation, two 149 Sqn Stirlings were lost; LJ621 ‘OJ-M’ and LX385  ‘OJ-C’ – with all but three of the eighteen crew being killed.

In August 1944, 218 Sqn moved the remaining crews over to Methwold completing the unit’s strength once more. This move also led to them taking on the Lancaster MKIs and IIIs. 218 Sqn was another squadron with a remarkable record of achievements, its most notable being the VC posthumously awarded to Flight Sergeant Arthur Aaron for his ‘most conspicuous bravery’ whilst at RAF Downham Market.

As the allied advance moved across Europe, 149 Sqn supported them. In December 1944, 218 Sqn departed Methwold taking their Lancasters to RAF Chedburgh and disbandment the following year. 218’s losses were not over though, just days before the war’s end on April 24th 1945, Lancaster NF955 ‘HA-H’ crashed on take off, the last fatality of the squadron’s operational record. For 149 Sqn food packages replaced bombs as the relief operation – Operation Manna – took hold. After the fall of Germany in 1945, 149 Sqn ferried POWs back to Methwold in Operation Exodus, and for many, it was their first taste of freedom for many years.

The final squadron to be stationed at Methwold was 207 Squadron, between October 1945 and the end of April 1946 also flying the Lancaster I and III. As with many other bomber command squadrons, its history was also long and distinguished; flying its final mission of the war on 25th April 1945, against the SS Barracks at Berchtesgaden. During its wartime service 207 Sqn had completed some 540 operations, lost 154 crews and earned themselves a total of 7 DSOs, 115 DFCs and 92 DFMs.

In 1946, the Lancasters of 149 Squadron departed Methwold and all fell quiet. The site was officially closed in 1958 and the land returned to the former owners. In the early 1960s, much of the concrete was removed for hardcore, buildings were demolished and the land returned to agriculture, a state it primarily survives in today.

RAF Methwold

Stores huts used for light industry

Methwold airfield is located south of the village of Methwold, accessible by the B1112. As you drive along this road, the technical area is to your left and the main airfield to your right. The entire site is primarily agricultural, with some of the remaining buildings being used for farming purposes or light industry. Many of these are accessible or at least can be seen from the main public highway.

Large parts of the runways do still exist, although much of them are covered in newly developed industrial units, or are hidden away on private land. These most notable developments are at the northern end of the runway closest to Methwold village. However, best views of what’s left, are from the southern end, along a farm track that was once the perimeter track. Also here, is a single large and original ‘T2’ hangar, now used for storing agricultural equipment and other farm related products. This main north-westerly runway, built later in the war, is also used for farm related storage. Divided by a large fence, it is now part track and part storage. The remaining sections of perimeter track, a fraction of its original size, allows access to the runway past the hangar to an area of development further south to where the turret trainers once stood. Also visible here, is the Gymnasium built to drawing 16428/40 later adapted by the addition of a projection room (889/42) for recreational films.

Back alongside the B1112 hidden amongst the woods, is the technical area. Here in between the trees are the former technical huts and workshops now used by small industrial units, many of which survive in varying conditions, some of these are accessible to the general public.

RAF Methwold

One of the former runways looking north-west.

Methwold was never intended to be major player in the war. home to a small number of squadrons, it housed a variety of aircraft and a number of nationals who all combined, tell incredible stories of heroism, bravery and dedication. The squadrons who passed though here, carried out some of the RAF’s most daring raids, whether it be as part of a thousand bomber raid, a small force to attack the heart of Reich, or a diversionary raid to foil air and ground forces.

Methwold is now quiet, agriculture has taken over. The sound of heavy piston engines are now replaced by the sound of tractors, the buildings that once housed brave young men and their incredible machines now home to the machinery of food and farming. The small remnants of Methwold hold stories of their own, for it is here that history was made, war was won and lives were lost – and all in a very unassuming manner.

Notes and further reading 

Local information and further detail is available from the local Methwold history group. 

Methwold was originally visited in April 2013.

RAF Metheringham – One of Bomber Command’s finest. (Part 3)

In this, the last part of RAF Metheringham, we see how one of its brave crews earned the Victoria Cross for their outstanding bravery, and how, as the war camr to a close, Metheringham was closed down and disposed of.

On the night 24th/25th April, 1944, took 106 Sqn back to Germany once more, to Munich and another ‘clear night’ with accurate bombing reported. But, then it was Schweinfurt a city that would become synonymous with high casualties especially amongst colleagues in the US Air Force.

Metheringham would send sixteen aircraft that night with take off commencing at 21.25 from the Lincolnshire airfield with another mix of 4,000lb, 41lb and 30lb bombs. Over the target, marking would again be low level by Mosquitoes but this time  it was inaccurate. Strong winds hampered the bombers, with many of the bombs falling away from the main target. Crews reported large fires across the city accompanied by ‘large explosions’. Sadly these were not to be the target and as a result the mission was not deemed a success.

Of the 206 Lancasters sent out that night (26th/27th) twenty-one were lost to heavy and sustained night fighter attacks, a figure of 10% of the force, a terrible blow for Harris and his Command. From Metheringham, five aircraft failed to return, with a further one returning on three engines. Methringham’s loss that night was some 31%, a third of its force gone in one mission. It was a difficult mission for 106 Sqn, with thirty-six airmen lost,  (JB601 was carrying a second pilot). Ten of these were taken alive as POWs, four managed to evade capture, whilst the rest were killed. The deaths of the remaining twenty-two must have had another huge impact in the Metheringham dining room that morning.

During this mission the remarkable actions by the crew of Lancaster ME669, and in particular Flight Engineer Sergeant Norman C. Jackson (later Warrant Officer), would become well known. After being hit several times by a  night fighter, a fire started in the inner wing section next to the upper fuel tank.  Sgt. Jackson, who had been wounded in the leg and shoulder, donned his parachute and grabbed a fire extinguisher before climbing out on to the wing through an escape hatch in the fuselage roof. Upon leaving, his parachute was deployed into the cockpit area, where his colleagues gathered it up and gradually fed the lines through the hole allowing Jackson to gain access to the fire in the wing. Undertaking such an act on a burning aircraft and at altitude, was no easy task and getting back, had he been successful, virtually impossible. The wind knocked the extinguisher out of his grip which prevented Jackson from succeeding in achieving his aim. The fire, now spreading, began to burn both his parachute, hands and face and fearing for his safety, his colleagues let go, releasing him from the stricken bomber. Sgt. Jackson fell to Earth, his parachute partially burned, opened and allowed him to reach the ground alive, but suffering several injuries in the process.

The 21 year old Canadian Captain, F/O. Frederick M. Miffin D.F.C., then ordered the crew to abandon the aircraft; himself and 20 year old F/Sgt, Norman H. Johnson (Air Gunner) both failing to survive.

Sgt. Jackson’s brave attempt to save his colleagues and their aircraft earned him the Victoria Cross for his actions, his citation being published in the Fourth Supplement to the London Gazette on Tuesday 23rd October 1945.*2

The Schweinfurt raid had been a major blow to the Metheringham crews, but it had also shown their courage and determination to win, regardless of the dangers to their own safety.

Another heavy blow on the night of 7th/8th May took another four aircraft along with all but one of the crew, Sgt. J Smith evading capture, in a month that would see a further six aircraft go down with heavy losses.

June 1944 would see another remarkable event take place. Although the entire crew of DV367 were lost on the night of 7th / 8th, they were all awarded the DFM for their action, an usual act in any squadron, and one that nonetheless reflected the bravery of RAF crews at that time.

RAF Metheringham

Metheringham’s memorial garden rests besides a C-47 Dakota ‘KG651’ as a representative model that visited the airfield at the end of the war. Visitors are able to enter the aircraft and sit in the cockpit.

Following the Allied invasion of Normandy, the US forces would begin to use Metheringham as an evacuation point for wounded American troops from nearby  Nocton Hall Military Hospital. Once a suitable recovery had been made, the troops were brought to Metheringham and flown on to Prestwick for onward travel and reparation to the United States.

Rarely a month would go by without the squadron facing some loss. Exactly a month later in July, Metheringham would see yet another dip in their crew numbers as five more aircraft went down on the mission to St.-Leu-D’Esserent – the flying bomb storage dump. A force of 208 Lancasters and thirteen Mosquitoes accurately bombed the mouth and access roads to the tunnels in which the bombs were being stored. Metheringham’s loss was particularly high, almost a third of the sixteen sent out being lost. Whilst many airmen were either captured or evaded capture, another eighteen were lost.

In September 1944, No. 1690 (Bomber) Defence Training Flight arrived ay Metheringham airfield. A unit formed seven months earlier at Syerston after 1485 (Bomber) Gunnery Flight was re-designated, it operated a number of single and twin engined aircraft including the Spitfire, Oxford and Wellington bomber under the code ‘9M’. They were used to train bomber crews in the art of defence against fighters, performing violent moves to throw off their attacker. One famous pilot of this unit who served at Metheringham was the Commanding Officer Sqn. Ldr. John Leslie Munro, CNZM, DSO, QSO, DFC, JP of 617  Sqn fame. The Flight would leave Metheringham in the summer of 1945, being disbanded in October that same year back at Syerston.

It had been a long and difficult war for the crews at RAF Metheringham. As the end of the war drew ever closer, they all knew their last mission would soon be here. On April 25th 1945, that day arrived.

Sixteen Lancasters took off to either bomb Tonsberg in the southern region of Norway, or mine the Oslo fjord. A last ditch effort to force the capitulation of the German leadership and end the conflict that had devastated the world for the last six years.

By the time the cease fire was announced, 106 squadron had flown 5,834 sorties with a loss of 187 aircraft (59 from Metheringham), 3.21% on average per mission. 17,781 tons of bombs and mines were dropped and 267 decorations awarded.

After the war, 106 Sqn was earmarked for ‘Tiger Force’ operations and training was tailored to meet these new requirements: fighter affiliation sorties, high level bombing and air-sea firing exercises. Also during May, operation ‘Exodus‘ was put into place and a number of 106 Sqn aircraft flew to the Continent to bring back POWs, many landing at Dunsfold on their return. On the 9th May, whilst evacuating POWs from Rheine airfield, one aircraft from 106 Sqn struck a bomb crater causing damage to the aircraft, the crew and their valuable cargo of POWs thankfully escaped unhurt. The aircraft was then repaired with parts being ferried over from Metheringham the next day. Between May 4th and May 11th, Metheringham crews repatriated 1,484 prisoners of war bringing them home from captivity.

During June aircraft were exchanged with those from 8 Group at RAF Oakington, RAF Warboys and RAF Graveley, allowing Operation ‘Firebrand‘ to be completed by the 19th. Other operations included ‘Rebecca‘, ‘Dodge‘, ‘Nickel‘ and ‘SPASM‘.

On June 15th, another Lancaster squadron, No. 467 (RAAF), joined 106 here at Metheringham. In the days preceding their arrival, they spent many hours dropping ordnance into the sea, a comment in the ORB stated “it seemed like the old days with all serviceable aircraft loaded with incendiaries and it looked like a real operational take off.” It goes on to say a ‘waste but necessary‘ reflecting perhaps the feelings of the men as the squadron wound down for the final few weeks.

The advanced party arrived to make sure the transition went smoothly, with the main party arriving shortly afterwards. Beer was supplied by Metheringham and the crews soon got to know each other well. On July 11th, an athletics competition was run between the two squadrons, involving contests such as ‘tug-o- war’, ‘hop, step and jump’, ‘throwing the cricket ball’ and distance races.

With the announcements of Japan’s capitulation on August 15th, all 106 Sqn ‘Tiger Force’ training flights were cancelled although it continued to be used as the basis of further training operations. B.A.B.S. (Beam Approach Beacon System) training also continued at the airfield.

RAF Metheringham

Air Raid Shelters were once common place on Britain’s airfields.

Shortly after 467’s disbandment on September 30th 1945, October saw yet another Lancaster unit arrived at Metheringham, No. 189 Squadron who brought yet more Lancaster MK.Is and III. to be disposed of and they too were disbanded within a month.

The poor weather that had caused so many problems during the winters of the 1940s leading to Metheringham having FIDO installed, continued on into 1946 curtailing many flights and operations. On 13th  February 1946 the final curtain came down and a memo came though to Metheringham to ‘stand down’ from all operational and non-operational flying as of 00:01, 15th February 1946. Sixteen aircraft were to be ferried to RAF Graveley to have Mark III H2S units fitted, although this was cancelled and the aircraft were sent to Waddington (10), Binbrook (1), Lindholme (4) and one further Lancaster going to Waddington. By 22nd February 1946 all aircraft had left Metheringham and the squadron no longer existed, 106 Squadron was once more consigned to the history books and Metheringham airfield would follow not long after. Men, machinery and administrative items were then disposed of in accordance with the relevant Bomber command instructions. By April, everyone had left, the site was stripped and placed in care and maintenance, a condition it remained in until December 1950, whereupon it was abandoned before being sold off ten years later.

Like many stations, local people used the accommodation sites for their own accommodation, the runways were eventually pulled up for hardcore, buildings and other metal structures were removed for scrap or sold off to farmers. By the early 1970s Metheringham had all but been wiped off the map. The Watch Office left to decay has since been bought by a local developer, with a mammoth task ahead of him he hopes to turn it into accommodation and a small museum/residential block.

Metheringham’s record of achievement was a proud one, with generally low loss statistics they were to face some of the toughest challenges of the war, losing many crews in the process. Their determination to survive and to win over the Nazi tyranny led to many brave and heroic acts, acts which helped secure the release of hundreds of captured airmen.

RAF Metheringham

There are many reminders of RAF Metheringham.

Metheringham’s gallant and brave young men, are all remembered in a small, but excellent museum that now utilises part of one of the accommodation areas. A memorial to the aircrew stands on the eastern perimeter track as a reminder of the 995 Airmen who were lost whilst serving with 106 Sqn.

Much of Metheringham’s runway and perimeter track still exists today, in most part as a public road. The width of the concrete bases far exceeding the width of the road. A memorial stands to the eastern side overlooking the main airfield site (Site 1) with lines of tress denoting the remainder of runways long gone. The main B1189 road dissects the accommodation areas with Site 1, as was common with late wartime airfields. The museum lies off the junction of this road and the main Woodhall Spa road B1191 along the entrance to Westmoor Farm. If taking the B1189 toward the Metheringham village, you will pass a number of former wartime buildings used as small industrial units and farm storage. These are on private land although the museum do organise visits to some of these at certain times of the year. After passing these, turn right, this road was one of the secondary runways and crosses the remains of the main runway part way down. It then bends to the right taking you along the perimeter track, and then right again to the memorial – a circular route that traverses what was the peri track. Several of the hardstands still survive, mainly on farm property and difficult to see from the ground, but the number of buildings still standing is quite remarkable for such a short lived airfield.

Trail 1 then continues on, visiting another former Bomber Command airfield RAF Woodhall Spa.

Sources and further reading.

*1 Fleming, J., “The Callendar Effect: The Life and Work of Guy Stewart Callendar (1898-1964)“, 2007, The American Meteorological Society

*2 The London Gazette, 23rd October 1945.

*3 Operational Record Book March 1944 – IWM AIR-27-834-6

Operational Record Book January 1944 – IWM AIR 27/834/1

Operational Record Book November 1943 – IWM AIR 27/833/22

Operational Record Book April 1944 – IWM AIR 27/834/8

Operational Record Book – Squadron Number: 106 Summary of Events: Y – IWM AIR 27/835/9, (01 May 1945 – 28 February 1946)

467 RAAF (Royal Australian Air Force) Summary of Events: Y 01 May 1945 – 30 September 1945 – IWM AIR 27/1931/33

Middlebrook. M., Everitt. C., “The Bomber Command War Diaries.” 1996, Midland Publishing.

Records of a 1690 BDTF pilot can be read on the Website ‘A Pilot’s Story‘.

Metheringham Airfield Museum webiste holds details of opening times, admission fees and special events. An excellent little museum it is well worth a visit.

RAF Metheringham – One of Bomber Command’s finest. (Part 2)

After Part 1, we continue following the crews of 106 Squadron at RAF Metheringham. The weather and in particular fog became a huge problem for aircrew, and bomber Command in particular. Something had to be done.

During the 1940s, fog was a particular problem around Britain’s airfields, often reducing visibility down to virtually nil, meaning bombers could neither take off nor land. Arthur Harris realising the effect this was having on his bomber operations, requested investigations be carried out into a possible method for clearing the fog thus allowing bombers to operate in this appalling conditions and widening the possibilities of operations in bad weather.

Churchill, influenced by Harris’s argument, instructed his Scientific Adviser Lord Cherwell to begin action at once, and so the Petroleum Warfare Department began to assemble a team of experts – who had already carried out some investigations into the weather and methods for dealing with fog – into a team to investigate the problem. A wide ranging group of scientists and industrialists carried out research concluding that heat was by far the best method for clearing fog over the low lying landscape.

The requirement put forward was to clear a standard Class A runway of at least 1,000 yards long and 50 yards wide, and an area up to 100 feet above the ground – a staggering 1.65m cubic yards of air. Further limitations were then put on the order restricting the placement of any obstacles likely to endanger an aircraft within 50 feet of the runway’s edge.  A mammoth task but one which saw the development of the oil burning FIDO system.

The FIDO (Fog Investigation and Dispersal Operation) system was developed under the leadership a British Civil Engineer Arthur Clifford Hartley, CBE who worked with the Petroleum Warfare Department, and whose initial ideas involved using one of two streams of fuel; petroleum trialled at RAF Graveley, and Coke trialled at RAF Lakenheath.  After initial (and rather crude) tests at both Moody Down (petroleum) and Staines (coke), petroleum was found to be the better of the two fuels, and henceforth, the Gravely model was used as a template for fourteen further sites of which Metheringham was one.

Installed at Metheringham during early 1944, it saw pipes laid alongside the runway which when lit, created an initial mass of smoke. Once the system had ‘warmed up’ the smoke dissipated and the fog began to ‘burn off’ as the immense heat from the burners created an up draft of warm air.

By the war’s end FIDO had been used across England to assist in the landing of almost 2,500 aircraft most of which would otherwise have not been able to land without great danger to the crews or ground staff; it had been one of the war’s greatest success stories and was sold as such to the wider public. So successful in its outcomes, FIDO was intended to be installed at London’s major airport Heathrow, after the war, but the cost of running each system was astronomical, burning some 6,000 – 7,000 gallons of fuel in four minutes – the time it took to clear the designated volume of air. It is estimated that during its wartime use, something like 30 million gallons of fuel were burnt and whilst the cost to the taxpayer was tremendous,  it is thought to have saved the lives of over 10,000 airmen in the process.*1

Back in the air, the night of March 15th/16th saw split missions  with one section going to Stuttgart and and a further six aircraft heading to the aero-engine factory at Woippy in France. These six made up a total formation of twenty-two Lancasters, a flight that included 617 Sqn aircraft. With promises of good weather over the Metz region, it came as  a huge disappointment to find 10/10 cloud cover over the entire target.  Even with the target being identified on the H2S screen and five marker flares being dropped, the leader announced the mission scrubbed and all aircraft were instructed to return to base taking their full complement of bombs with them. So strong were the crew feelings that 617 Sqn’s leader, Leonard Cheshire, seriously considered complaining! However, despite this, all aircraft returned including those of 106 Sqn to Metheringham with only minor flak damage to ND331.

Lancaster B Mark IIIs of No. 106 Squadron at Metheringham,heading to Frankfurt. The attack on 22/23 March 1944 caused extensive destruction to eastern, central and western districts of the city. © IWM (CH 12543)

With the next few missions passing without major incident, the night of March 30th, would deal a hefty blow to the crews of 106 Sqn.

With take off starting at 22:15, seventeen Lancasters would depart Metheringham heading for Nurumberg carrying a range of 4,000lb, 1,000lb, 500lb, 41lb and 30lb bombs. Over the target, skymarkers guided the bomb-aimers as cloud was reported as heavy as 10/10 again. Searchlights and flak were evident as were fighters which attacked and damaged Lancaster ND332 piloted by F/O. Penman. The Lancaster, which claimed two enemy aircraft damaged, returned to England putting down on Manston’s emergency runway. Both the rear and mid upper turrets were out of action, one of the engines caught fire, and on landing, the undercarriage collapsed due to the enemy action. luckily though, no crewmen were injured in the sustained attack that caused the Lancaster’s severe damage.

A further Lancaster had to return early, Lancaster JB567 after suffering the failure of the port inner engine landing back at Metheringham after two and half hours into the flight. Similarly it was an engine failure that also caused the early return of JB641 this time landing three hours after departure. Three of the seventeen Lancasters were already out of action.

Meanwhile on the continent, Lancaster ND585, was reported missing, later being found to have been shot down by a German night fighter, crashing in Belgium with the loss of all its crew. On board was, at 18 years old, another of Bomber Command’s youngest ever crewmen, Sgt. Julian Mackilligin RAFVR (S/N: 1804016), who even at his young age, was already half way through his operational quota. He was buried at the Hotton War Cemetery, Luxenbourg.

Next came another two losses, Lancasters JB566 piloted by F/S. T. Hall DFM and ND535 piloted by F/O. J Starkey. Both went down with the loss of all but four crewmen. The mission had indeed been costly, forty-two airmen were out of action, seventeen of them killed.*3

By the end of the first quarter of 1944, 106 Sqn had carried out more sorties than any other 5 Group squadron (358) losing 8 aircraft in the process. This gave the men of Metheringham an average of 19 sorties per aircraft in the first 90 days.

April began with a mix of bombing and ‘Gardening‘ missions, operations that included laying mines along the Koningberger Seekanel, with mines being dropped from as low as 150 ft. Even though some aircraft reported heavy ground fire from the banks of the Canal, the mission was deemed to be a great success and all aircraft returned safely.

The month continued to go well for the Metheringham crews, but the night of April 22nd / 23rd would take another toll on the morale of the crews. That  night saw twenty Lancasters fly to Brunswick as part of  a much larger force of 238 Lancasters and seventeen Mosquitoes. The mission, whilst generally uneventful, marked the first operation in low level target marking by No. 5 Group over a large city, an aid that proved fruitless on this occasion partly due to low cloud/haze obscuring the bomb aimer’s clear sight. With varying reports of cloud from 5/10 to no cloud and haze, all bombers reported bombing on markers, but damage and ground causalities were recorded as low.

RAF Metheringham

The former Gymnasium now forms part of the museum and holds a range functions including weddings and talks.

RAF loses that night were also relatively low, with only four aircraft being lost from the whole flight. Sadly though, one of these, Lancaster MK.III ‘JB567’ ZN-E piloted by F/Lt. J. Lee was a Metheringham aircraft. F/Lt Lee had only one more mission to go before completing his first tour of duty. Only two of his crew survived, being picked up by German forces and sent to POW camps. This loss only went to strengthen the idea that it was difficult, if not impossible, to achieve a full tour of duty unscathed.

The next night 24th/25th April, 1944, took 106 Sqn back to Germany once more, to Munich and another ‘clear night’ with accurate bombing reported. But, then it was Schweinfurt a city that would become synonymous with high casualties especially amongst colleagues in the US Air Force.

In part 3, we see how incredible brave acts earned a Metheringham airman the highest honour – the Victoria Cross.

The entire post can be seen in Trail 1.

RAF Metheringham – One of Bomber Command’s finest. (Part 1)

In this post we return to Lincolnshire and ‘Bomber County’, to the area south of the city of Lincoln. Here, we are not far from the still active RAF Coningsby, the former RAF Woodhall Spa, the Officer Training College at RAF Cranwell and the former bomber base RAF East Kirkby.

Many of the airfields in this area were the RAF’s Bomber Command airfields, several housing the four-engined heavies the Lancaster bomber. Being a flat region of England it was an ideal landscape for Bomber Command, it was also near enough to the continent and yet far away from intruders to suffer the risk of major attack.

We continue on on this trail by visiting one such airfield, an airfield that lasted until the war’s end featuring only one major flying unit, 106 Squadron. Today, we add a new addition to Trail 1 as we visit the former base RAF Metheringham.

RAF Metheringham.

Located on the edge of the Lincolnshire Fens 3 miles east of the Lincoln Cliff escarpment, and near to the village from which it takes its name, Metheringham was opened in 1943 as a class ‘A’ bomber airfield under the control of No. 54 Base, 5 Group, RAF Bomber Command. It would fall under the control of the main base at RAF Coningsby, operating in conjunction with RAF Woodhall Spa, in a three station network implemented to streamline the Bomber Command structure.

Like many airfields of the time, it had the usual three concrete  runways; a main runway running slightly off north-south at  2,000 yds,  and two additional runways of 1,400 yds each running north-east to south-west and north-west to south-east. The technical area was located to the west of the airfield, with the huge bomb store to the north. Metheringham had two T2 hangars and one B1, along with numerous spectacle hardstands around the perimeter track.

RAF Metheringham

Large sections of Metheringham’s runways still exist mainly as public highways. The line of trees denotes a further runway.

The accommodation areas, mainly Nissen hutting, were spread to the south and west of the airfield, separated from the main airfield by the public highway, a feature common with many late wartime airfields. The entire site covered 650 acres, previously utilised as forest or rich farmland,

Built from requisitioned land over the winter of 1942/43, construction was not complete until after the advanced party arrived in early November 1942. Described by some as ‘cold’, ‘bleak’ and ‘inhospitable’, it was not unlike the many other unfinished wartime airfields scattered across Britain at the time. Muddy and with little in the way of creature comforts, it was soon to be home for bomber crews of the Royal Air Force, who would reside here for the remainder of the war.

With the advanced party hurriedly connecting mains water and power, the first and primary unit to serve from the airfield, 106 Squadron, began arriving hoping for something more than cold huts and muddy pathways.

A First World War Squadron who had been disbanded in 1919 and reformed in 1938 as war loomed, 106 Squadron had initially operated single engined and twin-engined light trainers before transferring to No. 5 Group and bombers. It first real foray into the bomber war was with the under-powered Manchester before switching to the far superior big sister, the Lancaster, in May 1942. This change over occurred at their previous station RAF Syerston, and within a week of their November 11th arrival here at Metheringham, they were flying their first Metheringham mission, and it would be right into the German Heartland.

Following on from the usual familiarisation flights, thirteen Lancasters of 106 Sqn would take to the air on the night of November 18th/19th for a bombing raid on the German capital. Mid November signified the start of  a period known as the ‘Battle of Berlin’, a period in the Second World War where Air Chief Marshal Sir Arthur Harris, would finally get the chance to put into practice the idea that massed bombing of the capital would bring about the demise of the morale of the population by sustained attacks from Bomber Command. After witnessing first hand the Blitz of Britain’s cities, Harris was determined that such a campaign could succeed. However, ignoring the fact that the German’s own example had failed in reducing the British morale, he pressed on, sending wave after wave of bombers deep into Germany and Berlin itself.

So it began on that November night. With each 106 Sqn Lancaster carrying a 4,000lb bomb along with a mix of smaller bombs, they set off for Berlin. With moderate flak over the target, and no night-fighters encountered,  resultant damage was light especially compared to some missions that would be flown by the Command.

The raid itself was not considered a great success, and whilst no major injuries were sustained on the mission, Sgt. R. Smith, the Mid upper gunner of Lancaster JB642, suffered severe frost bite after passing out due to a faulty Oxygen system in the aircraft. After landing at the fighter airfield at RAF Tangmere, Sgt Smith was treated for his injuries.

With one other aircraft landing away from base, the remainder of 106 Sqn all made it back to Metheringham with relatively minor damage. A remarkable escape considering the nature of the target.

RAF Metheringham

There were plans to rebuild the Watch Office, a mammoth task considering its very poor condition.

A return to Berlin saw 106 Sqn back in the air on the 22nd/23rd and then again on the following night 23rd/24th November. The continuing spell of good luck saw all crews return safely again with only light to moderate damage to their aircraft. However, the night of 26th/27th would see 106’s luck finally run out and the first Metheringham loss.

Lancasters JB592 piloted By F/O. J. Hoboken DFC (his third flight to the capital that week) and ED873 piloted by F/O. R. Neil, were both lost that night. JB592, was brought down not far from Gross-Karben, in Hesse Germany with the loss of all the crew on board. ED873 suffered early engine problems with the starboard outer engine surging not long after take off. Once passed the coast, the 4,000 lb bomb was safely jettisoned and sent to the waters below where it was seen to explode by the crew. The aircraft then turned to land, overshot the runway and crashed into a field opposite the airfield. The crew were uninjured apart from the rear gunner (Sgt. Parker) who received minor injuries in the crash. This injury would however, prove to be a godsend, playing a vital role in his survival later on. This third night of bombing saw a force of 443 Lancasters take a heavy toll, with 28 being lost in action over the continent and another 14 over England. A loss rate of over 6%.

It was F/O. Neil’s crew who, after their lucky escape, would fall as the next victims of Berlin’s defence. With the original rear gunner still out of action due to the broken arm received in the last crash, he was replaced by Sgt. G. Stubbs, who made his last and fatal flight in ED874 on the night of December 2nd/3rd. The aircraft was brought down with the loss of all those on board, including the replacement Sgt. Stubbs. Berlin was fast becoming a rather large and sharp thorn in the side of Metheringham crews who by now, longed for a change in the target.

With one more Lancaster lost that year (Lancaster MK.III ‘JB638’, ZN-G) again with all on board, the cold 1943 winter drew to a close with many empty bunks in the Metheringham huts. It would be a long and bitter winter though, a winter that would last for several months over the 1943/44 period and all as the Battle for Berlin continued to rage on.

The New Year 1944 should have brought new hope for the Metheringham crews, but sadly things were to be worse – much worse. In fact, it would go on to prove to be the worst year in 106 Sqn’s history with their highest losses experienced to date.

The year began with fine but cold weather recorded as fifteen crews reported for duty on New Years Day. With bated breath they waited for the curtain to be pulled back to see where the bomb run marker would now take them. A thin line that denoted high chances of survival or low. But once again, and to the dismay of crews, the flight line marked its way across the continent to Berlin, it would be yet another night over the capital. With a take off time of 23:59, crews were briefed, checks carried out and engines started. Over the target 10/10 cloud were reported, so bombing was carried out on Pathfinder markers, with many of the Metheringham aircraft verifying their position with H2S.

Although fifteen aircraft took off, only thirteen made it to Berlin, Lancasters JB642 ‘ZN-J’ and JB645 ‘ZN-F’, both MK.IIIs, were shot down with the loss of thirteen airmen. The youngest of these, Sergeant John Alfred Withington (s/n: 1628244) was only 18 years of age and one of the youngest causalities of Bomber Command. The only survivor, F/S. A. Elsworthy, was captured and taken to a POW camp, Stalag Luft III in the German province of Lower Silesia  not far from the town of Sagan.

RAF Metheringham

Many of Metheringham’s buildings remained scattered about the accommodation areas.

With yet more flights to Berlin, briefings were becoming rather repetitive, and January ended the way it began with the loss of another seven air crew led by RAAF pilot P/O. K Kirland. Over the whole month, 106 Squadron had flown 123 sorties over nine nights, a total of 769 flying hours,  dropping 497 tons of bombs, the second highest total in the whole of No. 5 Group.

In the next post we see how Metheringham along with thirteen other airfields coped with the problem of fog, and how they continued to take the battle deep into the heart of Germany.

The full post can be seen in Trail 1.