RAF Foulsham – A Leader in Electronic Warfare. (Part 1)

In Norfolk sits an airfield that only had a short wartime life, but it is one that is more than significant. Used in the electronic warfare role, it went on to house a small number of heavy bomber squadrons all crammed with electronics to detect, monitor and interfere with enemy transmissions.

In conjunction with this, it also saw a detachment of two-seat P-38/F-5 Lightnings, a rare aircraft in this country, and possibly the only one to do so. Dogged by bad weather it was identified as a suitable site for ‘FIDO’ the fog dispersal system, and post war it was used in both the scrapping of DH Mosquitoes and as a storage unit.

In Trail 22 we revisit the former RAF Foulsham.

RAF Foulsham

RAF Foulsham, sits approximately 8 miles north-east of the Norfolk town of Dereham. It had a short active life of just three years, lasting between May 1942 and 1945, at which point it was closed to flying and used as a storage site for military hardware. It remained in this lesser state until the 1980s when it was deemed surplus to requirements and finally closed. The land it stood on, was then sold off to local farmers.

Built over the period 1940-41 by the construction company Kirk and Kirk Ltd, RAF Foulsham occupied land some 173 feet above sea level, and opened under the control of 2 Group Bomber Command. Much of the material that was brought in to construct Foulsham came via nearby railways stations, then along local roads through the village, leaving locals facing endless mud and traffic.

As a war-time airfield, Foulsham would have three tar and wood chip runways, one of which would later be equipped with the fog dispersal system ‘FIDO’, a valuable if not bizarre system designed to dissipate fog along airfield runways.

Foulsham’s three runways were 1,900 and 1,350 yards long, with the main runway heading in a north-south direction. By the end of the war it would have thirty-seven heavy bomber hardstands, nine T2 hangars and one B1, and as such, was a formidable size. Personnel numbers were reflected in this, with accommodation spread over several sites to both the south and east, able to accommodate upward of 2,500 personnel of mixed rank and gender. The ever important technical site sat to the east, with the bomb store situated to the south-west of the airfield, just off the end of the main north-south runway.

RAF Foulsham

The original Fire Tender shed.

The watch office, now long gone, was built to design 518/40 which included and Meteorological section attached to the building. These designs were a development of earlier models using a new 9 inch rendered brick wall as opposed to timber, although timber was initially required for the floors and ceilings. Due to a shortage in wood at the time though, concrete replaced a large portion of these leaving only the balcony and control room using such material.

Whilst Foulsham opened under 2 Group, it would almost immediately – within a month of opening – be handed over to the US forces of the 8th Air Force and be renamed station B.13. However, this change never evolved into anything  more as no American personnel were stationed here, and by the October it was back in RAF hands, and 2 Group once more. The next few years would see the airfield change hands several more times, and with each change would come new aircraft, new personnel and new roles.

The first units to arrive here were those of the host unit 2 Group. Both 98 and 180 Squadron arrived in mid October 1942 after their reformation/formation at RAF West Raynham. During this time, they both began to receive their aircraft, the American built B-25 ‘Mitchell II’. Their transfer across to Foulsham gave the airfield the honour of being the first station to use the type operationally. Both squadrons would remain active in the light bomber role until 18th August 1943 at which point they would depart and the airfield would change ownership once more.

98 Squadron, a First World War unit, had been operating out of Kaldadarnes in Iceland following a terrible loss of personnel when the Lancastria was sunk in June 1940. Their reformation at West Raynham, and subsequent move to Foulsham, had been quickly met with yet more losses, when one of the Mitchells ‘FL206’, spun killing all four members of the crew on board.

After this, the squadron would be dogged by misfortune, the squadron adjutant noting in the Operational Records that excessive rain had turned the site into a “disgraceful condition”; the weather was one aspect the staff would have to put up with for some time to come. *5

For the first sixteen days of November, all but a handful of days were washed out, the despair of staff being felt through the Operational Records, each day met with ‘Lectures continue, adverse weather for flying‘. However, on the 16th, training flights did manage to take place, but it too was met with more sadness as a second set of fatalities occurred.

During the training flight, Mitchell FL179 suffered a bird strike in the carburettor of the starboard engine, this caused the engine to fail. With only one serviceable engine the pilot, Flt. Sgt. K. Williams (s/n: 1062588), tried to land at nearby RAF Attlebridge, unfortunately the aircraft stalled and went into a spin. The resultant crash killed all three aircrew on board and wrote off the Mitchell.

Things were to not get any better for the squadron either. On the 30th, a third crash took yet four more lives when FL708 collided with high tension cables near to RAF Wendling. The explosion from the collision also killed a local farmer who was ploughing his field at the time of the accident. It had been a terrible start for the fledgling unit.

The poor weather continued relentlessly, hampering the squadron’s progress, both on the ground and in the air, with training flights being cancelled on a regular basis. During the small numbers that were taking place, further problems came to light adding to the frustrations already felt by the crews.  Since taking on the initial batch of nine Mitchells on September 18th, the squadron had been having problems with the aircraft especially the guns and their turrets.

Gunners had found that extended bursts of gunfire were impossible, usually no more than a dozen rounds could be fired at any one time, a situation borne out by Wing Commander Foster, the Group Armament Officer, on the 16th December. In an attempt to remedy the situation, an American gun turret specialist visited the squadron, but by the 18th it was considered that the guns were ‘obsolete’.

RAF Foulsham

A defence ‘pill box’.

January was much the same, snow added to further problems and again the aerodrome was noted as being in a “very bad condition“, all flying being cancelled until the middle of the month when a small number of flights did get airborne.

The first battle order came through on January 21st, but due to a late delivery of bombs, it was also cancelled, meaning the squadrons first operation flight wouldn’t take place until the next day.

Six aircraft were ordered to operations, and whilst all made it to the target, one aircraft, FL693, was hit by flak and disintegrated. All on board were presumed killed.  The first months of 98 squadron had been challenging and difficult for those posted here.

180 Squadron had fared a little better, although after walking into a spinning propeller, L.A.C. J. Aspinall was killed, the only fatality of the squadron during the same period.

On July 26th 1943, an emergency landing was made at Foulsham by a B-17F #42-29802 of the 326th BS, 92nd BG, 8th AF, after a traumatic series of events that earned the co-pilot, John C. Morgan Flight Officer (later 2nd Lt.), the Medal of Honour for his valour and courage in action.

In part 2 we see how Morgan earned this prestigious award and how Foulsham continues to develop.

The entire story of Foulsham can be seen in Trail 22.

1st Lt. Raymond Harney and 2nd Lt. Warren French – 349th BS, 100th BG

Lt Raymond Harney (Photo courtesy of Tsymond Harney JR.)*1

A few years ago a story came to light that not only brought home the brutality of war but also the compassion found in war. It was of two American airmen whose World War II story finally come to a close 70 years after their death.

The two airmen, U.S. Army Air Corps 1st Lt. Raymond Harney (s/n O-523208) and U.S. Army Air Corps 2nd Lt. Warren French, (s/n O-2056584) of the 349th BS, 100th BG, were in a B17G (44-6306) over Germany on September 28th 1944, when they were hit by flak whilst on a mission to Merseberg. This would be their eighth and final mission.

Mission 652 involved a total of 342 B-17s which were sent to bomb the Merseburg/Leuna oil refinery and any additional targets of opportunity. During the operation, 10 B-17s were lost, 4 were damaged beyond repair and 251 damaged but repairable. Escort for the mission was provided by 212 P-51s of the USAAF.

B-17 ‘#44-6306’, was delivered to Kearney airbase on 28th June 1944,  then moved to Grenier airbase, New Hampshire on 9th July 1944, for onward transport to the United Kingdom.  It was assigned to the 349th Bomb Squadron, of the 100th Bomb Group, given the code ‘XR-G’, and based at RAF Thorpe Abbotts from the 12th July 1944.

The crew of #44-6306, assigned on the 28th August 1944, was: (Pilot) 1st Lt. Raymond E.Harney (Co-pilot); 2nd Lt. William R.Kimball (Navigator); 2nd Lt. Charles M.Hamrick (Bombardier); 2nd Lt. Warren.M.French (Top Turret/Engineer); Cpl. Thadeus L.Gotz (Radio Operator/Gunner); Cpl. Hubert J.Burleigh,Jr. (Ball Turret); Cpl. Melvin F.Cordray (Waist Gunner); Cpl. Robert C.Minear (Waist Gunner); Cpl James J.Sorenson, and (tail Gunner) Cpl. John H. Bundner. However, for reasons unknown at this time, for this particular mission, Gotz was not aboard, and instead S/Sgt. Jack D.Francisco flew as tail gunner and Cpl. Robert C.Minear flew as the Flight Engineer.

At 12:10, whilst over the target, the B-17 was hit in the number 2 engine by anti-aircraft flak. As a result, the engine caught fire, the aircraft withdrew from the protection of the formation, joining another formation further back, but began to fall back again when the number 4 engine was also feathered. Harney continued to fly the crippled B-17 for two hours after being hit, before finally deciding enough was enough and he ordered the crew to bail out. Being determined to save his friend and the aircraft, he also decided that he and the injured French, would remain and try to land the aircraft.

Outside of the village of Schwickershausen, to the north of another major target, Schweinfurt, Germany, they attempted a belly landing bringing the aircraft down in a turnip field. The B-17 slid across the ground, ripping off the port wing, causing a tremendous fire. Neither Harney nor French sadly survived the subsequent fireball.

Although he managed to get the crew to leave the aircraft, their safety was not guaranteed and sadly, three were killed by local police in the following days. An event not uncommon in Nazi Germany. Only two of the gunners, Cpl. Melvin F.Cordray, and Cpl. Robert C.Minear, survived as POWs.

What makes this story more significant than usual, is what followed after the crash.

The local people made a wooden cross in remembrance of the crew and they kept it hidden away in the local church for over 70 years.

The cross kept secret for so many years.*2

The large wooden cross, had the words “Hier ruhen in Gott! 2 amer. Flieger,” or “Here rests in God 2 American flyers,” engraved on it, along with details of the aircraft crash. On the 70th anniversary of the crash, 28th September 2014, a memorial service was held in the village of Schwickershausen. Following this, on 5th October, the cross was flown over to England in an American KC-135 Stratotanker from RAF Mildenhall, with two Luftwaffe Tornadoes escorting them over Germany. The cross was donated to the ‘Bloody 100th’ museum at Thorpe Abbots for safe keeping. A certificate was also handed over along with the cross signifying not only the now peaceful and co-operative alliance between the two nations, but the final closing of a chapter of the history of two crew members of the “Bloody Hundredth.”

The cross being transported in the Boom pod of a KC-135 Stratotanker. October 2014.*4

This is a remarkable story, and one that certainly stands out amongst the horrors and heroism of the Second World War.

2Lt Warren M French

Warren French’s memorial stone in Belgium*3

Lt. Raymond E. Harney’s Gravestone is at Ft. Snelling Cemetery in Minnesota, his remains are in the graveyard at Gemeindefriedhof Schwickershausen. Warren French’s headstone is in the Ardennes, Neuville-en-Cond, in Belgium.

Thorpe Abbotts airfield and museum is featured in Trail 12

Sources:

*1 photo the Bloody 100th Foundation.

*2 Photo from RAF Mildenhall news

*3 Photo from ‘Find a Grave

*4 Photo from RAF Mildenhall News

This story first appeared in the RAF Mildenhall News report October 20th 2014.

RAF Downham Market (Part 2 – D-Day to the War’s End)

In Part 1 Downham was born, serving the Stirlings of Bomber Command before becoming part of Bennett’s Pathfinder Force. A large airfield, it was often busy and as the war progressed toward D-Day, preparations began for operations over the invasion area.

On June 3rd 1944 Lancaster ND841 ‘F2-D‘ piloted by F/O. George. A. Young (s/n: 134149) RAFVR 635 Squadron, was detailed to attack Calais as part of the preparations for the forthcoming D-Day invasion. There would be eight other aircraft from RAF Downham Market also detailed for the mission, and take off would be late that evening.

The mission as a whole would involve 127 Lancasters and 8 Mosquitoes of 1, 3 and 8 Groups and the targets would be the gun batteries at both Calais and Wimerereux. It was a  diversionary raid as part of Operation “Fortitude South“, the elaborate plan to fool the Germans into believing the invasion would occur in the Pas-de-Calais region.

At 28 minutes past midnight, F/O. Young lined the Lancaster up on the runway, opened the throttles and began the long run. As the Lancaster approached take off, it began to swing striking the roof of the B1 Hangar. In an uncontrollable state the aircraft crashed just outside the airfield killing all those on board. What was left of the aircraft was salvaged, and three of the crew buried in the local cemetery in Downham Market.

Downham Market Cemetery

F.Sgt. Stanley Wharton (RAFVR) 635 Sqn. One of seven Killed 4th June 1944.

Two months later, another pilot of 635 Sqn, also flying a Lancaster III, ND811, ‘F2-T’, Squadron Leader Ian Bazalgette, would be awarded the second of Downham’s Victoria Crosses.

On August 4th 1944, flying Lancaster ‘T’ for Tommy, on a daylight raid to mark the V1 storage depot at Trossy St. Maximin, the aircraft was hit by flak knocking out both starboard engines and setting the aircraft on fire. Bazalgette pressed on, marked the target and then instructed the crew to bail out. Two of the crew were so badly injured they could not do so, and so Bazalgette attempted a crash landing. Unfortunately on impact with the ground the aircraft exploded, killing all three remaining crew members on board.

For his bravery and sacrifice, Ian Bazalgette was also awarded the V.C., the highest honour for military personnel. The London Gazette, of 14th August 1945, announced the award, citing: “His heroic sacrifice marked the climax of a long career of operations against the enemy. He always chose the more dangerous and exacting roles. His courage and devotion to duty were beyond praise“.

During that same month, August 1944, another squadron would appear here at Downham. Joining 635 Sqn were 608 Sqn, who had previously been operating abroad. They were reformed here on August 1st that year, also joining Bennett’s elite group. Another Mosquito squadron, they bolstered the number of aircraft and personnel present here at Downham. Flying the Mosquito XX, XXV and eventually XVI, they remained at Downham for a year whereupon they were once more disbanded. Whilst operating these aircraft, 608 Sqn would fly 1,726 operational sorties all as part of Bennett’s Pathfinder Force.

608 Sqn’s primary role was to carry out night strikes as part of the Pathfinder Operations focusing on the German heartland. Targets included: Berlin, Frankfurt, Hanover, Essen, Stuttgart, Nuremberg, Hamburg, Emden and Kiel. Their first operational sortie from Downham was on the night of 5th/6th August 1944, when a single Mosquito took off and bombed Wanne-Eickel.

Then, a month later, on the night of 6th November 1944, twelve aircraft from 608 Sqn took off in a diversionary attack on targets at Gelsenkirchen. The idea was to draw defences away from a much larger force attacking both Gravenhorst and Koblenz. The plan was for 608 to begin their attack five minutes ahead of the other forces, a plan that went like clockwork.

The full story of Mosquito KB364, piloted by P.O. James McLean (26) and Sgt. Mervyn Lambert Tansley (21), appears in Heroic Tales, but this was to be their final, fatal flight.

On return, the aircraft careered into All Saints’ Church, Bawdeswell, some 30 miles north-east of the airfield, setting it alight. The impact was such that parts of the aircraft struck two other homes, causing extensive damage to both properties. The resultant fire took four hours to extinguish and included crews from other nearby airfields. In honour of the two airmen, a plaque manufactured from part of the Mosquito has been mounted on the church wall inside the building.

The Christmas period of 1944 was a busy one for Downham and for the FIDO operators. With freezing fog, snow and general poor weather causing many problems for those on the continent and for those on British soil attempting to take off, FIDO crews were going to be busy. FIDO primarily designed as a landing aid, also permitted take offs during poor visibility. However, getting to the runway was a challenge in itself. Often with visibility down to just feet, ground staff would line the perimeter tracks with torches to guide each aircraft safely along. Anyone who made a mistake took the risk of running off the perimeter track, sinking into the ground along side or worse.

By the dawn of 1945 the war in Europe was all but over. Operations began to focus on troop concentrations, possible German escape routes and harbours. Both 635 and 608 Sqns continued operational flying until the war’s end. In August and early September these last two operational squadrons at Downham Market were disbanded, 608 Sqn on August 24th and 635 Sqn on September 1st. This left Downham devoid of all front line units.

last raid - Kiel canal ground & air crew photo 2 May 1945 at Downham Market found by Brian Emsley, Welwyn G, father Edward Emsley far left httpwww.bbc.co.uknewseducation-32532153

A recently discovered photograph showing a D.H. Mosquito of Downham Market, taken on May 2nd 1945. It was taken just prior to the last mission undertaken by RAF aircraft on an attack on the Kiel Canal. It shows Ground & Aircrew next to their Mosquito and ‘Cookie’. It was found by Brian Emsley,  his father Edward Emsley is far left.*

With peace now settling across Europe, focus turned to returning personnel back to ‘Civvy street’. Within 8 Group, a new scheme was set up, and personnel were encouraged to make use of it. Across the range of Pathfinder stations, EVT (Educational and Vocational Training) was introduced. These classes were designed to give personnel the much needed skills in a range of civilian areas, to help them integrate back into civil life. Classes were broad and included a range of domestic activities such as: landscape gardening, cookery, music and carpentry. Some of these such as ‘domestic science’ were designed with the WAAFs in mind, whilst others were geared more (but not exclusively) toward the men.

"CIVVY STREET COURSE" IN R.A.F. PATHFINDER GROUP

1945 – Landscape and floral gardening are subjects given in the E.V.T. classes at Downham Market. Leading Aircraftman Arthur Pickersgill [centre] is now the station instructor. (IWM CH16028)

RAF Downham Market finally closed in 1946, but in 1948 the site was used for night Helicopter flight trials by BEA – the civil air company – transporting mail using Sikorsky S-51 Helicopters. This was a short lived venture but was by the end, considered a very successful companion to the day times routes recently started between Peterborough and a number of towns between Kings Lynn and Norwich. The venture included installing a flashing Sodium Beacon at Downham Market, its precise location on the airfield is not known and it may well have been a mobile unit*4.

Eventually in 1957, the land was sold off. The site was returned to agriculture but the airfield’s runways remained intact. In the 1970s, the Downham Market by-pass was built and the concrete runways were an ideal source of local hardcore. All three were subsequently removed along with large sections of the perimeter track leaving a mere road’s width for the larger part. Many of the buildings were at this time left, and small businesses soon took them over. One of these, a kitchen sales shop, now houses a small display relating to the history of the airfield.

At ground level, the discerning eye and a general appreciation of airfield structure and layout, suggest a presence of something more interesting. Huts, whilst in very poor condition, poke through overgrown trees and bushes, and provide shelter and storage facilities for local industry. The condition of windows and brickwork suggest that time is gradually running out for this once thriving airfield, unless other businesses move in.

The main runway ran east – west and for many years a small section of this remained for the farmers use. It was this runway that utilised FIDO, the storage area (at the far end) now taken over by the car dealership.

Downham Market Runway remains

The remnants of the main runway. Sadly this has now also been removed. It was this runway that utilised FIDO.

The remaining two runways were both removed for the hardcore. The western perimeter track remains in part width, from the threshold of the second runway virtually to the top to the threshold of the northern end of the third runway. However, the A10 road now dissects this and the uppermost part has been removed also. A new track (a public track) has been built for the farmer, this cuts across the northern end of the airfield and it is here that the (flooded) Battle Headquarters can be found. Now part of a ditch, its roof forms a bridge into one of the adjoining fields, it can only be found with careful searches of this ditch!

Battle Headquarters

A flooded Battle Headquarters. Several rooms exist below ground level, but these are all flooded, some said to be very deep.

Virtually the entire length of the northern part of the peri track can be walked round to the eastern end of the main runway. Part way along, another track leads off to the former bomb store, this is private the store now a wooded area. Also along here is the ultra heavy fusing point, a shed that is now used by the local farmer. At the far end of the peri track is where the accommodation area was constructed for the FIDO installers using Laing Hutting. Across the road can be seen the car dealership built on what was the FIDO installation. None of the original buildings remain here, but the peri track widens out to full width again at this point and heads east back toward the technical area.

Across the road from the technical area is the camp entrance and Bexwell, a small collection of houses and a church. Here a small memorial is placed telling the stories of the two heroic and brave crew members Aaron and Bazalgette. This road is the old road that led to all the accommodation areas. The WAAF site being the first and one of only two sites left with buildings still in place.

RAF Downham Market

Buildings on the WAAF site.

The other sites here include the Communal Site 1, Dormitory Site 1 (A), Sick Quarters, Dormitory Sites No. 2 (B), 3 (C), 4 (K) and 5 (J). Another track leads off to a sewage works. The road eventually joins the main A10. Across from here is the Communal Site 2, the second site with buildings still in use, and currently used by an engineering firm. A First World War memorial is also located here oddly hidden away amongst the bushes. Alongside these buildings are a pathway that leads to the second sewage treatment works.  This site can also be accessed by public footpath from the main road into Downham itself.

looking back to accomodation area

The sewage site. Through the trees you can see the remains of Communal Site 2.

Downham Market is an airfield that has a remarkable history, the dedication and bravery of the crews being second to none. What is left of this historic site is continually under threat, decay and dilapidation rapidly taking over.

The town is regularly overflown by F-35s from Marham, but when I was first here, two Tornadoes flew over whilst I was reading the dedications to both Bazalgette and Aaron. A fitting tribute not only to the two brave pilots, but all the crews that served here and to a station originally built to serve as a satellite for the very same airfield.

In 2015, a £170m regeneration plan was announced, perhaps signalling the end of Downham Market airfield for good (see here) – further details of these plans were to be released in the early part of 2016, but the funding for the scheme seemed to have been withdrawn in January 2020. No more seems to have been said about this venture, but more recently, development work for a fast-food outlet and shop was started alongside the western perimeter track, hopefully this won’t lead to further loss.

In April 2017 a project was launched to raise money for a seven slab memorial to be built close to the site of the former Dormitory Site 1, adjacent to the A10 road. The project hoped to raise in the region of £250,000 to cover the cost of the memorial and provide a lasting memory of those who flew and died whilst serving at RAF Downham Market. The full story and pictures can be accessed on the Eastern Daily Press website. There are more details and a link to the donations page on the RAF Downham Market website. I have been unable to confirm latest details and it may be another victim to the pandemic of 2020/21, only time will tell.

Trail 7 next leaves Downham Market heading east towards Norwich, stopping off at RAF Marham. On the way, we pass through the Norfolk countryside and a secret that shall no doubt, forever remain just that.

Sources and further reading (Downham Market).

* Photo published by the BBC 3/5/2015.

Technical information regarding the site was obtained from official drawings 50/W/117/42 and 50/W/116/42 courtesy of RAF Museum Hendon.

*1 National Archives AIR 27/1350

*2 National Archives AIR 27/1352/5

*3 National Archives AIR 27/2155/1, AIR 27/381/5

*4 Woodley, C. “The History Of British European Airways” Pen & Sword, 2006

The RAF’s pathfinder group, 635 squadron, flew daring missions in Lancasters, and a site dedicated to the crew and personnel of the squadron can be found on the RAF pathfinders archive website. A superb collection of photographs and personal accounts bring their memories alive.

The full Trail appears in Trail 7.

RAF Downham Market (Part 1 – The beginning)

In Trail 7, we visited the northern part of Norfolk, not far from the coast where it borders Cambridgeshire to the west and the North Sea to the north and east. In this part of the trail we visit a site that was once one of Norfolk’s most prestigious airfields, where not one, but two VCs were awarded to airmen of the RAF.

Not far from RAF Marham, we return to this once busy airfield to see what is left and take another look at the incredible history that was RAF Downham Market.

RAF Downham Market (Bexwell)

Located in the corner of the A10 and A1122, 10 miles south of Kings Lynn and and 15 miles north east of Ely, RAF Downham Market (known locally as Bexwell) was only open for four years. Yet considering its relatively short life, it created for itself a unique history that was, and remains, unprecedented in military history.

Built by W. & C. French Ltd., it was primarily a bomber station serving initially with 2 Group before transferring to 3 Group and then to 8 PFF (Pathfinder) Group, Bomber Command. Opened as a satellite station to RAF Marham, it eventually became an airfield in its own right, achieving this status on 3rd March 1944, when it became a parent station itself.

RAF Downham Market

One of the several buildings surviving at Downham Market.

Downham opened in 1942 as a bomber station, a role it performed for the duration of the Second World War. To achieve this, it would require substantial runways and a number of dispersed accommodation sites. As a classic Class ‘A’ airfield, it was spread over a large area incorporating two main sites, the main airfield to the north and the accommodation to the south. It was equipped to accommodate 1,719 male and 326 female personnel at its peak. A network of small roads would link all these dispersed sites together.

Downham would have three concrete runways the main being 1,900 yards long running east-west, whilst the second and third ran north-west to south-east and north-east to south-west, each 1,400 yds long. The classic ‘A’ formed by these runways, was linked by a perimeter track with 36 original pan style hardstands. At its peak, Downham boasted seven hangers, six ‘T2’ and one ‘B1’ which replaced two of the hardstands reducing the number to 34. None of these hangars survive here today. It had the usual bomb store (to the north east), technical area (south side) and eight accommodation areas spread well to the south and south west. As with all these Class ‘A’ stations, the two areas were separated by a public road, the ‘airfield’ to the north and accommodation to the south.

Today, little remains of the actual airfield site, the runways having been removed some considerable time ago. However, on the technical site there are a number of buildings still remaining, and in the accommodation areas further buildings also exist. All of these are either used by local industry or local farmers.

On opening, Downham received its first residents, the Stirling MK.Is of 218 (Gold Coast) Squadron. Arriving on the 8th July 1942, they would retain these aircraft until February 1943, when the new updated Stirling MK.III was brought into squadron service. 218 Sqn had a history that went back to the First World War; disbanded in 1919 they had been reborn in 1936, and were posted to France where their Fairey Battles were decimated by the superior fighters of the Luftwaffe. In November 1940, prior to arriving here at Downham, the squadron joined 3 Group, it remained operational with this Group for the remainder of the war.

On July 6th, they began preparing for their move to Downham, aircraft were stood down and no operational flying took place. On the morning of the 7th, thirteen Stirlings departed RAF Marham, completing the 10 mile straight line flight they arrived at Downham fifteen minutes later. By midnight, the entire squadron had transferred over, and crews were settling into their new quarters. Over the next few days air tests, fighter affiliations and cross country flying were the order of the day, the first operational flight not taking place until the 12th. In Stirling ‘HA-N’ was P.O. Farquharson and in ‘HA-R’ was Sgt. Hartley. A ‘gardening’ mission, only two crews were assigned and briefed but records show that “The vegetables were planted in the allotted positions. 18,000lb of seed were planted during this effort“*1. With that, Downham Market had now entered the war.

Over the next few weeks operations began to build, and targets moved into Germany itself. Lubeck, Vegesack, Duisberg, Hamburg and Saarbrucken were all on the initial list of operations. Apart from early returners due to ice or poor weather, all operations were considered successful and bombing was ‘accurate’.

On 29th July, a royal party visited RAF Downham Market to see how the crews were settling in at the new station. Led by Air Vice Marshall HRH The Duke of Kent, and accompanied by Sir Louis Grieg KBE CBO (ret),  the party were given an official tour of the airfield by Wing Commander P. D. Holder DFC – the Station Commander. After talking to a number of ground crews and watching Stirlings being bombed up, the Royal party then sampled the delights of the officers mess before departing the airfield.

In February 1943, 218 began replacing their Stirling MK.Is with the upgraded MK.IIIs, the last model of the Stirling bomber before they were relegated to other duties. By June, the last of the MK.Is were gone. Although fitted with better engines, the MK.III still remained limited by both its short wingspan and poorly designed bomb-bay.

In the following month a major decision was made to install the still experimental FIDO fog dispersal system here at Downham Market. With RAF Graveley only just having hers installed, the benefits of this system were by now bearing fruits, but despite this, only fifteen British airfields were to have the system installed. FIDO used oil burnt through a series of pipes set alongside the runway. These burners were supplied from large storage tanks, which in Downham’s case, were located to the south-east just off the airfield site. Each tank was filled by road from Kings Lynn, five tankers carrying out two runs each to complete the fill. Oil from these tanks, was then fed into the system – which was installed along the main east-west runway – by large pumps. Once lit, the burners could clear extensive fog or mist in a relatively quick time. The main storage tank site is today a car dealership, all signs of the network of pipes having since been removed.

Downham’s FIDO installation was slow at first, and only covered the initial touchdown area and the first 700 yards of the main east-west runway. A number of burner types were fitted at Downham over a period of time, starting with the MK.III or Haigill burner. These were in turn were replaced y the MK.IV and eventually, when labour became more available, the MK.V which was a sturdier, longer lasting burner capable of withstanding much heavier use.  It wouldn’t be until late 1943/44 that a longer section of the system was installed, now extending to 1,362 yds, almost the entire length of the main runway. The problem with FIDO was always where runways crossed, and here the pipes had to be placed below ground level. Along side the runway they were above ground, and with difficulty in seeing, some aircraft did manage to damage the piping on more than one occasion. With experimental lighting and landings used in the autumn of 1943, the first use of the system was on the night of December 16th/17th that year, when a large number of aircraft returning from Berlin were diverted to Downham due to their own bases being fog bound.

Over 35 aircraft landed at Downham that night, the toll on crews had FIDO not been in existence would certainly have been considerably higher than the terrible price that had already been paid on that disastrous night over Berlin. FIDO with all its counter arguments, had proved its worth in one fell swoop.

The Short Stirling, the first of the heavies for Bomber Command, was liked by many crews, but its short-comings were to become apparent all too soon. One of its problems was its enormous height, created through its huge and weak, undercarriage, which sometimes made landings difficult. Another recurring problem was a significant swing to port when taking off, combine the two features, and you have a difficult aeroplane to control at the best of times, let alone when badly damaged or in very poor weather.

One of the first casualties at Downham occurred on the morning of May 14th 1943, when Stirling ‘BF480’ HA-I piloted by Sgt. W. Carney, swung on touchdown careering off the runway into the Watch Office. No injuries were sustained by those onboard, but two other crewmen on the ground, who had previously landed, were killed in the accident. Coincidentally, another 218 Sqn Stirling, ‘EF367’, HA-G had a similar landing away at RAF Chedburgh at the same time on the same night. Onboard that aircraft there were an American and a New Zealander, all but two of the crewmen were killed, the others  escaping with injuries.

With plans for the invasion of occupied Europe well in hand by mid 1943, movements across Britain were starting to take place. At Downham a number of hangars were used to store Horsa gliders (hence the large number on site) ready for the invasion the following year. Between April 1943 and March 1944 the airfield was awash with stored examples. Accompanying the gliders were No. 14 Heavy Glider Maintenance Section, who maintained and prepared the gliders ready for when they were needed.

In the August 1943, an element of 218 Sqn was extracted to create a new squadron, 623 Sqn, using the MK.III Stirlings already on site. On the very day they were formed, 10th August 1943, four crews were briefed for operations, the target Nuremberg. Unfortunately, once over the target, crews had difficulty in distinguishing any relevant ground detail, and as a result, bombs were scattered over a wide area and the operation was largely unsuccessful. With little opposition all aircraft returned to Downham safely.

RAF Downham Market

One of the many huts that were left on the airfield.

However, two days after this on the night of August 12th /13th 1943, it was a different matter. It was whilst flying a 218 Sqn Stirling over Turin, that Flight Sergeant Arthur Louis Aaron, would suffer bullet strikes to his head that would break his jaw and tear away a large part of his face. Further bullets damaged his lung and right arm rendering it useless. Aaron still fought on though, despite his severe injuries, managing to assist the bomb-aimer in flying the stricken Stirling away from the enemy. Unable to speak, he communicated instructions to his bomb-aimer by writing with his left hand. Aaron attempted on four occasions to land the plane, but with failing strength, he was persuaded to vacate the cockpit; enabling the bomb-aimer to complete the belly landing on the fifth attempt. Aaron later died from exhaustion, the consequence of his determination and unparalleled allegiance to his crew, his aircraft and his duty. Aaron was the first of two pilots to receive the Victoria Cross whilst at Downham Market – both for extreme bravery in the face of the enemy.

The new squadron 623 Sqn, like many other squadrons however, was to be a short lived one. With high demand for Stirlings in the Conversion Units, it was decided to utilise the aircraft of 623 Sqn for this role, and on December 6th 1943 the unit was officially disbanded. Some crews returned to 218 Sqn but many others were posted out to new units. Flying of a total of 150 sorties in just four months, the squadron would lose ten aircraft, a loss rate of almost 7%.

The void left by 623 Sqn would be soon filled though. Just four days later another unit would transfer in, that of 214 (Federated Malay States) Sqn from RAF Chedburgh also a Stirling MK.III unit. For the majority of December, 214 Sqn would carry out ‘gardening’ missions, dropping mines designated ‘Nectarines‘ or ‘Cinnamon‘. Other operations would see bombs dropped on ‘Special Targets‘ although the Operational Records don’t specify the identity of these targets. 214 Sqn as with 623 Sqn, would be another of these short stay units, on January 17th 1944 they would transfer to RAF Sculthorpe and 100 Group, for RCM (electronic warfare) duties and a new aircraft, the B-17 Flying Fortress or Fortress I. As crews carried out circuits, lectures and training at Sculthorpe, the remainder of the squadron continued operations from Downham. By the 24th January though, all personnel had transferred over and Downham Market was far behind them.

In March 1944, Downham’s long standing unit 218 Sqn was finally ordered out, and on the 7th the entire squadron departed, the operations books simply stating: “218 Sqn moved from Downham Market to Woolfox Lodge by road and air today“. *2 Once at Woolfox Lodge, they would begin disposing of their Stirlings to take on the new heavy bomber – the Avro Lancaster.

The dust wasn’t allowed to settle at Downham however, and before long more personnel and a new Squadron would arrive, ready to fill the skies of Norfolk. This was no ordinary squadron though. With concerns about the poor quality of bombing and the lack of accuracy, it was decided to form a new Group that went much against the wishes of Arthur Harris. Seen as ‘elitist’, Harris vehemently disagreed with the new Group and fought his corner bravely. But with little choice in the matter and lacking his own high level support, he eventually succumbed to the Air Ministry’s demands, putting in command the Australian Group Captain Donald C.T Bennett, CB, CBE, DSO.

The new group would be called 8 Group (PFF) ‘The Pathfinders’, and was designed to use the cream of Bomber Command crews whose record for bombing had been excellent. Aircraft from the Group were to fly ahead of the main bomber force and ‘mark’ the target by various means – coloured flares being the primary and main method. In principle it worked well, but as records show, it was not without its own difficulties or setbacks.

Bennett, an aggressive pilot who didn’t suffer fools gladly, quickly won the admiration of his crews. He was also highly admired by Harris, who once described him as the the “most efficient airman” he had ever met; Harris considered Bennett perfect for the role. In appointing Bennett, Harris dismissed all other possible candidates including Air Chief Marshall Basil Embry, the Air Ministry’s most likely favourite.

The Pathfinders were officially formed on 15th August 1942, with 8 Group coming into official formation in January 1943. With the arrival of the new Squadron, 635 Sqn, Downham would now be playing its part in this role. This change would also mean a change in aircraft type at this Norfolk airfield, out went the now relegated Stirlings and in came Avro’s remarkable four engined heavy, the Lancaster MK.III.

RAF Downham Market

The remains of the Technical site looking toward the airfield.

635 Sqn was created under the command of Wing Commander Alan George Seymour Cousens on March 20th 1944. Using ‘C’ Flight from RAF Graveley’s 35 Sqn and ‘C’ Flight from RAF Bourn’s 97 Sqn. A total of eight aircraft and crews from each flight immediately began the move to Downham. At 09:15 the first of the road crews arrived from Bourn, with further sporadic arrivals until 11:00. The first aircraft to arrive touched down at 12:00, and within the next 20 minutes all aircraft were safely on the ground. Graveley crews began arriving soon after this, their first aircraft, along with a ground party, arriving at 15:05.

The new squadron consisted of 36 Officers, 120 NCOs and 200 ‘other ranks’. They were accommodated in Site ‘J’ whilst 20 NCOs and 40 armourers were accommodated in site ‘B’. A small number of officers were put up in the Rectory just outside the main gate of the airfield*3.

Shortly after the crews had landed, they were quickly briefed for an operation to attack Munich, but by the time the aircraft were prepared and bombs loaded, the operation was cancelled, the crews were then given the chance to settle in to their new homes.

635 Sqn would continue to use the Mk.III Lancaster for the next four months, replacing it with the Lancaster MK.VI  from March onward. This was an unusual model of the famous aircraft as it had neither a nose nor mid-upper turret, instead it was crammed with electronic radar jamming devices. Also replacing the normal three-bladed propellers were four bladed examples, aiming to improve the aircraft’s performance.

A growth in aircraft numbers and the development of Pathfinder methods soon led to a new branch of the Group, the Light Night Striking Force (LNSF) equipped with de Havilland’s ‘Wooden Wonder‘ the Mosquito.  In response to this, 571 Sqn, a new light bomber squadron equipped with the Mosquito XVI, was born here at Downham on April 5th 1944, barely two weeks after 635 Sqn themselves arrived. As a temporary measure it was decided that on April 10th, the squadron would be reduced to one Flight instead of two leaving eight aircraft plus a ‘spare’ at Downham whilst the remainder transferred to RAF Graveley. The idea behind the move was two-fold, firstly to bolster the expansion of 105 Sqn at Graveley, and secondly, to provide experience for the ground crews on the Mosquito.

The move went well, but on the 17th, a new order would come through that would change Downham yet again.

Movement order 21 required the entire 571 squadron to transfer to RAF Oakington, effective by 24th April. With that, preparations began and the advanced party moved from Downham on the 22nd followed by the rear party on the 24th. The entire squadron including the Graveley detachment were, by the end of the day, now at Oakington. Due to the move, there were no operations flown by the squadron from Downham Market during this short period of their history.

This departure left 635 Sqn as the only operational squadron at Downham Market. Whilst somewhat quieter, it is was not to be all plane sailing.

In Part 2, we see how Downham takes part in D-Day, the end of the war approaches but operations continue and Downham remains busy. After the war, the airfield is used for other purposes, and eventually closes. We then see what remains today and ask what does the future hold?

The full Trail appears in Trail 7.

RAF Great Massingham – Blenheims, Bostons and Mosquitoes.

In the heart of Norfolk, some 40 miles west of Norwich and 13 miles to the east of King’s Lynn, lies a small, quaint village typical of the English stereotype. Small ponds frequented by a range of ducks, are thought originally to be fish ponds for the 11th century Augustinian Abbey, and the history of the village is believed to go back as far as the 5th Century.  Massingham boasts an excellent village pub, and a small shop along with beautiful walks that take you through some of Norfolk’s most beautiful countryside; it has to be one of Norfolk’s greatest visual assets.

Sited above this delight is the former airfield RAF Great Massingham, which during the war years was home to number of light bombers and even for a short while, the four engined heavy, the B-17. In Trail 21, we return to RAF Great Massingham.

RAF Great Massingham

Great Massingham airfield lies in the heart of Norfolk, some 40 miles west of Norwich and 13 miles to the east of King’s Lynn, lies a small, quaint village typical of the English stereotype. Small ponds frequented by a range of ducks, are thought originally to be fish ponds for the 11th century Augustinian Abbey, and the history of the village is believed to go back as far as the 5th Century.  Massingham boasts an excellent village pub, and a small shop along with beautiful walks that take you through some of Norfolk’s most beautiful countryside; it has to be one of Norfolk’s greatest visual assets. Sited above this delight is the former airfield RAF Great Massingham, which during the war years was home to number of light bombers and even for a short while, the four engined heavy, the B-17.

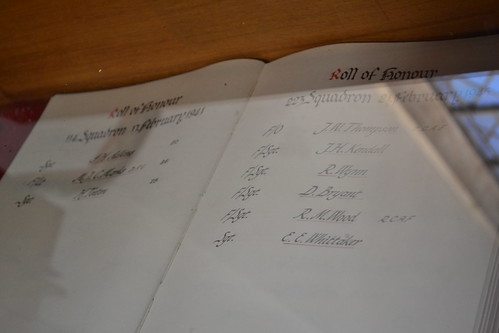
Before entering Great Massingham I suggest you stop at Little Massingham and the church of St. Andrew’s. For inside this delightful but small church, is a roll of honour*1 that lists enormous amounts of information about the crews who served at the nearby base. It gives aircraft details, mission dates and crew names amongst others. It is a hugely detailed collection of information covering 1940-45, in which time 600 Massingham crews lost their lives. Seven of these crew members, are buried in the adjacent church yard: Sqn. Ldr. Hugh Lindsaye (18 Sqn), Sgt. John Wilson (RNZAF – 107 Sqn), Sgt. Thomas Poole (107 Sqn), P/O. Arthur Lockwood (107 Sqn), Flt. Sgt. Gordon Relph (107 Sqn), F/O. Charles Ronayne (RAF) and F/O. Joseph Watkins (239 Sqn), all being killed in different circumstances. This is a valuable and enlightening stop off to say the least.

RAF Great Massingham

The Roll of Honour in St. Andrew’s Church, Little Massingham.

On leaving the church turn right and you will almost straight away enter the village of Great Massingham. The airfield is to the east behind the village holding the high ground, which makes for a very windy and open site, whilst the village nestled on the lower ground, remains calm and quiet. Built originally as a satellite for the nearby West Raynham, Massingham opened in 1940 with grass runways initially under the command of 2 Group, Bomber Command and then latterly 100 Group, whose headquarters were at Bylaugh Hall. The distance between both RAF West Raynham and RAF Massingham was so small, that crews would cycle from one to the other each morning before operations.

RAF Great Massingham

The Officers Mess now a farm building.

There were a total of four T2 hangars and one B1 hangar built on this site. The airfield also had sixteen pan-type hardstands and twenty-one loop-type hardstands, giving a total of thirty-seven dispersal points around its perimeter.

The main accommodation and communal sites which totalled five and two respectively, were near to Little Massingham church, to the west, along with further areas to the south of the airfield . These included a communal area to the south-west of the village and sufficient accommodation for 1,197 men, consisting of Officers, Senior NCOs and ordinary ranks.  This was later upgraded to accommodate 1,778 men. In addition, accommodation was provided for the WAAFs of the airfield, 102 in total at the outset. This was also increased in the airfield’s upgrade, taking the total number of  WAAFs to 431.

The bomb dump and ammunition stores were well to the north away from the personnel as was standard. A number of anti-aircraft sites were scattered around the perimeter offering good protection from any attacking aircraft.

The first occupants of Massingham were the Blenheim IVs of 18 Sqn RAF who arrived in the September of 1940.

18 Sqn were previously based at West Raynham, making the transition invariably very smooth. In fact, operations barely ceased during the change over, the last West Raynham sortie occurring on 7th September 1940 with a six ship formation attack on the docks and shipping at Dunkirk, and the first Great Massingham sortie on the evening of the 9th to Ostend.

Whilst at Great Massingham, 18 Sqn flew the Blenheim Mk.IV initially on short range bombing sorties to the French coast. All was fairly quiet for the first few weeks, the squadron’s first loss not occurring until November 28th 1940, when Blenheim P6934 crashed after hitting high tension wires west of the airfield. All three of the crew were injured and admitted to hospital, but Sgt. William E. Lusty (S/N: 751633) died from his injuries the following day.

18 Squadron remained at Great Massingham until April the following year (1941), performing in the low-level bombing role. Like most other RAF airfields around this area of Norfolk, it would be dominated by twin-engined aircraft like the Blenheim and its subsequent replacements. As a reminder to those who may have got complacent about the dangers of flying in wartime, the departure of 18 Sqn was marred by the loss of Squadron Leader Hugh Lindsaye (S/N: 40235), who was killed whilst towing a drogue near to Kings Lynn a few miles away. An investigation into the crash revealed that a drogue he was pulling had become separated and fouled the port elevator. The pilot lost control as a result and all three crewmen (SgT. Stone and F/O. Holmes) were killed. Sqn. Ldr. Lindsaye is one of those seven buried in Little Massingham.

Shortly after the departure of 18 Sqn, Massingham took on another Blenheim squadron in the form of 107 Sqn, a move that was coincided with a detachment of B-17 Flying Fortresses of 90 Squadron.

The B-17 (Fortress I) squadron was formed at Watton earlier that month, they moved to West Raynham whereupon they began trials at a number of smaller airfields including Bodney and Massingham, to see if they were suitable for the B-17. These initial tests, which were undertaken by Wing Commander McDougall and Major Walshe, were a series of ‘circuits and bumps’ designed to see if the ground and available runways were suitable. It was decided that Massingham was indeed suitable, and so a decision was made on the 13th, to base the aircraft at Massingham but retain the crews at West Raynham, transport vehicles ferrying them to and from the aircraft on a daily basis. For the next few days further tests were conducted, and engineers from Boeing came over to instruct ground crews on the B-17’s engineering and armaments. Concerns were soon raised by crews about Massingham’s grass runways, and how well they would perform with the heavier four engined B-17’s constantly pounding them.

RAF Great Massingham

Remains around the perimeter track.

On the 23rd May, H.R.H The King conducted an inspection of Bomber Command aircraft at RAF Abingdon, in Oxfordshire. Amongst the types presented with the RAF bombers was a Fortress I from Massingham. The King, Queen and two Princess’s Elizabeth and Margaret, all attended and took a great interest in the Fortress. The Royal party taking considerable time to view and discuss the heavy bomber’s merits and features.

Back at Massingham, flight tests, training and examinations of the B-17 continued until in June 1941, when 90 Sqn were ordered out of both Massingham and West Raynham, moving to RAF Polebrook in Northamptonshire. But by the October, the Fortress’s had all gone from RAF bomber service, problems with freezing equipment convincing the RAF not to use the heavies in bombing operations.

By February 1942 the unit was disbanded and all its assets were absorbed into 1653 Heavy Conversion Unit (HCU). Within days of 90 Sqn’s arrival at Massingham, another more permanent squadron also arrived, again performing in the same low-level bombing role as their predecessors 18 Sqn. The spring of 1941 saw 2 group perform some of their largest operational sorties to date, with many Blenheims continuing their daylight raids on shipping and docks in north-west Germany.

It was during this hectic time, on May 11th, that 107 Sqn, would arrive at the Norfolk base at Massingham. Being taken off operations on the 10th, the air personnel made their way down from the Scottish base at Leuchars whilst the ground staff travelled by train the following day. A number of crews were posted on detachment to bases at Luqa, Ford and Manston.

After a short settling in period missions began again in earnest with their first twelve ship operation in Bomber Command taking them to Heliogoland on the 13th. Two of these Blenheims returned with engine problems, but the remainder managed to attack the target, in an operation that was considered a great success, with complete surprise being achieved. Flying at very low level was key to this operation, and whilst all aircraft returned home safely, one aircraft piloted by Sgt. Charney, flew so low he managed to strike the sea with his port engine; as a result, the airscrew was damaged and broke away leaving the aircraft flying on just one of its two powerplants!

The end of May was a difficult month for 107. On the 21st they returned to Heligoland, with nine aircraft taking off at 14:00, detailed for a daylight formation attack on the target. With  visibility of 12 – 15 miles, they pressed home their attack from as low as fifty feet, in spite of what was an ‘intense and accurate’ flak barrage. Four aircraft were hit by this flak, and in one of them, Sgt. John Wilson (S/N: 40746) was killed when shrapnel struck him in the head. Sgt. Wilson is also one of the seven in the church yard at Little Massingham.*2

On the return flight, a second aircraft also damaged by the flak, had an engine catch fire. The pilot and crew were all lost after ditching in the sea. Fl. Sgt. Douglas J. R. Craig (S/N: 903947) never having being found, whilst two other crewmen (Sgt. Ratcliffe and Sgt. Smith) were seen climbing into their life raft, later being picked up by the Germans and interned as prisoners of war.

On the 23rd the squadron was then detailed to search for shipping off France’s west coast. Due to bad weather, they were unable to make Massingham and had to land at Portsmouth instead. Continued bad weather forced them to stay there until the 27th when they were able at last to return to Massingham. No further operations were then carried out that month.

RAF Great Massingham

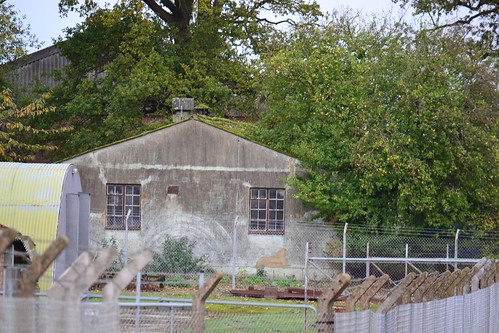
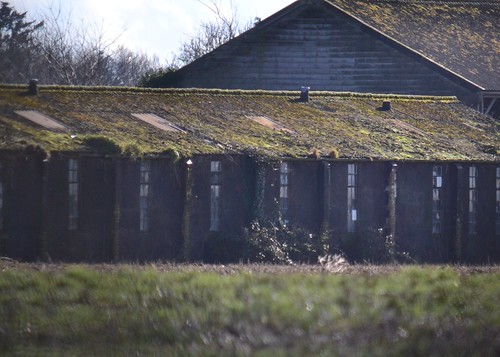
Gymnasium and attached Chancellery now a car repair shop.

The dawn of 1942 saw Bomber Command face its critics. High losses brought into question the viability of these small light aircraft as bombers over enemy territory, a situation that would see 2  Group, as it was, all but removed from operations by the year’s end.

But the end was not quite here, and January  of 1942 saw 107 take on the Boston III ( an American built aircraft designated the ‘Havoc’) as a replacement for the now ageing Blenheim. With the new aircraft 107 remained at Massingham, at least until the early August, where they made a short move to Annan before returning to Massingham a mere week later. It would take only a month before the first 107 Sqn Boston would be lost.

Whilst on a training flight, Boston W8319, struggled to join the formation, after turning back, it was seen to fall to the ground, the resultant fireball killing all three crewmen on board.

Despite this, losses over the coming months remained light. With the introduction of US airmen and the 15th Bomb Squadron, June / July saw a number of Massingham aircraft transfer across to the American’s hosts 226 Sqn at Swanton Morley. One of these aircraft, crewed by two US airmen; Captain S. Strachan and Lt. C. Mente, crashed near RAF Molesworth killing both on board.

By the end of 1942, 107 Sqn had lost a total of 23 aircraft on operations, and with each Boston carrying four crewmen it meant losses were increasing for the unit.

In February 1943, the Boston IIIs were replaced by the IIIa model. During May, the whole of 2 Group would begin to transfer across to the 2nd Tactical Air Force (TAF) in preparations for the invasion the following year. Losses had been high for the group, the light bombers being easily cut down by both Luftwaffe fighters and flak.

At the end of August 1943, it was 107 Sqn’s turn and they departed Great Massingham for Hartford Bridge and a new life within the 2nd TAF. It was during these summer months that a Free French unit, 342 Lorraine Squadron would arrive at Massingham. A unit formed with Bostons at West Raynham, it would stay at Massingham between July and into early September before moving off to rejoin 107 Sqn at Hartford Bridge, also beginning a new life within the 2nd Tactical Air Force.

It was these postings that would lead to the end of Massingham as a day bomber station, and no further vulnerable light bombers of this nature would be stationed here again.

In April 1944 Great Massingham  was redeveloped and upgraded, more accommodation blocks were provided and three concrete runways were laid; 03/21 and 13/31 both of 1,400 yards, and the third 09/27 at  2,000 yards, this would give the site the shape it retains today.

A year-long stay by 1694 Bomber (Defence) Training Flight with amongst them, Martinets, gave the airfield a much different feel. Target towing became the order the day and non ‘operational’ flying the new style. In the June of 1944, 169 Sqn would arrive at Massingham, operational flying was once again on the cards, with night intruder and bomber support missions being undertaken with the Wooden Wonder, the D.H. Mosquito. Between June and the cessation of conflict this would be a role the squadron would perform, and perform well, with numerous trains, ground targets and Luftwaffe night fighters falling victim to the Mosquito’s venomous attacks. Included in these are a damaged Ju 88 on the night of October 26th 1944 south of the Kiel Canal, and five trains on the night of October 29th.

RAF Great Massingham

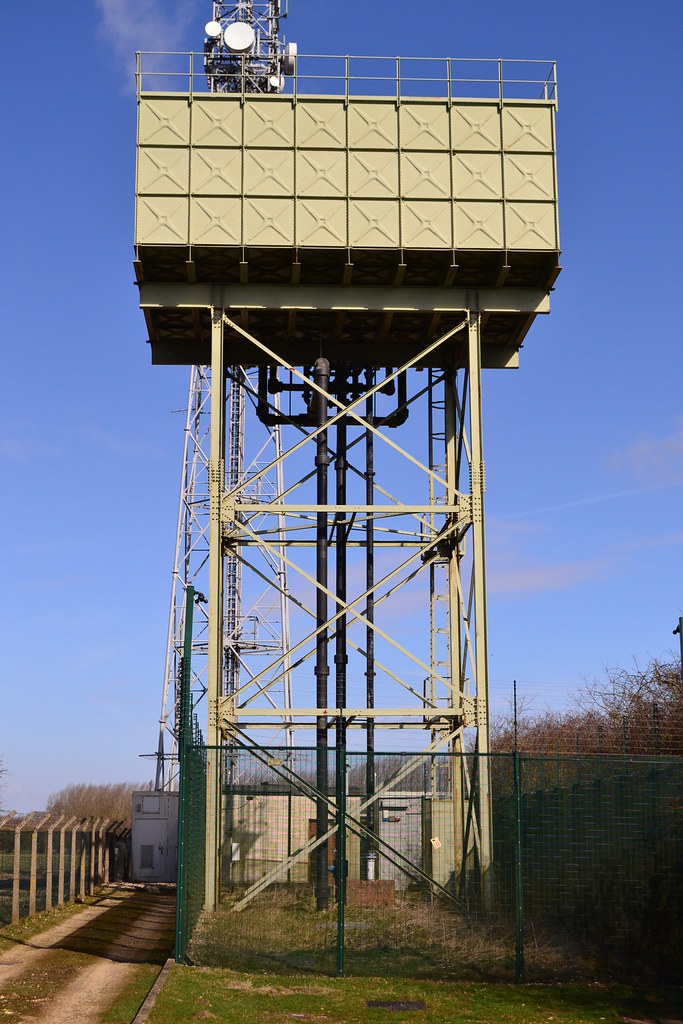
Original high-level Braithwaite water tank.

With them, came 1692 (Bomber Support Training) Flight, to train crews in the use of radar and night interception techniques.

Formed at RAF Drem in Scotland in 1942 as 1692 (Special Duties) Flight, they operated a range of aircraft including Defiants, Beaufighters and Mosquitoes. The two units stayed here at Massingham until both departed in August 1945, at which point 12 Group Fighter Command, took over responsibility of the site.

As radar and night interception roles developed, a new unit was created at Massingham under the control of the Central Fighter Establishment (CFE), who were to trial different techniques and strategies for air interception. They later moved to West Raynham where they continued to carry out this role.

Over the years a number of  post war celebrities were stationed at Massingham, they included F.O. Keith Miller AM, MBE – the Australian Test cricketer; P.O. (later Squadron Leader) Bill Edrich DFC – the England cricketer and the BBC commentator – Flt. Sgt. Kenneth Wolstenholme DFC and Bar.

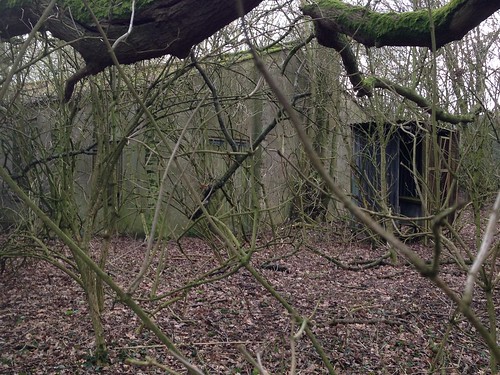
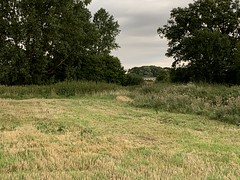
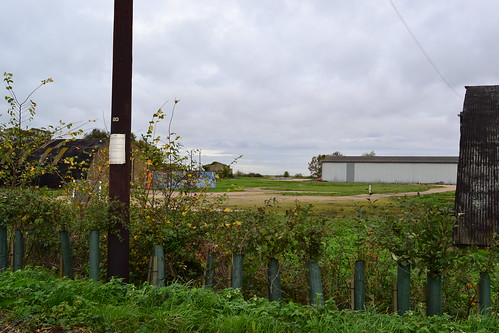
After the aircraft left, the airfield fell quiet and was very quickly closed. 1946 saw the last personnel leave, and it remained dormant until being sold in 1958. Bought by a farmer, it is now primarily agriculture, although a small private airfield has opened utilising the former runways, and flying visitors are welcomed with prior permission. The airfield at great Massingham has a public footpath running part way through it. This is accessible at either end of the southern side of the airfield, and permits access along part of the original perimeter track. Accessing the eastern end of the path is easiest, a gated road from the village takes you up to the airfield site. Once at the top, you can see the large expanse that was the main airfield site. Trees have since been cultivated and small coppices cover parts of it. To your right at this point the peri track continues on in an easterly direction, but this section is now private and access is not permitted. This track would have taken you toward the Watch office, the Fire Tender building and storage sheds – all these being demolished long ago. A further area to the south of here has now been cultivated, and there was, what is believed to have been a blister hangar, located at this point – this too has long since gone.

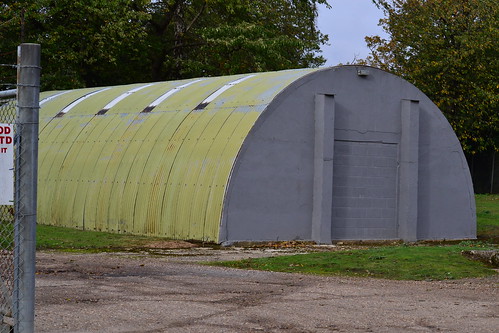
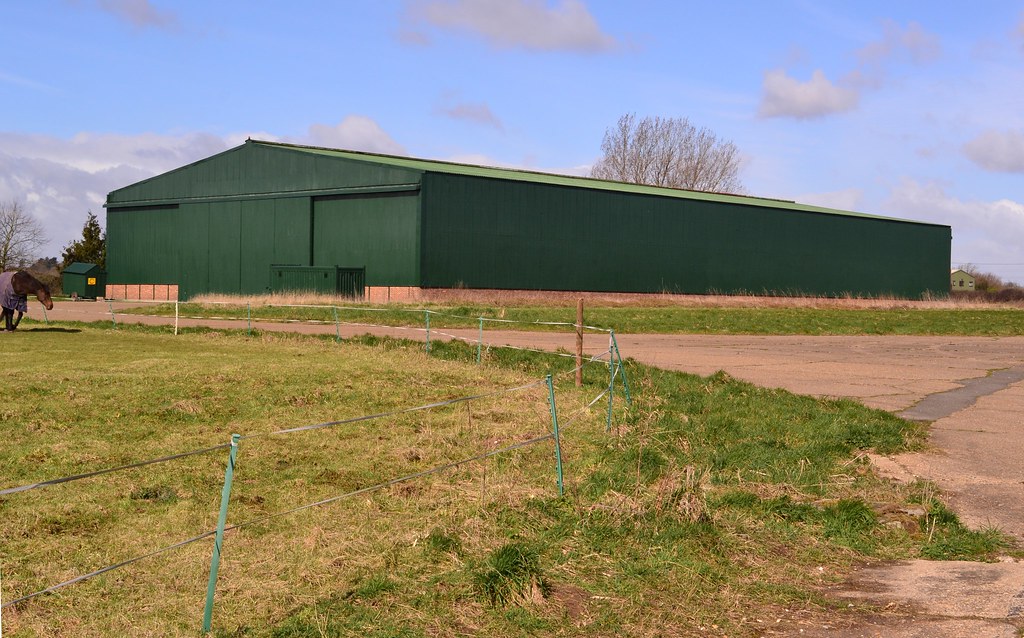
The public path turns left here and takes you round in a northerly direction. To your left is a T2 hangar, it is believed that this is not the original, but one that had been moved here from elsewhere. This however, cannot be confirmed, but there was certainly a T2 stood here originally.

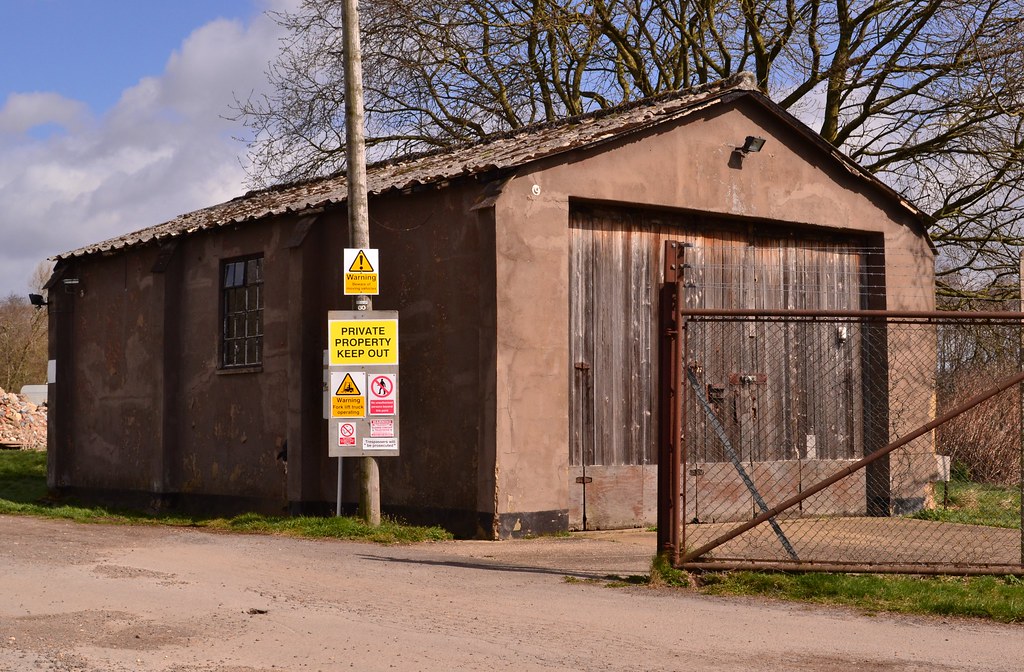
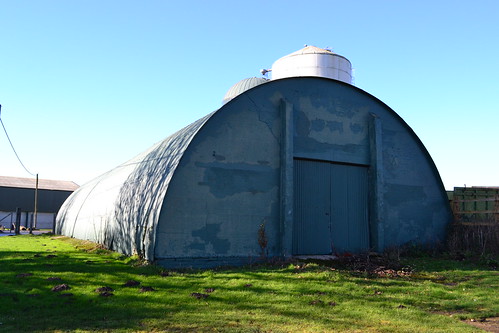
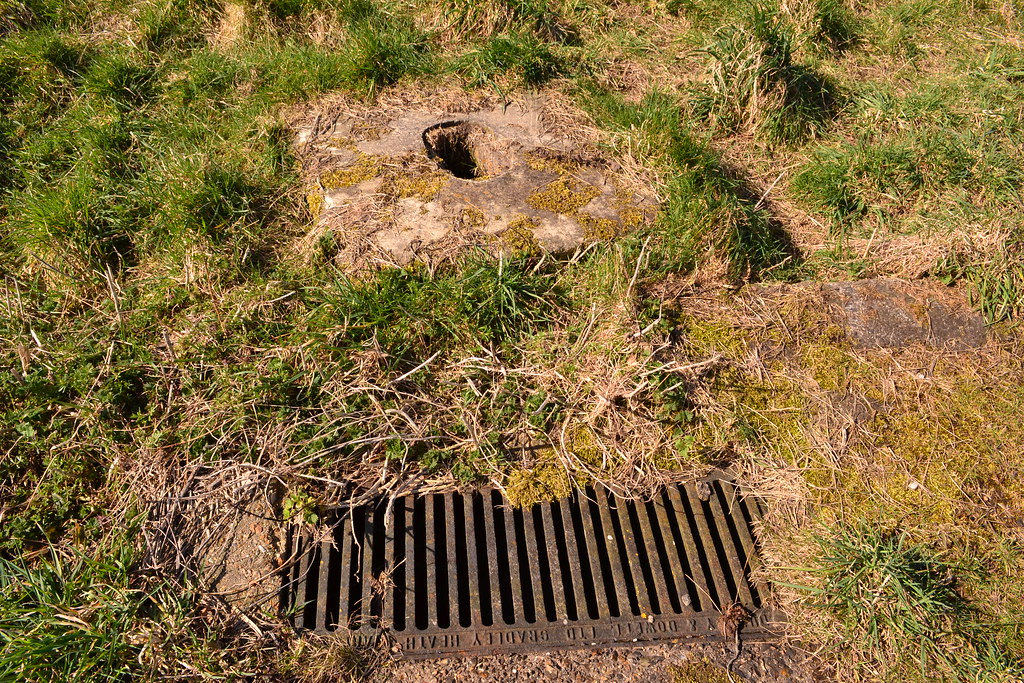
The track continues round, a farm building, very much like a hangar, houses the aircraft that now fly. Sections of runway drainage are visible and piles of rubble show the location of smaller buildings. The track then takes you left again and back to the village past another dispersal site, now an industrial unit complete with blister hangar.

Other foundations can been seen beneath the bushes and leaves on your right. This may have been the original entrance to the site, although Massingham was unique in that in was never fenced off, nor guarded by a main gate. Other examples of airfield architecture may be found to the north side of the airfield, indeed satellite pictures show what looks like a B1 hangar on the northern perimeter.

RAF Great Massingham

The perimeter track and T2 hanger re-sited post war.

After walking round, drive back toward Little Massingham, but turn left before leaving the village and head up toward the distant radio tower, itself a remnant from Massingham’s heyday. We pass on our left, the former accommodation site. Now a field, there is no sign of its previous existence. However, further up to the right, a small enclave utilises part of the Officers’ Mess, the squash court, and gymnasium with attached chancery. Hidden amongst the trees and bushes are remnants of the ablutions block, and other ancillary buildings. Continue along this road, then take the left turn, toward the tower. Here is the original high-level Braithwaite water tank and pump house, still used for its original purpose and in very good condition.

Finally, a lone pill-box defensive position can also be found to the west of the village, some distance from the airfield in the centre of a farmer’s field. All small reminders of the areas once busy life.

Great Massingham is a delightful little village, set in the heart of Norfolk’s countryside. Its idyllic centre, pubs and shops surround ponds and greens. A short walk away, is the windy and open expanse that once was a bustling airfield, resounding to the noise of piston engines. All is now much quieter, their memories but a book, some dilapidated buildings and a handful of graves. Standing at the end of the runway, looking down the expanse of concrete, you can easily imagine what it must have been like all those years ago. From Great Massingham we head east, to RAF Foulsham, before turning north and the North Norfolk coast, an area of outstanding natural beauty and some fine examples of airfield architecture.

Sources and links RAF Great Massingham

*1 A comprehensive history of RAF Massingham, including RAF material, is now under the care of the Massingham Historical Society. Contact Anthony Robinson antmassingham@gmail.com for details about the Museum or Roll of Honour, a hard copy of which can be purchased for a small fee.

*2 The ORB shows this as Sgt G, Wilson and not J.W. Wilson.

National Archives AIR 27/842/10

RAF Great Massingham is remembered on the Massingham village website which includes details of the Roll of Honour.

Massingham was first visited in 2015.

January 1st 1945 – Loss of Mosquito PZ340

On the afternoon of January 1st 1945, Mosquito FB.VI #PZ340, ‘HB-Z’ took off from RAF West Raynham, according to the Operational Record Book it was assigned to a “high level bomber support” sortie over Heligoland, unusual as these Mosquitoes were not pressurised models. The pilot, F/O Ian George Walker (s/n: 156104) and navigator/wireless operator F/O. Joseph Ridley Watkins (s/n: 152875), had only just been brought together, F/O Watkins, from Wanstead in Essex, normally being based with 141 Squadron, but on attachment to 239 Squadron, when the flight took place.

On return, from the mission, the aircraft crashed near to Narford Hall, an Eighteenth Century stately home located a short distance to the north-east of RAF Marham in Norfolk. Whilst not confirmed, it is thought the crash was caused by an instrument failure, a crash that resulted in both airmen being killed.

Following the accident, F/O. Walker was returned to his home town and was buried in St. Michael’s Cemetery in Dumfries. F/O Watkins however, was buried locally, in nearby St. Andrew’s Church, Little Massingham not far from RAF Great Massingham. Both airmen were only 21 years of age.

The Mosquito, a Hatfield manufactured aircraft, was produced under contract 555/C.23(a), and was an aircraft designed for ‘intruder’ strike missions, it was the most commonly used variant of all Mosquitoes.  239 Squadron was in the process of replacing these examples with the MK. XXX before its disbandment on July 1st 1945.

Little Massingham St. Andrew's Church

F/O Watkins died on January 1st 1945 after the Mosquito he was in crashed near to RAF Marham, Norfolk. He rests in St. Andrew’s Church yard, Little Massingham.


A Happy Christmas!

I would just like to take this opportunity to wish all those of you who have followed, read or commented on the blog, a very merry Christmas and a very happy and safe New Year.

A extra big thanks goes out to those of you who have stuck around for so long, we’re now approaching our seventh year of the blog and have managed to visit over 125 airfields, 105 memorials and 40 museums. These have stretched from Perth in Scotland to the South coast of England, Suffolk in the east to Gloucestershire in the west. The range of these airfields is enormous, and they continue to vanish, with many in a worse state now than they were when I visited at the beginning of the journey.

Very soon many of these will be gone, lets hope the memories of those who served are not also gone with them.

A very happy Christmas one and all!

RAF Andrews Field – (Great Saling/Station 485) – Trail 33: Essex Part 1.

RAF Attlebridge  (Station 120) – Trail 7: Northwest Norfolk.

RAF Barkston Heath (Station 483) – Trail 2: Lincoln Borders and Newark

RAF Barton BendishTrail 7: Northwest Norfolk.

RAF Biggin Hill (Westersham) (Station 343) – Trail 4: Kent Part 1.

RAF Bircham NewtonTrail 20: North Norfolk (Part 1).

RAF Bodney (Station 141) – Trail 8: Swaffham and Her Neighbours (Part 1 of 3).

RAF Bottesford (Station 481) – Trail 52: Leicestershire’ Borders.

RAF Bottisham (Station 374) – Trail 55: Around Newmarket

RAF Boulmer – Trail 47: Northumberland.

RAF BournTrail 31: Southern Cambridgeshire (Part 2).

RAF Brenzett (ALG) – Trail 18: Kent Part 2.

RAF BruntonTrail 47: Northumberland.

RAF Bungay (Flixton) (Station 125) – Trail 14:  Central Suffolk (Part 1).

RAF Bury St. Edmunds (Rougham) (Station 468) – Trail 16: West Suffolk (part 1).

RAF Castle CampsTrail 45: Essex (Part 2).

RAF Caxton GibbetTrail 29: Southern Cambridge (Part 1).

RAF Charterhall Trail 41: The Borders of Scotland and England.

RAF ChedburghTrail 49: Bomber Command – Bury St. Edmunds to Haverhill

RAF Collyweston Trail 37: The Northern Reaches of Cambridgeshire.

RAF Coltishall – Trail 7: Northwest Norfolk.

RAF ConingsbyTrail 1: Lower Lincolnshire.

RAF CottamTrail 40: Yorkshire (East Riding).

RNAS CrailTrail 53: Scotland’s East Coast – Fife

RAF CranwellTrail 2: Lincoln Borders and Newark.

RAF Debach (Station 152) – Trail 39: Suffolk around Ipswich (Part 1).

RAF Debden (Station 356) – Trail 46: Essex Part 3.

RAF Deenethorpe (Station 128) – Trail 6: American Ghosts.

RAF Deopham Green (Station 142) – Trail 27: Southern Norfolk (Part 3).

RAF Digby (Scopwick) – Trail 1: Lower Lincolnshire.

RAF Docking – Trail 20: North Norfolk (Part 1).

RAF Downham Market (Bexwell) – Trail 7: Northwest Norfolk.

RAF Drem – Trail 42: Edinburgh’s Neighbours.

RAF Dunino –  Trail 53: Scotland’s East Coast – Fife.

RAF East Fortune – Trail 42: Edinburgh’s Neighbours.

RAF East Kirkby Trail 1: Lower Lincolnshire.

RAF East Wretham (Station 133) – Trail 13: Southern Norfolk around Diss (Part 2).

RAF Eye (Brome) (Station 134) – Trail 14: Central Suffolk (Part 1).

RAF Fersfield – (Station 130) – Trail 28: Southern Norfolk (Part 4).

RAF FoulshamTrail 22North Norfolk (Part 3).

RAF FowlmereTrail 32Southern Cambridgeshire (Part 3).

RAF Framlingham (Parham) (Station 153)Trail 39: Suffolk around Ipswich (Part 1).

RAF GamstonTrail 54: The Great North Road.

RAF Glatton (Station 130) – Trail 6: American Ghosts.

RAF Gransden Lodge – Trail 31: Southern Cambridgeshire (Part 2).

RAF Graveley – Trail 29: Southern Cambridge (Part 1).

RAF Grafton Underwood (Station 106) – Trail 6: American Ghosts.

RAF Great Dunmow (Station 164)- Trail 33: Essex (Part 1).

RAF Great MassinghamTrail 21: North Norfolk (Part 2).

RAF Great Sampford (Station 359) – Trail 50: Haverhill’s neighbours – Wratting Common and Great Sampford.

RAF Hardwick (Station 104) – Trail 12: Southern Norfolk around Diss (Part 1).

RAF Hawkinge – Trail 18: Kent Part 2.

RAF Hethel – Trail 38: To the West of Norwich.

RFC HinghamTrail 38: To the West of Norwich.

RAF Holme on Spalding Moor Trail 40: Yorkshire (East Riding).

RAF Hunsdon – Trail 25: Hertfordshire.

RAF Kimbolton (Station 117) – Trail 6: American Ghosts.

RAF King’s Cliffe (Station 367) – Trail 6: American Ghosts.

RAF LanghamTrail 23: North Norfolk (Part 4).

RAF Lashenden (Headcorn) – Trail 18: Kent Part 2.

RAF Lavenham (Station 137) – Trail coming soon.

RAF Leuchars – Trail 53: Scotland’s East Coast – Fife.

RAF Little SnoringTrail 22North Norfolk (Part 3).

RAF Little Walden – – Trail 46: Essex Part 3.

RAF Macmerry Trail 51: Southern Scotland

RAF MarhamTrail 7: Northwest Norfolk.

RAF Martlesham HeathTrail 48: Suffolk around Ipswich (Part 2).

RAF Matching (Station 166) – Trail 33: Essex Part 1.

RAF Matlaske (Station 178) – Trail 34: North Norfolk (Part 5).

RAF MattishallTrail 36: North Norfolk (Part 6).

RAF Mendlesham (Station 156) – Trail 15: Central Suffolk (Part 2).

RAF MepalTrail 11: Around Ely.

RAF MetheringhamTrail 1: Lower Lincolnshire.

RAF Methwold – Trail 8: Swaffham and Her Neighbours (Part 1).

RAF Milfield –  Trail 47: Northumberland.

RAF Narborough (Narborough Aerodrome)- Trail 7: Northwest Norfolk.

RAF Newmarket Heath – Trail 55: Around Newmarket

RAF North CreakeTrail 23: North Norfolk (Part 4).

RAF North Pickenham (Station 143) – Trail 9: Swaffham and Her Neighbours (Part 2).

RAF North WealdTrail 25: Hertfordshire.

RAF North Witham (Station 479) – Trail 3: Gone But Not Forgotten.

RAF Old Buckenham (Station 144) – Trail 13: Southern Norfolk around Diss (Part 2).

RAF Oulton – Trail 34: North Norfolk (Part 5).

RAF Polebrook (Station 110) – Trail 19: Northamptonshire American Ghosts II.

RAF Rattlesden (Station 126) – Trail 15: (Central Suffolk (Part 2).

RAF SawbridgeworthTrail 25: Hertfordshire.

RAF ScamptonTrail 30: Scampton and the Heritage Centre.

RAF SconeTrail 56: Perthshire.

RAF SculthorpeTrail 21: North Norfolk Part 2.

RAF Sedgeford – Trail 20: North Norfolk (Part 1).

RAF Shipdham (Station 115) – Trail 10: Swaffham and Her Neighbours (Part 3).

RAF Snailwell (Station 361) – Trail 55: Around Newmarket

RAF Snetterton Heath – (Station 138) – Trail 27: Southern Norfolk (Part 3).

RAF Spanhoe Lodge (Station 493) – Trail 6: American Ghosts.

RAF Steeple Morden – Trail 32: Southern Cambridgeshire (Part 3).

RAF Stoke OrchardTrail 24: Gloucestershire.

RAF Stradishall- Trail 49: Bomber Command – Bury St. Edmunds to Haverhill

RAF Sutton BridgeTrail 3: Gone But Not Forgotten.

RAF Swannington – Trail 36: North Norfolk (Part 6) 

RAF Swanton Morley – Trail 38: To the West of Norwich.

RAF Thorpe Abbotts (Station 139) – Trail 12: Southern Norfolk around Diss (Part 1).

RAF Tibenham (Station 124) – Trail 13: Southern Norfolk around Diss (Part 2).

RAF Tuddenham – Trail 16: West Suffolk (Part 1).

RAF Tydd St. Mary – Trail 37: The Northern Reaches of Cambridgeshire.

RAF Upwood – Trail 17: The Pathfinders.

RAF Warboys – Trail 17: The Pathfinders.

RAF WaterbeachTrail 11: Around Ely.

RAF Watton (Station 376/Station 505) – Trail 9: Swaffham & Her Neighbours (Part 2).

RAF Wendling (Station 118) – Trail 10: Swaffham and Her Neighbours (Part 3).

RAF West Malling Trail 4: Kent Part 1.

RAF West RaynhamTrail 21: North Norfolk Part 2.

RAF WethersfieldTrail 45: Essex (Part 2).

RAF Westley – Trail 16: West Suffolk (part 1).

RAF WinfieldTrail 41: The Borders of Scotland and England.

RAF Winthorpe Trail 2: Lincoln Borders and Newark.

RAF WitchfordTrail 11: Around Ely.

RAF Wittering  – Trail 37: The Northern Reaches of Cambridgeshire.

RAF Woodall SpaTrail 1: Lower Lincolnshire.

RAF Wratting CommonTrail 50 – Haverhill’s neighbours – Wratting Common and Great Sampford.

January 1st 1945 – Loss of Mosquito PZ340

On the afternoon of January 1st 1945, Mosquito FB.VI #PZ340, ‘HB-Z’ took off from RAF West Raynham, according to the Operational Record Book it was assigned to a “high level bomber support” sortie over Heligoland, unusual as these Mosquitoes were not pressurised models. The pilot, F/O Ian George Walker (s/n: 156104) and navigator/wireless operator F/O. Joseph Ridley Watkins (s/n: 152875), had only just been brought together, F/O Watkins, from Wanstead in Essex, normally being based with 141 Squadron, but on attachment to 239 Squadron, when the flight took place.

On return, from the mission, the aircraft crashed near to Narford Hall, an Eighteenth Century stately home located a short distance to the north-east of RAF Marham in Norfolk. Whilst not confirmed, it is thought the crash was caused by an instrument failure, a crash that resulted in both airmen being killed.

Following the accident, F/O. Walker was returned to his home town and was buried in St. Michael’s Cemetery in Dumfries. F/O Watkins however, was buried locally, in nearby St. Andrew’s Church, Little Massingham not far from RAF Great Massingham. Both airmen were only 21 years of age.

The Mosquito, a Hatfield manufactured aircraft, was produced under contract 555/C.23(a), and was an aircraft designed for ‘intruder’ strike missions, it was the most commonly used variant of all Mosquitoes.  239 Squadron was in the process of replacing these examples with the MK. XXX before its disbandment on July 1st 1945.

Little Massingham St. Andrew's Church

F/O Watkins died on January 1st 1945 after the Mosquito he was in crashed near to RAF Marham, Norfolk. He rests in St. Andrew’s Church yard, Little Massingham.


RAF Swanton Morley – Small but rich in history.

In this Trail, we return to Norfolk and take in three former airfields each of notable historical value. Our first is probably better known as an Army barracks than it is an RAF airfield, but, for the duration of the Second World War, it would be home to a number of different aircraft types and to a range of international crews. Amongst the many residents here would be those from Poland, the Netherlands, Australia and New Zealand. We start our journey at the former RAF Swanton Morley.

RAF Swanton Morley

Following the end of hostilities in 1918, Britain’s defences and in particular the RAF, were cut back dramatically. From around 250,000 personnel (the worlds largest air force) to just under 30,000 by the early 1920s, the reductions were both severe and widespread. Political in-fighting between the three armed forces and the Government had seen the RAF lose out significantly, and under the terms of the ‘Ten year Rule’, expansion was prevented, and so little could be done to redress the declining situation.

During the 1930s, world developments (and in particular those in Germany) raised the threat of yet another war, at which point the Government realised that Britain’s defences were now totally inadequate and in dire need of redevelopment and expansion.

Their response was a series of expansion ‘schemes’  which would not only reshape the organisation of the RAF, but would cater for the huge increase in numbers of personnel that would be required to raise an adequate fighting force .

Considered lacking in direction by many, these early schemes surprisingly paid little attention to future needs, and so no real provision was made for supporting aspects such as training, maintenance or supply.

Scheme A, approved in July 1934, would set the bench mark at 84 home-based squadrons, a figure that was still woefully inadequate compared to the might that was building up across the channel. Each scheme would build on and replace the former, taking into account layout, new developments and the materials available – but all under the monetary restrictions of the 1930’s depression.

By the time war came, Scheme ‘M’ had been implemented (November 7th 1938), which called for 163 home based squadrons involving 2,500 aircraft for Britain’s home defence. It was under this scheme that Swanton Morley would be built.*1.

Initially designed as a fighter station, construction began in 1939, and one of the criteria for this scheme was to include type ‘C’ hangars. However, being incomplete by the outbreak of war, it was caught in the transition period between temporary and permanent aircraft storage. The ‘C’ types were cancelled in favour of three ‘J’ types, only one of which was actually built – this left Swanton Morley with considerably less hangar space than was actually required. Unfinished, the airfield opened on September 17th 1940 under the ownership of No. 2 Group Bomber Command.

As war broke out, a small detachment of 107 Squadron Blenheim IVs were based here. 107 Sqn were widely spread with other detachments at: Lossiemouth, Newmarket, Hunsdon, Horsham St. Faith and Ipswich, whilst the main squadron was based at RAF Wattisham. As part of 83 Wing, 107 would be joined by a further detachment from 110 Sqn the following month, also bringing the twin-engined Blenheim IV.

It was a No. 2 group aircraft that famously made the first sortie over the German frontier on the very day war broke out, and then on the second day, Monday September 4th 1939, a flight of four 107 Sqn aircraft and one 110 Sqn all from RAF Wattisham, dropped the first salvo of bombs on German ships at Wilhelmshaven . It was from one of these aircraft (Blenheim IV ‘N6240’) that Observer, Sergeant George Booth, and AC1 L. J. Slattery would become the first British Prisoners of War, captured when their Blenheim was shot down by German defences. None of the five aircraft returned, a rather disastrous start to the war for the RAF.*2

Work continued at Swanton Morley throughout the next two to three years, and eventually accommodation blocks were raised, hard perimeter tracks laid and four T2 hangars erected. Around twenty hardstands were created although many aircraft were still dispersed on the grassed areas around the technical site. A bomb store was developed to the south, and lighting added to the three runways, but despite of all the improvements, upgrades and developments, it was felt Swanton Morley did not warrant having any hard runways and so they continued to remain as grass.

It wasn’t until the end of October 1940, that Swanton Morley would have its own squadron of aircraft, 105 Squadron arrived bringing their Blenheim IVs to compliment those of 107 Sqn and 110 Sqn. With two detachments at Lossiemouth and Luqa (Malta), 105 would take part in anti-shipping sorties and attacks on targets in the low countries. A successful unit they swapped these for the Mosquito IV in November 1941, becoming the first operational squadron to receive these highly manoeuvrable aircraft, taking them to nearby Horsham St. Faith in the following month.

ROYAL AIR FORCE BOMBER COMMAND, 1939-1941.

A Blenheim of 105 Squadron passing over a fiercely burning enemy merchant vessel (© IWM (C 1940)

One of Swanton Morley’s earliest casualties was a 105 squadron aircraft, piloted by F/O. D. Murray DFC with Sgt’s C. Gavin and T. Robson. The aircraft, Blenheim IV ‘T1890’, was brought down over Brussels with the loss of all three crew members.

It was during August of 1941, that the first of many units would arrive – No. 152 Squadron. Like so many other squadrons around the country, their stay was to be short-lived taking their Spitfire IIAs to Coltishall the following December.

Coinciding with 105’s departure, was 226 Squadron’s arrival. At the end of December 1941, 226 Sqn would bring a new twin-engined aircraft to the grounds of Swanton Morley, the Douglas Boston. The Mk III was proving to be a formidable medium bomber and night-fighter, featuring improved armour, larger fuel tanks and its two Wright Twin Cyclone engines providing 1,600hp each. 226 Sqn were to later replace the MKIIIs with the MKIIIAs in January 1943 under the lend-lease agreement and then very shortly afterwards, with the B-25 Mitchell II. 226 Sqn operated these aircraft for almost a year at Swanton Morley before moving on to Hartford Bridge and the continent in 1944, thus becoming Swanton Morley’s longest standing squadron.

It was with 226 Squadron that the United States would make its mark on the war. On June 29th 1942, with both Eisenhower and Churchill present, twelve RAF Boston IIIs were sent to bomb the Marshalling yards at Hazebrouck, one of these aircraft (AL743) was flown by an all American crew. A rather ‘unofficial’ entry into the conflict, it was made more formal on Independence day, July 4th 1942 when six U.S. crews joined 226 Squadron in a low-level attack against Luftwaffe airfields in Holland. Twelve RAF aircraft took off a few minutes after 07:00 hrs and flew low and fast over the North Sea toward Holland. After splitting up to attack their designated targets, one group encountered severe flak and was badly beaten, one aircraft crashing whilst another had an engine knocked out. Before the pilot could regain control, the aircraft, Boston AL750, scraped the ground coming remarkably close to a complete disaster. However, the pilot Major Charles Kegelman, managed to regain control and nurse the stricken aircraft back to Swanton Morley. Of the twelve Bostons sent out, two U.S. and one RAF crewed aircraft failed to return. A baptism of fire that resulted in a 30% loss of the U.S. Air Force contingency. For their bravery, three DFCs were awarded to the U.S. crews, with Major Kegelman receiving a D.S.C. from Major Gen. Dwight D. Eisenhower, American commander in the European war theatre. This made Major Kegelman the first member of the United States forces in Europe to be decorated for gallantry against the enemy.

Whilst not the first U.S. involvement nor their first casualties of the war, their actions did officially bring the United States into the European conflict.

Sergeant Bennie Cunningham, Technical-Sergeant Robert Golay, Major Charles C Kegelman and Lieutenant Randall Dorton in front of a Boston bomber. (Roger Freeman Collection IWM)

1943 would go on to prove to be an eventful year for Swanton Morley. With the Allied invasions plans taking shape, a new force was needed to support those destined to take to the Normandy beaches. The creation of the Second Tactical Air Force (TAF) in November 1943, was designed to meet that challenge and with it came changes at Swanton Morley.

Ownership now passed from Bomber Command to the Second TAF, and many units that would operate from here were part of that force. Following a relatively short stay by 88 Squadron (30th March 1943 – 19th August 1943) flying both the Boston III and IIIA, No. 305 (Weilkopolski) Squadron would arrive bringing the first Polish crews to Swanton Morley. Being the fourth and final Polish bomber squadron to be formed, they arrived in early September bringing Wellington MK Xs with them. Whilst serving in Bomber Command, the Polish had amassed some 1,117 sorties in which they had lost 136 brave young men as either killed or captured.

After arrival here, 305 Sqn changed their Wellingtons for Mitchell IIs and in line with the Second TAF objectives, began attacking targets around the Cap Griz Nez region. Being daylight operations, this was something new for the Polish crews, but one they relished and carried out well. In November after only being at Swanton Morley for two months, the Polish crews left leaving 226 Sqn with only a small detachment of 98 Squadron Mitchells for company.

At the end of 1943, three days after Christmas, No. 3 Squadron arrived bringing  a new breed of aircraft with them – the single-engined Typhoon IB, which they kept at Swanton Morley until February 14th 1944. No. 3 Sqn had been one of three founder squadrons of the Royal Flying Corp in 1912 and they remain one of the few squadrons to retain an active role today, flying the aircraft’s namesake, the modern Eurofighter Typhoon.

Whilst here at Swanton Morley, No. 3 Sqn carried out duties that the ill-fated Hawker Typhoon performed well at, low-level ground attack and anti-shipping roles. Dogged by development problems – engines fires and deadly levels of Carbon Monoxide in the cockpit – the Typhoons suffered terrible problems throughout their wartime service, subsequently virtually every model was scrapped at the end of war.

February 1944 was all change again at Swanton Morley. A detachment of 107 Squadron would return after a couple of years absence, and with their arrival came the departure of 226 Sqn after just over two years of being at Swanton. On the thirteenth of that month, they left for Hartford Bridge in Hampshire, in preparations for the Allied invasion at Normandy.

In the two months that followed, Swanton Morley began its wind down, a move signified by a number of short stay units. Each of these would however bring a wide range of nationalities, including crews from the Australian unit No. 464 (RAAF) Sqn, from 25th March 1944 to 9th April 1944. Then came 180 Sqn (12 – 26th April 1944) a short-lived unit that survived just under four years before disbandment only to be reformed as No. 69 Sqn.

Coinciding with 180 Sqn was the Auxiliary Squadron, No. 613 Sqn with Mosquito VIs. This too would disband at the end of the war also to reform as 69 Squadron. Then as April drew to a close another international unit would arrive and depart, a New Zealand unit, No. 487 Sqn (RNZAF)  also bringing Mosquito VIs – an aircraft they used in conjunction with 464 Sqn in the attack on the Amiens prison earlier on.

Finally for two weeks in May 1944 (6th – 18th), a dutch contingency arrived in the form of No. 320 Squadron. 320 Sqn was formed out of evacuated Dutch airmen along with a handful of Fokker T-VIIIW seaplanes which they used until spares were no longer available. Here at Swanton Morley they had lost their seaplanes and were now flying Mitchell IIs, wreaking their revenge by attacking enemy communication lines and airfields. After the war the crews of this unit were transferred to the Royal Netherlands Navy and 320 was disbanded as an RAF unit.

ROYAL AIR FORCE: 1939-1945: COASTAL COMMAND

Before arriving at Swanton Morley, No. 320 Sqn flew a handful of Fokker T-VIIIW float-planes, that they had brought with them when the Netherlands fell to the Germans. Here, one is being serviced at Pembroke Dock, August 1940. (© IWM (CH 1042)

Coinciding with the invasion of Normandy in June 1944, the Bomber Support Development Unit (BSDU) transferred across from RAF Foulsham. Developed under the wing of 100 Group, they used a range of aircraft to investigate and develop electronic counter measures and radar technologies for aircraft.  At Swanton Morley, this involved nine Mosquitoes, MK XIX and XXX, to operate in both operational and non-operational duties. The BSDU (and 100 Group) were responsible for a range of electronic devices including Serrate, Hookah, Perfectos and Mandrel to name but a few, and were involved in some 114 operations, claiming  five air-to-air victories.

The USAAF were to play another small and final part in the life of Swanton Morley, when on 25th July 1944, B-24H ’41-29402′ “The Mad Monk” of the 786th BS, 466th BG, took off from nearby Attlebridge. It clipped some trees causing it to crash-land at Swanton-Morley; the aircraft was so severely damaged it was condemned and salvaged for spares.

Another near disaster was averted at Swanton Morley when Mosquito NFXXX (MM797) of the BSDU crashed after take off on the night of 2nd-3rd January 1945. On take off, with a full fuel load, the port engine began leaking glycol at a furious rate. Too low to bail out, the pilot, Flt. Lt. Harry White DFC, put the aircraft down on the frozen ground. After both pilot and co-pilot were pulled from the wreckage by local farmers, the aircraft exploded creating a ferocious fireball that destroyed the air frame completely.

Eventually the war came to a close, the ‘Window’ research station was transferred to the BSDU and in the summer 100 Group was disbanded. With that Swanton Morley fell quiet and no further operational units would serve from here.

In the closing months of 1946, No. 4 Radio School moved in using Avro’s Anson, and Percival’s Proctor and Prentice aircraft. Various ground units also used the site but gradually flying all but ceased. Eventually on September 15th 1995, Battle of Britain day, the RAF Ensign was lowered and RAF Swanton Morley was officially closed. A small private micro-light club took over part of the site, but in 1996 the Army claimed the airfield forcing the club to close. It remains in the hands of the Army today as the ‘Robertson Barracks’, named after Field Marshal Sir William Robertson and no flying takes place.

Swanton Morley’s history was fairly rare, in that it never had any concrete runways and boasted to be one of the longest lasting Worlds War 2 grassed airfields. It had, at its peak, one – ‘J’ Type hangar and four – ‘T2’ hangars. Its watch office, built to drawing 5845/39, included a Met Section and is now thankfully, a Grade II listed building making it one of the best originally preserved examples of Watch Office designs.

Swanton Morley june 2016 (3)

Swanton Morley had four T type hangars. All but one have been demolished. This one remains in private ownership.

Many of the original buildings have gone and either their concrete bases left or more modern replacements put in their place. Some of the concrete pathways have been removed as have all the dispersal pans. The bomb store is now a field and all but one of the hangars were demolished – the remaining one being re-clad.  A number of pill boxes and air-defence structures also remain, but like the main airfield site it is all securely kept behind very high fences and armed guards.

The public highway circumnavigates Swanton Morley, but views are best achieved from the main entrance. As with all active military sites there is a no stopping rule, but as you pass, careful observations will reveal some of the main buildings of the accommodation area.

Swanton Morley retains some if its historical features, and they are all in the care of either the Army or the local farmer. As the MOD holds this site, many of these features are well hidden from public view, but for now at least, this along with the preservation order on the watch office, does at least mean Swanton Morley’s past is in part ‘protected’ for future generations.

From Swanton Morley we visit two more airfields in the area, Hethel, a USAAF base with its own museum and Hingham an airfield that had possibly the shortest life of any UK airfield.

Sources and further reading

*1 Royal Air Force Historical Journal No. 35

*2 Chorley, W.R., “Bomber Command Losses of the Second World War, V1, 1939-40″, Classic, 1992

Norfolk Heritage Website

Freeman, R.A., “The Mighty Eighth“, Arms & Armour, 1970

Bowman, M., “100 Group (Bomber Support)”, Pen & Sword, 2006

Trail 34 a visit to former RAF Oulton

Laying quietly between the airfields at Matlaske and Swannington is another one of Addison’s 100 group’s small collection. An airfield that not only saw a variety of makes and models, but a range of nationalities as well, each having a remarkable story to tell. In the second part of Trail 34, we travel a few miles south and visit RAF Oulton.

RAF Oulton.

RAF Oulton in 1946, taken  from the north. (IWM)

Although an RAF base, Oulton was also home to the heavy American bombers the B-17 and B-24. However, they were not used in their natural heavy bomber role, but a more secret and sinister one.

Initially built as a satellite for the larger bomber base at Horsham St. Faith, Oulton originally only had grass runways. It would later, in 1942, be upgraded to class ‘A’ standard, which would require the construction of three concrete runways, a new tower and bomb store and upgrading to the technical site. Runway 1 (2000 yds) ran east-west, runway 2 (1,400 yds), north-east to south-west, and runway 3 ran approximately north-south and was also 1,400 yds. All were the standard 50 yards wide and would be connected by thirty-two loop style hardstands and eleven pan style hardstands. Uncommonly, Oulton would also have four T2 hangars (three to the eastern side and one to west, two of which would later hold Horsa gliders) and a further blister hangar.

The majority of the technical area was to the eastern side of the airfield next to the main entrance and along side Oulton Street. The two bomb stores were located to the north and western sides of the airfield well away from personnel and aircraft as was common. The first of the two towers, was built to drawing 15898/40, which combined the tower and crew rooms; the second built later to drawing 12779/41 (adapted to the now common 343/43) brought the airfield in line with other Class ‘A’ airfields.

RAF Oulton

One of the huts used for agricultural purposes today.

Throughout the war personnel accommodation utilised the grand and audacious Blickling Hall. A seventeenth century building that stands in a 4,777 acre estate that once belonged to the family of Anne Boleyn. Owned more recently by Lord Lothian, he famously persuaded Churchill to write to Roosevelt declaring Britain’s position and poor military strength. Lord Lothian was a great entertainer dining with many notable people including Joachim von Ribbentrop, Hitler’s foreign Policy advisor and close friend. A number of other notable events took place at Blickling, including, in early 1945, Margaret Lockwood raising eyebrows when she and James Mason arrived to film ‘The Wicked Lady’ .

In the early 1940s, the hall was requisitioned by the RAF, officers were billeted inside the ‘wings’ whilst other ranks were put up in Nissen huts within the grounds. The lake was used for Dingy training and the upper floors allowed for baths albeit with cold water!  In total some 1,780 personnel could be housed in and around the estate.

For the first two years between 1940 and 1942, Oulton airfield was the home to Blenheims, Hudsons and Beaufighters, each undertaking a light bombing or anti-shipping role as part of 2 Group.

First came 114 sqn on August 10th 1940 with Blenheim IVs. Apart from a small detachment at Hornchurch, they stayed here until the following March whereupon they moved to Thornaby. Their most notable mission was the mid-December attack on Mannheim, an attack that would signify the start of the RAF’s ‘area’ bombing campaign.  A short spell of three months beginning April 1941 by 18 Sqn, preceded their return later in November and then subsequent move to Horsham St Faith.

Like many airfields during this time, units moved around and it was no different for 139 Sqn. With their Blenheims and later Hudsons, they would leapfrog between Horsham St. Faith and Oulton throughout 1941 only to disband and reform returning in 1942 with Mosquito IVs.

RAF Oulton

A few buildings remain on the site, many are fighting a losing battle with nature. The main entrance to the airfield is just to the right of this building.

It was during this time in late 1941 that Hudson conversion flight 1428 would be formed at Oulton with the sole job of training crews on the Hudson III. They would remain here until the following May, at which point they were disbanded.

The re-establishment of 236 Sqn in July 1942 with Beaufighter ICs meant Oulton performed as part of Coastal Command for a short time. The success of 236 in torpedo strikes, led to a new wing being formed at North Coates with 236 leading the way, they departed taking their Beaufighters with them. This left a vacancy, that would soon be filled with a new twin-engined model, the Boston III and 88 Squadron.

88 Sqn were split over 6 different airfields before being pulled together here at Oulton. They retained two of these detachments, one at RAF Ford and the other at RAF Hurn, and their arrival and start of operations at Oulton, would be tarnished with sadness.

On October 31st 1942, a month after they arrived, ground crews were unloading a 250lb bomb from 88 Sqn Boston ‘W8297’ when it suddenly went off. The resultant explosion destroyed the Boston and killed six members*1 of the ground crew. The youngest of these, AC2 K. F. Fowler, was only 19.

After having suffered serious losses in France whilst claiming the first RAF ‘kill’ of the war, they were the first unit to fly the new Boston, and would continue to undertake dangerous daylight intruder operations. Flying daring, low-level missions, they would attack shipping and coastal targets before supporting the allied advance on D-day. Their most famous attack was the renowned bombing of the Philips works in Eindhoven, which resulted in the loss of production for six months following the raid. Ninety-three aircraft took part in the raid, all flying beyond the reach of any fighter escort, a factor that no doubt resulted in the heavy casualties sustained by 2 Group on that mission*2 .

DSC_0178

Two Nissen huts would have been next to this building, and according to the site map, it was part of the rubber store.

In March 1943, the Boston IIIs left and Oulton passed to Addison’s 100 group. As with many other airfields in this part of Norfolk, 100 group were using them to fly missions investigating electronic warfare and radio counter measures. This move to 100 Group would bring a major change for Oulton.

The now satellite of Foulsham would soon be seeing larger and heavier aircraft in the form of the American Fortress I (B-17E), II (F), III (G) and Liberator VI (B-24H). This change required extensive upgrading; the construction of hard runways, updating of the accommodation, new technical buildings and a second, updated tower, along with further storage facilities. The airfield was closed throughout the operation, and with the completion in May 1944 operations could begin almost immediately.

Both USAAF and RAF crews moved in. 1699 Flight were providing conversion for crews to fly the heavy bombers for their parent Squadron 214 Sqn, whilst the American 803rd BS, 36th BG flew radio-countermeasures in their B-17s and later B24s. This move here allowed their own parent station RAF Sculthorpe, to also be extensively redeveloped.

The Americans stayed for three months whilst their work was undertaken, but the RAF units remained until the end of the war. After 1699 Flt. had completed conversions, 214 changed Fortress IIs for IIIs and flew these until disbandment on July 27th 1945.

On August 23rd 1944, 223 Sqn reformed at Oulton. Having previously been flying the twin-engined Baltimore, the new unit would have to get used to much larger aircraft very quickly, a task they commanded with relative ease. They flew the heavier Liberator IVs, and Fortress IIs and IIIs until their final disbandment a year later.

Both 214 and 223 flew the heavy bombers now bristling with electronics. Using a range of electronic gadgetry such as ‘window’ ,’H2S’ and ‘Mandrel’, they had their front turrets painted over or removed and electronic equipment added. ‘Window‘ chutes were installed in the fuselage of the aircraft and a heavy secrecy enveloped the airfield.

The winter of 1944 proved to be one of the worst for many years, crews worked hard in the snowy environment, relaxing where they could at the nearby pubs, one nicely placed next to Blickling Hall and the other directly opposite the entrance to the airfield.

Both units would participate in a number of major, high prestige operations, providing radio jamming and window curtains for the bomber formations. ‘Spoof’ operations were common, diverting enemy fighters away from the real force and playing a daring game of cat and mouse with the German radio operators. As the war drew to a close, so too did the operations from 214 and 223. Eventually in July 1945 both Squadrons were disbanded, 214 being the renumbered 614 squadron, with 223 having to wait until 1959 before being reborn as a THOR missile squadron.

With the withdrawal of the heavies, the end was near for Oulton. After being used for storage of surplus  Mosquitoes for a year it was closed and sold off. The end had finally arrived and Oulton closed its gates for the last time.

Oulton airfield stands as a  reminder of the bravery of the light bomber and ECM crews; today many of the original buildings still remain, used for agricultural purposes and even by the National Trust.

RAF Oulton

One of the few buildings that remain, the former squadron offices.

Whilst the general layout of the airfield has changed with the addition of farm and ‘industrial’ units, its layout can still be recognised. The majority of the runways still exist, now housing poultry sheds, and large sections can easily be seen from the roadside. Luckily, even some of the original huts from the technical area are also in existence and ‘accessible’.

Approaching from the north, the first reference point is the memorial. Standing at the crossroads on the north-eastern corner, it serves as a pointer directly in line with the centreline of the Runway 2. Behind you to your right is the former sick quarters, here would have been an ambulance station, Static water tank and sick quarters, now all gone. Turning right here, keeping the airfield to your left, you pass along the northern boundary, within a short distance of what would have been the perimeter track.

The first sign is a pillbox. This was placed next to the special signals workshop which consisted of three small buildings. Now overgrown, this maybe a Vickers Machine gun Pillbox, different to ‘standard’ pill boxes as it has a concrete ‘table’ beneath the gun port designed to support the heavier gun and tripod.

Further along this road, to your right, is the first and main bomb store. A small track being the only visible reminder, the walls having been removed long ago. The large concrete ‘pan’ being the entrance, on which farm products are now stored.

The second store and USAAF quarters were further along this road, again all trace has gone and it is purely agricultural now. Retracing your steps, go back to the memorial. At the crossroads, ahead of you, was Number 1 accommodation site, now all farm buildings, but formerly the officers, sergeants quarters and airman’s barracks.

Turn right here and as you drive down Oulton Street, there are a number of original buildings back from the road in a small enclave. The National Trust own part of these and use them to restore historic textiles, one of these buildings being the squadron offices. The main entrance to the airfield is further along this road and now an insignificant farm gate, allowed to grow and fill in, the path buried beneath the grass. Beyond this, you can see some remaining buildings across the field, truly overgrown and very dilapidated, these are possibly the crew locker and drying rooms. Continue on along this narrow road and you arrive at the pond. Behind the pond, stands a well-preserved hut and smaller buildings. These were the main workshops, rubber store and general stores, now holding agricultural products and waste material. Certainly they are some of the better preserved buildings on the site. Further along, the road crosses the main runway, here it is full width on both sides of the road. Poultry sheds stand on the main section, whilst farm waste resides on the left.

RAF Oulton

The eastern end of the main runway.

Continuing on and the road crosses the third runway, where we turn left. We can now see the site of one of the four T2s, the road at this point using the original perimeter track before it departs away to the north.

From here, we return north, head back past the airfield and return to the main road. Here we turn right and follow the road for a few miles east through the woodland where we arrive at Blickling Hall. The accommodation sites here, include the No.1 and 2 WAAF sites, NAAFI, No. 4 and 5 accommodation site and various service sites.

The east wing of the Blickling Hall is now a museum, formerly the barracks and still shows the original paintwork. A range of uniforms, photos and personal stories can be seen and read.

There are virtually no remnants of the other sites which were primarily Nissen huts. Footpaths do allow you to walk through these, now natural spaces, walking in the footsteps of former airmen and women.

Next to the Hall, is the church of St. Andrew, in here is a small collection of artefacts and a roll of honour for those who died at Oulton. Also here is the sole grave of Sergeant L. Billington, who died on March 4th 1945 at the young age of 20. He was part of a crew in a Fortress III (B-17) on window duties. As the aircraft was returning from its mission, it was attacked by a JU 88, causing it to crash on the airfield boundary. All but two of the crew were killed*3, their bodies being buried in different locations. A sad end to another young life at Oulton.

St. Andrew's Church

The Roll of Honour at St. Andrew’s Church, next to Blickling Hall.

RAF Oulton housed a range of aircraft types and nationalities. Their role encompassed many important duties and missions that certainly helped defeat the Nazi tyranny. Many of these young men, led the way in today’s electronic counter measures and electronic warfare. The daring missions they led, firmly embedded in our history, and now the remnants of Oulton stand as a reminder to both their sacrifice and dedication.

Notes and Further Reading.

*1 The ground crew were:

E.J. Bone, Aircraftsman Ist Class
H. Bramham, Aircraftsman 2nd Class
A.C. Emery, Aircraftsman 2nd Class
K.F. Fowler, Aircraftsman, 2nd Class
F. Packard, Leading Aircraftsman
A. Torrence, Leading Aircraftsman

Source Aircrew remembered website.

*2 National Archives, RAF Bomber command diary 1940.

* The crew were:

P/O H Bennett
Sgt. L Billington
F/S H. Barnfield
W/O LJ Odgers (RAAF)
F/S W Bridden
F/S LA Hadder
F/S F Hares
Sgt. A McDirmid (injured)
W/O RW Church (injured)
Sgt. PJ Healy

Source: Chorley, W.R., RAF Bomber Command Losses 1945, 1998, Midland Counties.