Australian Flt. Sgt. Rawdon H. Middleton VC (RAAF) 149 Sqn RAF

100641

Pilot Officer Rawdon Middleton (RAAF)*1

Middleton (s/n: 402745) was born on 22nd July 1916 in Waverley, New South Wales, Australia. Son of Francis and Faith Middleton, he was educated at Dubbo Hugh School. Nicknamed ‘Ron’ by his friends, he was a keen sportsman excelling at many sports particularly cricket and football. After leaving school, he worked as a ‘Jackaroo’ (cattle handler) until joining the Royal Australian Air Force on the 14th October 1940 under the Empire Air Training Scheme. He learnt to fly at Narromine, New South Wales and then was sent to Canada for further training in preparation for his posting to the UK. He finally arrived in Britain in September 1941, as a second pilot, and his first operational squadron was No. 149 Squadron RAF, who were flying Short Stirling bombers out of both Lakenheath and nearby Mildenhall in Suffolk.

P01019.003

Five student pilots from No. 7 Empire Air Training Scheme (EATS) course at No. 5 Elementary Flying Training School (5 EFTS) Narromine. They are left to right: Aircraftman (AC) Gordon Orchard; AC Douglas Scott; Leonard Reid; Pilot Officer (PO) Douglas Wilberforce Spooner (DFM); PO Rawdon Hume Middleton*2

Middleton’s first experience of operations, was in a Short Stirling over the Rhur, the industrial heartland of Nazi Germany. After spending a short time with 149 squadron he moved temporarily to No. 7 Squadron (RAF).

In July 1942, as first pilot, he was given his own aircraft and crew, it was also around this time that he returned to 149 squadron.

Their first mission together would be on July 31st, to bomb the strategic and heavily defended target, Düsseldorf. Middleton and his crew would continue to fly together and took part in other prestigious missions; namely Genoa on the 7th of November and his 28th mission, Turin on the 20th November. His 29th and final mission, would take place on the night of 28/29th November 1942.

In the early evening of the 28th he took off in Stirling BF372 coded ‘OJ-H’ as part of the raid on the Fiat works in Torino, Italy, along with 227 other aircraft which included – 117 Avro Lancasters, 46 Short Stirlings, 45 Handley Page Halifaxes, and 19 Vickers Wellingtons.

Middleton’s crew consisted of: Ft.Sgt. Leslie Anderson Hyder, Ft. Eng: Sgt. James Ernest Jeffrey, Bomb Aimer F.O. G. R. Royde, Wireless Operator: Sgt. John William Mackie; Gunners: P.O. N. E. Skinner, Sgt. D. Cameron and Sgt. H. W. Gough. Three of these had already completed their tour of 30 operations and could have left. However, their dedication to Middleton kept them together.

The mission would take the aircraft over the Alps and the Stirling, laden with bombs and fuel combined with having a notoriously poor ceiling, had to negotiate through the mountains rather than fly over them. A factor that often resulted in a high number of casualties.

Once over the target area, OJ-H was subjected to an extreme flak barrage. With poor visibility, Middleton had to make three passes over the target area to enable his crew to positively identify it. It was on the third pass that a shell burst hit the cockpit. The resulting damage was severe, and fragments had hit Middleton’s head badly injuring him. His right eye was lost and his skull exposed. There were further hits on the aircraft’s fuselage causing considerable damage to the control systems and airframe. Knocked unconscious by the blast, Middleton lost control and the aircraft plummeted through the skies to an altitude of around 800ft. The second pilot, Fl.Sgt. Hyder eventually managed to take the controls, release the bombs over the target and then pull the aircraft into a climb, safely reaching 1,500ft.

With his aircraft severely damaged, Middleton had a choice, get his crew to bail out over occupied France and certain capture, fly to Africa or head back to England; a journey that would last over 4 hours and put the aircraft at risk of attack and the crew in danger. Wanting to give them a fighting chance of getting home, he opted for the latter, and set a course for England.

SUK10501

Middleton was buried with full military honours at St. Johns Church, Beck Row. Suffolk.*3

The aircraft experienced a number of attacks as they crossed occupied France, but Middleton, fighting for survival, kept reassuring the crew that he would get them home. Eventually, and against all the odds, they made the English coast, and once over land Middleton ordered the crew to bail out. Five crewmen left the stricken aircraft whilst the other two remained to help him control it. Turning for the Channel, Middleton ordered the two remaining crew members to bail out, whilst he stayed at the controls, steadying the aircraft.

By now the Stirling was very low on fuel and it finally gave up the fight and crashed at 03:00 on the morning of November 29th 1942. Middleton, too injured and too weak to escape the wreckage, drowned within the aircraft fuselage. His two crew members, Sgt. James Ernest Jeffrey (576050) age 19 and Wireless Operator Sgt. John William Mackie (994362) age 30, despite escaping, also drowned. Both the bodies of Sgt Mackie and Sgt. Jeffrey were washed ashore later that day on the 29th.

Middleton’s body remained in the aircraft, but was eventually freed from the wreckage by the action of the sea, and was washed ashore on Shakespeare Beach, Dover, in February 1943. His remains were taken to RAF Lakenheath and he was buried in St John’s churchyard, Beck Row, within sight of his airfield in Suffolk, with full military honours. Middleton was only 26 and only one mission away from ending his tour and returning home.

For his action, dedication and bravery, Flt. Sgt. Middleton was posthumously awarded the Victoria Cross, the first to any serving member of the R.A.A.F in World War II. He was also posthumously awarded a commission as Pilot Officer, backdated to mid November before his sortie to Turin. Thirty years later, in 1978, Middleton’s V.C. was presented to the Australian War Memorial, in Canberra for safe keeping and preservation.

For their actions, the other crew members received three DFMs and two DFCs. Fl.Sgt. Leslie Hyder (DFM) was injured, P.Officer. N. Skinner (DFC) was also injured, along with Sgt. H. W. Gough (DFM). F.O. G. R. Royde (DFC) and Sgt. D. Cameron (DFM) escaped unhurt.

The London Gazette published a report on 12th January 1943. It said:

“Fl. Sgt. Middleton was captain and first pilot of a Stirling aircraft detailed to attack the Fiat Works in Turin one night in November, 1942. Very difficult flying conditions, necessitating three low altitude flights to identify the target, led to excessive petrol consumption, leaving barely sufficient fuel for the return journey. Before the bombs could be released the aircraft was damaged by anti-aircraft fire and a splinter from a shell which burst in the cockpit wounded both the pilots and the wireless officer. Fl. Sgt. Middleton’s right eye was destroyed and the bone above it exposed. He became unconscious and the aircraft dived to 800 ft. before control was regained by the second pilot, who took the aircraft up to 1,500 ft. releasing the bombs, the aircraft meanwhile being hit many times by light flack. On recovering consciousness Fl. Sgt. Middleton again took the controls and expressed his intention of trying to make the English coast, so that his crew could leave the aircraft by parachute. After four hours the badly damaged aircraft reached the French coast and there was once more engaged and hit by anti-aircraft fire. After crossing the Channel Fl. Sgt. Middleton ordered the crew to abandon the aircraft. Five left safely, but the front gunner and the flight engineer remained to assist the pilot, and perished with him when the aircraft crashed into the sea”.

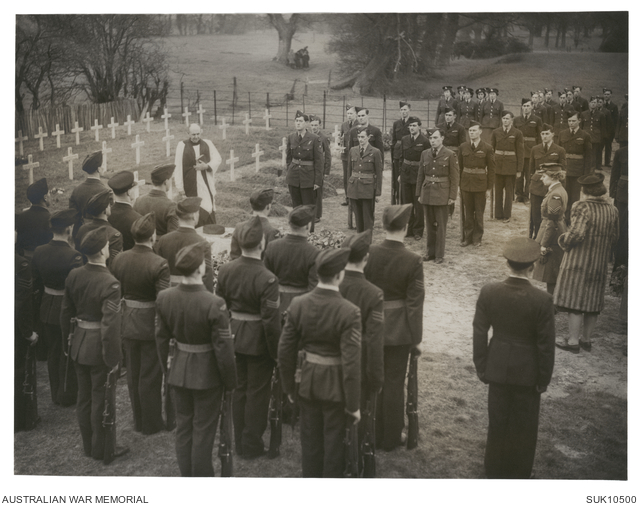
Funeral service for 402745 Flight Sergeant Rawdon Hume Middleton, the RAAF’s first VC winner. He was buried with full military honours in a country churchyard near his station. Air Vice Marshal H. N. Wrigley represented the High Commissioner for Australia (Mr S. M. Bruce) and the RAAF. The graveside service was conducted by Squadron Leader H. C. Thrush of Prospect, SA, RAAF Chaplain. (Australian War Memorial Public Domain)

Middleton’s citation read:

“Flight Sergeant Middleton was determined to attack the target regardless of the consequences and not to allow his crew to fall into enemy hands. While all the crew displayed heroism of a high order, the urge to do so came from Flight Sergeant Middleton, whose fortitude and strength of will made possible the completion of the mission. His devotion to duty in the face of overwhelming odds is unsurpassed in the annals of the Royal Air Force”.

In honour of Middleton’s bravery, Number 1 RAAF Recruit Training Unit at RAAF Base Wagga has renamed the club in his name, the “Middleton VC Club”, and he also appeared on one of the 1995 Australian 45c stamps. The dining hall located at the nearby (now American) base at RAF Mildenhall in Suffolk, has also been named in his honour.

St. John's Church Beck Row, Mildenhall

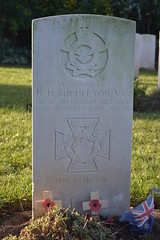
Fl. Sgt. Rawdon Hume Middleton, VC (RAAF) 149 Sqn RAF, St. John’s Church, Beck Row, Suffolk.

Middleton was a brave and dedicated young man who gave his life to save those of his crew. Each and every one of them acted with the highest dedication, sadly for some, it cost them dearly.

Sources

*1 photo courtesy of Australian War Memorial, image 100641, Public domain.

*2 photo courtesy of Australian War Memorial, image P01019.003, Public domain.

*3 Photo courtesy of Australian War Memorial, Image SUK10501, Public domain

*4 Photo courtesy of Australian War Memorial, Image SUK10500, Public domain

Heroic tales – Aviation Trails.

Sgt. James Ward VC.- 75 (NZ) Sqn RAF Feltwell.

We have seen through the many ‘Heroic tales‘, acts of daring and valour that have astounded the average man in the street. Acts of heroism that were completed without forethought or consideration for personal safety, where the lives of fellow crewmen and their aircraft were put far beyond that of their own.

Some of these included flying an aircraft with astonishing injuries, staying with an aircraft until such times as all the crew have either left – or because they have been unable to leave – remaining at the controls to attempt a landing without help or hydraulics. There have even been cases of airmen exiting the aircraft to extinguish external fires whilst both at altitude and at speed. Indeed this is not a solitary occurrence; a number of airmen have been known to have performed such acts, some successfully others less so. But the fact that an airmen is willing to perform such an act of bravery, is in itself, incredible.

One such action occurred in July 1941 and was performed by 2nd Pilot Sgt. James Allen Ward (RNZAF) of 75 (NZ) Sqn, RAF Feltwell.

Sgt. James Allan Ward, 75 (NZ) Squadron RAF, standing in the cockpit of his Vickers Wellington Mark IC, L7818 ‘AA-V’, at Feltwell, Norfolk. (© IWM (CH 2963)

Sgt. Ward, the Son of Mr. Percy Harold Ward and Mrs. Ada May Ward, of Wanganui, Wellington, New Zealand was born on 14th June 1919, and was, following his training, posted to 75 (NZ) Sqn then at RAF Feltwell in Norfolk. The squadron were operating the new Vickers Wellington MK.Ic, or ‘Wimpey‘ as it was affectionately known, on a bombing mission to Munster in Germany.

Take off was at 23.10 on the night of July 7th 1941. On board (aircraft CNF.994/L7818) that night were: Canadian S/L. R. Widdowson (Pilot); Sgts. J. Ward (2nd Pilot); L.A. Lawton (Navigator); Mason (Wireless Op); Evans (Front Gunner) and A. Box (Rear Gunner), as part of a force of ten Wimpeys from Feltwell along with thirty-nine others from nearby bases.

The flight out was uneventful, with no interactions with either flak nor Luftwaffe night fighters. Over the target, bombs were released and several fires were seen to light, although German reports stated that little damage was done and no casualties were incurred.

The return leg took the formation over the Zuider Zee at which point the Wellington was strafed by canon fire from an Me 110 flying beneath it. As shells ripped though the fuselage, the rear gunner was injured in the foot but managed to return fire sending the attacker plummeting to Earth with heavy smoke pouring from the port engine.

Shortly after this, the Wellington’s wing, housing a fuel line damaged in the attack, itself caught fire and with the aircraft having a fabric covering, it was only a matter of time before it would also fall to Earth in a massive fireball.

With S/L Widdowson struggling to control the aircraft, which had had half its rudder shot away, its elevators severely damaged, hydraulics ruptured, flaps inoperable and bomb doors opened and damaged; a decision had to be made as to what to do next.

A bale out appeared to be the only safe and viable option. S/L. Widdowson gave the order and the crew began preparations to depart the stricken aircraft. Almost as a last minute attempt to save it, Widdowson instructed the crew to try and extinguish the fire, and they began ripping away the fabric covering the geodesic framework. Ward, grabbing a fire extinguisher, shot jets of agent through the hole toward the fire. At altitude and speed, the air stream was far too strong and the attempt had little effect on the burning engine.

At this point, and without attention to his own safety, Sgt. Ward decided to climb out and try to smother the fire with a canvas engine cover that had been used to raise S/L. Widdowson’s seat. Much to the dismay and protests of the other crewmen, Ward grabbed a parachute and attached a rope to himself and the Navigator, and began to climb out through the astrodome located between the wings in the fuselage’s ceiling. By punching holes in the aircraft’s fabric, he was able retain a foot and hand hold on to the aircraft, manoeuvring himself tight against the air frame toward the burning wing.

Once out onto the starboard wing, he approached the fire and pushed the canvas into the hole left by the flames. The fire burning furiously by now, was intense, and caused Sgt. Ward great pain forcing him to withdraw his hand several times before the slipstream finally caught the canvas tearing it from the hole and out into the dark night sky.

Being partially successful, there was little left for Sgt. Ward to do, so he began the arduous journey back toward the aircraft’s fuselage and its relative safety. By smothering the fire as he did, Ward’s attempts had made a difference, and shortly afterwards the fire extinguished itself enabling both the aircraft and crew to return to England safely making an emergency landing at RAF Newmarket Heath.

The Wellington with ‘hand-tholes’ after Sgt Ward tried to extinguish the fire.  (A) The hole caused by shell and, afterwards, by fire; (B) The Astro-Hatch through which Sergeant Ward, VC climbed; (1, 2 and 3) Holes kicked in the fabric by Sergeant Ward.(IWM CH3223)

Landing at 04:30, the Wellington came to a stop only after striking a fence on the airfield boundary, its brakes being totally unusable.

For his action, Sgt. James (Jimmy) Ward was awarded the Victoria Cross, the highest honour for bravery and extraordinary courage; he was the first New Zealander to win such an award during the Second World War. S/L. Widdowson for his actions, was awarded an immediate D.F.C. whilst Sgt. Box, the D.F.M.

At the time of the incident Sgt. Ward was only 22 years of age, he would be given his own crew and would go on to complete ten missions in total before, on the eleventh, being shot down and killed in another Wellington of 75 (NZ) Sqn over Hamburg on September 15th 1941.

Sgt Ward’s death brought a severe blow to the crews of 75 (NZ) Sqn, who perhaps thinking him invincible, went on to perform with great pride and determination in the face of great adversity. With over 8,000 sorties flown, the highest of any squadron in 3 Group, came a high cost, 193 aircraft being lost, the second highest of any Bomber Command Squadron of the Second World War.

Sgt Ward’s body was recovered from the crash that killed him, and along with his three comrades was laid to rest in the Ohlsdorf Cemetery in Hamburg, CWCG Plot 5A. A1. 9.

The report of Sgt. Ward’s VC. (Auckland Library Heritage Collection : 13 August 1941 : Item ref # AWNS 19410813-23-1)

Sgt. Ward’s citation appeared in the London Gazette “No. 35238” on 5 August 1941 p. 4515 and reads:

“On the night of 7th July, 1941, Sergeant Ward was second pilot of a Wellington returning from an attack on Munster.

When flying over the Zuider Zee at 13,000 feet, the aircraft was attacked from beneath by a Messerschmitt which secured hits with cannon shell and incendiary bullets. The rear gunner was wounded in the foot but delivered a burst of fire which sent the enemy fighter down, apparently out of control.

Fire then broke out near the starboard engine and, fed by petrol from a split pipe, quickly gained an alarming hold and threatened to spread to the entire wing. The crew forced a hole in the fuselage and made strenuous efforts to reduce the fire with extinguishers, and even the coffee in their vacuum flasks, but without success. They were then warned to be ready to abandon the aircraft.

As a last resort, Sergeant Ward volunteered to make an attempt to smother the fire with an engine cover which happened to be in use as a cushion. At first he proposed to discard his parachute, to reduce wind resistance, but was finally persuaded to take it. A rope from the dingy was tied to him, though this was of little help and might have become a danger had he been blown off the aircraft. With the help of the navigator, he then climbed through the narrow astro-hatch and put on his parachute. The bomber was flying at a reduced speed but the wind pressure must have been sufficient to render the operation one of extreme difficulty.

Breaking the fabric to make hand and foot holds where necessary, and also taking advantage of existing holes in the fabric, Sergeant Ward succeeded in descending three feet to the wing and proceeding another three feet to a position behind the engine, despite the slipstream from the airscrew which nearly blew him off the wing. Lying in this precarious position, he smothered the fire in the wing fabric and tried to push the cover into the hole in the wing and on to the leaking pipe from which the fire came. As soon as he removed his hand, however, the terrific wind blew the cover out and when he tried again it was lost. Tired as he was, he was able with the navigator’s assistance, to make successfully the perilous journey back into the aircraft.

There was now no danger of fire spreading from the petrol pipe, as there was no fabric left nearby, and in due course it burnt itself out. When the aircraft was nearly home some petrol which had collected in the wing blazed up furiously but died down quite suddenly. A safe landing was then made despite the damage sustained by the aircraft.

The flight home had been made possible by the gallant action of Sergeant Ward in extinguishing the fire on the wing in circumstances of the greatest difficulty and at the risk of his life.”

Sources.

National Archives – AIR 27/645/34, AIR 27/645/33

Auckland War Memorial Museum Website.

RAF Bottisham – A small airfield that became a big player (P2)

In Part 1 of RAF Bottisham, we saw how the airfield was opened as a satellite and how it was underused for the first part of its life. With numerous short stay or training squadrons it never really  attained the level of prestige it wanted.

In part 2 we see how this struggle continued in 1943, but in 1944 things would change, and Bottisham would become a major front line airfield with a record breaking Fighter Group.

RAF Bottisham (Station 374).

Between January and mid March, 2 Squadron were stationed here, albeit briefly, after receiving their own Mustangs in the preceding April. With their parent airfield Sawbridgeworth being unusable, they needed a new place to stay. The advanced party departing, led by F.Lt. Fletcher, on the 30 January, with the main party leaving the following day. Using these Mustangs 2 Sqn would fly long range reconnaissance flights over to Holland, where they would photograph military compounds and enemy shipping.

After that, in March, came another four short-stay units; 268 Squadron who stayed for a mere 4 days; 613 Sqn who stayed for twelve days; 169 Sqn for two days and 4 Sqn who stayed here for a little longer at four months. 4 Sqn were another unit who had previously used both the Lysander and Tomahawk before converting over to the Mustang.

Their departure in July signified the end of RAF operations from Bottisham airfield, the site being all but empty for the next six months. At this point the US Eighth Air Force took over the airfield, poured engineers into it, developed the technical site and  improved the accommodation blocks. After renaming the airfield Station 374, they began to bring in a new unit and Bottisham would finally become the airfield it was so struggling to be.

At the end of November, the twelfth and last Fighter Group to fly P-47s joined the VIII Air Force here at Bottisham. The 361st FG had only been active for eleven months when they entered combat in January 1944. Their journey had taken them from Richmond AAB in Virginia, through Langley Field, Millville New Jersey, back to Richmond and then, via the Queen Elizabeth, on to Bottisham their first European stop. Here the three squadrons: 374th FS, 375th FS and 376th FS flew P-47D ‘Thunderbolts’ or ‘Jugs’ as they were affectionately known, under the command of Colonel Thomas J.J. Christian Jnr, a high ranking officer who was killed in action in August 1944.

‘The Bottisham Four’, 26th July 1944, Leader is Col. Thomas J. J. Christian Jr. Second plane ‘E2-S’ flown by Lt. Urban L. Drew; third is Major Roswell Freedman’s E2-A and the fourth is P-51B E2-H ‘Suzy G’ flown by Lt. Francis Glankler. None of these aircraft survived the war (IWM UPL 18209)

Colonel Christian led the 361st on their first combat sortie on January 21st 1944, as part of an escort of over 600 fighters, to the Pas de Calais and Cherbourg areas. Here, almost 800 B-17s and B-24s from the First, Second and Third Bomb Groups attacked thirty-six ‘V’ weapons sites, thirty-four in the Pas de Calais and two at Cherbourg. As the formation split, the 361st went to Calais, where poor weather hampered the bomb runs. However, allied air superiority meant there were little pickings for the fighters and few enemy aircraft were engaged or shot down. The group returned to Bottisham yet to draw their first blood.

Over the next few weeks, the Group would take part in further escort duties, covering bombers to Frankfurt, Watton, Wilhelmshaven and Gilze-Rijen. February saw them participate in the ‘Big Week’ campaign with further missions to Germany.

On April 27th, the Eighth Air Force undertook two missions, No. 322 and 323, both targeting areas in France and Belgium. On one of these missions was Capt. Charles H. Feller who took off with the 375th FS to escort the bombers. His P-47, ’42-75447′ was the only aircraft lost on that mission, a loss made worse by the fact that his brother Cpl. Jack Feller, was waiting to meet him at the main gate. Cpl. Feller, was informed that his brother was missing in action, and at the time his whereabouts weren’t known. It later transpired that he was killed whilst attacking the former French Air base Etampes-Mondesir which had been taken over by the Luftwaffe*1.

Back at Bottisham, the heavy weight of the Thunderbolt was playing havoc with the Sommerfeld tracking, forcing it to be replaced with Pierced Steel Planking (PSP), a feat that was achieved in a matter of just three days.

As the winter of 1944 passed and spring arrived, the 361st were told that their P-47s were to be replaced by Mustangs, the P-51 would be returning to Bottisham once more, but in a far Superior form than its original one.

In May, the first of these more agile and more powerful P-51s arrived, and under the guidance of General Arnold’s New Year message, “Destroy the enemy Air Force where ever you find them, in the air, on the ground and in the factories” they performed well achieving many high scores. Operating over the Normandy landscape during May, they attacked targets such as airfields, marshalling yards and transport systems, taking out 23 Locomotives in one day, a quarter of the entire day’s total. After Normandy, the 361st  would go on to  cover the breakout at St. Lo, and the failed airborne operation ‘Market Garden‘ in the autumn of 1944.

In late September 1944, the 361st transferred to Little Walden in Essex, but even with their belongings packed and furniture in transit, they would still be willing to perform their duty. On the 26th, they escorted over 1,100 heavy bombers to a range of targets in Germany. Whilst approaching Hamm, one of the pilots 1st Lt. Urban Drew (one of the Bottisham Four), spotted an Me 262 beneath him. After giving chase, diving at incredible speeds to catch the jet, he finally lost him, but not until after he had expelled over 1,300 rounds of ammunition, in a chase that took him from 20,000 ft to 0 ft, in a matter of minutes. The frustration of the pilots in catching these new aircraft clear in their reports back at base.

On the next day, as the move was progressing, another call came out. This time it would be a good day for the pilots of the 361st. Escorting almost 1,200 bombers to Germany again, the group spotted large numbers of enemy fighters attacking the bomber formation in a ‘company front’ attack. The P-51s dived in, splitting the 109s and 190s sending them wayward. ‘Heading for the deck’, a flight of four P-51s lead by Lt. William Beyer gave chase, and in what turned out to be a disastrous day for the Tibbenham based 455th BG (losing 25 aircraft the highest of any mission), the 361st managed to achieve the highest recorded number of kills for any fighter group to date.

After Kassel, Sept. 27, 1944: Lt. William Beyer (left), and Lt. Bocquin (right) prepare their reports. While Bocquin downed three enemy planes, Beyer got five– becoming an “Ace in a Day.” .(IWM UPL 29364)

With eighteen confirmed kills, five for Beyer who was an ‘Ace in a day’, and three for the Squadron Leader 1st. Lt. Victor Bocquin, it was an amazing achievement for the 361st, and as their last operation from Bottisham, it gave cause for great celebration.

Their time at Bottisham had now come to an end and they never returned to the airfield where they had cut their teeth. The move, instigated by a reshuffling of the Air Force’s organisation, meant that the 361st would be closer to the Bomb Groups they were to be attached to. It also signalled the end of Bottisham as an active front line airfield.

By the time the ‘Yellow Jackets‘ as they were known, had completed their tours, they had completed 441 missions, claiming 226 enemy aircraft destroyed in the air and 105 on the ground.

With the departure of the 361st, Bottisham fell operationally quiet. In the following June 1945, it was passed back to RAF control and linked once more to Snailwell, who used it as a relief airfield for Belgian pilots of the RAF (Belgian) Initial Training School. In the October, its status was reduced to satellite and the Belgian’s partially moved in. Using primarily Tiger Moths, the Belgians used Bottisham for a mere ten months, disbanding as a Royal Air Force unit in April 1946 and passing over to the Belgian Air Force. With that, Bottisham closed on May 1st, and stood empty until sold for agricultural use in October 1958.

Since then, the runways have been pulled up, the buildings on the airfield have been removed and the accommodation blocks have all been built up expanding the village that played such a great part in its life. On the corner of the airfield site a small cluster of buildings still stand, these include the former squadron offices (themselves former crew rooms), a sleeping shelter, and general purpose huts. These have been purchased and are being restored to house a small museum dedicated to those who served at the airfield.

RAF Bottisham

The former Sleeping Shelter.

The airfield itself is now cut by the main A14 dual carriageway. But by leaving this road and turning along the A1303,  you can access both the museum and the airfield quite easily. The museum sits on the corner of the A1303 and Wilbraham Road, along which, if you turn right, cuts across the airfield and the remains of the former runway. As with many former airfields the runway line has been planted with trees giving a good indication of both its location and size. Parts of the perimeter track are also visible from this road to the north end, but otherwise there is little left to see other than a small selection of concrete patches. The village has a memorial in both the British Legion club and in the village with the Thomas Christian memorial. Sadly, little else of this small but once busy airfield exists today.

Bottisham airfield was generally speaking, a minor airfield housing a number of units in its early years. However, once it became fully fledged, it became not only significant, but a leader in the stakes of war. Now all but gone, the memories of those who served here are firmly embedded in the streets of Bottisham along with a few buildings that survive to tell their story.

My sincere thanks go to the members of the Bottisham Airfield Museum who so kindly stopped their work to give me a personal guided tour of the site when I visited. I wish them luck in their venture.

Sources and Further Reading.

The full story of Bottisham can be read in Trail 55 – Around Newmarket.

The full story of Colonel Thomas Christian appears in Heroic Tales. 

National Archives – AIR 27/1465/10

National Archives – AIR 27/19/25

National Archives – AIR 27/2170/1

Bottisham Airfield Museum website.

*1 Wilson, K., “Blood and Fears – How America’s Bomber Boys and Girls in England Won Their War” Orion Books, 2016.

RAF Bottisham – A small airfield that became a big player (P1)

In Trail 55 we travel from Snailwell to Cambridge passing through Newmarket and the former bomber airfield that has become the famous horse racing circuit. From here, we continue west where we find a small airfield that has all but gone, the last remnants now a small museum that utilises a mix of original and non-original buildings.

This particular airfield was home to a number of RAF units but is perhaps more noted for its American links, and in particular the fighters of the 361st Fighter Group. On our third stop around Newmarket, we visit the former airfield RAF Bottisham.

RAF Bottisham (Station 374).

Located about 5.5 miles east of Cambridge between the villages of Little Wilbraham and Bottisham village, Bottisham airfield was initially opened in 1940 as a satellite for the new bomber base at Waterbeach, a few miles to the north of nearby Cambridge. Although designed as a satellite, it would later become a fighter airfield in its own right, with its own resident unit.

At first, the runways were grass and there were only two. However, later on, a third runway was ‘constructed’ and each of the three were then strengthened, using initially Sommerfeld Track and then Pierced Planking, both similar and both temporary methods of construction that were easy and quick to lay. Around the concrete perimeter track were fifteen concrete hardstands and a further 48 hardstands constructed with the steel matting. This gave a vast number of areas to safely disperse parked aircraft.

The longest runway was 1,435 yards long, whilst the shortest was some 300 yards shorter. The Watch office, designed to drawing 15371/41, was of brick construction with concrete slabs for the roof, which was the most common design used on World War Two airfields. Demolished in 1948, it was an off-shoot of design 12779/41 which allowed for smaller windows at the front of the tower, more commonly found where night flying regularly took place such as bomber airfields.

RAF Bottisham

On site, there were eight Blister hangars (9392/42), a fourteen bay T2 Hangar (3635/42) and a range of stores, fire tender shelters, workshops and offices, mostly brick or steel framed buildings of standard airfield designs.

Accommodation was eventually erected over ten sites both WAAF and enlisted men/officers, many of which were located in and around the village of Bottisham itself.  This huge increase would eventually lead to a massive explosion in the village’s population.

For the first seven months of its existence, from March to October 1940, Bottisham saw little activity, and as the land was little more than a field, it was totally unsuitable for anything larger than a small aircraft. As a result it was barely used, and little development occurred on the site. The only visitors being seen were the occasional Tiger Moth of the 22 Elementary Flying School (EFTS), from nearby Cambridge. 22 EFTS was set up, at Cambridge, on the declaration of war in 1939, and they used a range of small light trainers: Miles Magisters, Proctors, Tiger Moths and Hawker Demons.

For the next year or so, Bottisham airfield remained in this state, barely used and under-developed until, in July 1941, it was handed over to the Army Co-operation Command and 241 Squadron.

After being disbanded at the end of 1919, 241 Squadron was reformed in 1940 by merging two ‘A’ Flights from other units. They initially used Lysander IIs replacing them with Blackburn Rocs, a model they replaced again with Lysander IIIs before moving to Bury St. Edmunds. After that, they moved here to Bottisham, on July 1st 1941. After a matter of only weeks, the Lysanders were replaced with Tomahawk IIA (the British named P-40) which was intended to be a fighter escort aircraft for the RAF. However, its poor performance led to it being used instead for pilot training and Army cooperation work. Something that would become significant over the next year or so. Over the next few weeks, the new aircraft were collected and ‘normal flying training’ flights were the order of the day.

RAF Bottisham

The runway, marked by the treeline looking south-west.

The British saw the Tomahawk as a possible fighter aircraft during the 1940s supplementing the Spitfires and Hurricanes provided by British aircraft manufacturers. However, production problems of the P-40 led to the British seeking alternative suppliers. Realising there was a niche for a new model, the North American Company offered to design their own fighter, one which they designed, built and tested within 100 days. This new model, whilst not perfect, its Allison engine performing badly at altitude, would eventually go on to supply the American Air force and become one of the most famous aircraft ever built – the P-51 Mustang.

With detachments of aircraft based at Snailwell, Macmerry, Henlow and Docking, 241 Squadron would be spread far and wide, but continued to pursue their duties as an Army Cooperation flight. However, their job was not easy, the new Tomahawks and the poor British weather over the winter 1941-42, proved to be a major challenge for both air and ground crews here at Bottisham. The Operational Record Books for the period showing that the month of January in particular was ‘not satisfactory’, with crews struggling to keep aircraft serviceable in the poor weather. On the 20th, a new structure for the Air Force and a new section for the Squadron were brought into being. This did not however, alleviate the difficulties the crews were having. The main issue seemed to be down to generator drive problems in the P-40s, which combined with an accident in the squadron’s  Airocobra, meant flying was very much restricted to the last remaining Lysanders.

On March 15th 1942, things would begin to change. In now fine weather, the first four of the new P-51 Mustangs arrived, flown down from Speke (now Liverpool airport) by P/Os Kirkus, Clarke, Harrup and F/Lt. Coe. During the next few weeks as more P-51s arrived, the old Tomahawks were gratefully handed over to other Training units and Squadrons, and probably without a tear being shed.  Then on May 1st 1942, 241 Squadron began its departure for pastures new and Ayr in Scotland. On that day, the road party left Bottisham in 21 vehicles at 09.00hrs, whilst the rail party left in the evening at 20:00hrs. By the next day, the rail party had arrived but it would be a further 24 hours before the road party would find their new home.

Throughout the war Bottisham would develop a strong relationship with nearby RAF Snailwell, being only a few miles apart, the two frequently used each other to store and operate their aircraft. The next two squadrons to arrive were just that, both Snailwell based units that moved in to Bottisham. Bottisham was never considered a good posting in these early stages of the war, its accommodation at this point was considered primitive, cold and damp, it was certainly not the most hospitable airfield to have to stay at.

RAF Bottisham

A pot Belly stove stand now in the museum.

Some two weeks after 241’s departure the first of these squadrons arrived – 652 squadron. 652 was part of the Air Observation Post (AOP) and like all the units 651 – 666 they were manned partly by Army (pilots) and RAF (maintenance crews) personnel, they were noted for persistent and regular moves sometimes even daily. Noted as being at Bottisham between June and August 1942, 652 Sqn operated Tiger Moths in the observation role, spotting gun shots off the Hunstanton coast for field artillery units. At the end of their stay here at Bottisham they departed moving to Westley in Suffolk.

The second squadron to arrive at this time was another Tomahawk squadron, 168 Squadron, who were formed at Snailwell on 15th June 1942, moving across to Bottisham in mid July after receiving their Tomahawk IIs. Operating from Bottisham in these early days preceded a move to the fighter station at Tangmere and a more glamorous role with Mustangs and later Typhoons.

The transfer occurred in the afternoon of July 13th, with four flights amounting to twelve aircraft flying in formation across to Bottisham. The flights were led by W/Cdr. Watson-Smyth, who on their arrival realised that the AOP squadron were still using the accommodation blocks, and as the new ones were not yet finished, ‘A’ flight had to share until theirs was suitably completed. There was also insufficient room for the officers, who had to sleep in tents in the grounds around the Mess, whilst ground crews were billeted in three huts in the grounds of Bottisham Hall.

On July 19th, the squadron used the new north-south runway for the first time, it was noted that it was rather more “bumpy” and “shorter” than the east-west runway  but was considered “satisfactory” for their use.

During their stay here, 168 Sqn performed many cross country navigation and fighter affiliation exercises. However, a lack of Allison engine tool kits meant many aircraft were unserviceable for long periods. This became a frustration with the flights, restricting their flying time to a minimum. Then on 31st July, a large quantity of the specialist tool kits finally arrived, and the aircraft were able to be repaired and normal flying duties continued.

The dawn of 1943 would bring little change to Bottisham. More short stay units would mean life was a little more hectic, but Bottisham was still not the major front line airfield it so wanted to be.

In part two we see how Bottisham struggled on in the next year. But January 1944 would see big changes and a renewed impetus that would propel Bottisham to the forefront of Fighter aviation.

January 1st 1945 – Loss of Mosquito PZ340

On the afternoon of January 1st 1945, Mosquito FB.VI #PZ340, ‘HB-Z’ took off from RAF West Raynham, according to the Operational Record Book it was assigned to a “high level bomber support” sortie over Heligoland, unusual as these Mosquitoes were not pressurised models. The pilot, F/O Ian George Walker (s/n: 156104) and navigator/wireless operator F/O. Joseph Ridley Watkins (s/n: 152875), had only just been brought together, F/O Watkins, from Wanstead in Essex, normally being based with 141 Squadron, but on attachment to 239 Squadron, when the flight took place.

On return, from the mission, the aircraft crashed near to Narford Hall, an Eighteenth Century stately home located a short distance to the north-east of RAF Marham in Norfolk. Whilst not confirmed, it is thought the crash was caused by an instrument failure, a crash that resulted in both airmen being killed.

Following the accident, F/O. Walker was returned to his home town and was buried in St. Michael’s Cemetery in Dumfries. F/O Watkins however, was buried locally, in nearby St. Andrew’s Church, Little Massingham not far from RAF Great Massingham. Both airmen were only 21 years of age.

The Mosquito, a Hatfield manufactured aircraft, was produced under contract 555/C.23(a), and was an aircraft designed for ‘intruder’ strike missions, it was the most commonly used variant of all Mosquitoes.  239 Squadron was in the process of replacing these examples with the MK. XXX before its disbandment on July 1st 1945.

Little Massingham St. Andrew's Church

F/O Watkins died on January 1st 1945 after the Mosquito he was in crashed near to RAF Marham, Norfolk. He rests in St. Andrew’s Church yard, Little Massingham.